Insurance on Invoices
When a student is enrolled in a device protection policy and an incident happens during the policy term, the invoice generated from that incident automatically reduces by the policy's coverage rules. Manage1to1 captures the policy details on the invoice itself so the audit trail survives even if the policy is later deleted or modified.
This page explains the math, the audit display, the claim-counting rules, and the one-off override flow.
How the math works
Insurance Policies expose three independent dials. Any combination can be used; leave a dial blank to disable it.
| Dial | Meaning |
|---|---|
| Co-Pay | Fixed dollar the client always pays per claim. |
| Coverage % | Share (0–100) of the claim the policy absorbs. |
| Coverage Cap | Maximum dollar amount the policy will absorb in one claim. |
When more than one dial is set, the system applies them in this order:
- Start with the original invoice subtotal (sum of all part / fine line items).
- If Coverage % is set, multiply by that percentage to get the policy's contribution.
- If Coverage Cap is set, lower the policy's contribution to that ceiling.
- If Co-Pay is set, raise the client's share to at least that floor.
- The client owes the difference. Subtotal is never negative.
Worked examples
These mirror the most common real-world configurations.
| Scenario | Original | Co-pay | % | Cap | Client owes | Policy covers |
|---|---|---|---|---|---|---|
| Strict $29 co-pay (AppleCare-style) | $125.00 | $29 | — | — | $29.00 | $96.00 |
| $20 plan covers up to $250 | $300.00 | — | 100% | $250 | $50.00 | $250.00 |
| District plan: $25 co-pay + $250 cap | $300.00 | $25 | — | $250 | $50.00 | $250.00 |
| 80% coverage, no cap | $300.00 | — | 80% | — | $60.00 | $240.00 |
| Cheap incident below cap | $100.00 | — | 100% | $250 | $0.00 | $100.00 |
The first row matches the screenshot below — a $125.00 screen-replacement invoice on a student enrolled in AppleCare+ (2025-2026) with a $29 co-pay reduces to $29.00 owed by the family and $96.00 absorbed by the policy.
What you'll see on the invoice
The invoice profile shows the audit lines explicitly so a parent, principal, or auditor can see exactly how the discount was applied.
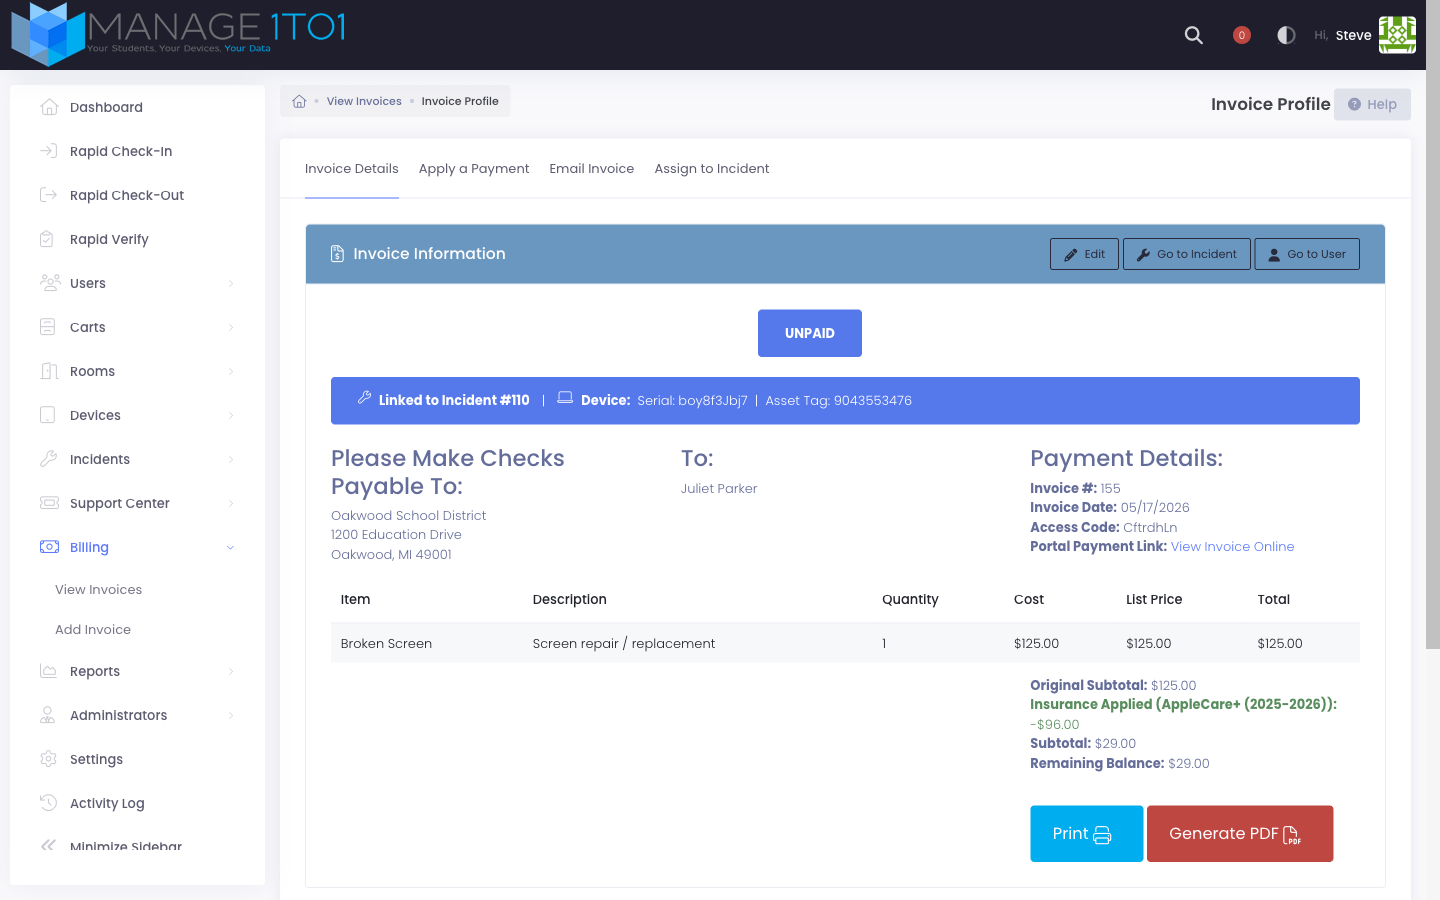
The right-hand totals column expands to include:
- Original Subtotal — the raw sum of items before any insurance adjustment.
- Insurance Applied (Policy Name + Term) — the dollar amount the policy absorbed, shown in green with a minus sign.
- Subtotal — what the client actually owes.
- Remaining Balance — what's still due after any payments.
If an administrator used the one-off override to apply the policy after the claim cap was reached, an additional orange "Claim-cap override applied" badge appears in the same area along with the override administrator's name in the activity log.
How claims are counted
A claim is any non-cancelled invoice that has the insurance enrollment attached. The system counts claims per enrollment term — between the enrollment's start and end date.
- Generating an invoice with an active enrollment increments that enrollment's claim count by one.
- Cancelling the invoice (status set to Cancelled) restores the slot, so test invoices and undone billing don't burn a real claim.
- Once the count reaches the policy's Max Claims / Term value, subsequent incidents on the same enrollment generate full-priced invoices with no adjustment, and an audit message indicates the cap was reached.
The counter is visible from the incident detail page so admins can see "claim 1 of 2 this term" before opening a new claim.
Charging full price for an uncovered incident
Not every incident should be covered. Intentional damage, or a fine the district has decided the family should pay in full, shouldn't draw down a student's coverage. When you add a fine to an incident whose student is covered on the incident date, the Add Fine window shows a coverage note and a checkbox:
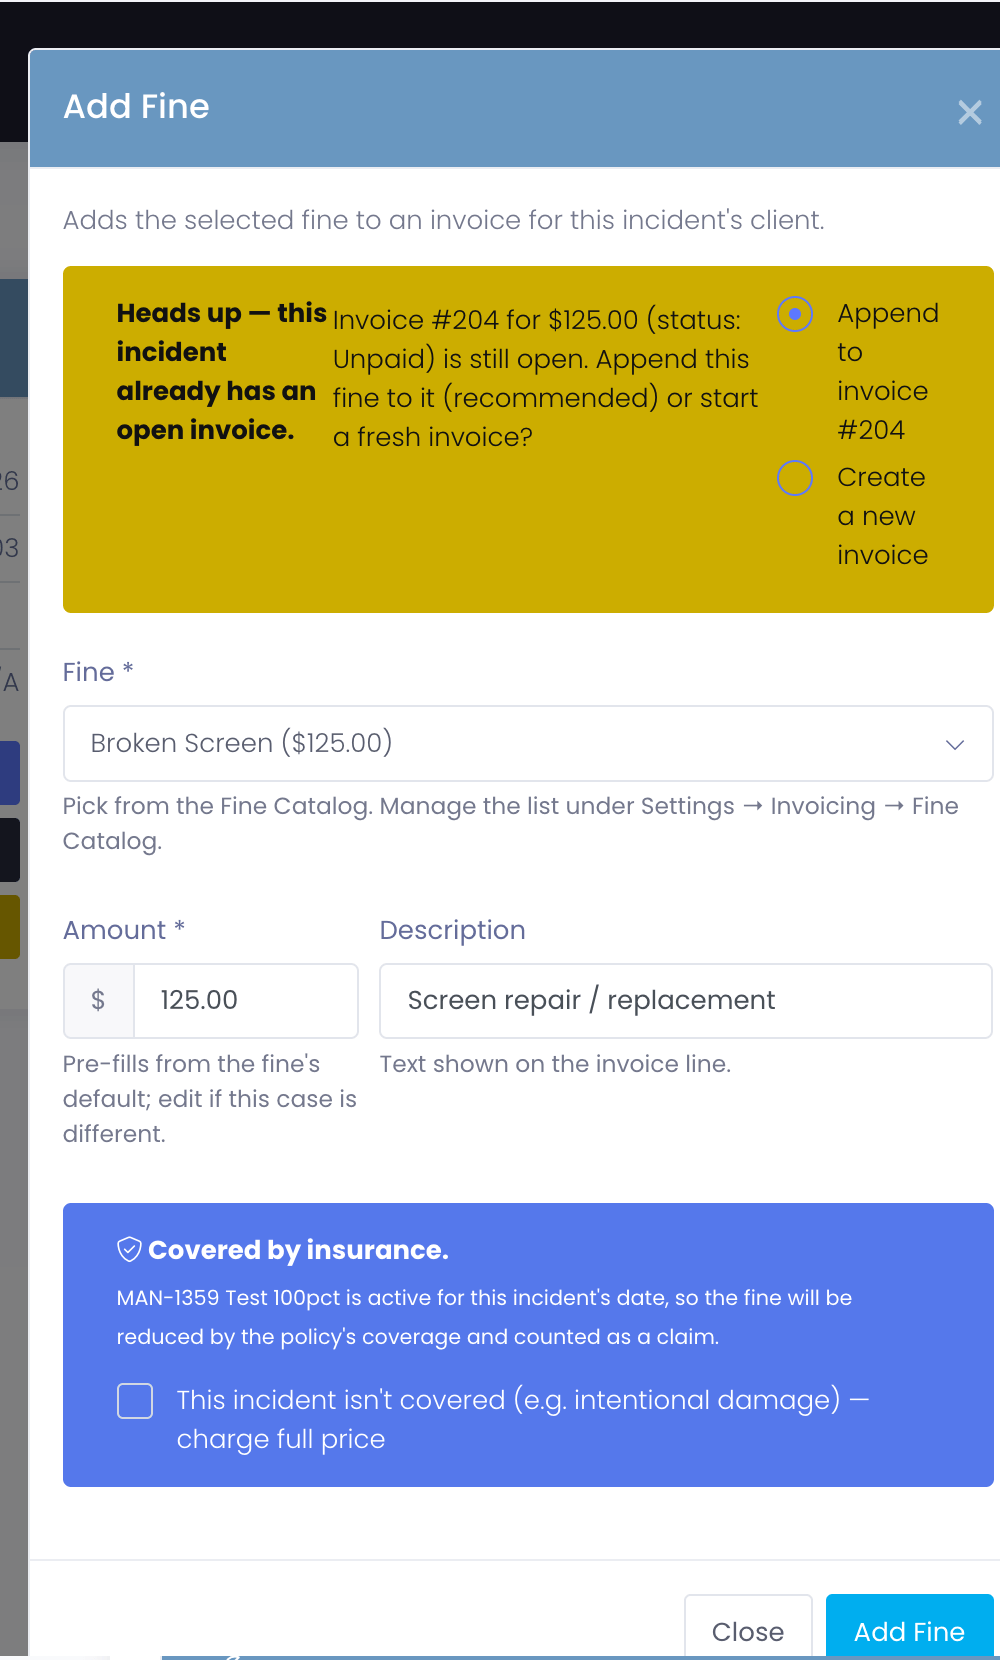
- Leave the box unticked (the default) and the fine reduces by the policy, exactly like any other claim, and counts toward the claim limit.
- Tick "This incident isn't covered (e.g. intentional damage) — charge full price" and the fine is billed at full price with no claim recorded — so an uncovered incident never eats into the student's claims for the term.
This applies to fines added to a new invoice. A fine appended to an invoice that already has insurance applied keeps that invoice's existing coverage. If you make the wrong call at this step, you don't have to delete the fine and start over — you can flip the coverage afterward, described next.
Changing coverage after the invoice exists
The "charge full price" decision isn't locked in once the invoice is created. If a fine was billed at full price and should have been covered — or was covered and a review later found the damage was intentional — you can switch it in place from the incident's Billing History, with no need to delete and re-add the fine.
Open the incident, go to the Billing History tab, and use the shield button in the invoice's Action column:
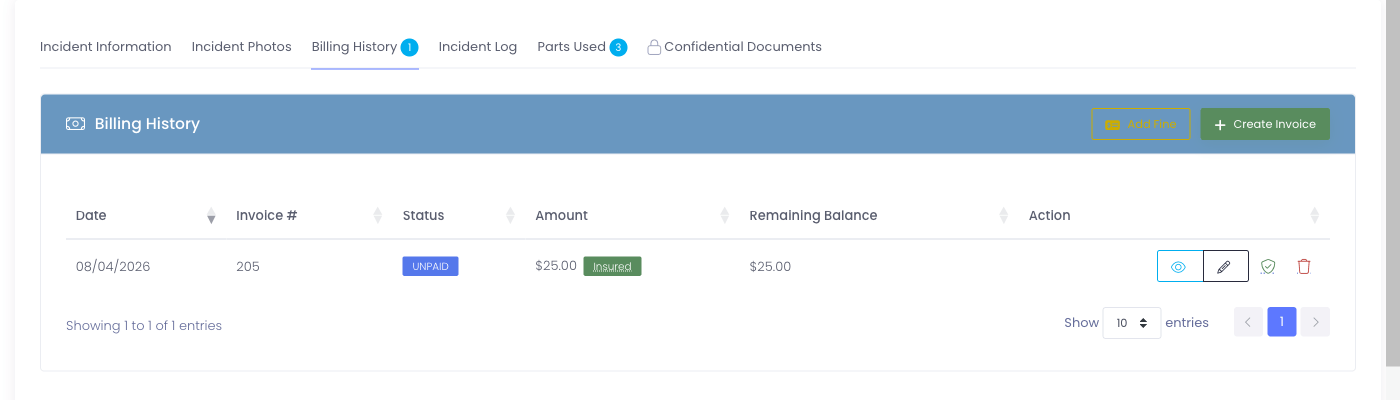
- A green shield means the policy is applied. The Insured tag appears next to the amount, and the amount shown is what the family owes after the discount. Click the shield to charge full price — the amount jumps to the full total and the claim is released back to the policy for the term.
- A grey shield means the fine is at full price. Click it to apply the policy — the amount drops to what the family owes after coverage, and a claim is recorded for the term.
Each switch asks you to confirm, then updates the amount, the balance, and the term's claim counter right on the page.
If you turn coverage on but the student has already used every claim allowed for the term, the fine stays at full price and Manage1to1 tells you the cap is reached. If you have permission to override the cap (and the policy allows it), you'll be offered the choice to apply coverage anyway — the same one-off override described below.
Once any payment has been recorded against an invoice, its coverage can no longer be changed from this screen, because doing so would change the amount owed after money has already been collected. Handle those under Billing instead.
Incident page coverage badge
Every incident detail page displays a coverage badge that reflects the policy status on the incident date (not "today" — that's important when an incident is logged after a policy has lapsed).
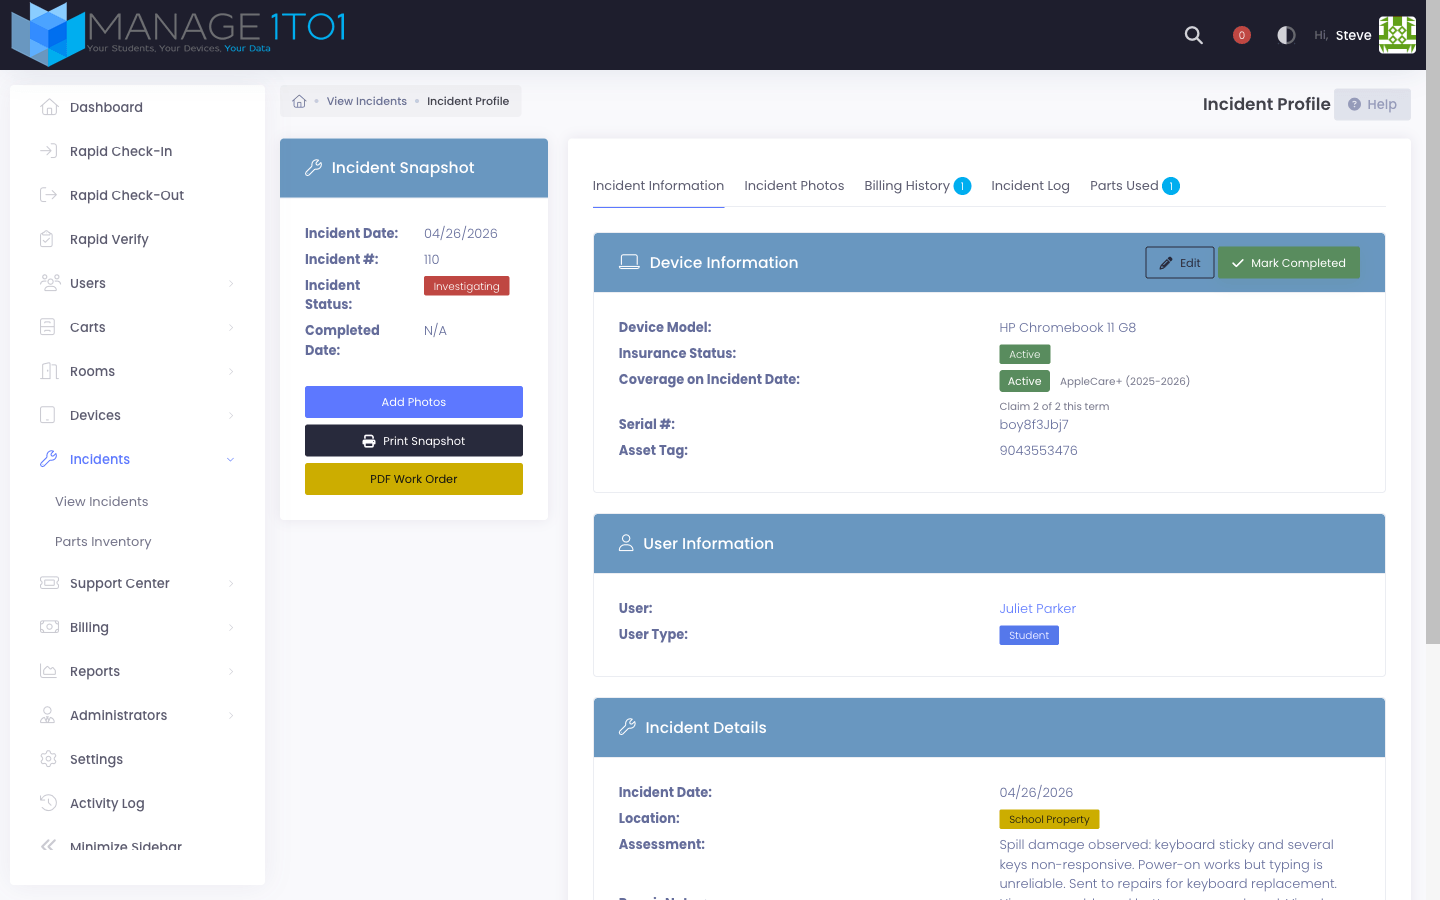
Possible badge states:
- Active (green) — the student has an enrollment that was valid on the incident date. The policy name and current claim count appear underneath.
- No Active Coverage (grey) — no enrollment was valid on the incident date.
If the policy has a claim cap, the counter reads "Claim X of Y this term" where Y is the policy's Max Claims / Term. When the cap is reached, the counter switches to "Coverage exhausted (Y of Y this term)".
One-off override
Sometimes a vendor will approve a goodwill claim past the contracted cap — a third broken screen the family can't afford to replace at full price, an administrative decision to absorb the cost, etc. Manage1to1 allows this without breaking the cap rule for everyone else:
- The policy itself must have Allow Override turned on. AppleCare+ and other strict contracts should leave this off; district-run plans typically allow it.
- The administrator generating the invoice needs the Override Insurance Claim Cap permission, granted on their role.
- Both gates must align. A checkbox appears on the invoice-generation flow when the cap has been reached and both gates are satisfied. Ticking it applies the policy adjustment anyway.
Every override is logged: the invoice records the acting administrator's id and surfaces an orange "Claim-cap override applied" badge in the invoice profile.
Use the override when the vendor has explicitly approved a goodwill claim — record the approval reference in the incident notes for audit. Avoid using it as a routine workaround for a cap that's too tight; if the cap is misconfigured, raise it on the policy instead so future claims also count correctly.
Where to verify the impact
Three places give you visibility into how much the insurance program is actually saving families and the district:
- Incident detail — per-incident badge with claim counter (above).
- Invoice profile — per-invoice audit line.
- Reports → View Reports → Insurance Claims Utilization — per-enrollment claims used / allowed, % utilization, total $ absorbed.
- Reports → View Reports → Insurance Enrollment Summary — per-policy roll-up of enrollments, expirations, and total dollars absorbed.
See the Reports page for screenshots and column descriptions.