Random Checks
Random Checks pulls a random sample of your devices so you can physically inspect a representative slice of the fleet — without auditing every single unit. It's the sampling companion to Rapid Verify: instead of sweeping everything, you draw a handful (or a few hundred), then work the resulting checklist at your own pace.
Each check is saved. You can generate it today, work half the list this afternoon, and finish the rest next week — the progress sticks. Every check is also a permanent record of who pulled it and what they found, so it doubles as an accountability trail for board-mandated spot checks and insurance sampling.
Generating a check and reviewing a check are separate permissions, so you can let anyone review the history while limiting who can pull a new sample. See Permissions below.
Why Sample Instead of Audit Everything?
A full inventory audit answers "did we lay eyes on every device?" — the right tool for an end-of-year sweep. But that's a big lift, and you don't need it to answer a smaller, more frequent question:
"Is our inventory data trustworthy right now?"
Random Checks answers that by sampling. Pull 25 devices at random, walk to each one, and confirm it's where the system says it is and in the condition it should be. If all 25 check out, you have real confidence the whole fleet is in good shape. If several are wrong, you've caught a data-quality problem early — before the annual audit.
Because the sample is drawn randomly across your scope, nobody can "clean up" just the devices they know will be checked. That's what makes a spot check meaningful.
Generating a Check
- Go to Devices → Rapid Verify → Random Checks in the main menu
- Click New Random Check
- Enter how many devices to pull (1–500)
- Optionally narrow the pool with any of the filters
- Click Generate checklist
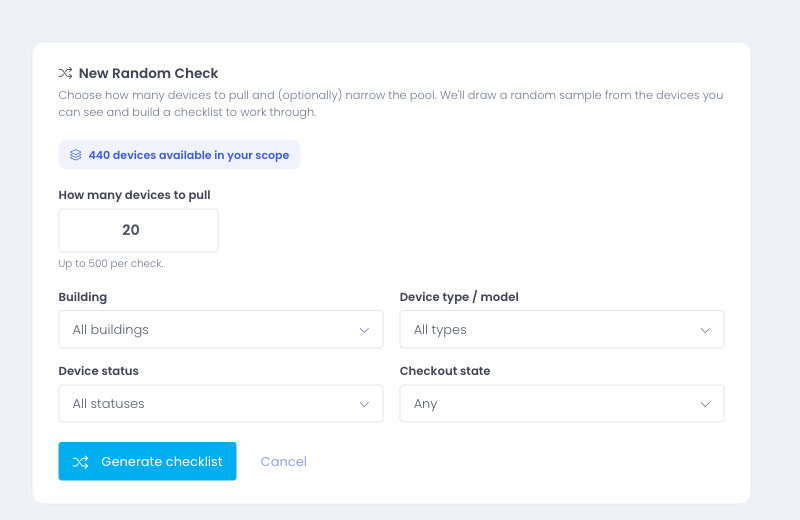
The banner at the top shows how many devices are currently available in your scope, so you know how large a sample you can draw before you pick a number.
Narrowing the Pool
By default a check draws from every device you can see. Use the filters to focus the sample:
| Filter | What it does |
|---|---|
| Building | Sample only devices at one campus |
| Device type / model | Sample only a specific make/model (e.g. all Chromebooks) |
| Device status | Sample only devices in a given status |
| Checkout state | Sample only checked-out devices, only available ones, or any |
Filters combine — pick a building and a model to spot-check, say, the 8th-grade iPad cart at one school. The sample is drawn randomly from whatever pool the filters leave.
For a quick confidence check, 20–30 devices is plenty. For a formal compliance sample, your policy may specify a percentage of the fleet. The "available in your scope" count on the form helps you translate that into a number.
Working the Checklist
Generating a check opens its checklist. Each row is one device, showing its asset tag, model, location, and who it's assigned to. Work down the list as you physically handle each device.
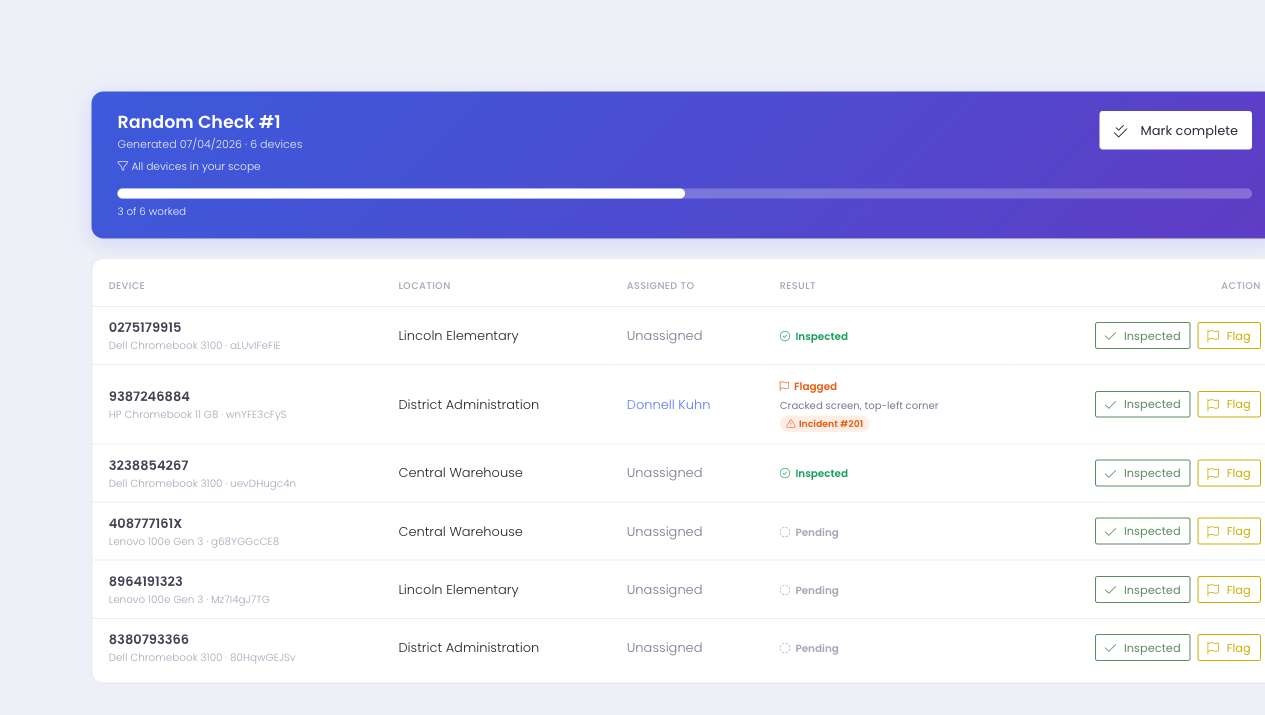
For each device you have two actions:
- Inspected — you found the device and it's fine. The row turns green.
- Flag — something's wrong (damage, wrong location, can't locate it). You can add a note and, optionally, open an incident.
The progress bar at the top fills as you work, and the checklist saves each action immediately — close the page and come back whenever; your progress is waiting.
Everything on the checklist is clickable: the asset tag opens the device, the assigned user opens their profile, and a flagged device's incident opens that incident — so you can jump straight to any record without searching for it.
Inspecting a Device
Click Inspected when the device checks out. Beyond marking the row, an inspection also records that you physically saw the device — the same "last seen" touch Rapid Verify records — so a random check keeps your Last Seen data fresh as a side benefit.
Flagging a Device
Click Flag when something's wrong. A short form appears:
- Note — describe the problem (e.g. "cracked screen, top-left corner" or "not in the assigned classroom")
- Also create an incident for this device — tick this to open an incident automatically
If you create an incident, the flagged row links straight to it, and the incident is pre-filled with the device, its assigned user, and your flag note — so the problem is already in your incident queue for follow-up, no separate data entry.
A flag records a finding — it does not check the device in or out or change its status. If you flag a device because you couldn't locate it, nothing about its assignment changes; you've simply logged that it needs attention.
Finishing a Check
When you've worked the whole list — or as much of it as you intend to — click Mark complete in the header. Completed checks stay in the history with their full results; marking complete just signals the check is done and stops it from looking like outstanding work.
You don't have to work every row to mark a check complete. A partially-worked check that you close out still preserves exactly what was and wasn't inspected.
Reviewing Past Checks
The Random Checks landing page lists every check that's been generated, newest first, with:
- Who generated it and when
- A progress bar (how many of the sampled devices have been worked)
- How many devices were flagged
- Whether the check is still open or completed
This is your spot-check history. Open any check to see its full checklist and results — useful when a board or auditor asks for evidence that you run regular inventory sampling.
Enabling Random Checks
Random Checks is off by default. An administrator turns it on at Settings → Inventory Settings → Settings tab, under Inventory Audit:
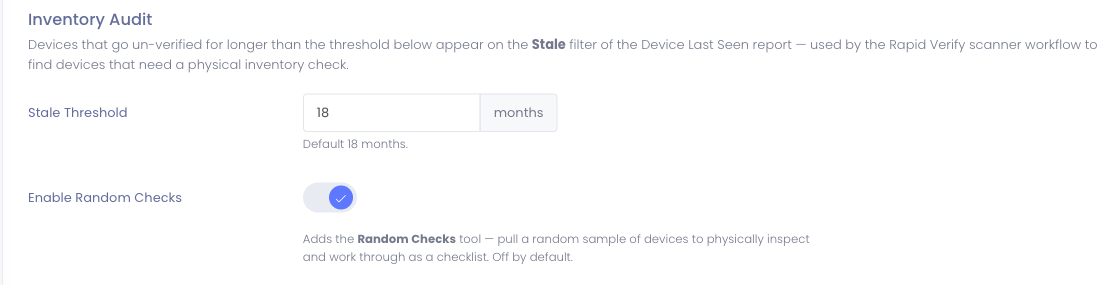
Switch Enable Random Checks on and save. The Random Checks item then appears under Rapid Verify in the main menu for any administrator whose role has the required permission.
Permissions
Two permissions control Random Checks, so you can separate pulling a sample from reviewing the history:
- Generate Random Checks — pull a new random sample and work its checklist. Grant this to the staff who actually run spot checks.
- View Random Checks — open and review checks and their results. Grant this more widely — to anyone who needs visibility into the sampling history without the ability to pull new samples.
Both are not granted by default; an administrator assigns them to the appropriate roles. An administrator who can generate a check can also review it.
Common Questions
Q: How is Random Checks different from Rapid Verify? Rapid Verify is for auditing devices you already have in hand — you scan each one to record that you saw it, and it's built for sweeping everything. Random Checks starts the other way around: it tells you which devices to go find by drawing a random sample, then gives you a checklist to inspect or flag each one. Use Rapid Verify for a full audit, Random Checks for a spot check.
Q: Can I control which devices get pulled? You can narrow the pool with the building, type, status, and checkout filters, but within that pool the selection is random — you can't hand-pick specific devices. That randomness is the point of a spot check.
Q: Do I have to finish a check in one sitting? No. Every action saves immediately. Generate a check, work part of it, and come back later — the progress is preserved. Checks stay open until you mark them complete.
Q: What happens to a device I flag? The row is marked flagged with your note. Nothing about the device itself changes unless you also chose to open an incident — in which case the incident is created and linked for follow-up. The device's assignment and status are left exactly as they were.
Q: Can I run a check for a building I don't have access to? No. Random Checks respects the same building permissions as the rest of Manage1to1 — a check only ever samples devices in buildings you can see.
Q: Does an inspection count as seeing the device? Yes. Marking a device inspected records the same physical "last seen" touch as a Rapid Verify scan, so running random checks keeps your Device Last Seen data current.