Rapid Check-In
Rapid Check-In processes device returns quickly, scan (or type) an asset tag, and the device is marked returned and available for reassignment, without navigating through individual device profiles. It's built for high-volume collection: end-of-year returns, loaner drop-offs, and repair intake.
This page covers returns. To issue devices to users, carts, or rooms, see Rapid Check-Out.
Access Rapid Check-In
- Navigate to Devices from the main menu
- Select Rapid Check-In
- The Rapid Check-In screen loads with the input field ready
Check In a Device
Using a barcode scanner (recommended for speed):
- Scan the device barcode, asset tag or serial number
- The system displays the current checkout information and user
- Press Enter or click Check In
- The device is checked in and the screen clears for the next device
Using manual entry:
- Type or paste the asset tag or serial number into the field
- Press Enter or click Check In
- The system displays the current checkout details
- Confirm and click Check In
- The device is checked in and the screen clears for the next transaction
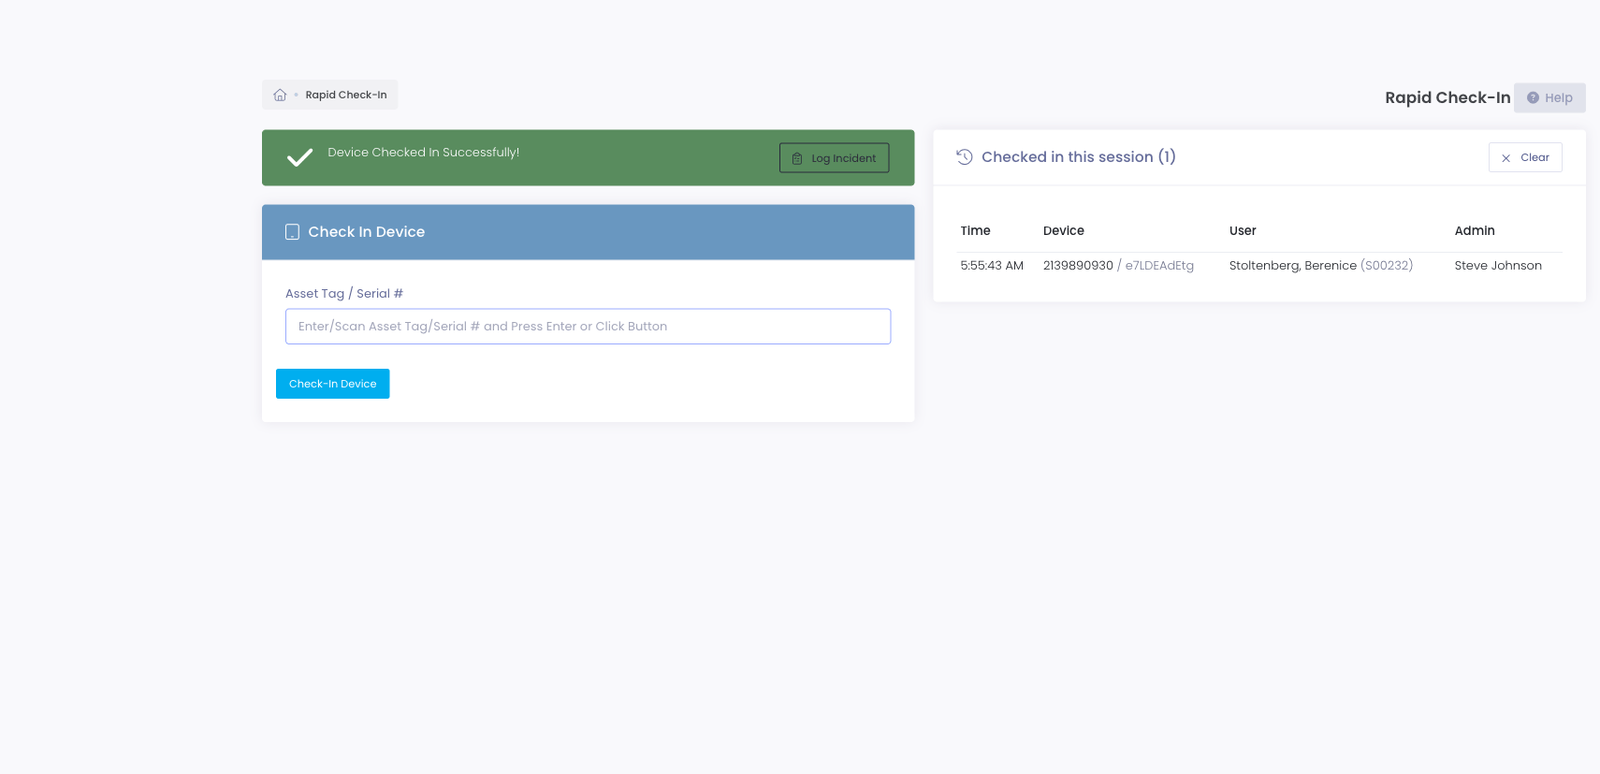
The page does not reload between scans, after each successful check-in, an inline confirmation appears, the input clears, and focus returns to the field, ready for the next device.
What Happens During Check-In
When you complete a rapid check-in:
- Device status changes from Checked Out to Active (or its previous status)
- The device is disassociated from the user's profile
- The return date is recorded (current date/time)
- The device becomes available for reassignment
- Checkout history is updated on both the device and user profiles
- The transaction is logged in the Activity Log
Log an Incident During Check-In
Returns are the moment damage is usually spotted, so Rapid Check-In can offer a shortcut to open an incident right after a device comes back.
When the Offer to Log an Incident option is on (Settings → Inventory Settings → Settings tab), a successful check-in shows a Log Incident button next to the confirmation. Clicking it opens a new incident in a new tab, already filled in with the device and the user it was just returned from, so you can record damage without leaving the scanner. The scan box keeps focus, so if there's nothing to report you just scan the next device.
The button only appears for staff who have permission to create incidents. If the option is off, check-in behaves exactly as before with no incident prompt.
Process Bundled Accessories During Check-In
If a device was handed out with bundled accessories (a charger, a case, and so on), checking it back in from the Rapid Check-In screen shows a Process Accessories button next to the confirmation. Click it to open the accessory handoff page in a new tab, where you can mark each accessory Returned, Keep, or Lost. The scan box keeps focus, so you can keep scanning and come back to the accessories when it suits you.
If an accessory ever gets missed, it isn't lost: the user's profile shows an accessory handoff pending banner listing anything still bundled to a returned device, with a link to process it. So bundled accessories always have a home no matter how the device was returned.
The button only appears for staff with permission to manage user accessories.
Session Check-In Log
As you scan, each successful check-in is added to a Checked in this session list beside the form, so you can confirm a run of devices at a glance instead of relying on the confirmation flash alone. Every row shows the time, the device's asset tag and serial number, the user it was returned from (with their Local ID), and who checked it in, newest at the top.

The list holds 25 rows per page and starts a new page as you keep scanning, so long check-in runs stay quick. Use Newer and Older to page through the session, or Clear to empty the list. The list covers the current session only, it clears when you leave or reload the page.
When a Scan Isn't Checked Out
Sometimes a scanned asset tag isn't currently checked out, the device was already returned, the wrong label was scanned, or the tag doesn't match a device. You control how Rapid Check-In responds to these failed scans with the Keep Scanning After a Failed Check-In setting in Settings → System Settings → Inventory Tab, under the Rapid Check-In section.

Keep Scanning turned on (default):
- A brief warning notification appears in the corner of the screen explaining the problem.
- The input clears and refocuses immediately, so you can scan the next device without stopping.
- Best for high-volume collection lines where the occasional off device shouldn't slow everyone down, you glance at the notification and keep moving.
Keep Scanning turned off:
- The workflow stops and shows an inline error message that stays on screen until your next action.
- Use this when you want to pause and resolve each problem scan before continuing, for example, a low-volume help desk where every device matters.
Either way, successful check-ins always clear the input and refocus for the next scan. This setting only changes what happens on a failed scan.
Custom Field Alerts
If any of the device's custom fields are configured to trigger an alert on check-in (see Custom Fields Tab), a popup appears before the check-in completes, listing each fired alert with the field name and message.
Click Continue to proceed, or Cancel to abort. Alerts at check-in are useful for confirming the device's condition on return, for example, prompting staff to verify accessories were returned or to log new damage.
Technology Restriction Warning
If the device was checked out to a user with an active Restricted Plan, the red Technology Restriction banner appears at the top of the page after the check-in completes. Use it as awareness for the next interaction with that user, for example, that they shouldn't be re-issued a device until the restriction is resolved.
Tips for High-Volume Collection
- Use barcode scanners rather than manual typing.
- Set up collection stations at multiple locations and run Rapid Check-In at each.
- Leave Keep Scanning on so an occasional already-returned device doesn't stall the line, review the session log, not each flash.
- Do a quick visual inspection for obvious damage and create incidents afterward, so the line keeps moving.
- Keep a running count against your expected total, and review the Activity Log after a large batch.
Common Questions
Q: A device won't check in, it says it isn't checked out. What happened? The device was likely already returned, or the wrong label was scanned. With Keep Scanning on, you'll see a brief warning and can continue; with it off, the workflow pauses so you can resolve it. See When a Scan Isn't Checked Out.
Q: Does the session log persist? No, it covers the current session only and clears when you leave or reload the page. It's a visual confirmation aid; the permanent record lives in each device's history and the Activity Log.
Q: Can I check a device back out right after returning it? Yes. Check it in here, then switch to Rapid Check-Out to reassign it, common for swapping a damaged device for a loaner.