Bundling Accessories With a Device Checkout
This guide walks through the bundle-and-handoff workflow: ticking off every charger, case, or cable that leaves the desk with a device, then accounting for each one when the device comes back.
You'll see:
- How the Bundle Accessories modal pops automatically right after a checkout
- Where bundled items show up on the user profile and the device profile
- What happens at check-in (the handoff banner) and how to clear it on the Accessory Handoff page
About 2 minutes to bundle at checkout, and 30 seconds per device to process the handoff at check-in.
Before You Begin
Prerequisites
- Accessories catalog populated — Make sure Settings → Accessory Catalog has the items your district issues (Charger, Hard Case, Stylus, USB-C Cable, etc.) and that each has some on-hand stock at the location you're checking out from.
manage-user-accessoriespermission on your admin role.- A user with no current checkout (so you have something to check out to them) — or jump in mid-flow if a checkout already exists.
Why Bundle at All?
When a charger goes missing two months later, you want to know whether it was bundled with that specific Chromebook or handed out as a standalone replacement. Bundling ties each accessory to a specific lease + device, so the user's ledger and the device's history both show what shipped together. At check-in, you don't have to guess what's supposed to come back.
If your district doesn't track accessories per device, you can hit Skip on the modal at every checkout — no harm done, and the modal won't pester you again until the next checkout.
Step 1: Check Out a Device to the User
Use whichever checkout path you already know — Rapid Checkout, the + Check Out Device button on a user profile, or the device's own Check Out action.
Complete the checkout exactly as you normally would (signature, condition, etc.). The moment the checkout is recorded, Manage1to1 redirects you back to the user profile with the Bundle Accessories modal already open.
Step 2: Tick the Accessories That Left With the Device
The Bundle Accessories modal lists your full catalog with a row per accessory type. Anything that left the desk with this checkout, tick it here.
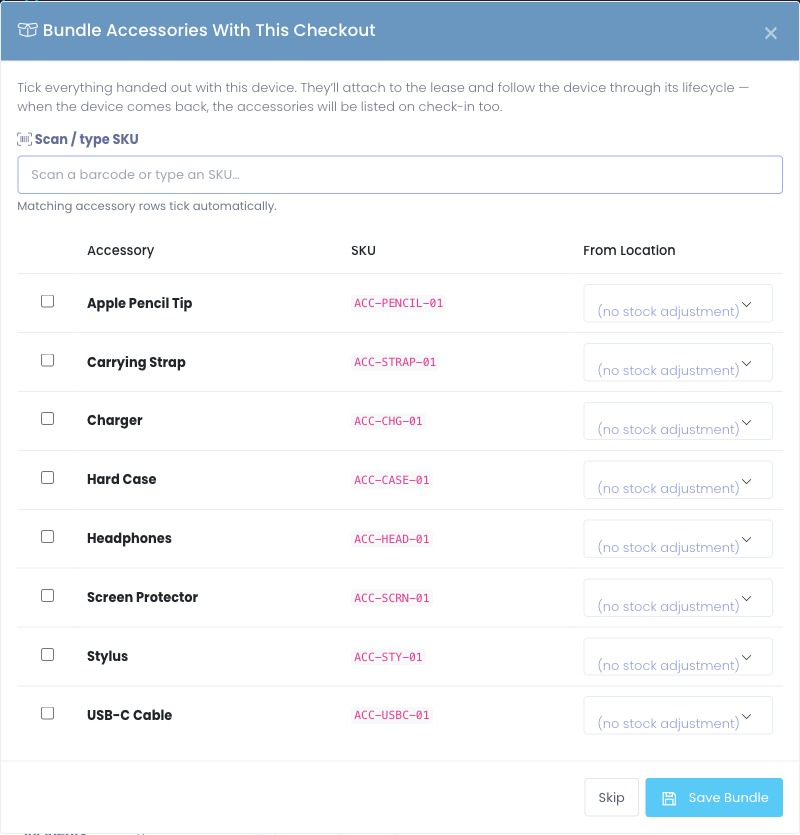
You have two ways to pick items:
Scan or Type a SKU
The cursor lands in the Scan a barcode or type an SKU… input by default. If you scan an accessory's barcode (or type its SKU and press Enter), the matching catalog row's checkbox ticks itself and the input clears so you can keep scanning. This is the fastest path when your accessory shelf has printed labels.
Tick by Hand
For accessories that aren't barcoded, click the checkbox on the row and pick a From Location if you want stock decremented. Untick a row to back out — nothing's saved until you hit Save Bundle.
Each ticked row independently picks a stock location, so you can record that the charger came out of the Central Warehouse while the case came out of the High School Tech Office in a single bundle.
When the rows match what physically left the desk, click Save Bundle. Manage1to1 writes one accessory_assignments row per ticked accessory, all tied to this lease + device, and decrements stock at each chosen location.
If your district doesn't track accessories per device, hit Skip. The lease still records cleanly — no accessories are tied to it, and the bundle modal won't appear again unless another checkout happens.
Step 3: Confirm It Landed on the User Profile
The user profile's Accessories card refreshes after Save Bundle. Anything you just bundled appears in a section titled with the device's asset tag, nested under that device:
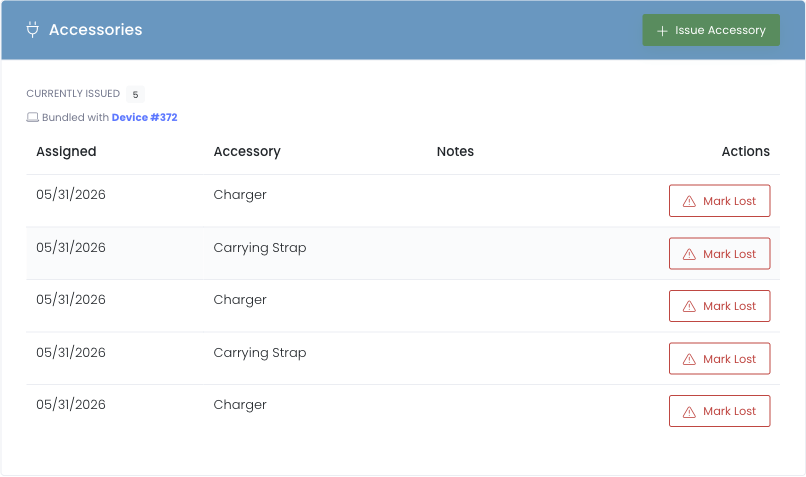
Standalone accessories (issued to the user without a device) sit above the grouped sections, so the visual hierarchy is "what they have on its own" → "what they have with each device."
Each grouped row shows the accessory name, the location it came from, when it was issued, and an inline Mark Lost action.
Step 4: Confirm It Landed on the Device Profile
Open the device profile (Devices → click the asset tag). Scroll to the Accessories on This Device card:

This card mirrors the user-profile view from the device's perspective — it tells the next tech who picks this device up exactly what's supposed to be travelling with it.
Step 5: Check the Device Back In Like You Normally Would
When the device returns, run a standard check-in (Rapid Check-In, the Check In button on the device, or the Check In action on the user's Current Checkouts). The check-in itself doesn't change — accessory handling happens on the next screen.
After the check-in succeeds, Manage1to1 redirects you back to the user profile. If the lease had bundled accessories that are still active, a yellow banner appears at the top of the Accessories card:

The banner tells you how many accessories are still attached to the lease you just closed and offers a single Process Handoff button.
Skipping the banner is fine. The accessories stay active on the user's ledger nested under the now-returned device's asset tag. The banner reappears the next time you open that user profile. Process it whenever the user is in front of you with the physical items.
Step 6: Process the Handoff Page
Click Process Handoff on the banner. The Accessory Handoff page lists every active accessory on that lease with three decision buttons per row:
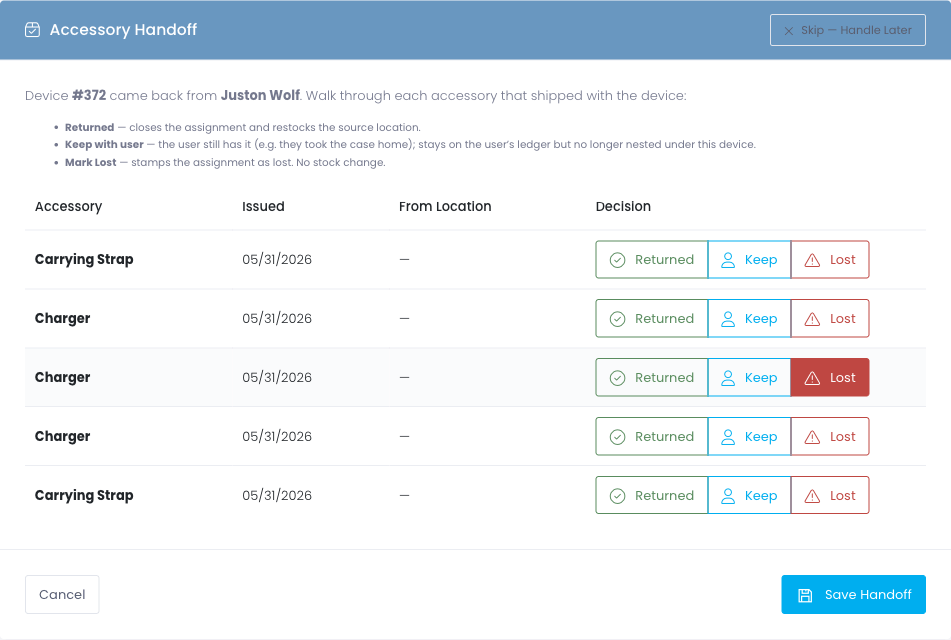
For each accessory, choose:
- Returned — Cleanly closes the assignment and adds 1 back to the source location's stock. Use this when the user physically hands the item back.
- Keep — The user is keeping the accessory. The row stays on their ledger as still-issued but is no longer nested under the now-returned device. Common when chargers go home for the summer even though the device comes back.
- Lost — Stamps the assignment as lost (no stock change). The next time they're issued the same accessory, it counts toward the replacement-threshold warning.
You can mix decisions in a single handoff — return the case, keep the stylus, mark the charger lost. Then click Save Handoff at the bottom.
If you're not ready to commit, Skip — Handle Later dismisses the page without writing changes; the banner stays on the user profile so you can come back to it.
Step 7: Verify the Handoff Stuck
After Save Handoff, you land back on the user profile. The handoff banner is gone, and the Accessories card now reflects your decisions:
- Returned rows have moved into the user's accessory history (with a Returned status and the timestamp)
- Keep rows are still listed as Accepted but no longer nested under the returned device — they appear in the standalone-accessories section at the top of the card
- Lost rows show a red Lost badge with the loss timestamp
Open the device profile for the device you just checked in — the Accessories on This Device card now shows "No accessories are currently bundled with this device", because everything was either returned, kept by the user, or marked lost.
Common Questions
Q: Can I bundle accessories to a lease that already exists (i.e. days after the checkout)? The bundle modal only auto-opens immediately after a checkout. To add an accessory to an existing lease retroactively, issue it from the user profile's Issue Accessory modal — it'll attach to the device's open lease automatically.
Q: What happens if I hit Skip and realize I should have bundled something? Open the user profile, click + Issue Accessory, and pick the catalog item + location. It'll be recorded as issued to the user (just not nested under the device's lease group). The audit trail is identical to a bundled row.
Q: A user lost their charger but kept the device. Can I just mark the charger lost without checking the device in? Yes. On the user profile's Accessories card, find the row and click Mark Lost inline — no check-in required. The accessory's status flips to Lost, the row stays attached to the lease, and you can replace it via + Issue Accessory at any time.
Q: What if a user returns the charger but not the case? On the Handoff page, click Returned on the charger row and Lost (or Keep) on the case row, then Save Handoff. Mixed decisions are the norm, not the exception.
Q: Do bundled accessories count toward the replacement-threshold warning? Yes. Every issuance counts — bundled or standalone. If a user has been issued three chargers in twelve months (in any combination of bundles and standalone), the threshold banner appears on their Accessories card.
Q: Is there a report of who has what bundled with each device? Yes — the Accessories on This Device card on every device profile shows the live picture, and the user profile's accessories ledger keeps the full per-user history including everything ever lost.
Troubleshooting
The Bundle Modal Didn't Open After Checkout
Possible causes:
- The user profile has no catalog accessories defined. Add at least one entry in Settings → Accessory Catalog.
- Your admin role is missing the
manage-user-accessoriespermission. Have a Tech Director check Settings → Manage Permissions.
Save Bundle Says "No Stock at Selected Location"
Cause: You ticked an accessory whose chosen location has zero on-hand.
Fix: Either pick a different From Location (one with stock), or first add stock via Settings → Accessory Catalog → Manage → Adjust Stock.
The Handoff Banner Won't Go Away
Cause: The accessories on that lease are still active (status is Accepted with no returned_at or lost_at).
Fix: Click Process Handoff and decide each row (Returned, Keep, or Lost). Anything you mark Returned or Lost closes the assignment; anything you mark Keep un-nests it from the device but keeps it on the user's ledger. Either way, the banner disappears once every row has a decision.
I Marked Returned by Mistake — Can I Undo?
Open the user profile's Accessories history, find the row in the user's history list, and click Mark Found (or in older terminology, the row's inline edit action). Stock at the location it was returned to does not automatically decrement back; you'd need a manual stock adjustment if that matters for your audit.
What This Workflow Doesn't Cover Yet
These are deliberate scope cuts in the current release:
- Default bundles per device type. You can't yet pre-configure "every Chromebook ships with a charger and a case" so the modal pre-fills. For now it starts empty each time.
- Per-unit serial tracking. Each catalog entry is an accessory type, not a specific physical item. You can't yet track which exact charger went out to which user.
- Bulk handoff across multiple leases. The handoff page is per-lease. If a user is returning three devices on the same visit, that's three handoff cycles.
If any of these block your workflow, let Manage1to1 support know so they can be prioritized.