Issuing, Losing, and Replacing an Accessory
This guide covers the standalone accessory lifecycle — handing one out, recording when it gets lost, and issuing a replacement. It also walks through the replacement-threshold warning that surfaces when the same user has been issued the same accessory too many times in a year.
(If the accessory left the desk with a device during a checkout, use the Bundling Accessories With a Device Checkout guide instead — bundled accessories live in the lease cycle.)
30 seconds per issuance. Marking lost is one click. Adjusting the threshold takes about a minute.
Before You Begin
Prerequisites
- Accessories catalog populated — At least one accessory type defined in Settings → Accessory Catalog.
- Stock at a location you can issue from — Visit Settings → Accessory Catalog → Manage on the accessory and add stock via Adjust Stock.
manage-user-accessoriespermission on your admin role.
Step 1: Open the User's Profile
Find the user (search by name, scan a badge, or jump from a lease) and open their profile. Scroll to the Accessories card — it sits between Recently Lost and Current Incidents.
The card has three states:
- Empty — no accessories ever issued to this user
- Has issuances — every assignment ever made, with the current status (Accepted / Declined / Lost / Returned) per row
- Above threshold — a yellow banner warns you the user has been issued the same accessory too many times in the last 12 months (covered in Step 5)
Step 2: Issue an Accessory
Click + Issue Accessory on the card header. The Issue Accessory modal opens:
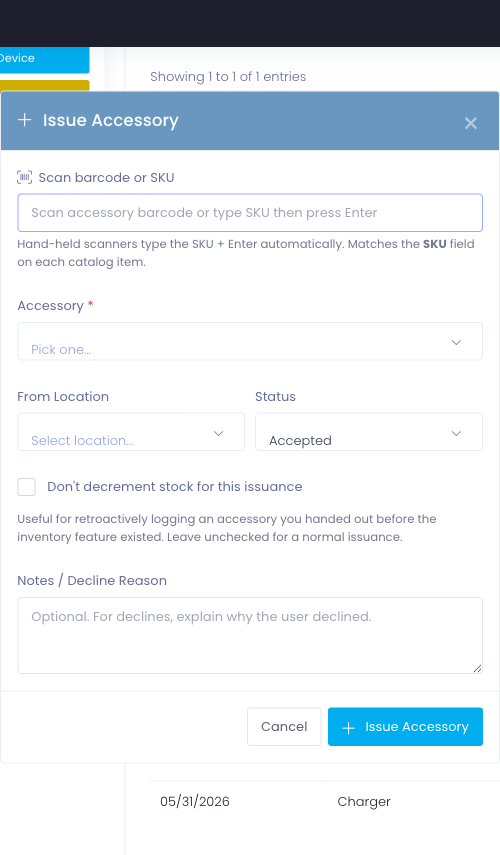
Fill it in:
- Scan barcode or SKU (optional) — If your accessories have printed barcodes, scan one and the Accessory dropdown auto-selects. Otherwise leave it blank.
- Accessory (required) — Pick from the catalog dropdown.
- From Location — Pick which inventory location the physical item is coming out of. Stock at this location decrements by 1 when you submit.
- Status — Default is Accepted. Set to Declined if the user is refusing the accessory (the row still records for the audit trail, but no stock moves).
- Don't decrement stock for this issuance (checkbox) — Tick this when you're recording a paper-trail issuance that already happened (or backfilling history). Stock stays untouched.
- Notes / Decline Reason (optional) — Free-text note. If status is Declined, capture why here.
Click Issue Accessory. The card refreshes and the new row appears with the chosen status badge.
Step 3: Record It as Lost When the User Reports It Gone
When a user comes back and says "I can't find my charger", you flip that specific row's status from Accepted to Lost.
On the user's Accessories card, find the row for the lost accessory. Each Accepted row has an inline Mark Lost action button:

Click Mark Lost. A confirmation prompt appears. Confirm, and:
- The row's status badge flips from Accepted to Lost
- The loss timestamp is stamped on the row
- The Mark Lost action is replaced by Mark Found so you can reverse the call if the user finds it tomorrow
- Stock at the source location does not change — the unit was already decremented when it was originally issued
Marking lost is purely a status change. No replacement is auto-issued, and no stock movement happens. The next time you issue the same accessory to that user, that's a fresh Issue from your shelf.
Got It Back? Mark Found
If the user surfaces the accessory after all, click Mark Found on the row. The status flips back to Accepted and the loss timestamp clears.
Step 4: Issue a Replacement
A replacement is just another + Issue Accessory — exactly like Step 2. There's no special "replacement" button, because the Accessories card already shows the user's full history, so the previous loss is visible while you're issuing the new one.
When you issue the replacement, stock at the chosen From Location decrements by 1 as normal.
Step 5: Watch for the Replacement-Threshold Warning
When a user has been issued the same accessory three or more times in the trailing twelve months — bundled or standalone, lost or not — a yellow banner appears at the top of their Accessories card:

The banner names the specific accessory and the count, so before you issue a fourth charger you can see "oh — this is the fourth charger this year" and have the conversation.
The banner is a signal, not a block. You can still issue the replacement — but the prompt tends to shift the conversation from "here's another one" to "let's figure out what's happening."
When the Banner Disappears
The banner re-evaluates each time the Accessories card loads. Once the user is back under the threshold (because the trailing 12 months window rolled forward and dropped an old issuance), the banner is gone automatically.
Step 6 (Optional): Adjust the Threshold for Your District
The default threshold is 3 issuances in the trailing 12 months. To change it:
- Open Settings → Configure General Settings
- Find the AccessoryReplacementWarningThreshold setting
- Set it to any positive integer to change the count (e.g.
5makes the banner appear after the 5th issuance) - Set it to
0to disable the banner entirely without affecting any per-user history - Save
The new value applies on the next page load — no cron tick or rebuild required.
The current threshold is district-wide and applies across every catalog entry. If you need "warn after 2 chargers but 5 styluses" per-accessory, that's a feature request — file it with Manage1to1 support.
Common Questions
Q: A user lost their charger six months ago and we're now issuing the third replacement. Will the threshold banner show? Yes, if all three issuances fall inside the trailing 12-month window. The banner counts every issuance, regardless of whether previous ones were lost, returned, or kept.
Q: Does marking something Declined count toward the threshold? Yes. Declined still records as an issuance attempt for the audit trail. If a user has refused 3 chargers in a year, that's also a conversation worth having.
Q: What if a user transfers to another building or graduates? Does their accessory history follow them? Yes. The accessory history is attached to the user record, not to a building or grade level. As long as the same user account exists, every issuance is visible.
Q: Can I see a report of users above the replacement threshold? Not as a dedicated report yet. The banner appears per-user when you're on their profile. A district-wide "who's above threshold" report is on the roadmap — let support know if it would help.
Q: I marked something lost but it was actually returned. How do I record the stock back? Click Mark Found to undo the loss status. Stock does not automatically increment on Found (mirroring the no-stock-decrement-on-Lost behaviour). If the item is genuinely back on the shelf, do a manual stock adjustment via Settings → Accessory Catalog → Manage → Adjust Stock.
Troubleshooting
The Issue Accessory Modal Has No Accessories in the Dropdown
Cause: No active accessories in your catalog, or every catalog entry is deactivated.
Fix: Go to Settings → Accessory Catalog and add at least one entry, or reactivate an existing one.
The From Location Dropdown Is Empty
Cause: No active inventory locations defined.
Fix: Go to Settings → Inventory Settings → Parts Locations and create at least one active location. Accessories share locations with Parts inventory, so a location you've already defined for Parts works for accessories too.
I Issued an Accessory and Stock Didn't Decrement
Possible causes:
- You ticked Don't decrement stock for this issuance in the modal (the paper-trail flag).
- You set the status to Declined — stock only decrements on Accepted.
Fix: Issue the accessory again with Accepted status and the stock-decrement checkbox unticked. If you want to fix the prior row's stock, do a manual stock adjustment.
The Threshold Banner Showed Even Though We Adjusted the Setting
Cause: Browser cached the user profile page.
Fix: Hard-refresh (Cmd + Shift + R / Ctrl + Shift + R). The banner re-evaluates on every page load.