Setting Up a Custom Domain
This guide walks you through configuring a custom domain so your district can access Manage1to1 from a branded URL like helpdesk.yourschool.org instead of yourdistrict.manage1to1.com.
Custom domains are configured in the Manage1to1 Client Area — the same place you manage your subscription and billing — not inside the Manage1to1 admin app. You won't find these steps under the app's own Settings menu.
What You'll Need
- Owner-level access to the Manage1to1 Client Area
- Access to your domain's DNS settings (through your DNS provider — GoDaddy, Cloudflare, Google Domains, your district's DNS server, etc.)
- A subdomain you'd like to use (e.g.,
helpdesk,devices,tech,m1t1)
Step 1: Choose Your Domain
Decide what URL you'd like your staff to use. Common choices include:
helpdesk.yourschool.orgdevices.yourdistrict.edutech.yourschool.orgmanage.yourdistrict.k12.state.us
The subdomain can be anything — choose something short and memorable that your team will recognize.
Step 2: Enter the Domain in the Client Area
- Log in to the Manage1to1 Client Area
- Navigate to Settings → Custom Domain
- Enter your desired domain name in the input field (e.g.,
helpdesk.yourschool.org) - Click Continue Setup
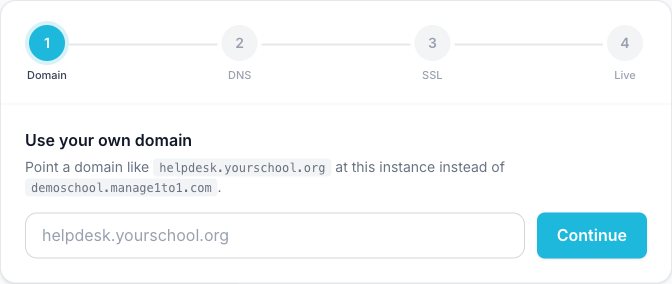
Manage1to1 will save your domain and show you the DNS instructions for the next step.
Step 3: Create the DNS Record
You'll need to create a CNAME record in your DNS provider. The Client Area shows you the exact Type, Name, and Value to use:
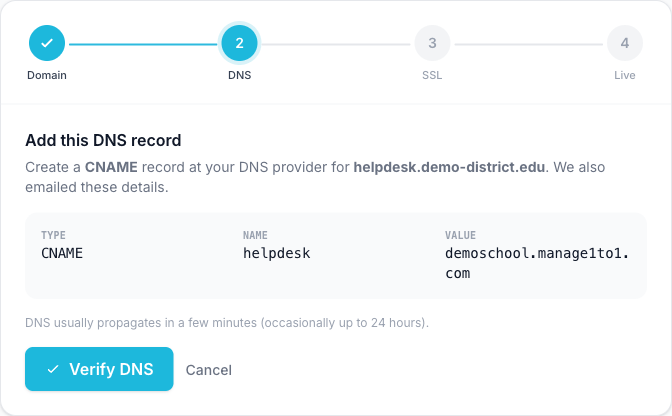
The general format is:
| Field | Value |
|---|---|
| Record Type | CNAME |
| Name / Host | The subdomain portion (e.g., helpdesk) |
| Value / Points To | Your Manage1to1 subdomain (e.g., yourdistrict.manage1to1.com) |
| TTL | Default (or 3600) |
DNS Provider Examples
Google Domains / Google Cloud DNS:
- Go to your domain's DNS settings
- Click Add Record
- Select CNAME as the record type
- Enter the subdomain as the host name
- Enter
yourdistrict.manage1to1.comas the data - Save
Cloudflare:
- Go to your domain's DNS tab
- Click Add Record
- Choose CNAME type
- Enter the subdomain in the Name field
- Enter
yourdistrict.manage1to1.comin the Target field - Set Proxy status to DNS only (gray cloud) — do not proxy through Cloudflare
- Save
GoDaddy:
- Go to My Products → DNS
- Click Add under DNS Records
- Select CNAME type
- Enter the subdomain in the Name field
- Enter
yourdistrict.manage1to1.comin the Value field - Save
Microsoft Azure DNS / Internal DNS:
- Open your DNS zone in the management console
- Add a new CNAME record
- Set the alias to your chosen subdomain
- Set the target to
yourdistrict.manage1to1.com - Save and allow time for propagation
If you use Cloudflare, make sure to set the proxy status to DNS only (gray cloud icon). Cloudflare's proxy (orange cloud) can interfere with SSL certificate provisioning and may cause connection issues.
Step 4: Verify DNS
After creating the DNS record:
- Wait a few minutes for DNS to propagate (usually 1–5 minutes, can take up to 24 hours)
- Return to Settings → Custom Domain in the Client Area
- Click Verify DNS
If the DNS record is correctly configured, you'll see a success message and SSL provisioning will begin automatically.
If verification fails, double-check:
- The CNAME record type is correct (not an A record)
- The target value exactly matches your
.manage1to1.comsubdomain - Enough time has passed for DNS propagation (try again in a few minutes)
Step 5: Wait for SSL
After DNS verification, Manage1to1 automatically provisions an SSL certificate for your custom domain. This typically takes less than a minute.
The status will show Provisioning briefly, then change to Active when complete. You can refresh the page to check.

Step 6: You're Done
Once the status shows Active, your custom domain is live. You can verify by visiting your custom URL in a browser — it should load your Manage1to1 instance with a valid HTTPS connection.
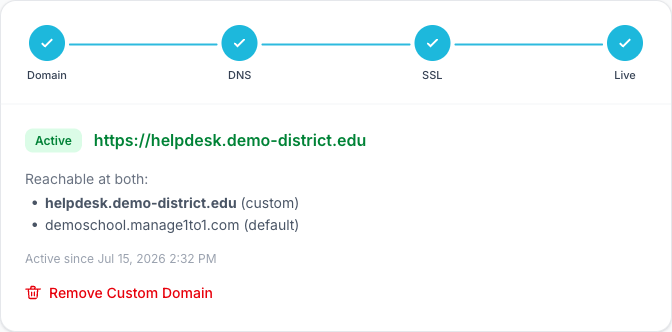
Share the new URL with your team. Both the custom domain and the original .manage1to1.com URL will continue to work — bookmarks and saved links to either URL will function correctly.
Troubleshooting
DNS verification keeps failing:
- Confirm the CNAME record exists using a tool like dnschecker.org — enter your custom domain and check for CNAME records
- Ensure the target value is your exact
.manage1to1.comsubdomain (no trailing period, nohttps://) - If using Cloudflare, disable the proxy (use DNS only / gray cloud)
- Wait up to 24 hours for full propagation if your DNS provider is slow
SSL provisioning failed:
- This usually means the domain isn't reachable yet — try clicking Retry after a few minutes
- Confirm that port 80 (HTTP) is not blocked by a firewall for your domain
- Contact Manage1to1 support if the issue persists after multiple retries
Custom domain loads but shows a certificate error:
- The SSL certificate may still be provisioning — wait a minute and refresh
- Clear your browser cache or try an incognito/private window
- If using Cloudflare with proxy enabled, switch to DNS only mode
I want to change my custom domain:
- Go to Settings → Custom Domain and remove the current domain
- Set up the new domain following these same steps
- Don't forget to update (or remove) the old CNAME record in your DNS provider
Tips
- Keep it short —
helpdesk.yourschool.orgis easier to remember thanmanage1to1devicemanagement.yourschool.org - Communicate the change — let your team know the new URL so they can update bookmarks
- The old URL still works — you don't need to update existing links or integrations immediately
- No cost — custom domains are included with your Manage1to1 subscription