Auto-Route Tickets by Keyword
Most help desk teams have a few topics that always go to the same person: Chromebook problems → the hardware tech, network outages → the networking team, password resets → the on-call admin. Done manually, that's a triage step on every ticket. Done as a workflow, it's invisible — the right tech is already assigned by the time anyone looks at the queue.
This recipe walks through building one keyword-routing rule end-to-end. Once you've got one going, the same pattern scales out to as many keyword rules as your district needs.
What you'll build
A workflow that, every time a new ticket is opened:
- Watches the subject for the word Chromebook
- If it matches, assigns the ticket to a designated technician — bypassing whatever round-robin or default the department would normally apply
The same recipe applies to any topic-keyword combination — printer, projector, outage, password, email, VPN, etc. Author one rule per topic, prioritize them in the rule list, and you've got a routing map for the whole queue.
Before you start
You need:
- The Manage Ticket Workflows permission (under the Help Desk permission category)
- A staff member already configured as an admin in Manage1to1, with access to the relevant department's tickets
- A clear sense of the keyword you want to match. The keyword check is case-insensitive but otherwise literal — Chromebook matches chromebook, CHROMEBOOK, and MyChromebookIsBroken but won't match chrome book (with a space)
If multiple keywords should route to the same person, that's still one rule — see Variation: route on any of several keywords near the bottom.
Step 1: Open the rule list
Navigate to Support Center → Ticket Workflows from the main navigation. The first time you visit, you'll see an empty state with three quick-start examples; that's where this guide picks up.
Click Create your first workflow (or New Workflow in the top-right if you've authored rules before). The editor opens to the Settings tab.
Step 2: Name and describe the rule
Give the rule a clear, action-oriented name. "Route Chromebook tickets to Pat" is better than "Workflow 1" — your future self and any teammate maintaining the rule will thank you.
Add a description with enough context that someone can understand the rule without opening it:
"Subject contains 'Chromebook' → assign Pat Chen, who handles all hardware tickets in the Hardware department."
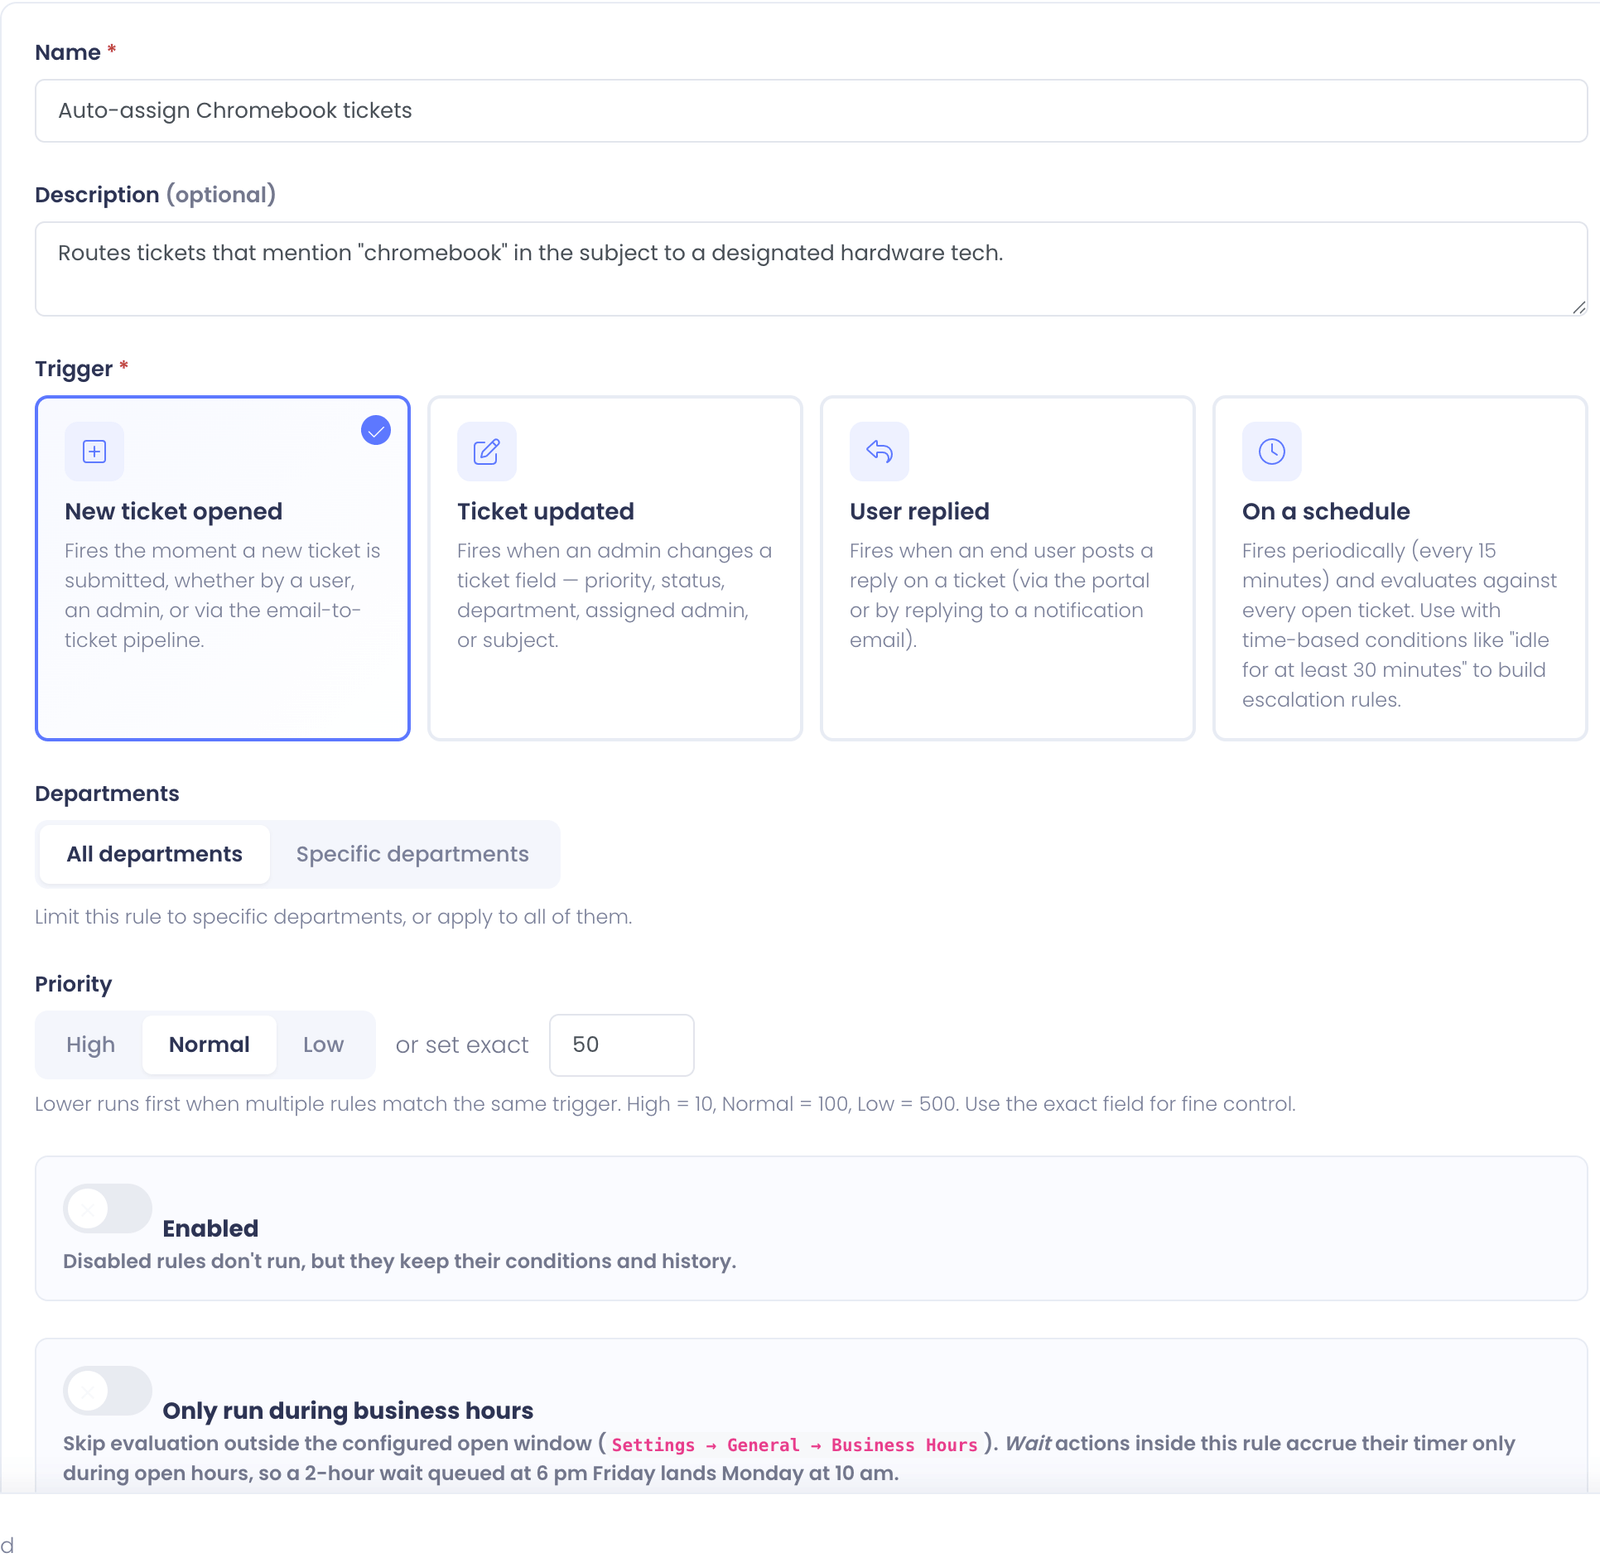
Step 3: Pick the trigger
In the Trigger section, select New ticket opened. Most routing rules use this trigger because you want the routing to happen the moment the ticket lands, before anyone has a chance to look at it.
The other two triggers (Ticket updated, User replied, On a schedule) are for different use cases — see the overview for the full picture.
Step 4: Scope to the right department (optional but recommended)
Under Departments, you have two choices:
- All departments — the rule looks at every incoming ticket
- Specific departments — the rule only looks at tickets in the departments you pick
Pick Specific departments and select the department(s) where Chromebook routing should apply. For most districts that's the Hardware or Device Repairs queue.
Why scope? Imagine someone in the Network & WiFi department opens a ticket titled "WiFi keeps disconnecting on my Chromebook" — that's a network problem, not a hardware problem, and routing it to the hardware tech would be wrong. Scoping to Hardware keeps the rule from firing on cross-mention tickets.
If your district really does want all Chromebook tickets routed regardless of department, leave it on All departments.
Step 5: Set priority
Priority controls evaluation order when more than one rule could match the same ticket. Lower numbers run first.
For a basic keyword routing rule, Normal (100) is the right default. You'd want to raise it (lower number) only if you have a more general fallback rule (like a round-robin) that this specific rule should beat.
Step 6: Save the empty rule
Click Save Changes (the button at the bottom of the editor). This creates the rule in the database so the Conditions and Actions tabs become editable. The rule is still disabled — it won't fire on real tickets yet.
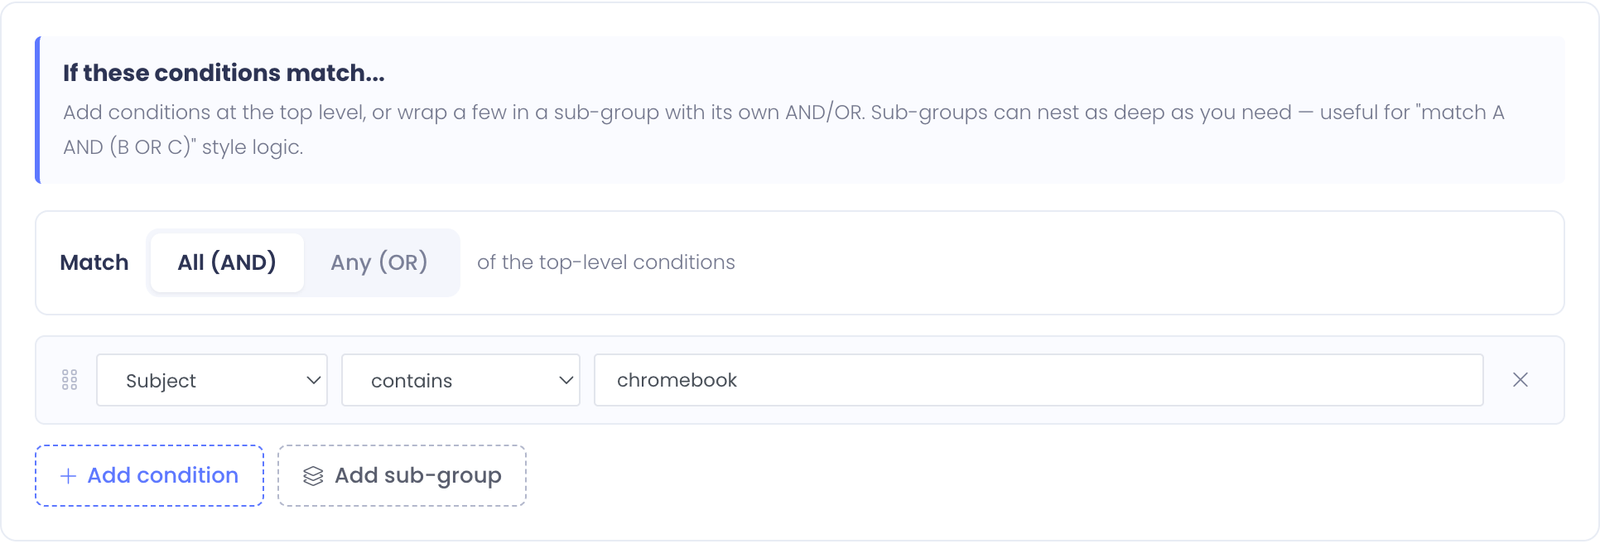
Step 7: Add the keyword condition
Switch to the Conditions tab. Click Add condition.
In the new condition row:
- Field → Subject
- Operator → contains
- Value →
Chromebook
The condition's match strategy at the top of the tab should be All of the conditions (the default). Since you only have one condition, AND vs. OR doesn't matter, but stick with the default for consistency.
The condition is case-insensitive, so you don't need to add separate lowercase / uppercase variants. Chromebook, chromebook, and CHROMEBOOK all match.
Step 8: Add the assign-admin action
Switch to the Actions tab. Click Add action.
In the new action row:
- Action type → Assign to admin
- Admin → pick the technician from the dropdown (it's alphabetical by name)
That's it. No other actions needed for the basic recipe.

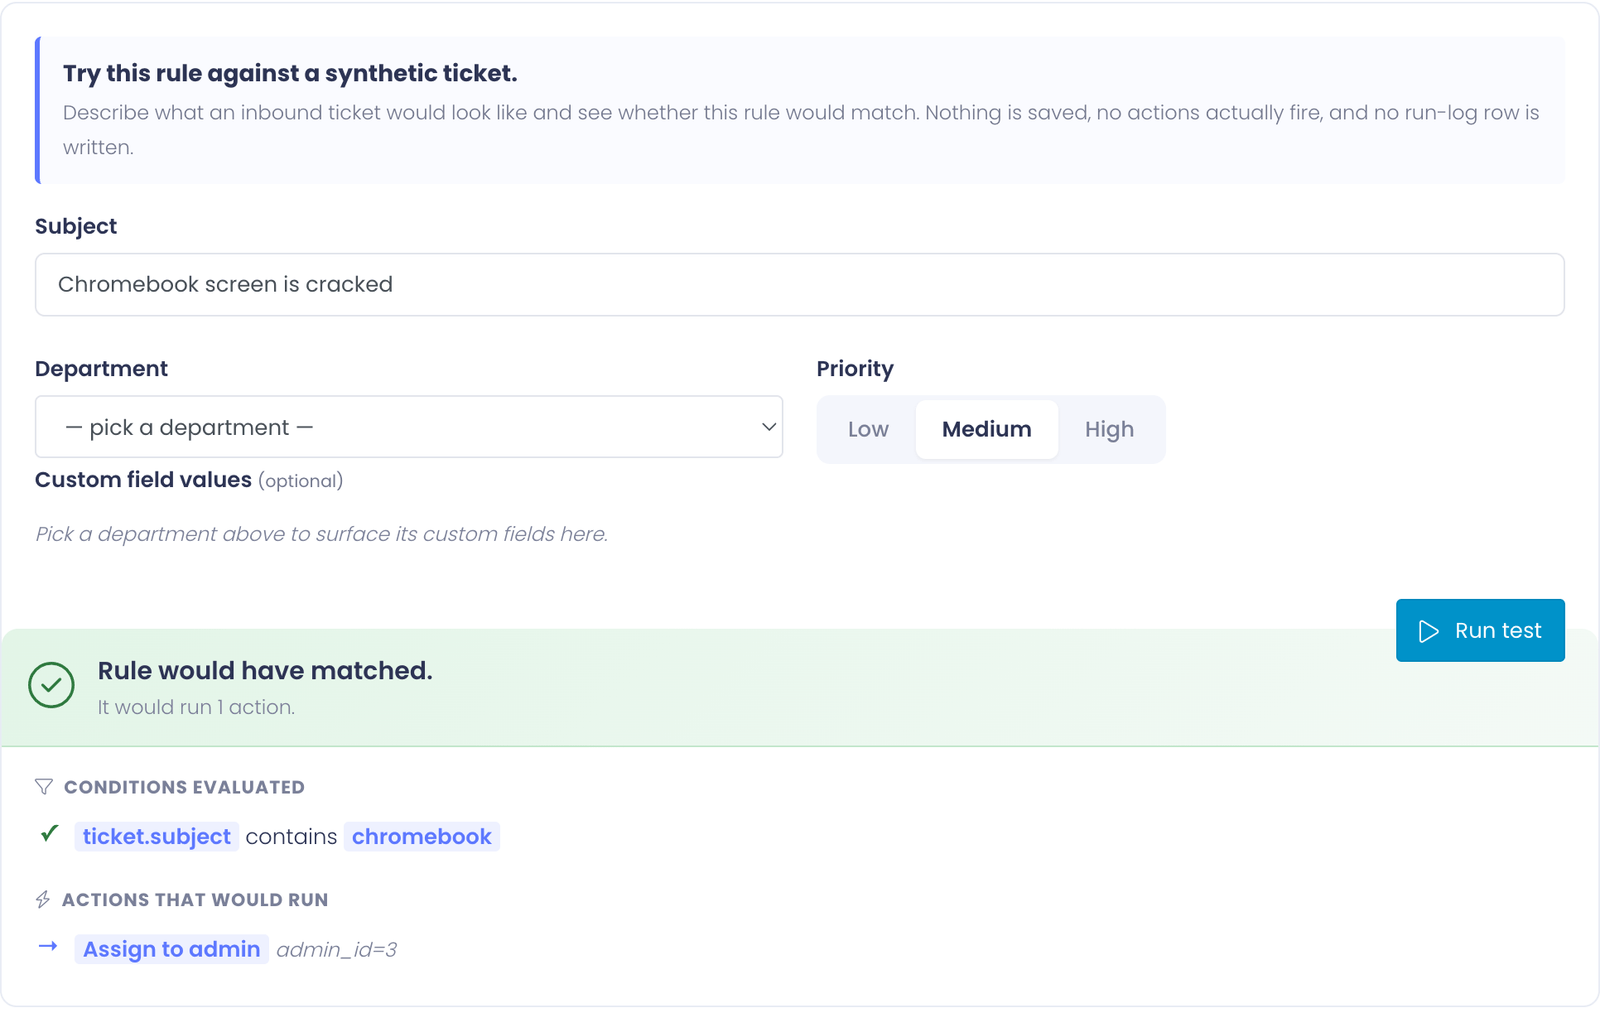
Step 9: Test it before going live
Switch to the Test tab. This dry-runs the rule against a synthetic ticket without creating anything in production.
Build a fake ticket that should match:
- Subject → "Chromebook screen is cracked"
- Department → whatever you scoped to
- Priority → Medium
Click Run test. The result panel should show:
- ✓ Subject contains "Chromebook" — green check
- The action that would run: Assign to [your tech]
Now test the negative case:
- Subject → "Printer is jammed"
- Same department, same priority
Click Run test again. The result panel should show:
- ✗ Subject contains "Chromebook" — red X
- Rule would NOT have matched — and the actions section is omitted
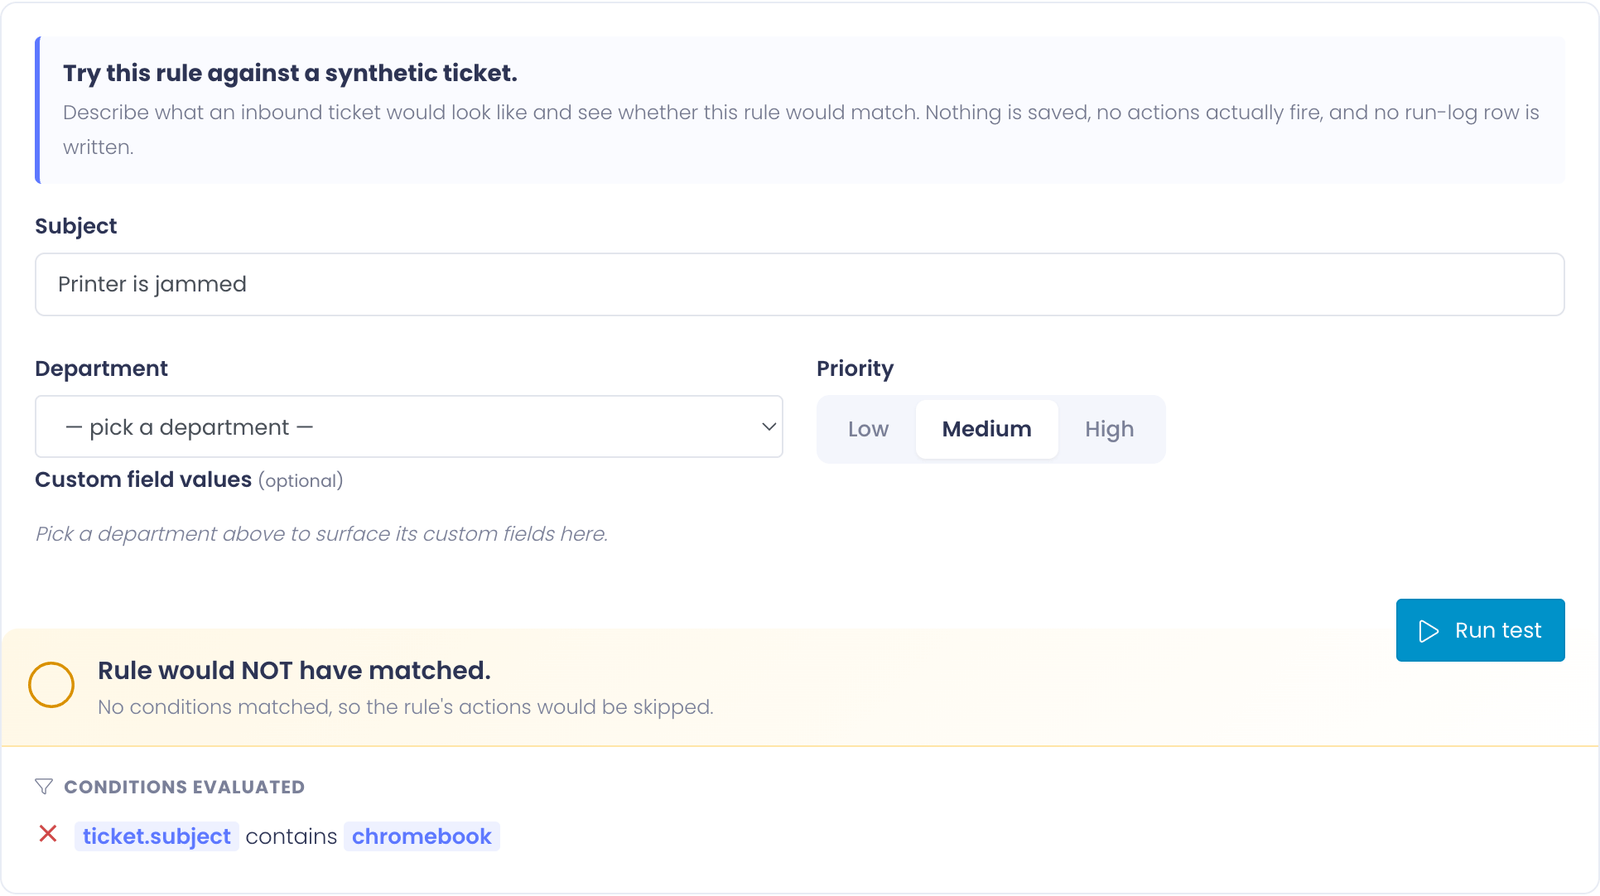
Both verdicts should match your intuition. If they don't, fix the rule before enabling — test mode is your safety net before turning the rule loose on real tickets.
Step 10: Enable the rule
Back on the Settings tab, flip the Enabled toggle on. Save Changes.
The rule is now live. Every new ticket that hits the trigger will be evaluated, and any that match the keyword condition will be assigned to your tech automatically.
Step 11: Watch it work
Switch to the History tab. Once tickets start flowing in, you'll see one row per evaluation — both matches (with the assignment that happened) and skips (where the keyword didn't match).
If the rule's match rate is much lower than you expected (say, 5%), the keyword might be too narrow. If it's matching everything (100%), it's probably too broad. Adjust the condition value and re-test.
Variation: route on any of several keywords
Instead of one keyword, route on any of Chromebook, Chrome OS, ChromeOS, MacBook, or iPad. One rule, several conditions, OR-joined.
Add multiple conditions on the Conditions tab — each with the Subject contains operator and a different value. At the top of the tab, switch the match strategy to Any of the conditions.
The rule now matches if any of the keywords appear in the subject. Same single action — assign to the hardware tech.
Variation: stop further rules after assigning
If you want this rule to "win" over any general round-robin or fallback rules below it, add a Stop action after the assignment.
The Stop action terminates rule processing for this ticket on this trigger. So a Chromebook ticket gets assigned to Pat and the round-robin pool below skips it entirely — no double-assignment.
Variation: route to a department instead of an admin
If you want the ticket to land in a different department's queue (rather than going to a specific person), use the Route to department action instead of Assign to admin. Optional checkbox: Clear admin — clears the current assignee so the receiving department's auto-assignment takes over.
This is useful for cross-cutting topics: "if a ticket in the General IT queue mentions network, route it to Network & WiFi."
Tips
- One rule per topic. Don't try to write a single rule that routes Chromebook and printer and network. They'd be tangled together — author one rule per topic and let priority order handle conflicts.
- Check the History tab weekly for the first month. It'll surface keyword variants you didn't think of (Chromebook but no rule for chromebooks plural — actually chromebook would match chromebooks because "contains" is a substring match, but you might find Chrombok typos that none of your conditions catch).
- Test from the user's perspective. The subject is whatever the user typed when opening the ticket. Run a few real tickets through the Test tab using actual subject phrasings to make sure the rule catches them.
Common Questions
Q: I added the rule but it didn't fire on a ticket I expected to match. Why? Most often, the ticket's department doesn't match the rule's department scope. Check the Settings tab → if it's set to Specific departments and the real ticket landed in a different department, the rule never even looked at it. The History tab won't show a row for skipped-by-scope evaluations.
Q: Can the rule fire on tickets opened by email? Yes — the New ticket opened trigger fires regardless of how the ticket was opened (user portal, admin-on-behalf-of, or inbound email).
Q: What happens if my designated tech is out of the office? The rule still assigns to them. You can either (a) disable the rule for the day, (b) reassign tickets manually, or (c) build a more sophisticated rule that round-robins across the team — see Round-Robin Assignment for that recipe.
Q: The rule is matching tickets it shouldn't. How do I troubleshoot? Open the History tab and find an offending row. Expand it — every condition's result is logged. The condition that matched when it shouldn't have is the one to tighten (try a more specific keyword, or add an additional condition that has to also be true).