Incident Profile
The Incident Profile is the complete view of a single incident record. This is your central workspace for managing a repair from start to finish - viewing damage details, tracking repair progress, uploading photos, managing billing, and documenting the complete incident timeline.
You access incident profiles by clicking on any incident from the View Incidents list, or from device/user profiles.
To view incident profiles, you need the View Incidents permission assigned to your administrator role.
Understanding the Incident Profile Layout
The incident profile is organized into two main areas: a quick-reference snapshot on the left and tabbed detail on the right.
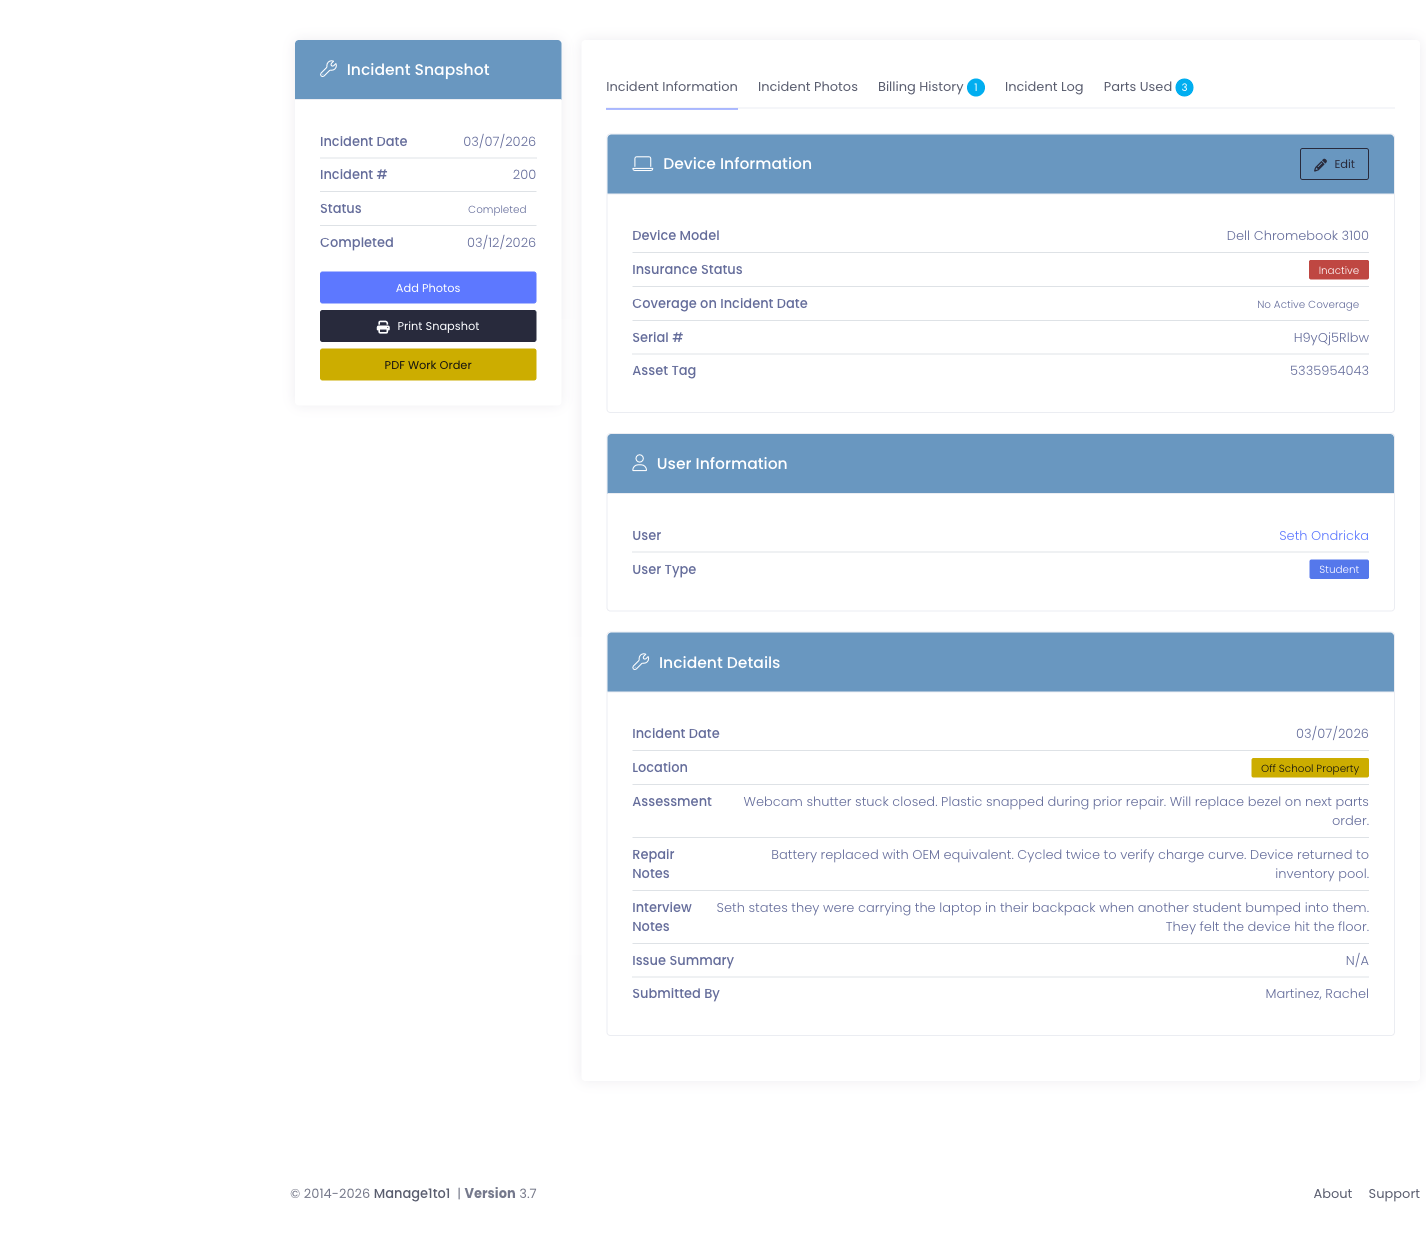
Incident Snapshot Sidebar (Left)
A quick-reference panel showing key incident information:
- Incident Date - When the problem occurred
- Incident # - Unique ID number
- Incident Status - Current state (Pending, In Progress, Completed, etc.)
- Completed Date - When repair finished (or N/A if still open)
Quick Action Buttons:
- Add Photos - Upload images of damage
- Print Snapshot - Print summary for paper records
- PDF Work Order - Generate printable work order
Main Content Tabs (Right)
The main area contains four tabs with detailed incident information:
- Incident Information - Complete details about the incident
- Incident Photos - Photo gallery of damage (prompts you to add the first photo when empty)
- Billing History - Related invoices and charges
- Incident Log - Activity timeline and notes
Incident Information Tab
This is the default tab when you open an incident profile. It contains three main sections.
Device Information Section
Shows details about the device that has the problem:
What you'll see:
- Device model (brand and model name), links to the device profile
- Insurance status (if your district tracks insurance)
- Serial number
- Asset tag
Quick action: Click the asset tag or serial number to jump straight to that device's profile. Device serial numbers, asset tags, and barcodes link to the device profile throughout Manage1to1, in device lists, user profiles, carts, rooms, and reports, so you can move between related records without hunting for them.
Toolbar buttons:
- Edit - Modify incident details (requires Edit Incidents permission)
- Mark Completed - Close out the incident and set completion date
The Mark Completed button only appears if the incident isn't already completed. Clicking it opens a confirmation dialog and automatically sets the Completed Date to the current timestamp.
User Information Section
Shows who had the device when the incident occurred:
If a user is associated:
- User's full name (clickable link to user profile)
- User type (Student or Staff)
- Grade, the student's grade level (shown for students)
- Building, the user's assigned building

Grade and building are pulled straight from the user's record, so you can see who the device belongs to and where, useful when preparing loaner lists or grouping repairs by school, without leaving the incident.
If no user:
- "No User Associated" - Incident was reported for an unassigned device
Incident Details Section
This is the core documentation of the problem and repair work.
Always visible:
- Incident Date - When problem occurred
- Location - School Property or Off School Property
- Assessment - Initial evaluation of the problem
- Issue Summary - Auto-generated summary of selected incident flags
- Incident Submitted By - Administrator who created the incident
Conditionally visible (only if data exists):
- Repair Notes - Work performed, parts used, repair details
- Interview Notes - User's account of what happened
- Apple ID - Apple ID for the device (Apple devices only)
- Apple Password - Password for Apple ID (requires View/Edit Incident Passwords permission)
- Device Unlock Code - PIN/passcode to unlock device
- Incident Last Updated By - Admin who last modified the incident
- Confidential Notes - Sensitive information (requires View/Edit Incident Confidential permission)
Apple Password and Confidential Notes are protected by special permissions. Even if you can view the incident, you may not see these fields unless you have:
- View/Edit Incident Passwords - To see Apple passwords
- View/Edit Incident Confidential - To see confidential notes
Additional Details Section
If your district has set up incident custom fields, their values appear here in an Additional Details card, for example a repair category or whether a loaner was issued.

Only fields that apply to this incident's building are shown, and any field marked Hide on Incident Profile is left off this view (it stays available on the Edit screen). If no incident custom fields have been configured, this section does not appear.
Incident Photos Tab
This tab holds a gallery of damage documentation. When no photos have been added yet, it shows a prompt to add the first one, click Add Photo to upload right from here.

What you'll see:
- Thumbnail images of all uploaded photos
- Photo count badge on the tab (e.g., "Incident Photos (3)")
- Click any photo to view full-size in a modal popup
- New photos appear in the gallery immediately after upload, without reloading the page
Photo management:
- Upload new photos using the Add Photos button in the sidebar
- Delete photos (if you have appropriate permissions)
- Photos are stored permanently with the incident record
Why photos matter:
- Visual documentation for insurance claims
- Evidence for billing disputes
- Proof of damage for accountability
- Before/after repair documentation
- Training examples for common damage types
Best practices:
- Take photos immediately when damage is reported
- Capture multiple angles
- Include close-ups of specific damage
- Show serial number/asset tag in at least one photo
- Document damage progression if repair is delayed
Learn more about managing incident photos →
Billing History Tab
Shows all invoices related to this incident, linking repair costs to billing records.
What you'll see:
| Column | Description |
|---|---|
| Date | When the invoice was created |
| Invoice # | Invoice identification number |
| Status | Paid, Unpaid, Partial, Canceled, etc. |
| Amount | Total invoice amount |
| Remaining Balance | Amount still owed |
| Action | Button to view invoice details |
Creating invoices from incidents:
If you have the Add Invoice permission, you'll see a Create Invoice button at the top right of this tab.
To bill for this incident:
- Click Create Invoice
- The invoice creation form opens with incident information pre-filled
- Specify the amount to charge
- Add any additional line items (labor, parts, etc.)
- Save the invoice
The invoice then appears in this tab, linking the charge to this specific incident.
Why link invoices to incidents:
- Track which repairs resulted in charges
- Generate reports on billing vs. warranty repairs
- Provide documentation for disputed charges
- Calculate total cost of incidents over time
- Identify repeat offenders for educational interventions
Payment tracking:
- View invoice status directly from the incident
- Click View to see full invoice details and payment history
- Remaining balance shows at-a-glance whether charges are outstanding
Incident Log Tab
The incident log is a chat-style timeline documenting everything that happens with this incident from creation through completion.
What the Log Shows
The log displays entries in chronological order (oldest to newest) with:
- Administrator name who made the entry
- Date and time of the entry
- The log message/note
Automatic log entries are created when:
- Incident is created
- Status changes
- Incident is edited
- Photos are added
- Incident is marked complete
- Flags are acknowledged
Manual log entries are notes added by administrators to document:
- Repair progress updates
- Communication with users
- Parts orders or delays
- Diagnostic findings
- Next steps or follow-up needed
Adding Log Entries
At the bottom of the Incident Log tab, you'll see a text area and Add Note button.
To add a log entry:
- Type your note in the text box
- Click Add Note
- The entry appears in the log immediately with your name and timestamp
To add incident log entries, you need the Add Incident Log permission.
What to log:
- "Ordered replacement screen from vendor, ETA 3 days"
- "Contacted user, device dropped during PE class"
- "Attempted repair, screen replacement successful, testing now"
- "Device ready for pickup, notified user via email"
- "User picked up device, confirmed all functions working"
Why use the incident log:
- Creates accountability trail
- Documents decision-making
- Communicates status to other administrators
- Provides context for future reference
- Helps track repair timelines
- Useful for training and process improvement
Deleting Log Entries
Some log entries can be deleted if needed (user-created entries typically allow deletion, system-generated entries may not).
To delete incident log entries, you need the Delete Incident Log permission.
When to delete log entries:
- ✅ Accidentally posted duplicate entry
- ✅ Entry contains incorrect information
- ✅ Typo or formatting error
- ❌ Don't delete entries to hide mistakes - add a correction entry instead
- ❌ Don't delete entries when incident is completed (historical record)
Quick Actions from the Incident Profile
Add Photos
Click the Add Photos button in the sidebar to upload images of damage.
Photo upload process:
- Click Add Photos
- Modal window opens with file upload interface
- Select one or more photos from your device
- Add optional descriptions for each photo
- Click Upload
- Photos appear in the Incident Photos tab
Supported formats: JPG, PNG, GIF File size limits: Check with your administrator (typically 5-10MB per photo)
To upload photos, you need the Add Photos permission.
Print Snapshot
Click Print Snapshot to generate a printable summary of the incident.
What's included:
- Incident number and date
- Device information
- User information
- Status
- Assessment and repair notes
- Basic incident details
Common uses:
- Paper records for repair technician
- Attaching to physical devices in repair queue
- Filing in paper-based records system
- Quick reference during phone calls
PDF Work Order
Click PDF Work Order to generate a formatted work order document.
What's included:
- Complete incident details
- Device specifications
- User information
- Repair notes and assessment
- Professional formatting for external repair vendors
Common uses:
- Sending devices to external repair shops
- Documentation for insurance claims
- Archival records
- Sharing with vendors or third parties
Edit Incident
Click the Edit button (in the Device Information section toolbar) to modify incident details.
What you can edit:
- Status
- Incident date
- Assessment
- Repair notes
- Interview notes
- Location
- Incident flags
- Confidential notes
- Apple credentials
- Custom fields
After editing:
- Changes are saved to the incident record
- An automatic log entry is created documenting the edit
- "Incident Last Updated By" field updates with your name
To edit incidents, you need the Edit Incidents permission.
Mark Completed
Click Mark Completed to close out the incident and set the completion date.
What happens:
- Confirmation dialog appears
- You confirm the completion
- Status changes to "Completed"
- Completed Date is set to current timestamp
- Automatic log entry is created
- Button changes to show incident is completed
When to mark complete:
- Repair work is finished
- Device is tested and functional
- All documentation is complete
- Device is ready to return to service
Important notes:
- This action can be undone by editing the incident
- Completion date affects repair turnaround statistics
- Completed incidents no longer appear in "open incidents" filters
Marking incidents completed requires the Edit Incidents permission.
Flagged Incidents
If an incident has the "flagged for administrative review" indicator set, you'll see a warning banner at the top of the profile:
Warning message:
"This incident is flagged for Administrative Review. Please review this incident and acknowledge once completed."
Acknowledge button: Click to remove the flag and mark it as reviewed
Why incidents get flagged:
- Certain incident flag types (like "Physical Damage") auto-trigger the review flag
- Administrators manually flag incidents requiring special attention
- High-cost incidents needing approval
- Patterns suggesting misuse or negligence
- Incidents requiring disciplinary follow-up
To acknowledge flags, you need the Flags permission.
Common Workflows
Scenario 1: Processing a Repair from Start to Finish
Student reports cracked screen, you handle the complete repair:
- Open the incident profile
- Review the Incident Information tab - read assessment and interview
- Click Add Photos - upload images of the cracked screen
- Add log entry: "Ordering replacement screen from vendor, ETA 2 days"
- Two days later, add log entry: "Screen arrived, beginning repair"
- Perform the repair
- Click Edit - add repair notes: "Replaced screen assembly, tested touch response, fully functional"
- Add log entry: "Repair complete, device tested and ready for user pickup"
- Click Mark Completed
- Notify user device is ready
Scenario 2: Billing for Damage
User damaged device through negligence, needs to be billed:
- Review Incident Information - confirm assessment and interview support charging
- Check Incident Photos - verify photo documentation exists
- Switch to Billing History tab
- Click Create Invoice
- Fill in charge amount (screen replacement: $150)
- Save invoice
- Invoice appears in Billing History tab
- Add log entry: "Invoice #12345 created for $150 screen replacement"
Scenario 3: Multi-Administrator Collaboration
Repair takes several days, multiple admins work on it:
Admin 1 (Day 1):
- Creates incident, adds assessment
- Adds log: "Device received, diagnosis needed"
Admin 2 (Day 2):
- Opens incident, reviews details
- Adds log: "Diagnosed as battery issue, ordered replacement battery"
Admin 1 (Day 4):
- Adds log: "Battery arrived, installed, device charging normally"
- Clicks Mark Completed
Admin 2 (Day 5):
- Reviews completed incident
- Adds log: "User picked up device, satisfied with repair"
Each admin sees the complete history, ensuring smooth handoffs and continuity.
Scenario 4: Insurance Claim Documentation
Device damaged, need to file insurance claim:
- Open incident profile
- Review Incident Information - verify location is "Off School Property"
- Check Incident Photos - ensure multiple angles documented
- Click PDF Work Order - generate documentation for insurer
- Review Incident Log - confirm timeline is documented
- Export/save PDF for insurance submission
- Add log entry: "Insurance claim filed with [Company Name], claim #XYZ123"
Tips for Using Incident Profiles
✅ Do:
- Keep incident logs updated throughout the repair process
- Upload photos as soon as damage is discovered
- Mark incidents complete promptly when repairs finish
- Use the log to communicate with other administrators
- Review all tabs to get complete incident picture
- Document conversations with users in the log
- Link invoices to incidents for proper tracking
❌ Don't:
- Leave incidents in "In Progress" forever - update or complete them
- Forget to add repair notes when marking complete
- Skip uploading photos for physical damage
- Delete log entries to hide mistakes - add corrections instead
- Edit assessment to remove original information - add to repair notes instead
Understanding Permissions
Different actions on the incident profile require different permissions:
| Action | Permission Required |
|---|---|
| View incident details | View Incidents |
| Edit incident | Edit Incidents |
| Mark completed | Edit Incidents |
| Add photos | Add Photos |
| View photos | Add Photos |
| Add log entry | Add Incident Log |
| Delete log entry | Delete Incident Log |
| View Apple passwords | View/Edit Incident Passwords |
| View confidential notes | View/Edit Incident Confidential |
| Create invoice | Add Invoice |
| Acknowledge flag | Flags |
Common Questions
Q: Can I reopen a completed incident? Yes. Click Edit, change the status from "Completed" back to "In Progress" or another status, and save. The completed date will be cleared.
Q: What's the difference between assessment and repair notes?
- Assessment - Initial evaluation when incident is created ("cracked screen, 3-inch diagonal crack")
- Repair Notes - Work performed to fix it ("replaced screen assembly, tested touch response")
Q: Why can't I see the Apple Password field? You need the View/Edit Incident Passwords permission to see password-protected fields.
Q: Can I delete an incident from the profile page? No. Deletion is done from the View Incidents list page and requires Delete Incidents permission.
Q: How many photos can I upload? Limits vary by configuration, but typically 10-20 photos per incident. Check with your system administrator.
Q: Do log entries notify other administrators? No. The incident log is passive documentation. Use email or other communication methods to alert others about important updates.
Next Steps
- Add Incident Photos - Learn photo upload best practices
- Manage Incident Log - Deep dive into incident logging
- View Incidents - Return to the incident list
The incident profile is your complete workspace for managing device repairs from initial report through billing and completion!