Automations
Manage1to1 has two kinds of automation, and the Automations page brings them together in one list so you can see everything your district has running at a glance:
- Smart Rules act on devices and incidents, flipping statuses, sending notifications, and closing stale work on a schedule. An incident rule can even update the device the incident is about, setting its status or moving it to another building, for example putting it In Repair or sending it to a repair location when the incident opens and back to Active when it resolves. Any Smart Rule can also be limited to business hours only, so it acts during the school day and pauses outside it.
- Workflows act on help-desk tickets, assigning, routing, escalating, and notifying as tickets come in and change.
Instead of checking two separate screens, you get a single table of every rule and workflow side by side.
How an automation works
Every automation follows the same shape: something happens, Manage1to1 checks whether your conditions match, and if they do, it runs the actions you set.
Where to find it
Open Automations from the main menu, or from Settings → Automations.
You'll see it if you can manage either Smart Rules or Workflows. If you only manage one of the two, you can still see the full list, but you can only switch the kind you're responsible for on or off.
Reading the list
Every automation appears as one row:
| Column | What it tells you |
|---|---|
| Name | The name you gave the rule or workflow. Select it to open the editor. |
| Type | What the automation acts on: Device, Incident, or Ticket. |
| Folder | An optional label for grouping related Smart Rules. Select it to move the rule to a folder or add it to one. |
| Tags | Optional labels for cross-cutting grouping. A rule can have several. Select Add or Edit to change them. |
| Trigger | When it runs, for example when a record is created, updated, saved, or on a schedule. |
| Status | The on/off switch. Flip it to enable or disable the automation right from the list. |
| Last Run | The last time the automation was evaluated. Shows Never if it hasn't run yet. |
| Runs | How many times the automation has been evaluated in total. |
Finding a specific automation
Above the table you can narrow the list:
- Object type: show only Device, Incident, Ticket, or Schedule automations.
- Status: show only the ones that are enabled, or only the ones that are disabled.
- Folder: show only the automations in a particular folder.
- Tag: show only the automations that carry a particular tag.
- Search: type any part of a name to filter instantly.
Combine them to answer questions like "which ticket automations are currently turned off?"
Organizing with folders
As your district builds up more automations, folders help you keep related ones together, for example a Device lifecycle folder or an Onboarding folder.
To put a Smart Rule in a folder, select its entry in the Folder column (it reads Add when the rule isn't in one yet), type a folder name, and save. Use the same name on other rules to group them together. To take a rule out of a folder, open the same box and clear the name.
Then use the Folder filter above the table to show just one folder's automations at a time.
Folders are available on Smart Rules today. Workflows show a dash in the Folder column and will gain folders in a future update.
Organizing with tags
Where a folder puts a rule in one place, tags let you label it several ways at once. A rule in your Device lifecycle folder might also be tagged urgent and after-hours, so you can pull up everything urgent regardless of which folder it lives in.
To tag a Smart Rule, select the Tags column for its row (it reads Add when the rule has no tags yet, or Edit when it does), type your tags separated by commas, and save. Reuse the same tag on other rules to group them. To remove all tags, open the same box and clear it.
Then use the Tag filter above the table to show just the rules that carry a given tag.
Like folders, tags are organizational only: they never change when or whether an automation runs. They are available on Smart Rules today; Workflows show a dash in the Tags column for now.
Turning an automation on or off
Use the switch in the Status column. The change takes effect immediately. There's no separate save step, and you don't lose your place in the list. Turning something off pauses it without deleting it, so you can switch it back on any time.
Automation metrics
Select Metrics at the top of the Automations page to see how your automations are actually performing, with Smart Rules and Workflows together in one view.
The dashboard shows:
- Evaluations, matches, and match rate across every automation for the period you choose.
- Top firing automations: the ones doing the most work, each with a small seven-day trend line and a badge showing whether it is a Smart Rule or a Workflow.
- By trigger: which triggers are creating the most load.
- Underperforming automations: ones that run often but rarely match, so you can tighten or retire them.
Use the 7 days, 30 days, and All time buttons to change the period. It is a quick way to answer "which automations are earning their keep, and which are just adding noise?"
Editing an automation
Select an automation's name to open it in its own editor:
- Smart Rules open in the Smart Rule builder.
- Workflows open in the Workflow builder.
Creating a new automation
Select New Automation at the top of the page and pick what it should act on:
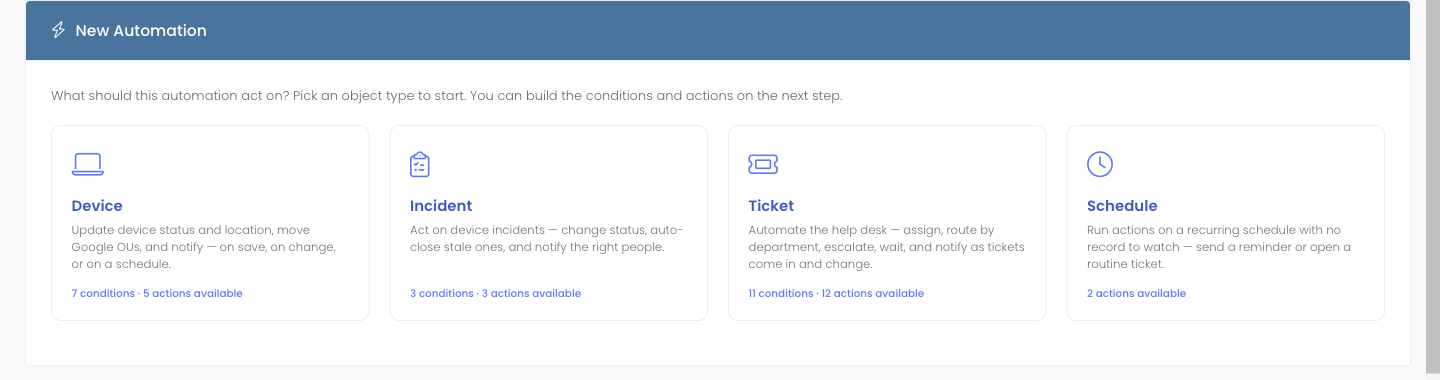
- Device or Incident opens the Smart Rule builder, pre-set to that object.
- Ticket opens the Workflow builder.
- Schedule opens a schedule-only Smart Rule that runs on a cadence with no record to watch, for standing tasks like a weekly reminder or a routine ticket.
Each option shows how many conditions and actions are available for that type, so you know what you can build before you start. You can still jump straight into the Smart Rules or Workflows builder from the buttons next to it.
Once created, the automation appears in this combined list automatically.
Starting from a template
If you would rather begin from a ready-made example than a blank rule, open Smart Rules and select Templates. You will find a small gallery of common starting points, for example flagging urgent tickets, auto-closing stale incidents, or notifying IT when a device is marked lost.
Select Use this template and Manage1to1 creates a new Smart Rule from it, turned off, and opens it in the editor. Review the conditions and actions, adjust anything specific to your district (a template marked Review before enabling uses example values, such as a status or a recipient, that you will want to point at your own), and turn it on when you are happy with it.
Templates are a starting point you can change freely: nothing is locked, and the rule is yours to edit like any other.