Custom Domain
Manage1to1 supports custom domains, allowing your district to access the platform using your own domain name (e.g., helpdesk.yourschool.org) instead of the default yourdistrict.manage1to1.com URL.
Custom Domain is configured in the Manage1to1 Client Area — the same place you manage your subscription and billing — not inside the Manage1to1 admin app. You won't find it under the app's own Settings menu. Every step on this page is done in the Client Area.
Custom domains give your staff a branded, familiar URL from login onward.
How It Works
When you configure a custom domain:
- You choose a domain name you own (e.g.,
helpdesk.yourschool.org) - Your IT team creates a DNS record pointing that domain to Manage1to1
- Manage1to1 verifies the DNS configuration and provisions an SSL certificate automatically
- Your instance becomes accessible at both your custom domain and the original
.manage1to1.comURL
Both URLs remain active — the original .manage1to1.com address always works as a fallback.
.manage1to1.com hostnameEveryday use — including Google, Microsoft, and ClassLink single sign-on — works on your custom domain, so your staff stay on your branded URL from login onward.
When you set up an integration in an outside console (for example Google, for mobile device management), enter your original yourdistrict.manage1to1.com hostname there. That's the address those services are registered against, and it keeps working regardless of your custom domain.
Requirements
To use a custom domain, you need:
- An active Manage1to1 subscription
- A domain you control — you must be able to create DNS records for this domain
- Owner-level access to the Manage1to1 Client Area
Custom domains work with subdomains of domains you own (e.g., helpdesk.yourschool.org, devices.mydistrict.edu). You do not need to purchase a new domain — any subdomain of an existing domain works.
Setting Up a Custom Domain
Custom domains are configured in the Client Area under Settings → Custom Domain (the Client Area's own Settings menu, not the admin app's). The setup process is:
- Enter your domain — type the domain you'd like to use
- Configure DNS — create a CNAME record in your DNS provider (instructions are provided)
- Verify DNS — Manage1to1 checks that your DNS record is correctly configured
- SSL provisioning — an SSL certificate is automatically generated (takes about a minute)
- Done — your custom domain is live
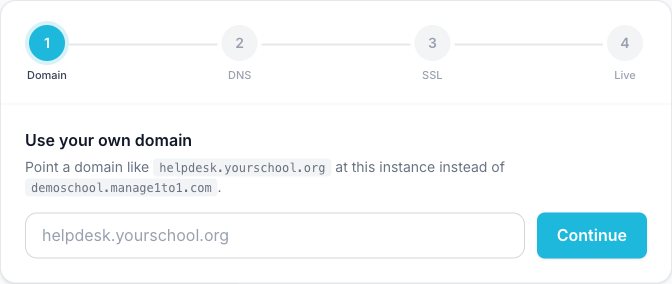
The setup screen walks you through each step. You start by entering the domain you'd like to use:
For detailed step-by-step instructions, see the Setting Up a Custom Domain guide.
DNS Configuration
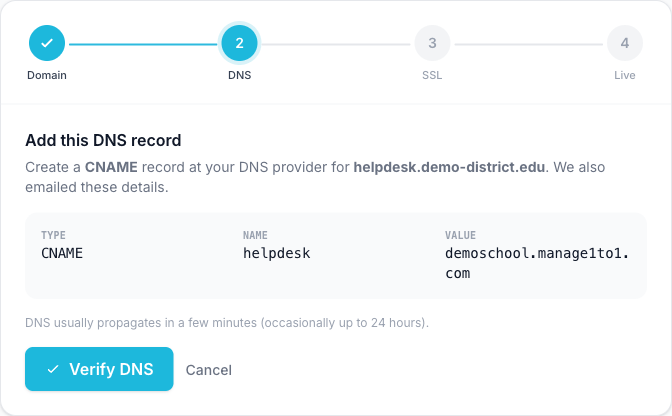
Your DNS record should be a CNAME pointing your custom domain to your Manage1to1 subdomain:
| Record Type | Name | Value |
|---|---|---|
| CNAME | helpdesk | yourdistrict.manage1to1.com |
The exact steps vary by DNS provider, but the concept is the same — you're telling DNS that your custom domain should route to your Manage1to1 instance. The setup screen shows you the exact Type, Name, and Value to enter, along with a Verify DNS button:
DNS changes typically propagate within a few minutes, but can take up to 24 hours in some cases. If verification fails, wait a few minutes and try again.
SSL Certificates
Manage1to1 automatically provisions and renews SSL certificates for custom domains using Let's Encrypt. You do not need to purchase, upload, or manage SSL certificates — it's fully automated.
Your custom domain will always use HTTPS, and HTTP requests are automatically redirected to HTTPS.
While the certificate is being issued, the wizard shows a brief provisioning step:

Managing Your Custom Domain
Viewing Status
Visit Settings → Custom Domain in the Client Area to see your current custom domain status:
- Active — your custom domain is working and accessible
- Pending DNS — waiting for you to create the DNS record and verify
- Provisioning — SSL certificate is being set up (usually under a minute)
- Failed — SSL provisioning encountered an issue (you can retry)
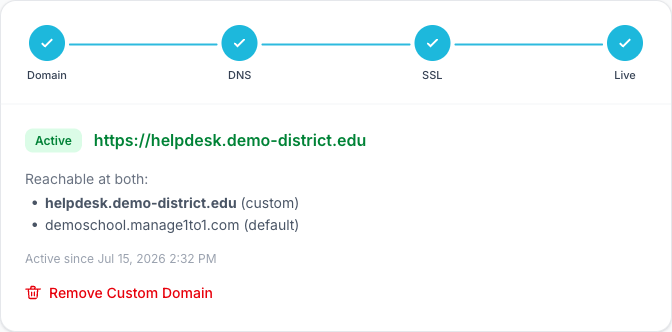
Once everything is in place, the page confirms your custom domain is live and reachable at both addresses:
Removing a Custom Domain
To remove your custom domain, visit Settings → Custom Domain in the Client Area and select Remove Custom Domain. Your instance will revert to the default .manage1to1.com URL immediately.
Frequently Asked Questions
Does the original .manage1to1.com URL still work?
Yes. Both URLs remain active at all times. Bookmarks, saved links, and integrations using the original URL will continue to work.
Can I use a root domain (e.g., yourschool.org) instead of a subdomain?
We recommend using a subdomain (e.g., helpdesk.yourschool.org) since CNAME records cannot be set on root domains with most DNS providers. If you need to use a root domain, contact support for assistance.
How long does setup take? Once your DNS record is in place, setup typically completes in under a minute. DNS propagation itself can take a few minutes to a few hours depending on your DNS provider.
Is there an additional cost? No. Custom domains are included with your Manage1to1 subscription at no extra charge.
What happens if I let my domain expire?
If your domain expires or the DNS record is removed, the custom domain will stop working. Your instance remains accessible at the original .manage1to1.com URL. You can set up a new custom domain at any time.
Can I change my custom domain? Yes. Remove the current custom domain and set up a new one. The process takes just a few minutes.