Send Email via Microsoft 365
Configure Manage1to1 to send outbound email through your Microsoft 365 (Exchange Online) account using OAuth2. Messages will be sent as your chosen Microsoft address, with no stored password.
To change email delivery settings you need the Manage Settings permission in Manage1to1, plus access to the Microsoft Entra admin center (Azure app registrations) for your organization.
Reuse your Help Desk setup if you have it
If you already connected Microsoft OAuth for Help Desk email importing, you can reuse the same Azure app registration for sending.
Sending uses a different callback address than importing, so add the outbound callback URL (shown in Step 1 below) as an additional entry under your app registration's Redirect URIs. Both importing and sending then run from the same registration. If you have not set up importing, follow the app-registration steps in the Help Desk email importing guide first, then return here.
Before you start
You will need:
- Access to the Microsoft Entra admin center
- The Microsoft 365 address you want Manage1to1 to send from
- An app registration Client ID (Application ID) and Client Secret
- The outbound OAuth Callback URL shown in Manage1to1
Microsoft disables SMTP sending on mailboxes by default. In the Microsoft 365 admin center, open the sending mailbox's mail settings and enable Authenticated SMTP. Without this, sending will fail even when the OAuth connection succeeds. Ask your Microsoft 365 administrator if you are unsure.
Step 1: Open the Email Server configuration in Manage1to1
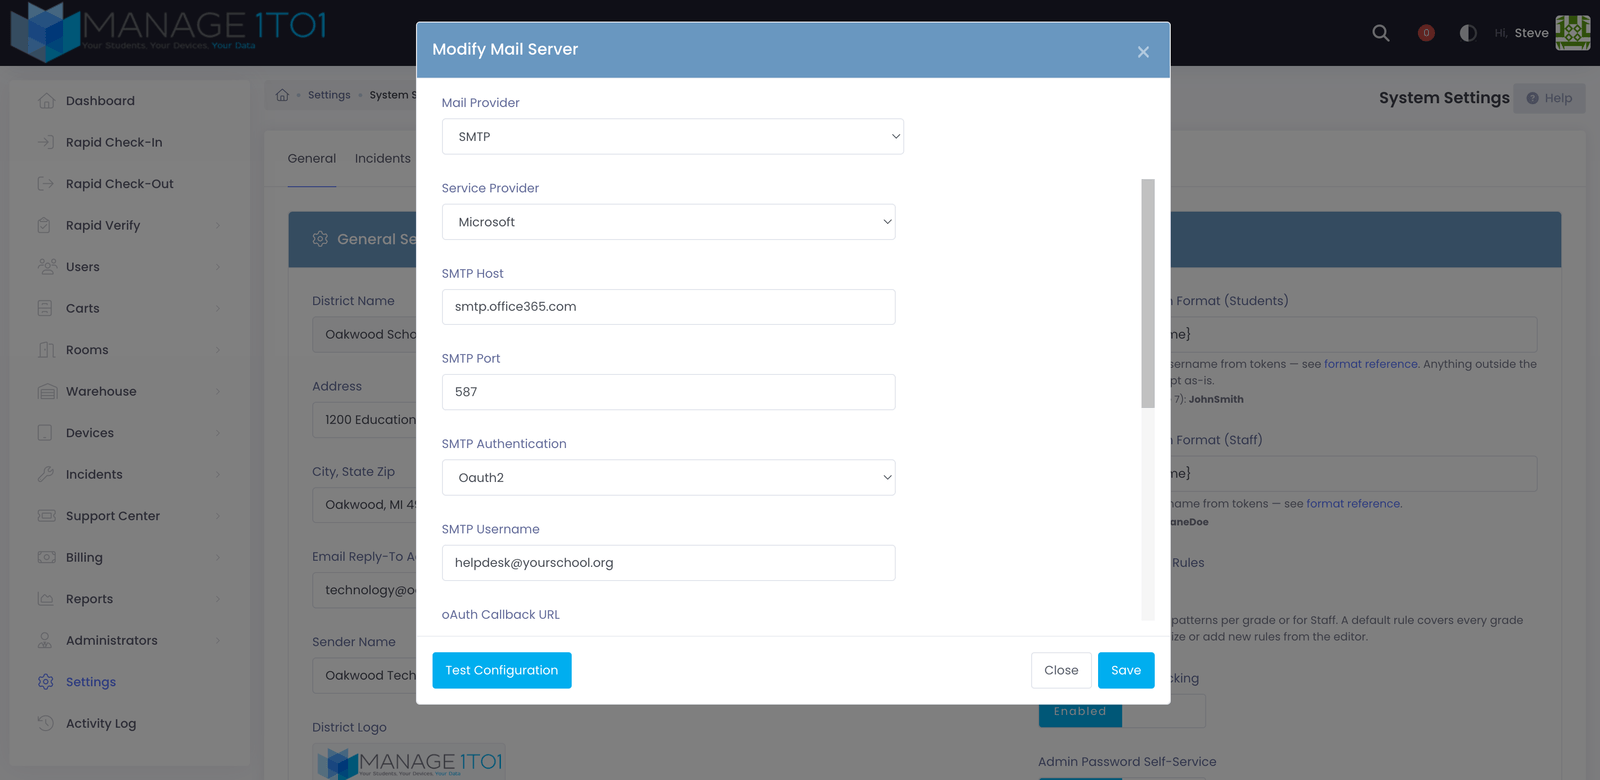
- Go to Settings → System Settings → General.
- In the Email Server field, select Update Email Server.
- Set Mail Provider to SMTP.
- Set Service Provider to Microsoft.
- Set SMTP Authentication to OAuth2.
The OAuth fields appear, including the read-only OAuth Callback URL.
Step 2: Set up the Azure app registration
In the Microsoft Entra admin center, open your existing app registration (or create one, following the importing guide), then:
- Under Authentication → Redirect URIs, add the OAuth Callback URL copied from the Manage1to1 screen. If importing is already configured, this is a second entry alongside the importing callback. Leave both in place.
- Under API permissions, confirm the app has permission to send mail through Office 365 SMTP (the same Office 365 Exchange Online permission used for mailbox access), and grant admin consent if your organization requires it.
- Under Certificates & secrets, use your existing client secret or create a new one. Copy its value now, because Microsoft only shows it once.
The redirect URI must match exactly. Any difference will stop the authorization and no token will be generated.
Step 3: Enter the sender and OAuth details
Back on the Modify Mail Server screen in Manage1to1, enter:
- SMTP Username - the Microsoft 365 address to send from (for example,
helpdesk@yourschool.org) - OAuth Client ID - the Application (client) ID from your app registration
- OAuth Client Secret - the secret value you copied
Manage1to1 sets the Microsoft send host (smtp.office365.com) and a secure port for you. Leave SMTP Security on the secure option shown.
Step 4: Connect and authorize
- Select Connect.
- When Microsoft prompts you, sign in with the same account as the sending address you entered.
- Approve access when Microsoft requests it.
After authorization completes, the OAuth Token field fills in automatically. That token is what lets Manage1to1 send on your behalf.
Step 5: Test and save
- Select Test Configuration to confirm Manage1to1 can send with these settings.
- Select Save.
If the test fails, confirm Authenticated SMTP is enabled on the mailbox, the redirect URI matches exactly, the Client ID and Secret are correct, and you authorized the same Microsoft account you entered as the sender. Re-run Connect if needed.
Once saved, all outbound Manage1to1 email for your district is delivered through your Microsoft 365 account.
Deliverability
Because mail now originates from your own Microsoft 365 account, your existing SPF and DKIM records cover it automatically. Confirm your setup in Email Deliverability.