Email Templates
Email templates control the content of messages that Manage1to1 sends automatically during key system actions. These messages are triggered by events such as invoices being generated, incidents being processed, ticket responses being sent, or other system-driven workflows.
Administrators can customize the included templates to better match district messaging standards, and create their own custom templates for use in Smart Rules and ticket workflows.
To open the Email Templates manager, go to Settings and select the Email Templates card.
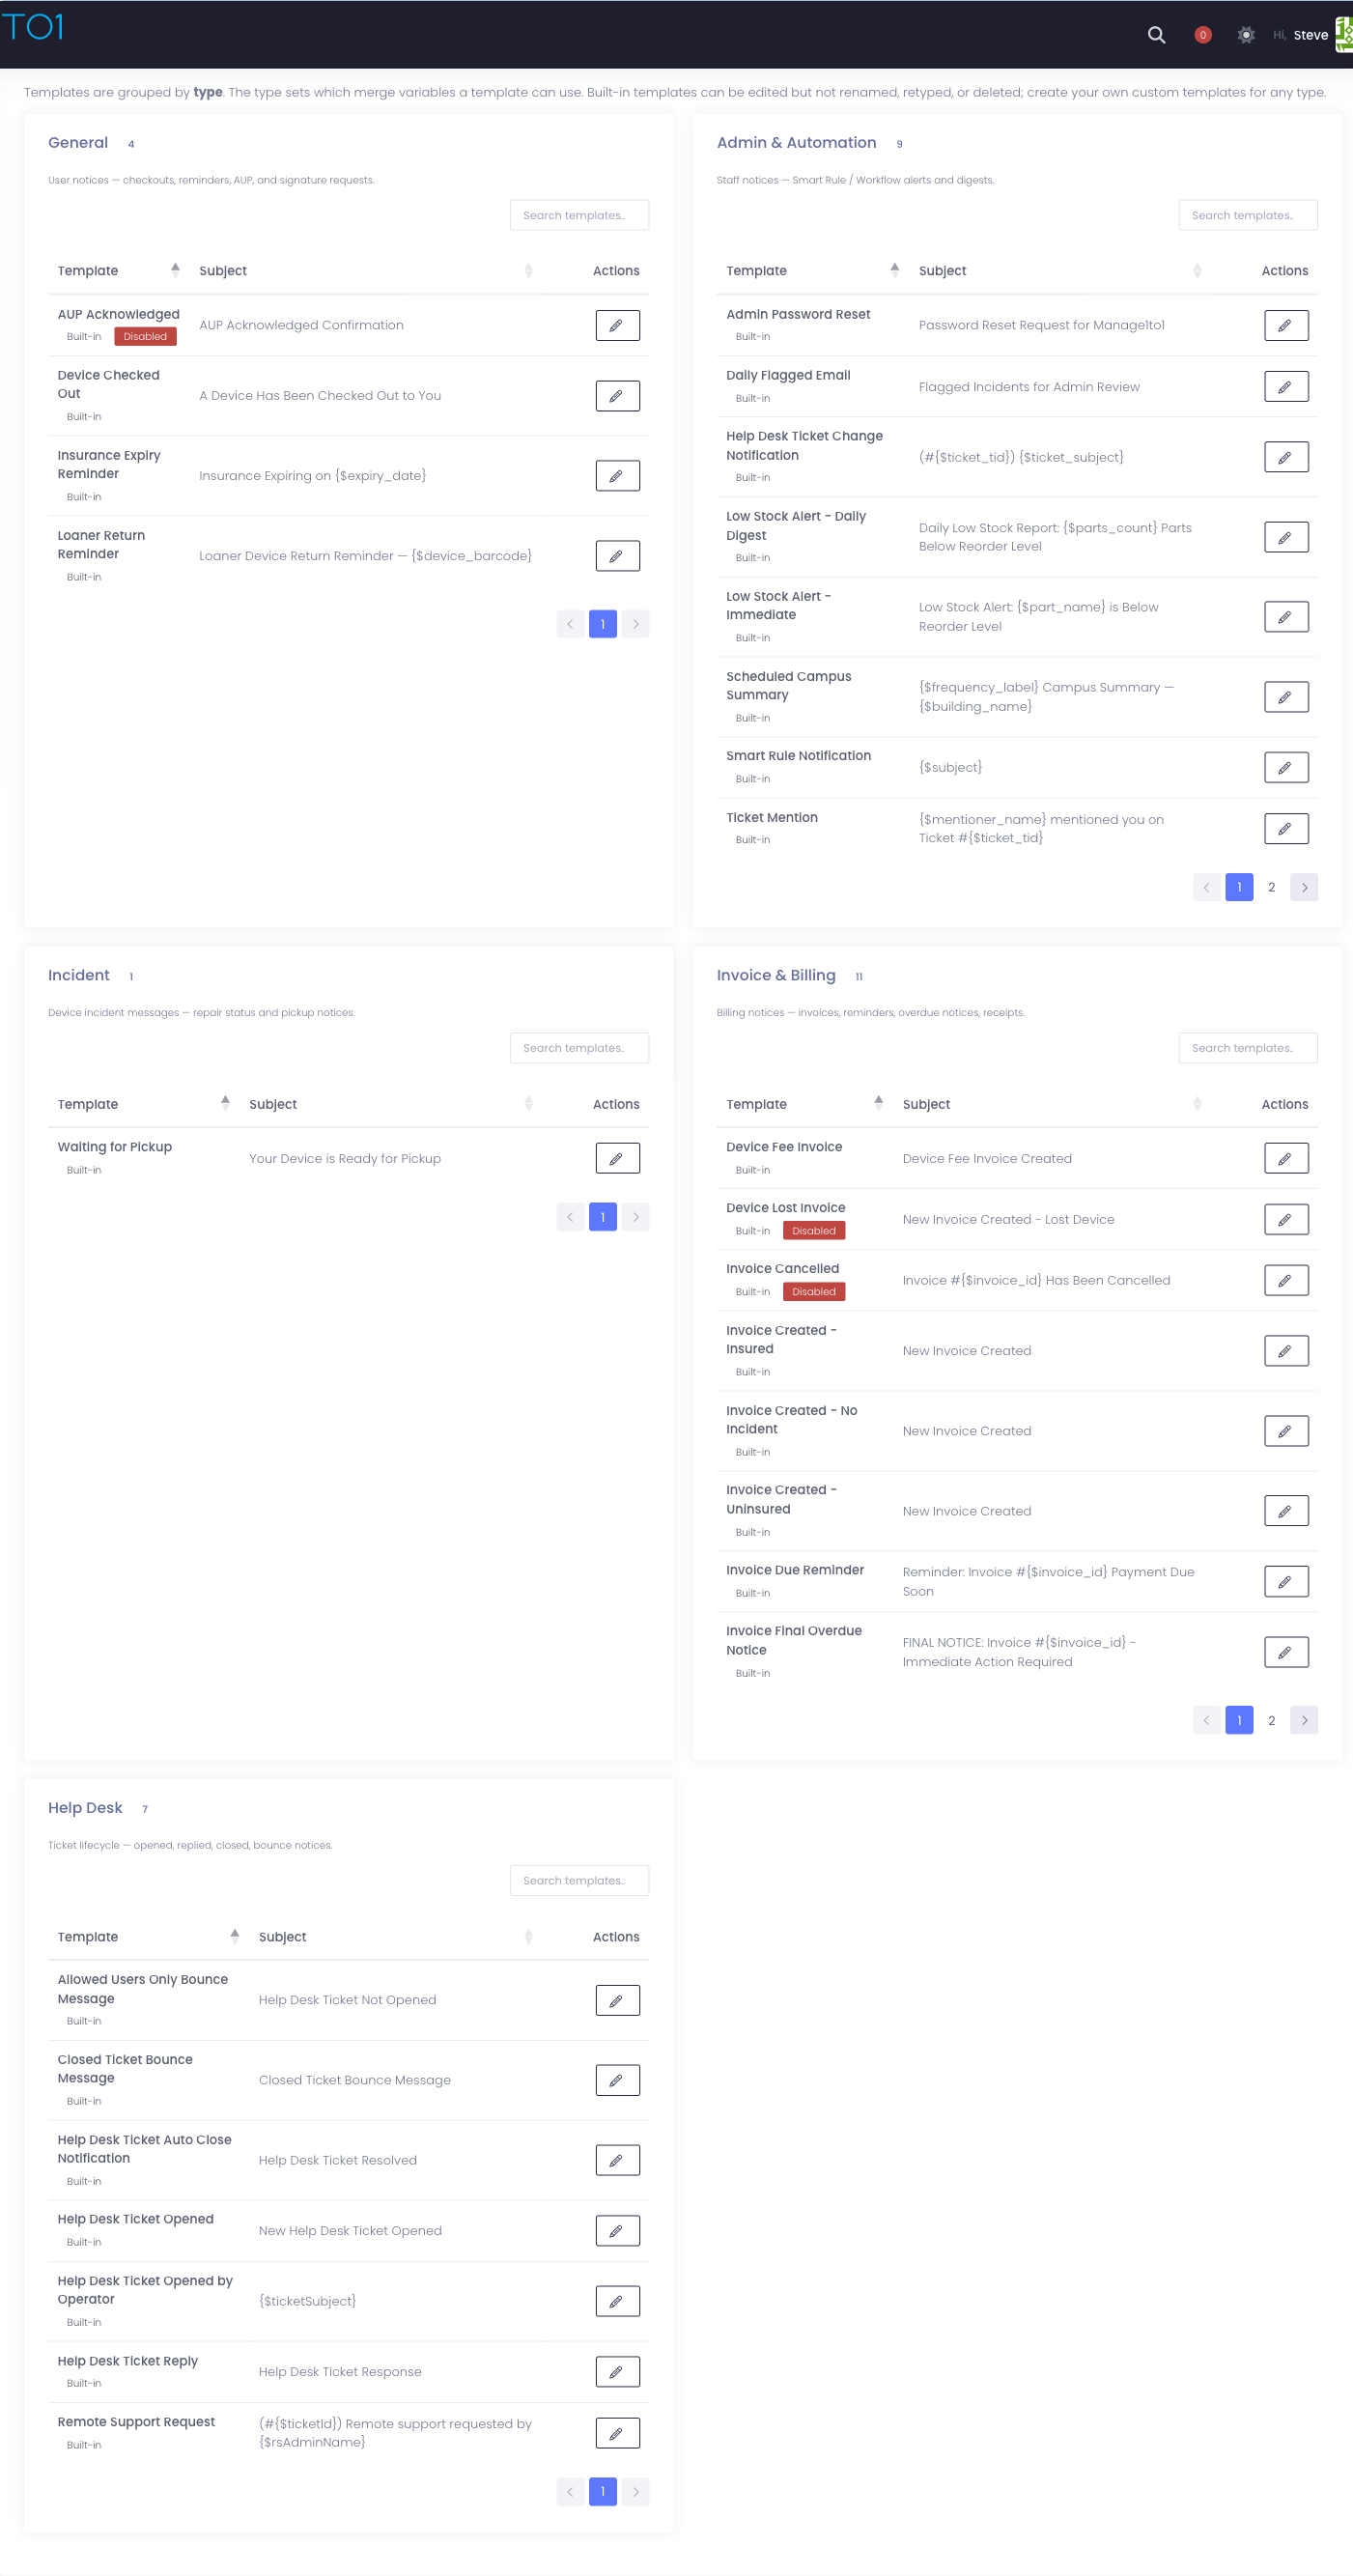
To access Email Templates, you need the Manage Settings permission assigned to your role.
If a built-in template is accidentally edited incorrectly, default templates can be restored by contacting Manage1to1 Support.
Understanding Email Templates
Think of email templates as form letters that automatically fill in specific information when sent - the structure and wording stay the same, but names, dates, amounts, and other details change for each recipient.
What email templates control:
- Subject lines and message content
- Which emails get sent automatically
- CC and BCC recipients per template
- Attachments included with emails
- Dynamic content using merge fields
Why email templates are important:
- Consistency - All families receive professional, standardized messages
- Efficiency - No need to manually write emails for common actions
- Accuracy - Merge fields automatically populate correct information
- Compliance - Documented communication templates for audit trails
- Customization - Tailor messaging to match district voice and policies
How Templates Are Organized
Templates are grouped by type. Each type corresponds to a specific area of the platform, and the type determines which merge fields are available to a template.
Template types:
- General - System-wide messages such as welcome and account emails
- Admin & Automation - Internal notifications sent to staff, including Smart Rule and workflow alerts
- Incident - Incident notifications and damage reports
- Invoice & Billing - Invoice creation, payment reminders, payment confirmations
- Help Desk - Ticket created, ticket updated, ticket resolved
The type determines:
- What data is available to the template
- Which merge fields you can insert into the subject and body
Multiple templates per type: More than one template can exist within a single type. For built-in templates, the system automatically selects the appropriate one based on the action and available data at the time the email is sent. For custom templates, you choose which template to use when you set up a Smart Rule or a ticket workflow.
Built-in vs. custom templates
Each template is labeled by its source:
- Built-in templates ship with Manage1to1 and power the platform's automatic emails. You can edit their content, but their name and type are fixed and they cannot be deleted.
- Custom templates are ones you create. You choose the type when you create them, and you can edit or delete them at any time.
Creating a Custom Template
Custom templates let you build your own messages — for example, a tailored alert for a Smart Rule or a ticket workflow.
- Go to Settings and select the Email Templates card.
- Select New Template to open the template editor.
- Fill in the template details:
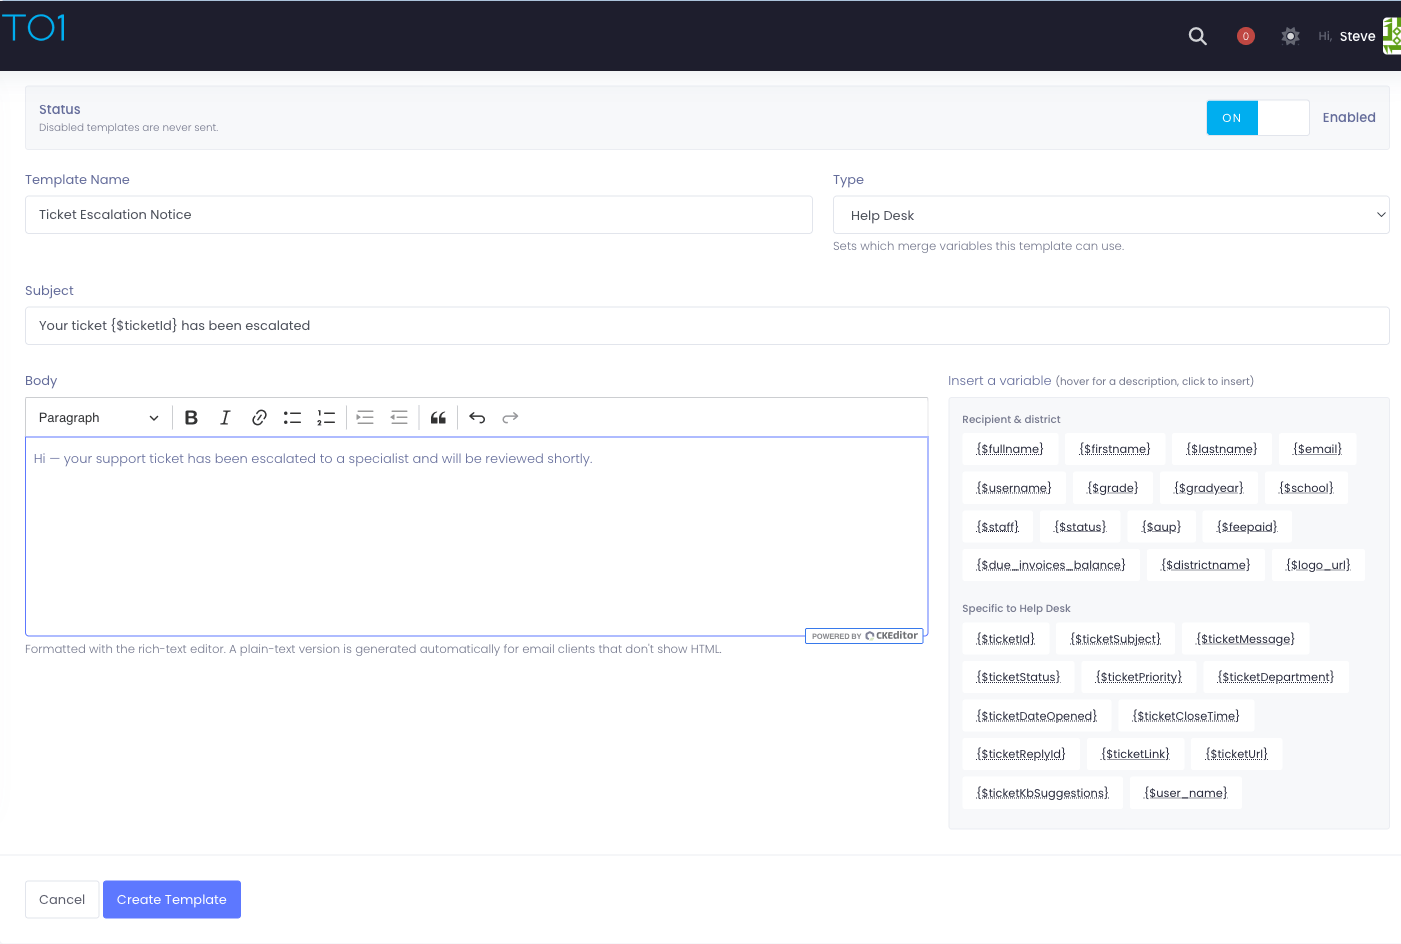
- Status - Use the toggle at the top to enable or disable the template. Disabled templates are never sent.
- Name - A label to identify the template (for example, "Overdue Device Alert"). Names must be unique.
- Type - The area this template belongs to. The type controls which merge variables are available, so choose the type that matches where you'll use the template. For example, choose Admin & Automation for a template you'll send from a Smart Rule or ticket workflow.
- Subject - The subject line recipients see. Merge variables are allowed here too.
- Body - The message content, written in the rich-text editor. The available merge variables are listed in the panel beside the editor, grouped by what they apply to — hover one to see what it inserts, then select it to drop it in at your cursor. A plain-text version of the email is generated automatically for recipients whose mail program doesn't display formatted messages.
- Select Create Template.
Your new template appears under its type, marked Custom, and becomes available wherever templates of that type can be selected.
You can change the type of your own custom templates, but built-in templates always keep their original type and name.
Deleting a custom template
To remove a custom template, select Delete next to it and confirm. Only custom templates can be deleted — built-in templates have no Delete option.
Editing an Email Template
To modify a template, select Edit next to the template you want to change. This opens an editor where you can update both the message content and supporting settings.
What You Can Edit
Email subject:
- Subject line that appears in recipient's inbox
- Can include merge fields for dynamic subject lines
- Example: "Invoice #$invoice_id from $districtname"
Email body:
- Main message content
- Switch between rich text and HTML views
- Insert merge fields for dynamic content
- Format with bold, lists, links, etc.
CC and BCC Recipients:
- Add email addresses to receive copies of this template's emails
- Note: Adding a CC or BCC address at the template level will force the recipient to be included any time that template is sent out
- If you wish to do this for ALL emails sent from Manage1to1, configure in the General Tab instead
Attachments:
- Upload files to include with every email sent from this template
- Common uses: District fee schedules, policy documents, instructional guides
- Multiple attachments can be added to a single template
Enable/Disable:
- Toggle template on or off
- Disabled templates don't send emails (useful for templates you don't want to use)
Merge Fields
Merge fields allow email content to adapt dynamically to each recipient. When an email is sent, these placeholders are replaced with real data from the system.
How merge fields work:
Template contains: "Dear $fullname, your invoice balance is $invoice_balance."
Email sent to parent: "Dear Jane Smith, your invoice balance is $125.00."
Common Merge Fields
The merge fields available depend on the template type and the action that triggered the email.
Invoice templates:
- $invoice_id - Invoice ID number
- $invoice_date - Date invoice was created
- $invoice_date_paid - Date invoice was paid
- $invoice_subtotal - Invoice subtotal amount
- $invoice_balance - Balance due on invoice
- $invoice_status - Current invoice status
- $invoice_items - Invoice line items (array)
- $invoice_html_contents - Invoice contents as HTML table
- $invoice_last_payment_amount - Last payment amount
- $invoice_last_payment_transid - Last payment transaction ID
- $invoice_previous_balance - User's previous balance
- $invoice_all_due_total - User's total balance
- $invoice_comments - Invoice comments
- $invoice_payment_link - Link for online payment
- $invoice_link - Link to view invoice (clickable)
User/student templates:
- $fullname - User's full name
- $firstname - User's first name
- $lastname - User's last name
- $email - User's email address
- $username - User's username
- $grade - Grade level
- $gradyear - Graduation year
- $aup - AUP status (Accepted/Not Accepted)
- $feepaid - Device fee status (Paid/Not Paid)
- $status - User status (Active/Inactive)
- $school - School/building name
- $staff - User type (Staff/Student)
- $appleid - Apple ID
- $due_invoices_balance - Unpaid invoice balance
Incident templates:
- $incident_id - Incident ID number
- $incident_date - Date incident occurred
- $incident_completed_date - Date incident was resolved
- $incident_device_serial - Device serial number
- $incident_device_asset - Device asset tag
Support ticket templates:
- $ticketId - Ticket ID number
- $ticketSubject - Ticket subject line
- $ticketMessage - Ticket message content
- $ticketStatus - Current ticket status
- $ticketPriority - Ticket priority level
- $ticketDateOpened - Date ticket was opened
- $ticketCloseTime - Time until auto-closure
- $ticketDepartment - Ticket department name
- $ticketUrl - Ticket URL
- $ticketLink - Link to view ticket (clickable)
Workflow Notification template: The Workflow Notification template is sent by the Notify admins workflow action. The merge fields available in this template are populated from the workflow rule and the matched ticket:
- $workflow_name - Name of the workflow rule that fired
- $ticket_tid - Ticket reference number
- $ticket_subject - Ticket title
- $ticket_priority - Ticket priority level
- $ticket_department - Ticket department name (or "—" if unscoped)
- $ticket_url - Deep link to the ticket profile
- $admin_first_name - Recipient admin's first name (per recipient)
- $admin_full_name - Recipient admin's full name
- $workflow_extra_block - HTML block containing the rule author's "additional context" note (empty when no extra context was supplied)
System-wide:
- $districtname - Your district name
- $date - Today's date
- $time - Current time
- $manage_url - Portal URL
- $manage_link - Clickable portal link
- $manage_admin_url - Admin area URL
- $manage_admin_link - Clickable admin area link
Viewing available merge fields: A list of available merge fields is displayed below the editor for each template. Click a merge field to insert it directly into the message body.
Conditional Logic in Templates
Email templates support conditional logic, which lets a single template show or hide sections of text depending on the data available when the email is sent.
What conditional logic does:
- Show or hide sections of text based on conditions
- Adjust messaging depending on available data
- Create flexible templates without duplicating content
Simple example:
{if $invoice_amount > 100}
This is a high-value invoice. Payment plans may be available.
{else}
Please submit payment at your earliest convenience.
{/if}
Common use cases:
- Show different text for students vs. staff
- Display a special message if an incident is damage vs. loss
- Include payment instructions only if an invoice is unpaid
- Adjust tone based on invoice status (1st notice vs. final notice)
Optional feature: Conditional logic is optional. Templates work perfectly well using merge fields alone, and conditional blocks are only needed for more complex scenarios.
Disabling Templates
In some cases, it may be desirable to prevent a specific email from being sent.
How to disable a template:
- Edit the template
- Mark it as disabled (toggle or checkbox)
- Save
What happens when disabled: The system will no longer send that email for any reason, until it is re-enabled.
Common reasons to disable:
- District prefers to handle certain communications outside of Manage1to1 (paper letters, phone calls)
- Template sends too frequently and annoys families
- District policy change makes template unnecessary
- Temporarily disable during testing or system changes
Example: District prefers to call parents about damage incidents rather than sending automated emails. Disable the "Incident Created" email template.
Template Updates
There are times in which Manage1to1 will update the default template, with new variables or a new look.
How template updates work:
If you have NOT modified the template:
- Manage1to1 will automatically overwrite and apply the update
- You receive improved template automatically
- No action needed
If you HAVE modified the template:
- Manage1to1 will NOT update your custom template
- Your customizations are preserved
- You must manually update if you want new features
Staying informed: Please see the Release Notes for any template changes that will be documented so you may manually update your customized templates.
Best practice: Review release notes quarterly to see if templates you've customized have received updates that you'd like to incorporate.
Best Practices for Email Templates
✅ Do:
- Keep templates clear and professional
- Test template changes by sending to yourself first
- Use merge fields instead of hardcoding names or amounts
- Include clear call-to-action (what parent should do)
- Provide contact information for questions
- Review templates annually for accuracy and tone
- Use conditional logic sparingly to maintain readability
❌ Don't:
- Remove merge fields unless you are certain they are not needed
- Make templates too long (families won't read lengthy emails)
- Use jargon or technical language parents won't understand
- Forget to test after making changes
- Hardcode information that should be dynamic
- Disable critical templates (invoice notifications, incident reports) without replacement communication method
- Over-complicate with excessive conditional logic
Common Email Template Use Cases
Customizing Invoice Email
District wants to add payment instructions to invoice emails:
- Open Settings and select the Email Templates card
- Find "Invoice Created" template (or similar)
- Click Edit
- In email body, add section:
Payment Options:
- Pay online at: https://district.manage1to1.com/portal
- Mail check to: District Office, 123 Main St, City, ST 12345
- Pay in person at your child's school office

Questions? Contact billing@district.edu
- Save
- Send test invoice to yourself to verify
Result: All invoice emails now include payment instructions.
Adding Fee Schedule Attachment
District wants to attach fee schedule PDF to all invoice emails:
- Edit "Invoice Created" template
- Click Add Attachment
- Upload "2024-25_Device_Fee_Schedule.pdf"
- Save
- All future invoice emails include PDF attachment
Result: Parents receive fee schedule with every invoice for reference.
Disabling Unnecessary Emails
District doesn't want automated ticket created emails (prefer phone calls):
- Find "Support Ticket Created" template
- Click Edit
- Set status to Disabled
- Save
Result: No automated emails sent when tickets are created.
Common Questions
Q: Can I create new email templates from scratch? Yes. Select New Template, give it a name, choose a type, and write the subject and body. Custom templates are available wherever templates of that type can be selected — for example, on a Smart Rule or ticket workflow notification.
Q: What happens if I delete a template? Only custom templates can be deleted. Deleting one removes it and stops any Smart Rule or workflow that used it from sending that message — those will fall back to the default. Built-in templates can't be deleted; contact Support to restore a built-in template's original content if needed.
Q: Can I send test emails to see how templates look? Yes. After editing, save the template and trigger the action (create a test invoice, etc.) or contact Support to manually send a test.
Q: How do I know which merge fields are available? They're listed below the template editor. Available fields depend on the template type and what data is accessible.
Q: What if I want different templates for different buildings? Email templates are district-wide by default. Building-specific templates require custom configuration - contact Manage1to1 Support to discuss options.
Q: Can parents reply to automated emails? Yes, if the reply-to address is configured in General Tab settings. Replies go to that inbox.
Q: What's the difference between template-level CC/BCC and General Tab CC/BCC?
- Template-level: Only for emails sent from that specific template
- General Tab: For ALL emails sent from Manage1to1 Use template-level for targeted notification needs.
Q: How do I restore a template to default if I messed it up? Contact Manage1to1 Support. They can restore the original default template.
Q: Can I use images in email templates? Rich text editor supports images. However, some email clients block images by default, so use sparingly and ensure text-only version is readable.
Q: Why isn't my template using the merge field I added?
- Verify correct merge field syntax (match exactly from list)
- Ensure merge field is available for that template type
- Check that data exists (e.g., $email only works if an email address is populated)
Email templates provide powerful automation for district communication while maintaining consistency and professionalism. Properly configured templates save staff time, ensure clear messaging, and support families with timely, relevant information.