Email Importing - Microsoft 365
Configure a Microsoft 365 (Outlook / Office 365) mailbox for Help Desk email importing using OAuth2 authentication.
This guide covers registering an app in the Azure Portal, granting the mailbox permissions, and authorizing the mailbox in Manage1to1 — the same way the Google connection works, using your own Microsoft app registration.
To configure Microsoft OAuth email importing, you need the Manage Settings permission assigned to your role in Manage1to1, plus access to the Azure Portal for your Microsoft 365 tenant.
Overview
Manage1to1 can connect to a Microsoft 365 mailbox using OAuth2 for help desk email importing. This is used only for the ticketing system — to import inbound messages and convert them into tickets or ticket replies.
OAuth2 is required for Microsoft 365 because Microsoft has retired basic authentication (username and password) for Outlook mail protocols. Connecting with OAuth also avoids storing a mailbox password and works with your tenant's security controls.
Why connect Microsoft 365 with OAuth:
- Required by Microsoft - Basic authentication is disabled for Outlook IMAP/POP/SMTP
- Enhanced security - No password storage in Manage1to1
- MFA compatibility - Works with Microsoft 365 multi-factor authentication
- Token-based access - Access can be revoked without changing the mailbox password
Email importing is used only for the help desk ticket system. It does not change how Manage1to1 sends outbound emails to administrators or end users.
Before you start
You will need:
- Access to the Azure Portal for your Microsoft 365 tenant
- A Microsoft 365 mailbox to use for the department
- Your Manage1to1 tenant URL
- The OAuth2 callback URL shown in Manage1to1 under the department configuration
If you have multiple departments with different Microsoft 365 addresses, each department must be authorized separately. Each mailbox generates its own connection token.
Step 1: Register an application in Azure
- Sign in to the Azure Portal.
- Open Microsoft Entra ID, then App registrations (this link opens the list directly).
- Click New registration.
- Give it a name that clearly identifies the purpose, for example:
Manage1to1 Help Desk Importing. - Under Supported account types, choose the option that matches your organization (single-tenant is typical for a single district).
Step 2: Add the redirect URI from Manage1to1
- During registration (or afterward, under Authentication), add a Web platform.
- Set the Redirect URI to the OAuth2 Callback URL shown in Manage1to1:
Navigate to Settings, then Help Desk Settings, then Help Desk Departments. Open a department (or create one), set Intake Mode to Custom Mailbox (POP / IMAP) in the Inbound Mail section, then choose the Microsoft provider and OAuth2 as the authentication method. The OAuth2 Callback URL appears alongside these mailbox settings — it is hidden while the department is set to Forwarded Address.
The redirect URI must match exactly. Any mismatch will prevent authorization and the connection token will not be generated.
Step 3: Grant mailbox permissions
- In your app registration, open API permissions.
- Click Add a permission, then choose APIs my organization uses and select Office 365 Exchange Online.
- Choose Delegated permissions and add:
IMAP.AccessAsUser.AllPOP.AccessAsUser.AllSMTP.Send
- Save the permissions.
These permissions let Manage1to1 read the mailbox to import messages and send replies. They apply only to the mailbox that signs in during authorization.
Step 4: Create a client secret
- Open Certificates & secrets.
- Create a New client secret and set an expiration that fits your renewal schedule.
- Copy the secret Value immediately — it is only shown once.
After this step you will have:
- Application (client) ID
- Client secret value
Keep both available. You will enter them into Manage1to1.
Microsoft caps client secret lifetimes (24 months maximum). When the secret expires, email importing stops with no warning — the department simply stops pulling in tickets. Note the expiration date you chose and set a calendar reminder a couple of weeks ahead to create a fresh secret and update it in Manage1to1. See the FAQ below for how to renew.
Step 5: Configure Microsoft importing in the department
In Manage1to1:
- Go to Settings, then Help Desk Settings, then Help Desk Departments.
- Create a new department or edit an existing one.
- In the Inbound Mail section, set Intake Mode to Custom Mailbox (POP / IMAP).
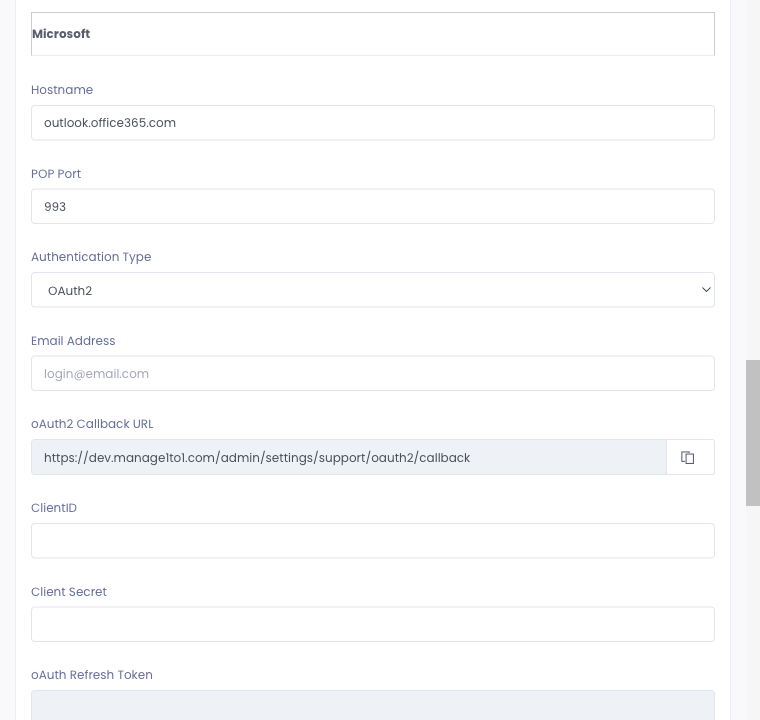
- In the Mail Server Information area, select Microsoft as the provider. The hostname and port fill in automatically.
- Select OAuth2 as the authentication method.
- Enter:
- The Microsoft 365 address that will receive department emails
- The Application (client) ID
- The client secret value
The Mail Server Information area is hidden while a department is set to the default Forwarded Address intake mode. You must first set Intake Mode to Custom Mailbox (POP / IMAP) (step 3 above) — the provider, authentication, and OAuth fields only appear in that mode.
At this point, the connection token field should still be empty.
Step 6: Authorize the mailbox
- Click Authorize.
- When prompted by Microsoft, sign in with the same mailbox account being configured.
If you are signed into multiple Microsoft accounts, the most common failure here is authorizing the wrong account. The token that comes back only works for the account you authorized.
- Approve access when Microsoft requests permissions.
Step 7: Confirm the connection token is generated
After authorization completes successfully, Manage1to1 will populate the connection token field automatically.
If the token field remains blank after authorization, importing will not work. The most common causes are a redirect URI mismatch, missing API permissions, or authorizing the wrong Microsoft account.
Step 8: Save settings and validate
- Click Save Settings.
- Manage1to1 will re-test the configuration during save.
If validation fails:
- Confirm the redirect URI matches exactly in the Azure Portal
- Confirm the Application (client) ID and client secret are correct
- Confirm the delegated Exchange Online permissions were added
- Confirm the authorized Microsoft account matches the mailbox entered in the department
- Repeat the authorization step if needed
Once saved successfully, Manage1to1 will begin importing mail for that department on its normal interval.
Testing Microsoft OAuth Importing
After configuration, verify email importing works correctly:
- Send a test email to the department mailbox from an external account
- Wait for the import cycle (5-15 minutes typically)
- Check Help Desk for a new ticket matching the test email subject
- Reply to the ticket through the Manage1to1 interface
- Reply again by email from the original sender to confirm the reply is appended to the same ticket
If the test ticket is not created:
- Verify the import cycle has run (wait 15-20 minutes)
- Check the mailbox via Outlook on the web to confirm the test email arrived
- Verify the connection token field is populated in the department configuration
- Confirm the Exchange Online delegated permissions were added and saved
- Re-authorize if the token field is blank
Common Questions
Q: Why can't I just use a username and password? Microsoft has disabled basic authentication for Outlook IMAP, POP, and SMTP. OAuth is the supported way to connect a Microsoft 365 mailbox.
Q: Do I need a separate app registration for each department? No. One app registration can support multiple departments. However, each department mailbox must be authorized separately to generate its own token.
Q: What permissions does Manage1to1 request from Microsoft? Delegated Exchange Online access to read the mailbox (IMAP/POP) and send replies (SMTP), for the mailbox that signs in during authorization.
Q: Can I revoke access after configuration? Yes. Remove the app's permissions or delete the app registration in the Azure Portal, or reset the mailbox credentials. Importing will stop. To restore importing, re-authorize the mailbox in Manage1to1.
Q: Can I use a shared mailbox or a distribution list? Use a real, licensed Microsoft 365 mailbox that can sign in during authorization. Distribution lists don't support the mailbox sign-in OAuth requires.
Q: Importing worked for months, then suddenly stopped. Why? The most common cause is an expired client secret. Microsoft client secrets have a maximum lifetime of 24 months, and when one lapses, token refresh fails and importing stops silently. In the Azure Portal, open your app registration's Certificates & secrets to check the expiration. Create a new secret, then follow the renewal steps below.
Q: How do I update the client ID or secret after initial setup? In the Azure Portal, create a new client secret under Certificates & secrets and copy its Value. Then in Manage1to1, edit the department configuration, update the field(s), re-authorize the mailbox (this generates a new token), and save. The new credentials take effect on the next import cycle.