User Rostering
The User Rostering section, found under Settings → Rostering & SIS, controls how Manage1to1 connects to a roster source to synchronize buildings, students, and staff automatically.
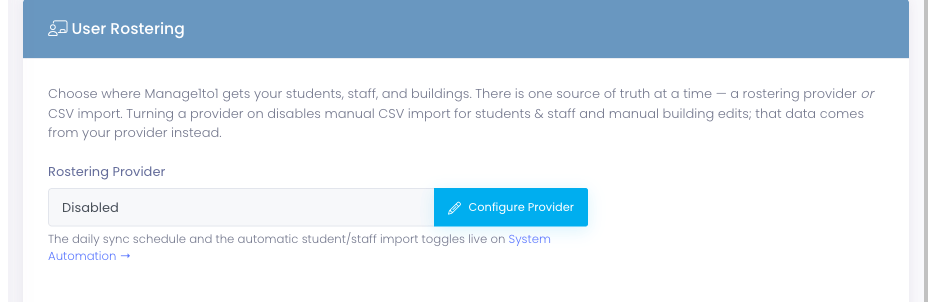
When enabled, your roster source becomes the authoritative source for that data within Manage1to1, allowing districts to keep roster information aligned with their SIS while reducing manual maintenance. The daily sync schedule and the automatic import toggles live on Settings → System Automation.
To access the User Rostering section, you need the Manage Settings permission assigned to your role.
Enabling OneRoster changes how Manage1to1 handles roster data. CSV imports for students and staff will be disabled and data will come from your OneRoster provider instead.
Understanding OneRoster Integration
Think of OneRoster as automated data sync between your SIS and Manage1to1 - instead of manually importing CSV files, Manage1to1 connects directly to your SIS platform and pulls roster updates automatically.
What OneRoster does:
- Imports and maintains buildings automatically
- Synchronizes students and staff daily
- Keeps enrollment and associations up to date
- Eliminates manual CSV imports
Why OneRoster matters:
- Accuracy - Roster data always matches SIS
- Efficiency - No manual CSV exports or imports
- Real-time - Changes in SIS appear in Manage1to1 within 24 hours
- Reliability - Standardized integration reduces import errors
What OneRoster is: OneRoster is an industry-standard specification for securely exchanging roster data between systems. Student Information Systems like Infinite Campus and identity platforms like ClassLink support OneRoster, allowing Manage1to1 to consume data using a consistent, secure API.
Important Behavior Changes
Once OneRoster is enabled, certain Manage1to1 features are intentionally restricted to prevent data conflicts.
What changes after enabling OneRoster:
- Buildings - Added/updated based on OneRoster data, not manual entry
- Students - Imported from OneRoster provider, CSV imports disabled
- Staff - Imported from OneRoster provider, CSV imports disabled
- Automation - OneRoster sync runs at configured daily automation time
Data flow:
SIS → OneRoster Provider → Manage1to1
Before enabling: Carefully review existing data to ensure alignment. If Manage1to1 is already in use, existing buildings must match the building identifiers your OneRoster provider will send.
Building Alignment Requirement
When enabling OneRoster on an existing system, the OneRoster School Building sourcedId value must match the Building SIS field in Manage1to1.
Why this matters:
- Students are associated with buildings based on the building identifier
- If building identifiers don't match, students will be ignored during sync
- Misalignment causes import failures and data gaps
How to ensure alignment:
- Review building identifiers in your SIS
- Confirm building SIS IDs in Manage1to1 match SIS identifiers
- Update Manage1to1 buildings if needed before enabling OneRoster
- Run building synchronization to confirm alignment
Example:
- SIS building code:
HS-001 - Manage1to1 Building SIS field:
HS-001✅ (matches) - OneRoster sends students with building
HS-001 - Students correctly associated with building
Mismatch example:
- SIS building code:
001 - Manage1to1 Building SIS field:
HS-001❌ (doesn't match) - OneRoster sends students with building
001 - Students ignored because building
001doesn't exist in Manage1to1
Initial Synchronization Process
Step 1: Configure OneRoster Provider
Before synchronization can begin, configure your OneRoster provider (ClassLink, Infinite Campus, etc.) in the User Rostering section.
Configuration requirements:
- Provider selection (ClassLink, Infinite Campus, etc.)
- Provider-specific credentials (Client ID, Secret, URLs)
- Test connection to verify configuration
Provider-specific setup:
- ClassLink Integration Guide
- Infinite Campus Integration Guide
- PowerSchool Integration Guide, native PowerSchool plugin with full field + photo access
- Standard OneRoster Integration Guide, for Veracross, Skyward, Aeries, Blackbaud, PowerSchool's OneRoster endpoint, and any other OneRoster-compliant SIS
Step 2: Building Synchronization
After connecting a OneRoster provider, a one-time building synchronization is required. This step establishes the building structure that all future user imports depend on.
What building sync does:
- Imports all buildings from OneRoster provider
- Creates new buildings that don't exist in Manage1to1
- Updates existing buildings with matching SIS IDs
- Establishes foundation for user synchronization
How to run building sync:
- Navigate to
Settings > Rostering & SISand find the User Rostering section - Click Sync Buildings (or similar)
- Wait for synchronization to complete
- Review results to confirm all buildings imported correctly
Important: Building synchronization must be completed successfully before student or staff synchronization will function as expected.
Troubleshooting: If buildings don't import, verify OneRoster provider configuration and check that provider has access to building data.
Step 3: User Synchronization
Once buildings are synchronized, an initial user synchronization can be performed. Depending on district size, this process may take some time.
What user sync does:
- Imports students from OneRoster provider
- Imports staff from OneRoster provider
- Associates users with buildings based on building alignment
- Creates new accounts and updates existing accounts
How to run user sync:
- Ensure building sync completed successfully
- Click Sync Users (or similar) in User Rostering section
- Wait for synchronization to complete (may take 5-30 minutes for large districts)
- Review completion message to confirm success
During this process:
- Students and staff are imported from the OneRoster source
- Associations are established based on building alignment
- Completion messaging indicates when the process has finished
Watching progress:
The sync runs in the background, so you can leave the page and come back without stopping it. While it runs, the User Rostering section shows live progress:
- The stage it is on (students first, then staff)
- A moving progress bar while records are being imported
- Running totals of how many records have been processed, newly created, and updated

When the sync finishes, the display switches to a completion summary showing how many accounts were created and updated. Large districts should expect longer sync times.
Ongoing Automation
After the initial sync, Manage1to1 continues to synchronize data automatically based on the schedule configured in the Automation Settings tab.
How ongoing automation works:
- OneRoster sync runs at configured daily automation time (e.g., 2:00 AM)
- Manage1to1 pulls latest roster data from OneRoster provider
- New users are created, existing users are updated
- Users missing from OneRoster are marked inactive (if configured)
Requirements for ongoing automation:
- OneRoster must remain enabled in User Rostering section
- Automated imports must be enabled in Automation Settings tab
- OneRoster provider must remain accessible (credentials valid, API functioning)
Manual synchronization: You can also initiate synchronization manually from the User Rostering section when needed:
- Use case: SIS data changed and you want immediate sync instead of waiting for nightly automation
- How: Click Sync Now (or similar) in User Rostering section
A manual sync runs in the background with the same live progress display shown during the initial sync, so you can start it and carry on with other work while it finishes.
Choosing Which Roles Sync
Your roster source labels each person with a role (for example Teacher, Administrator, Aide for staff; Parent, Guardian, Relative for family members). By default, Manage1to1 imports the roles most districts share, but some districts publish staff such as aides or administrators, or family members as guardians rather than parents, and those wouldn't come across.
You can control exactly which roles are imported under Settings → Automation Settings:
- Staff Roles to Sync: choose any of Administrator, Teacher, Aide, Proctor.
- Guardian Roles to Sync: choose any of Parent, Guardian, Relative.
If someone appears in your roster source but isn't showing up in Manage1to1, check that their role is selected here. Leave a selection empty to keep the standard default for your provider.
This applies to roster-source syncs (OneRoster, ClassLink, Infinite Campus). PowerSchool imports all active staff regardless of this setting.
Switching Providers
Moving to a different roster source, manual CSV/sFTP to a provider, or one OneRoster provider to another, is a supported, self-service change. The one thing that matters is aligning your building identifiers first, so existing schools aren't duplicated and their students aren't orphaned: providers identify each school by its sourcedId, which usually won't match the codes already on your buildings.
Switching Your Roster Source is the full walkthrough, how to pre-align building IDs before you switch, and how to use Preview Building Match to see exactly what a sync will do before anything is written.
Supported OneRoster Providers
Manage1to1 supports multiple OneRoster providers. Provider-specific configuration steps and requirements may vary.
Available providers:
- ClassLink - Third-party identity and roster platform
- Infinite Campus - Student Information System with native OneRoster support
- PowerSchool - Native PowerSchool plugin (PowerQuery) with full field access and student photos; PowerSchool's OneRoster endpoint is also supported via the Standard provider
- Standard OneRoster - Connect any OneRoster-compliant SIS directly (Veracross, Skyward, Aeries, Blackbaud, and more), with one-click presets for common vendors
Choosing a provider: If your district uses ClassLink or Infinite Campus, select the matching dedicated provider. For any other OneRoster-compliant SIS, use the Standard OneRoster provider and pick your vendor from its preset list. Follow the provider-specific documentation for detailed setup instructions.
Best Practices
✅ Do:
- Verify building alignment before enabling OneRoster
- Run initial building sync before user sync
- Test with small building or subset of users if possible
- Monitor sync logs after enabling automation
- Document which OneRoster provider you're using
❌ Don't:
- Enable OneRoster without verifying building SIS IDs match
- Skip building synchronization and go straight to user sync
- Switch providers without contacting Support first
- Disable automation without understanding impact (roster will stop updating)
- Assume sync failures will resolve on their own (investigate immediately)
Common Questions
Q: Can I use OneRoster and CSV imports at the same time? No. Once OneRoster is enabled, CSV imports for students and staff are disabled. OneRoster becomes the exclusive source for roster data.
Q: What happens if OneRoster sync fails? Sync failures are logged and previous data remains unchanged. Sync will retry at next scheduled automation time. Review logs to diagnose issue (credentials expired, provider API down, etc.).
Q: Can I manually add students if OneRoster is enabled?
You can still do this when OneRoster is active, however it is not recommended since OneRoster is the authoritative source. If you must create users manually, you would need to disable the option in Automation Settings labeled Automatically Mark Missing Students as Inactive.
Q: How long does initial user sync take? Depends on district size. Small districts (1500 students): 2-5 minutes. Large districts (10000+ students): 15-30 minutes. Progress indicators display during sync.
Q: What if a student is in Manage1to1 but not in OneRoster? If "Automatically Mark Missing Students as Inactive" is enabled in Automation Settings, the student will be marked inactive. Otherwise, student remains active but won't receive updates.
Q: Can I preview what will be imported before running sync? Yes, Preview Building Match (on the User Rostering page, next to Synchronize Buildings) connects to your provider and shows exactly how each incoming school will resolve, matched by ID, linked by name, or created new, without saving anything. See Switching Your Roster Source.
Q: Does OneRoster import guardians? Typically no. OneRoster focuses on buildings, students, and staff. Guardian data is usually imported via CSV separately.
Q: Can I disable OneRoster after enabling it? Yes. Set the Rostering Provider back to Manual CSV / sFTP; your buildings and people stay as they are and automated syncing simply stops. See Switching Your Roster Source.
The User Rostering section provides powerful SIS integration for districts that want automated roster synchronization. Proper configuration and building alignment ensure reliable, accurate data flow between your SIS and Manage1to1.