ClassLink Integration
Manage1to1 integrates with ClassLink using the OneRoster standard to synchronize buildings, students, and staff automatically.
ClassLink acts as the authoritative rostering source once enabled, allowing Manage1to1 to automatically stay aligned with your district's SIS data without manual imports.
To configure ClassLink integration, you need the Manage Settings permission assigned to your role.
Understanding ClassLink Integration
Think of ClassLink as the bridge between your SIS and Manage1to1 - ClassLink pulls roster data from your Student Information System and provides it to Manage1to1 using the OneRoster standard.
What ClassLink integration does:
- Imports buildings from ClassLink roster server
- Synchronizes students and staff automatically
- Eliminates manual CSV imports
- Keeps Manage1to1 aligned with your SIS daily
Why use ClassLink:
- Single Sign-On - If district already uses ClassLink for SSO, roster data is already available
- Standardized - ClassLink supports OneRoster specification natively
- Certified - Manage1to1 is a certified vendor on ClassLink's Rostering Platform
- Automated - Daily sync keeps data current without manual exports
Overview
ClassLink is a third-party platform that provides roster data to downstream systems using the OneRoster specification. Manage1to1 is a certified vendor on ClassLink's Rostering Platform and consumes roster data directly from the ClassLink API.
How it works:
Your SIS → ClassLink → Manage1to1
When this integration is enabled:
- Buildings are sourced from ClassLink
- Students and staff are synchronized automatically
- Manual CSV-based imports are disabled
- OneRoster becomes the exclusive roster source
Step 1: Authorize Manage1to1 in Your ClassLink Roster Server
Before Manage1to1 can pull any data, you enable it as an application inside your own ClassLink OneRoster portal (the Roster Server in the ClassLink Management Console) and choose which schools and fields to share. This step is completed entirely within ClassLink and requires ClassLink administrator access — it does not touch Manage1to1 yet.
The person who administers your district's ClassLink OneRoster tenant. If your Manage1to1 administrator is not also a ClassLink administrator, hand this section to whoever manages ClassLink for your district.
1a. Sign in to your ClassLink OneRoster portal
- Go to your district's ClassLink Management Console and sign in as an administrator.
- Open Roster Server (this is ClassLink's OneRoster portal — depending on your console it may appear as Roster Server or OneRoster).
- Open the Applications area, where every vendor you share roster data with is listed.
1b. Enable Manage1to1 as an application
Manage1to1 is a certified vendor on ClassLink's Rostering Platform, so you don't create anything from scratch — you enable the existing application.
- Search the ClassLink application library for Manage1to1.
- Add it to your applications (or open it if it's already listed).
- Set the application's status to enabled / allowed so it is permitted to request data.
Contact ClassLink support (or Manage1to1 Support) and ask them to make the Manage1to1 rostering application available for your tenant. This is a one-time step on ClassLink's side.
1c. Choose which schools to share
ClassLink lets you scope each application to specific organizations. On the Manage1to1 application:
- Share the schools (buildings) that will use Manage1to1 — typically all schools in the district.
- Sharing every school up front avoids students being skipped later because their building wasn't included. You can always narrow the scope afterward.
1d. Follow the prompts to select the recommended fields to send
ClassLink walks you through a data-sharing / privacy step where you choose exactly which fields (attributes) are shared with Manage1to1. Follow the prompts and make sure the fields Manage1to1 relies on are included. At minimum, share:
Schools / Organizations
- School name
- School identifier (
sourcedId) — this is what Manage1to1 matches buildings on - School number / SIS ID
Students
- First name and last name
- Student identifier (
sourcedId) and SIS ID - Username and/or email address
- Grade level
- Enrollments (which school each student belongs to)
- Status (active / inactive)
Staff
- First name and last name
- Staff identifier (
sourcedId) and SIS ID - Username and/or email address
- Role (Teacher, Administrator, Aide, etc.)
- School association
- Status (active / inactive)
Sharing the standard set of roster fields above gives Manage1to1 everything it needs and keeps future features working without another trip back to ClassLink. Manage1to1 only reads the fields it uses and ignores the rest, so there is no downside to including the full recommended set. If ClassLink offers a "recommended" or "default" sharing profile for the application, that profile is a safe choice.
Even after you share staff and guardian roles from ClassLink, you decide which of those roles actually import under Settings → Automation Settings (see Choosing Which Roles Sync). Sharing a role in ClassLink makes it available; the Manage1to1 setting controls whether it's imported.
1e. Save, and note your Tenant ID
- Save / apply the sharing configuration in ClassLink.
- Note your district's Tenant ID — you'll enter it in Manage1to1 in Step 2. It's shown in your Roster Server configuration and can also be provided by your ClassLink administrator.
Documentation: ClassLink maintains its own official support articles for enabling applications and configuring sharing rules in Roster Server. If a screen differs from what's described here, follow ClassLink's guidance for that screen — the goal is the same: Manage1to1 enabled, your schools shared, and the recommended roster fields turned on.
Step 2: Enabling ClassLink in Manage1to1
Once access has been granted in ClassLink, the provider can be configured in Manage1to1 from the User Rostering section under Settings → Rostering & SIS.
How to configure:
- Navigate to
Settings > Rostering & SISand find the User Rostering section - Click Configure Provider to open the Update Rostering Provider dialog
- Set Rostering Provider to ClassLink
- Enter your district's Tenant ID (obtained from the ClassLink portal)
- Click Test Configuration to validate
- Click Save once validation succeeds
What you'll need:
- Tenant ID — Your district's unique ClassLink identifier (obtained from the ClassLink portal)
About the other two fields: The dialog also shows ClassLink App ID and ClassLink Authentication Token. You do not fill these in — they are automatically obtained upon Tenant ID validation. Leave them blank and click Test Configuration; when validation succeeds, Manage1to1 fills them in for you.
Configuration validation: At a high level, this configuration involves:
- Selecting ClassLink as the OneRoster provider
- Supplying your district's Tenant ID
- Verifying connectivity before activation
Test configuration: The test verifies that Manage1to1 can successfully connect to ClassLink's OneRoster API using your Tenant ID and that permissions are correctly configured.
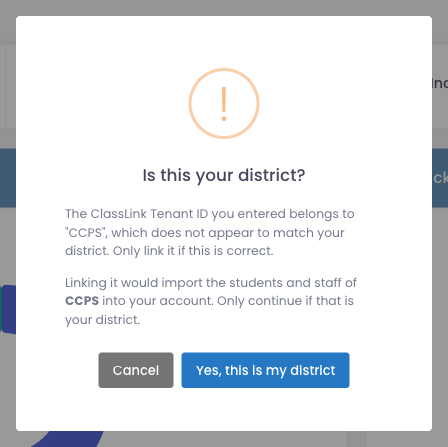
District verification: Because a ClassLink Tenant ID is not private, Manage1to1 confirms the Tenant ID you enter actually belongs to your district before it will pull any roster data. When you test the configuration:
- If the district name ClassLink returns for that Tenant ID does not obviously match your Manage1to1 account, you are asked to confirm it is really your district before continuing.
- If the Tenant ID is already linked to a different Manage1to1 district, it is refused. Contact Manage1to1 Support if you believe this is a mistake.
This protects every district from accidentally, or intentionally, linking the wrong Tenant ID and importing another district's students and staff.
If Test Configuration returns:
Validation Error: Unable to validate Tenant ID. Please ensure the Tenant ID is correct or try again later
the most common cause is not a wrong Tenant ID — it's that Manage1to1 hasn't been enabled or shared with in your ClassLink Roster Server yet. Even with the correct Tenant ID, ClassLink won't return the App ID and Authentication Token until your tenant is sharing data with the Manage1to1 application.
Before assuming the ID is wrong, go back to Step 1 and confirm, in ClassLink:
- Manage1to1 is enabled/allowed as an application (Step 1b).
- Your schools are shared with it (Step 1c).
- The recommended fields are shared (Step 1d).
- The configuration was saved in ClassLink (Step 1e).
Sharing changes in ClassLink can take a few minutes to take effect, so if you just saved them, wait a moment and click Test Configuration again. Only after confirming all of the above should you re-check the Tenant ID itself for typos.
If test fails:
- Confirm Manage1to1 is enabled and sharing your schools and the recommended fields in your ClassLink Roster Server (Step 1) — this is the most common cause of the validation error above
- Verify the Tenant ID is correct (copy/paste to avoid typos)
- If sharing was just changed in ClassLink, wait a few minutes and test again
- Contact Manage1to1 Support if issues persist
After the configuration is validated, Manage1to1 will be ready to synchronize buildings and users from ClassLink.
Step 3: Initial Synchronization
After enabling the ClassLink provider, perform initial synchronization to import buildings and users.
Building Synchronization
Run building synchronization first to import all buildings from ClassLink.
How to run:
- In User Rostering section, click Sync Buildings
- Wait for synchronization to complete
- Review results to confirm all buildings imported
What this does:
- Imports buildings from ClassLink Roster Server
- Creates new buildings in Manage1to1
- Establishes foundation for user imports
Important: Building sync must complete successfully before running user sync.
User Synchronization
After buildings are synchronized, run initial user synchronization to import students and staff.
How to run:
- Ensure building sync completed successfully
- Click Sync Users in User Rostering section
- Wait for synchronization to complete (may take several minutes)
- Review results to confirm students and staff imported
What this does:
- Imports students from ClassLink
- Imports staff from ClassLink
- Associates users with buildings
- Creates user accounts in Manage1to1
Step 4: Enable Ongoing Automation
After initial synchronization succeeds, enable automated imports to keep data synchronized daily.
How to enable:
- Navigate to
Settings > System Automation > Automation Settingstab - Ensure Enable Automatic Student Import is enabled
- Ensure Enable Automatic Staff Import is enabled
- Verify Default Daily Automation Time is configured
- Save settings
What this does:
- OneRoster sync runs automatically at configured time (e.g., 2:00 AM)
- Students and staff data updates daily
- New users are created, existing users are updated
- Changes in ClassLink appear in Manage1to1 within 24 hours
Ongoing maintenance: Once configured, ClassLink integration runs automatically. No manual intervention needed for daily operations.
Best Practices
✅ Do:
- Test configuration before running initial sync
- Run building sync before user sync
- Monitor initial sync to confirm success
- Enable ongoing automation after successful initial sync
- Review sync logs periodically to catch failures
❌ Don't:
- Skip building sync and go straight to user sync
- Disable automation without understanding impact
- Change Tenant ID without consulting ClassLink administrator
- Remove Manage1to1 from ClassLink approved applications while integration is active
Common Questions
Q: Where do I find my ClassLink Tenant ID? Your ClassLink administrator can provide the Tenant ID. It's also visible in ClassLink Roster Server configuration when Manage1to1 is added as an approved application.
Q: Test Configuration says "Unable to validate Tenant ID" — what does that mean? Despite the wording, this usually means Manage1to1 isn't being shared with in ClassLink yet, not that the Tenant ID is wrong. ClassLink only returns the App ID and Authentication Token once your tenant is enabled and sharing data with the Manage1to1 application. Confirm Step 1 is complete — application enabled, schools shared, recommended fields shared, and saved in ClassLink — then wait a few minutes and test again. Only if that's all correct should you re-check the Tenant ID for typos.
Q: The ClassLink App ID and Authentication Token fields are blank — what do I put there? Nothing. Leave them empty. They are filled in automatically when Tenant ID validation succeeds. If they stay blank after testing, validation didn't succeed — see the question above.
Q: Which fields should I share with Manage1to1 in ClassLink? Share the standard OneRoster roster fields — school name and identifiers, and for students and staff their names, identifiers, username/email, grade level or role, school association, and status. See Step 1d for the full recommended list. If ClassLink offers a default or recommended sharing profile for the Manage1to1 application, that profile is a safe choice. Manage1to1 only reads the fields it needs and ignores the rest.
Q: Students or staff are missing after sync — what should I check first? Confirm that, in your ClassLink Roster Server, the Manage1to1 application is sharing the school those people belong to and that their role and status fields are included in the sharing configuration. A school or field that wasn't shared in ClassLink is the most common reason records don't appear.
Q: Why was I asked to confirm my district when testing the Tenant ID? Manage1to1 checks that the Tenant ID you entered belongs to your district by comparing the district name ClassLink returns against your account. If they do not obviously match (for example, your ClassLink name is an acronym like "CCPS"), you are asked to confirm before continuing. This keeps districts from accidentally linking the wrong Tenant ID. If a Tenant ID is already in use by another district, it is refused entirely.
Q: What if my ClassLink sync fails? Check that Manage1to1 is still enabled as an application in ClassLink and that its school and field sharing haven't been changed or revoked. Review sync logs for specific error messages. Contact Support if issue persists.
Q: Can I use ClassLink for SSO and roster sync? Yes. Many districts use ClassLink for both single sign-on authentication and roster synchronization.
Q: How often does ClassLink sync with Manage1to1? Daily, at the configured automation time in Automation Settings. You can also trigger manual sync from the User Rostering section.
Q: What happens if I remove Manage1to1 from ClassLink approved applications? OneRoster sync will fail. Manage1to1 roster data will become stale until access is restored and sync resumes.
Q: Does ClassLink import guardians? Typically no. OneRoster focuses on buildings, students, and staff. Guardian data is usually imported via CSV separately.
Q: Can I switch from ClassLink to another OneRoster provider? Yes, it's a supported, self-service change. Align your building identifiers first so schools aren't duplicated. See Switching Your Roster Source.
ClassLink integration provides reliable, automated roster synchronization for districts already using ClassLink for identity management or single sign-on. Proper configuration ensures daily data sync with minimal maintenance required.