PowerSchool Integration
Manage1to1 connects to PowerSchool to roster students, staff, and guardians automatically, replacing the manual export of students.csv / staff.csv files and keeping up with mid-year enrollment changes on its own.
PowerSchool districts have two ways to connect, depending on what your PowerSchool administrator enables. Pick one.
Which path should I use?
| PowerSchool plugin (native) | OneRoster endpoint | |
|---|---|---|
| Provider to choose | PowerSchool (PowerQuery) | Standard OneRoster → PowerSchool preset |
| Setup | Upload a plugin to PowerSchool's Plugin Console | Your PowerSchool admin turns on the OneRoster option |
| Reach | Full PowerSchool data, custom fields and extension tables | Only the fields PowerSchool maps into OneRoster |
| Best when | You want the richest field access | You'd rather not upload a plugin |
This page covers the native plugin path. For the OneRoster path, choose the Standard OneRoster provider and select PowerSchool from its vendor dropdown, no plugin upload required.
To configure the integration in Manage1to1 you need the Manage Settings permission. To install the plugin in PowerSchool you need PowerSchool District/System Administrator access.
How the plugin works
The Manage1to1 plugin is a small, read-only package you install in PowerSchool once. It requests view-only access to a minimum set of roster fields and registers a handful of saved queries that Manage1to1 runs on its sync schedule.
PowerSchool (your roster) → Manage1to1
When this integration is enabled:
- Buildings, students, and staff come from PowerSchool
- Manual CSV imports for students and staff are disabled
Step 1: Download the plugin from Manage1to1
- In Manage1to1, navigate to
Settings > Rostering & SISand find the User Rostering section - Click Configure Provider
- Select PowerSchool (PowerQuery) as the provider
- Click Download plugin (.zip)
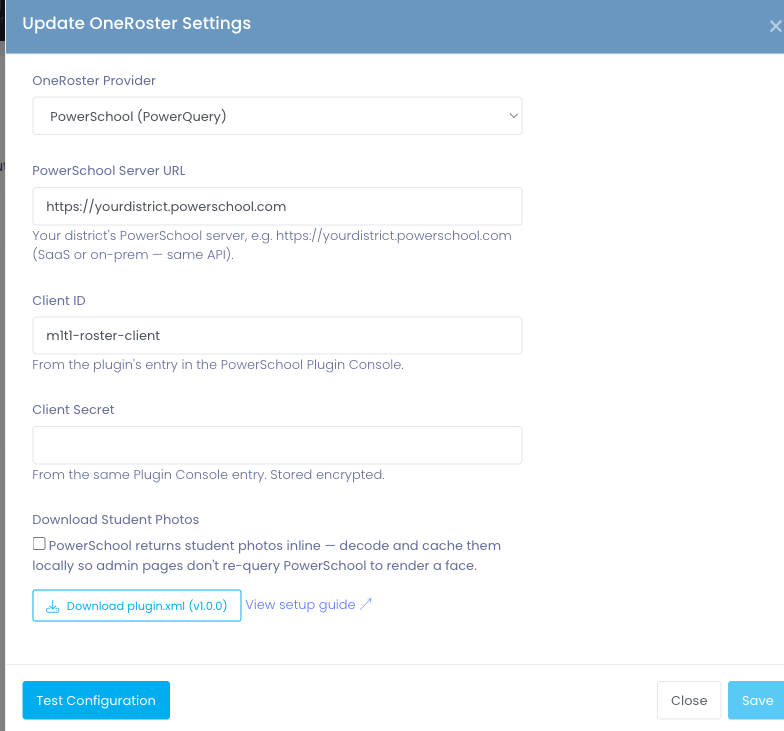
Keep the downloaded .zip file handy, you'll upload it to PowerSchool in the next step.
Upload the .zip exactly as downloaded, don't unzip it. Some browsers (Safari, for example) may extract it automatically; if that happens, use the original .zip file rather than the extracted folder, or PowerSchool will reject the install.
Step 2: Install the plugin in PowerSchool
This step happens entirely inside PowerSchool and requires District/System Administrator access.
- In PowerSchool, go to
System > System Settings > Plugin Management Configuration - Click Install
- Choose the
.zipfile you downloaded from Manage1to1 (upload it as-is, keep it zipped) - After it installs, enable the plugin
- When PowerSchool asks you to review the requested data access, approve it, the plugin only requests view-only access to the roster fields it needs
- Confirm Customization is turned on at
System > System Settings > Customization(see the warning below)
PowerSchool only lets a plugin's data queries run when Customization is turned on for your server (System > System Settings > Customization). If it's off, the plugin still installs and issues credentials, but every roster sync will fail, so if your connection test doesn't succeed even though your Client ID and Secret are correct, this is the first thing to check.
Manage1to1 occasionally ships an updated plugin, for example to roster more of your buildings (including administrative and district offices) or additional fields. When that happens, Manage1to1 flags it on the PowerSchool provider screen. To pick up the update, re-download the .zip (Step 1) and install it again in PowerSchool (Step 2), keeping it zipped. PowerSchool will then ask you to re-confirm the plugin's data access, review and approve it to keep rostering running.
Step 3: Generate the connection credentials
Once the plugin is enabled, PowerSchool can issue the credentials Manage1to1 uses to connect.
- Open the installed Manage1to1 plugin in PowerSchool
- Open its Data Provider Configuration (the OAuth / credentials area)
- PowerSchool displays a Client ID and Client Secret, copy both
These are the only two secrets you'll paste into Manage1to1. Treat the Client Secret like a password.
Step 4: Connect Manage1to1 to PowerSchool
Back in the Manage1to1 OneRoster settings (still on PowerSchool (PowerQuery)):
- PowerSchool Server URL, your district's PowerSchool web address (for example
https://yourdistrict.powerschool.com) - Client ID, from Step 3
- Client Secret, from Step 3
- Click Test Configuration
- Save once the test succeeds
Test Configuration confirms Manage1to1 can reach PowerSchool and that the plugin and credentials are working. A success message reports how many schools PowerSchool returned.
If the test fails:
- HTTP 401, the Client ID or Secret is wrong, or the plugin isn't enabled in PowerSchool.
- HTTP 403, the plugin's data access wasn't approved. Re-open the plugin in PowerSchool and confirm the access request.
- HTTP 404, the Server URL is wrong, or the installed plugin is out of date.
Step 5: Building Alignment
As with every roster source, the school identifier PowerSchool sends must match the Building SIS field in Manage1to1, or students attached to that school are skipped during sync. Review your buildings before the first user sync, see the User Rostering overview for the full building-alignment walkthrough.
Step 6: Initial Sync and Ongoing Automation
After the connection test succeeds, run the initial sync from the User Rostering section:
- Sync Buildings first, imports your schools and establishes the building structure user imports depend on.
- Sync Users next, imports students and staff. Large districts should expect this to take several minutes.
Then enable automated imports so the roster stays current:
- Navigate to
Settings > System Automation > Automation Settings - Ensure Enable Automatic Student Import and Enable Automatic Staff Import are on
- Confirm the Default Daily Automation Time
- Save
From then on, Manage1to1 pulls the latest roster from PowerSchool each day, new users are created and existing users updated automatically.
User sync relies on buildings already existing in Manage1to1. Always complete a successful building sync before syncing users.
Best Practices
✅ Do:
- Install the plugin and generate credentials before configuring Manage1to1
- Run Test Configuration before syncing
- Verify building alignment before the first user sync
- Re-approve the plugin's access when PowerSchool prompts after an update
❌ Don't:
- Skip building sync and go straight to user sync
- Share the Client Secret outside your IT team
- Run PowerSchool roster sync and CSV imports at the same time, pick one source of truth
Common Questions
Q: What's the difference between this and the OneRoster option? The native PowerSchool plugin reaches the full PowerSchool dataset, custom fields and extension tables. The OneRoster option (via the Standard OneRoster provider with the PowerSchool preset) only sees the fields PowerSchool maps into OneRoster and needs no plugin upload. Use whichever your PowerSchool administrator prefers.
Q: Do I have to upload the plugin every year? No. Install it once. You'll only re-confirm access if a future Manage1to1 release updates the plugin.
Q: Is the plugin read-only? Yes. It requests view-only access and only reads roster data. Manage1to1 never writes back to PowerSchool.
Q: My district's PowerSchool URL is different from the example. That's fine, enter your district's actual PowerSchool address. The example is only a placeholder.
Q: Does it import guardians? Yes, when your PowerSchool maintains contact records. Guardian completeness depends on what your district keeps in PowerSchool.
Q: Can I switch from PowerSchool to another roster source later? Yes, it's a supported, self-service change. The key is aligning your building identifiers first so schools aren't duplicated. See Switching Your Roster Source.
The PowerSchool integration brings automated rostering to one of the most common SIS platforms in K-12, install once, connect, and let the nightly sync keep your roster current.