Standard OneRoster Integration
The Standard OneRoster provider connects Manage1to1 to any OneRoster-compliant Student Information System using the standard OAuth2 connection that the OneRoster specification defines.
Where the ClassLink and Infinite Campus providers are tuned for one specific platform, the Standard provider is vendor-agnostic: if your SIS publishes a OneRoster API, you can point Manage1to1 at it directly — no middleware required.
To configure the Standard provider, you need the Manage Settings permission assigned to your role.
The SIS Vendor dropdown pre-fills the OneRoster version and scope values for common platforms, so most districts only need to paste in a URL and credentials. Choose your vendor before filling anything else in.
When to Use the Standard Provider
Use the Standard provider when your SIS supports OneRoster but isn't ClassLink or Infinite Campus — for example:
- Veracross
- PowerSchool
- Skyward
- Aeries
- Blackbaud
…or any other system that exposes a OneRoster 1.1 or 1.2 REST API secured with OAuth2 client credentials. If your platform isn't listed, choose Other / Generic and fill in the values your vendor provides.
How it works:
Your SIS (OneRoster API) → Manage1to1
When this integration is enabled:
- Buildings, students, and staff are sourced from your SIS
- Data synchronizes automatically on the daily schedule
- Manual CSV-based imports for students and staff are disabled
What You'll Need From Your SIS
Before you start, gather the following from your SIS vendor or your SIS administrator. Every OneRoster platform provides these — the labels each vendor uses may differ slightly.
| Value | What it is |
|---|---|
| Base URL | The web address of your SIS's OneRoster REST service. It usually ends in /ims/oneroster/v1p1 or /ims/oneroster/v1p2. |
| Token URL | The address Manage1to1 uses to request a secure access token. |
| Client ID | The identifier for the connection your SIS issues to Manage1to1. |
| Client Secret | The password that pairs with the Client ID. Treat it like any other credential. |
| OneRoster Version | Whether your SIS publishes OneRoster 1.1 or 1.2. Your vendor's documentation states this. |
| Scope (sometimes) | A permission string some vendors require. Many don't — leave it blank unless your vendor specifies one. |
Manage1to1 only ever reads roster data. If your SIS lets you scope the credential to read-only roster access, do so — it's the safest configuration.
Step 1: Create the Connection in Your SIS
In your SIS's administration area, create a new OneRoster (or "API client" / "OAuth client") connection for Manage1to1. The exact location varies by vendor, but you're looking for the area that issues OneRoster API credentials.
When you create it, your SIS gives you the Client ID, Client Secret, Base URL, and Token URL listed above. Keep them handy for the next step.
Each vendor documents this step in its own admin portal. When you pick your vendor from the SIS Vendor dropdown in Manage1to1, a View setup guide link appears that points to the matching instructions for that platform.
Step 2: Configure the Standard Provider in Manage1to1
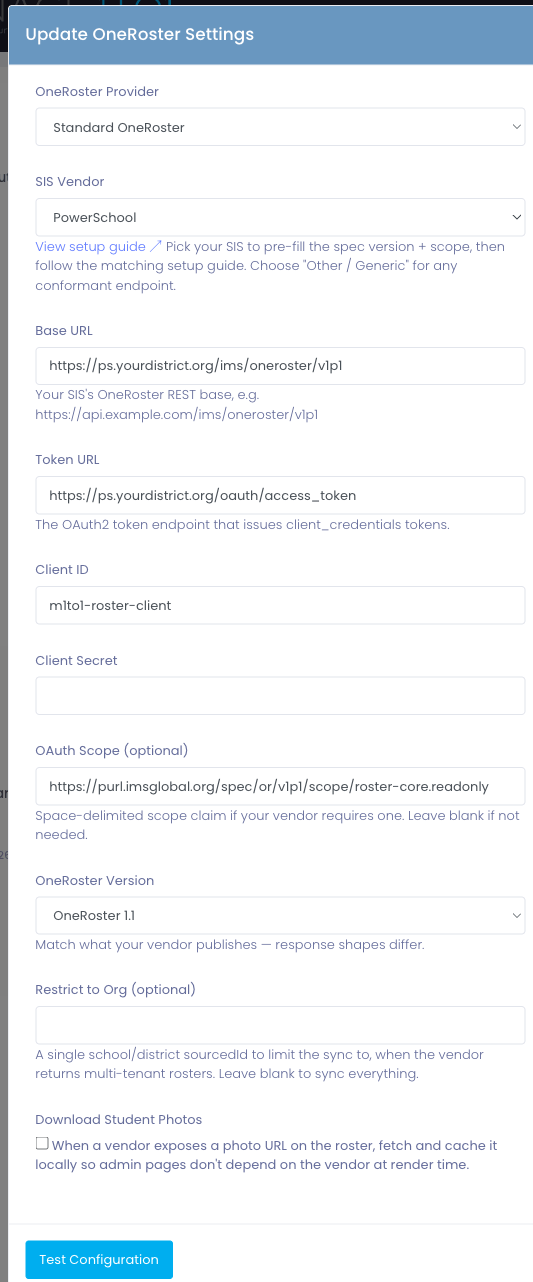
- Navigate to
Settings > Rostering & SISand find the User Rostering section - Click Configure Provider
- Select Standard OneRoster as the provider
- Choose your platform from the SIS Vendor dropdown — this pre-fills the OneRoster Version and Scope for you
- Paste in your Base URL and Token URL
- Enter your Client ID and Client Secret
- Confirm the OneRoster Version matches what your vendor publishes
- (Optional) Set Restrict to Org if you only want to sync a single school or district
- (Optional) Turn on Download Student Photos if your SIS exposes photos and you want them pulled into Manage1to1
- Click Test Configuration to verify connectivity
- Save the configuration once the test succeeds
Field reference
| Field | Notes |
|---|---|
| SIS Vendor | A convenience picker. Choosing a vendor pre-fills the version and scope; it doesn't lock you in — you can still adjust any field afterward. |
| Base URL | The OneRoster REST base from your SIS. A trailing slash is fine. |
| Token URL | The OAuth2 token endpoint from your SIS. |
| Client ID / Client Secret | The credentials your SIS issued for Manage1to1. |
| OAuth Scope (optional) | Leave blank unless your vendor requires a specific scope string. |
| OneRoster Version | Must match your vendor's published version — response formats differ between 1.1 and 1.2. |
| Restrict to Org (optional) | A single school or district identifier to limit the sync. Leave blank to sync everything the credential can see. |
| Download Student Photos | When on, and when your SIS publishes a photo for a student, the photo is fetched and stored in Manage1to1. |
Test configuration
The Test Configuration button asks your SIS for a token and reads a single organization back. A success message confirms Manage1to1 can reach your SIS and that the credentials and scope are correct.
If the test fails:
- "Invalid credentials" — double-check the Client ID and Client Secret (copy/paste to avoid typos), and confirm the Token URL is correct.
- "Insufficient scope" — your vendor requires a scope string you haven't supplied, or the connection in your SIS wasn't granted roster read access.
- "Endpoint not found" — the Base URL or OneRoster Version is wrong. Confirm whether your vendor publishes 1.1 or 1.2 and that the URL points at the OneRoster service.
Step 3: Building Alignment
As with every OneRoster provider, the School Building identifier your SIS sends must match the Building SIS field in Manage1to1, or students attached to that building are skipped during sync.
Review your buildings before the first user sync. See the User Rostering overview for the full building-alignment walkthrough and examples.
Step 4: Initial Synchronization
After the connection test succeeds, run the initial sync from the User Rostering section.
Building Synchronization
Run Sync Buildings first. This imports your schools from the SIS and establishes the building structure that user imports depend on.
User Synchronization
Once buildings are in place, run Sync Users to import students and staff. Large districts should expect this to take several minutes.
User synchronization relies on buildings already existing in Manage1to1. Always complete a successful building sync before syncing users.
Step 5: Enable Ongoing Automation
After the initial sync succeeds, enable automated imports so the data stays current:
- Navigate to
Settings > System Automation > Automation Settingstab - Ensure Enable Automatic Student Import is enabled
- Ensure Enable Automatic Staff Import is enabled
- Verify Default Daily Automation Time is set
- Save settings
From then on, Manage1to1 pulls the latest roster from your SIS each day at the configured time — new users are created and existing users are updated automatically.
Best Practices
✅ Do:
- Pick your vendor from the SIS Vendor dropdown before filling anything else in
- Use a read-only roster credential where your SIS allows it
- Confirm the OneRoster Version matches your vendor's documentation
- Verify building alignment before the first user sync
- Run Test Configuration before syncing
❌ Don't:
- Guess at the OneRoster Version — a mismatch causes confusing sync results
- Add a Scope value unless your vendor specifically requires one
- Skip building sync and go straight to user sync
- Switch providers after going live without contacting Support first
Common Questions
Q: My SIS isn't in the vendor dropdown. Can I still connect it? Yes. Choose Other / Generic and fill in the Base URL, Token URL, credentials, and OneRoster Version your vendor provides. The dropdown is only a convenience for pre-filling common values.
Q: Do I have to use the vendor preset? No. The preset just fills in the version and scope for you. Every field stays editable afterward, so you can override anything the preset sets.
Q: What's the difference between this and the ClassLink or Infinite Campus providers? ClassLink and Infinite Campus are dedicated providers tuned to those platforms' specifics. The Standard provider speaks the plain OneRoster standard, so it works with any compliant SIS — including those two if you'd rather configure them manually.
Q: Where do I get the Client ID and Secret? From your SIS. You create a OneRoster (or API client) connection for Manage1to1 inside your SIS's administration area, and it issues the credentials.
Q: Does the Standard provider import guardians? Manage1to1 reads guardian records when your SIS publishes them on the OneRoster feed. Availability and completeness of guardian data depend entirely on what your SIS exposes.
Q: Will student photos come across? Only if your SIS publishes a photo for the student on its roster feed and you've turned on Download Student Photos. Not every SIS exposes photos through OneRoster.
Q: Can I limit the sync to one school? Yes. Put that school's identifier in the Restrict to Org field. Leave it blank to sync everything the credential can access.
The Standard OneRoster provider opens automated rostering to districts on any compliant SIS. Pick your vendor, paste in the connection details, test, and sync — the same reliable daily roster flow, without being tied to a specific platform.