Inventory Settings
The Inventory Settings page is the single place where district administrators configure how devices are categorized, what models you carry, what statuses you use to track devices, and the district-wide rules that govern inventory behavior.
Inventory configuration used to live under System Settings → Inventory. It now has its own top-level Inventory Settings page, with a new Categories tab on top that lets you build a nested category tree above your device models. Renaming a model — or moving it to a different category — never breaks historical incident, invoice, or ticket links.
You need the Manage Settings permission to open Inventory Settings.
Opening Inventory Settings
From the main menu, click Settings. On the Settings page, click the Inventory Settings tile.
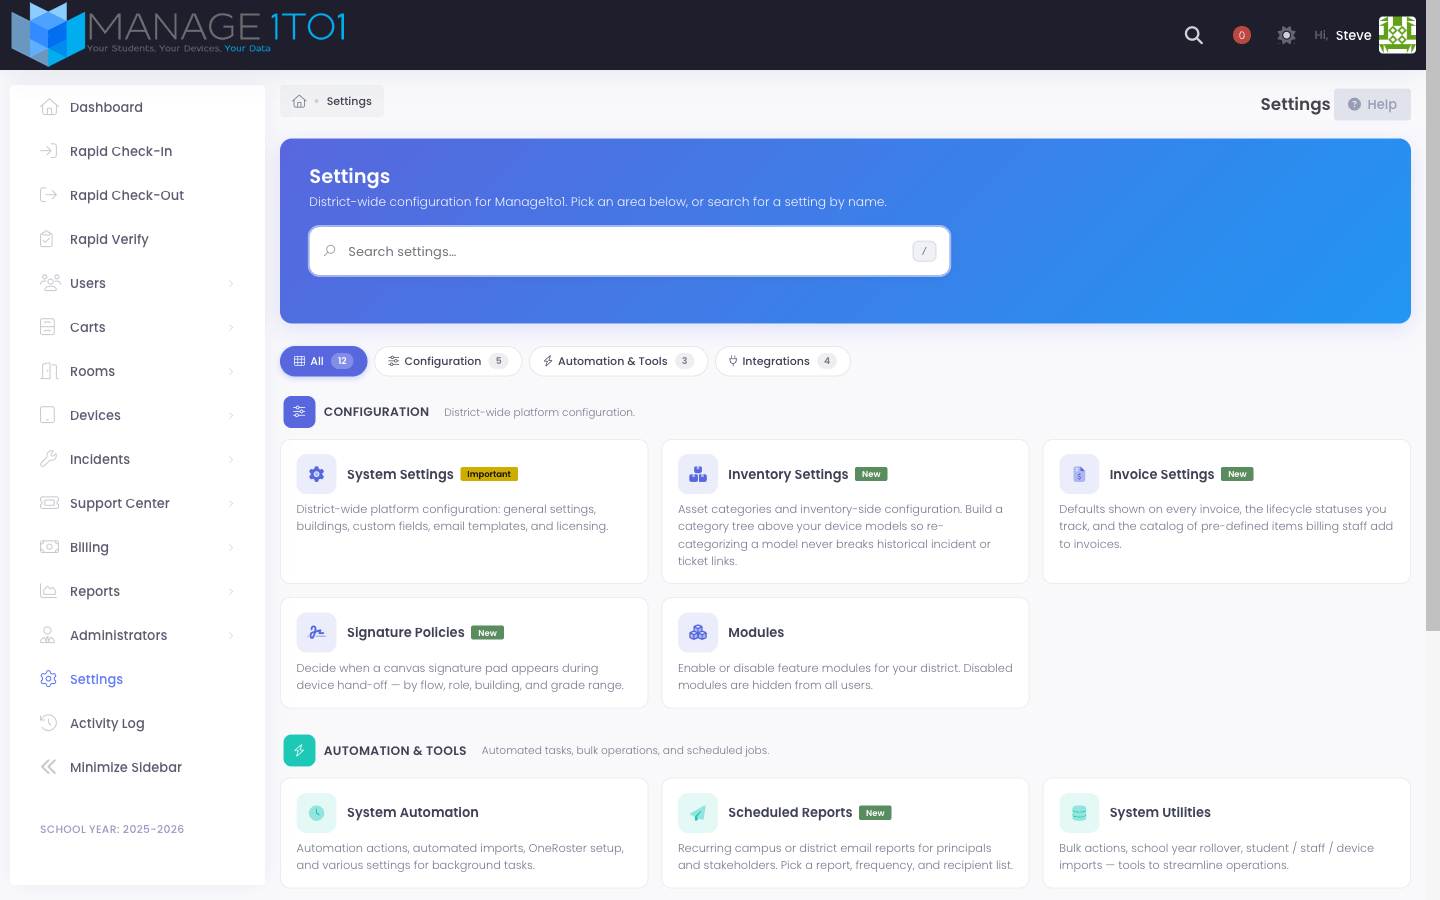
The page opens with several tabs across the top: Categories, Device Models, Device Status, Insurance (if enabled), Device Cases (if enabled), and Settings. Each is described below.
Categories tab
The Categories tab is the new home for your asset category tree. Categories sit above device models and let you group inventory the way your district actually thinks about it — for example, an Interactive Display category that holds every brand and model of classroom panel.

How categories work
- Every device model belongs to exactly one category.
- Categories can nest under other categories (Laptop → Chromebook, for example).
- Reports and the device list let you filter by category — picking Laptop automatically includes every model whose category sits anywhere under Laptop in the tree.
- Categories within a level always sort alphabetically. There is no manual ordering.
Adding a category
Click Add Category in the top right of the Categories tab.
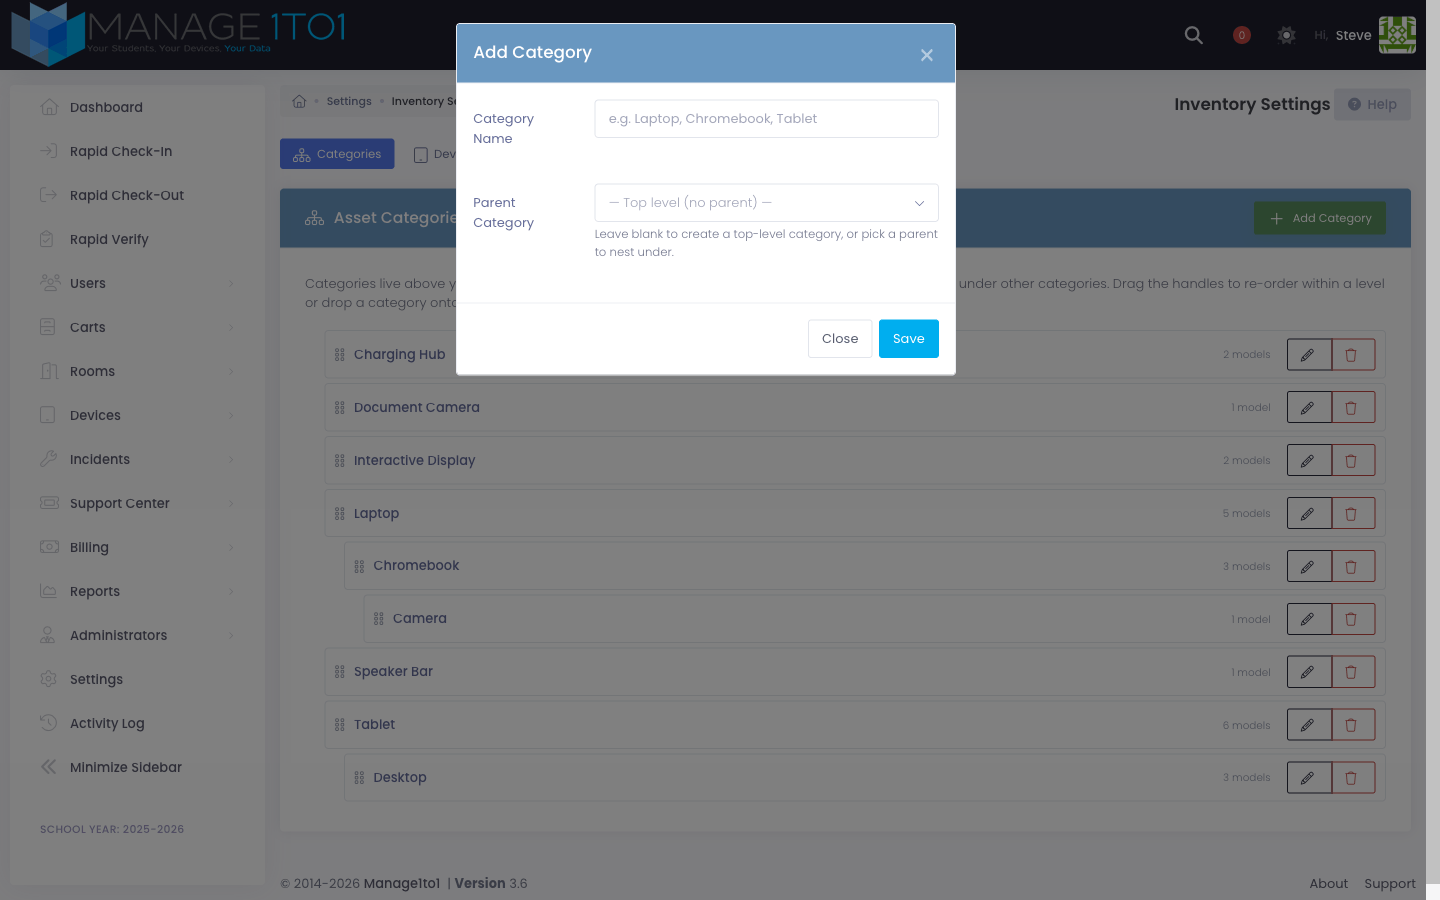
Enter a Category Name (for example, "Tablet" or "Charging Hub"). Optionally pick a Parent Category to nest the new category under an existing one. Leave Parent Category blank to create a top-level category. Click Save.
Editing a category
Click the pencil icon next to a category. The same modal opens, pre-filled with the current values. Change the name or the parent and click Save.
The Parent Category dropdown automatically excludes the category you're editing and any of its descendants — those would create circular nesting.
Re-nesting by drag and drop
Grab the handle on the left of any row and drag the category onto another category to nest it underneath. A dashed drop zone appears under every parent while you drag, labeled with the full path so you always know where the dropped category will land — for example, Drop here to nest under Laptop / Chromebook.
After you drop, the page updates immediately and the category log records the move (for example, "Camera moved from top level to Chromebook").
Deleting a category
Click the trash icon next to a category and confirm in the popup.
A category can only be deleted when it has no child categories and no device models assigned to it. Re-assign the affected models to a different category first, or delete child categories from the bottom up.
Device Models tab
The Device Models tab lists every device model your district stocks. Each row shows the category, brand, model, supplier, visibility, and actions.
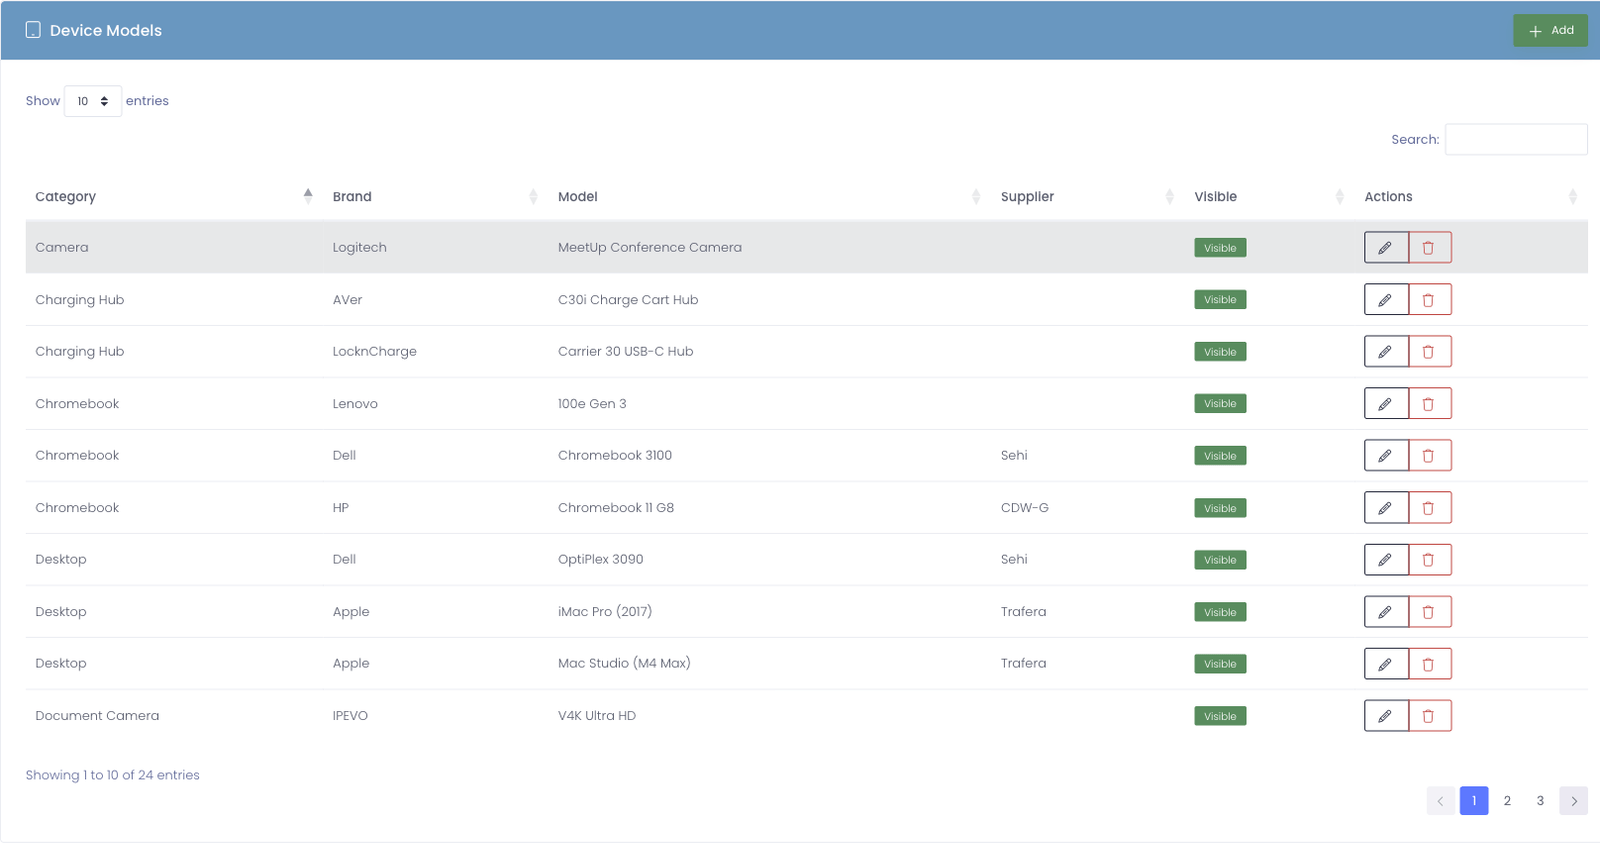
Click Add in the top right to create a new model. The Add Device Model modal asks for the category, brand, model name, supplier, price, and a Visible toggle. Categories you've defined on the Categories tab appear in the dropdown; you can also type a new category name to create it inline.
Use the pencil icon to edit a row; use the trash icon to delete it.
A model can only be deleted when no devices are assigned to it.
Device Status tab
The Device Status tab lists every status you use to track devices through their lifecycle — for example, Active, Loaner, Storage, Retired.
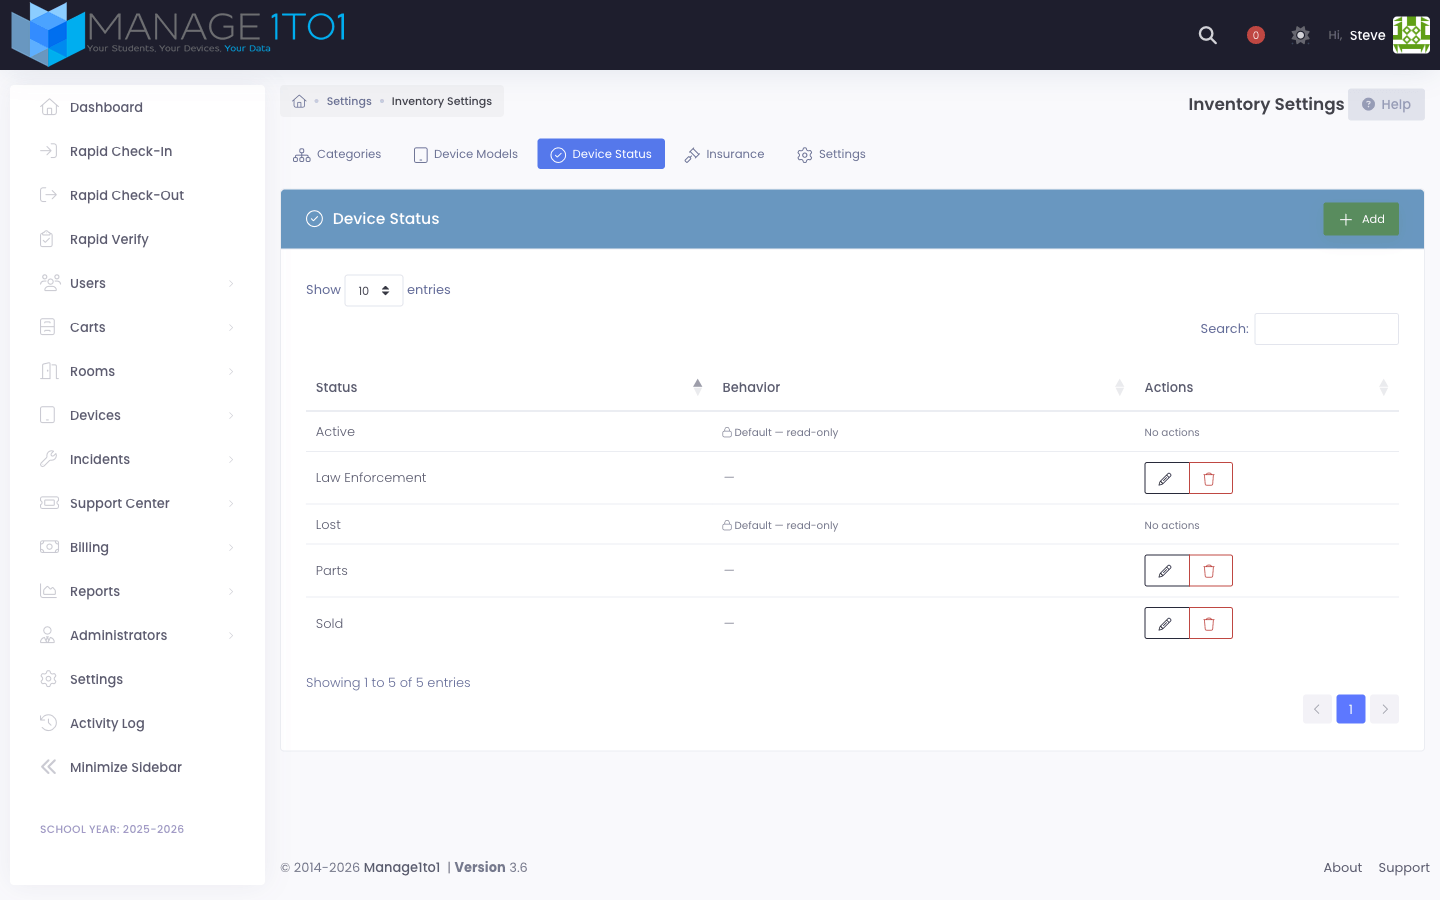
Click Add to create a new status. Each status has:
- Name — what it's called, shown on the device list, filters, and reports.
- Auto-Hide — when enabled, devices set to this status are automatically hidden from the active device list. Useful for terminal statuses like Retired or Disposed.
The default status (typically Active) is read-only and cannot be edited or deleted.
A status can only be deleted when no devices are using it.
Insurance tab
The Insurance tab appears when the Insurance module is enabled. It lists every insurance policy your district offers — including the per-term offerings sold each year (for example, AppleCare+ 2025-2026 and AppleCare+ 2026-2027 are separate policies so historical claim counts and revenue stay tied to the year they were sold).

Click Add to create a new policy. Disabling a policy hides it from the user and device forms without touching historical insurance records.
A policy can only be deleted when no enrollments reference it.
Creating or editing a policy
The policy editor exposes every dial you'd typically need to model a real-world device protection plan:
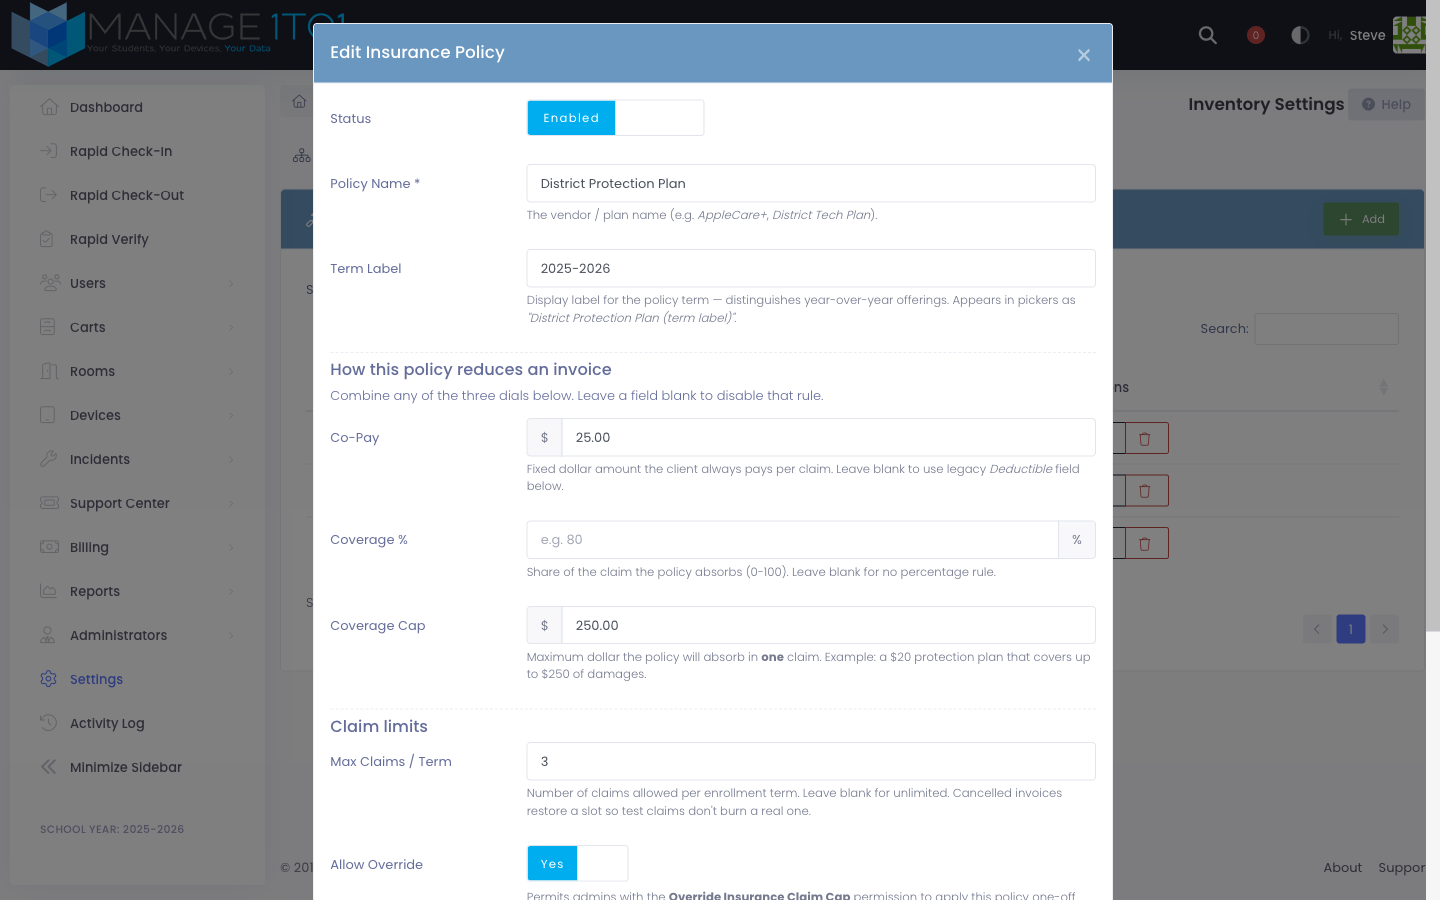
Identification
- Policy Name — the vendor / plan name (e.g. AppleCare+, District Tech Plan).
- Term Label — display label that disambiguates year-over-year offerings (e.g. 2025-2026). Pickers show the policy as "Policy Name (Term Label)".
How this policy reduces an invoice
Combine any of the three financial dials below. Leave a field blank to disable that rule.
- Co-Pay — fixed dollar amount the client always pays per claim.
- Coverage % — share (0–100) of the claim that the policy absorbs.
- Coverage Cap — maximum dollar amount the policy will absorb in one claim. Example: a $20 protection plan that covers up to $250 of damages — the policy absorbs up to $250 per claim, and the client owes any excess.
When more than one dial is set, the math applies in this order: percentage → cap → co-pay floor. See Insurance on Invoices for worked examples.
Claim limits
- Max Claims / Term — number of claims allowed per enrollment term. Leave blank for unlimited. Cancelled invoices restore a slot so test claims don't burn a real one.
- Allow Override — when on, an administrator with the Override Insurance Claim Cap permission can bypass the cap on a per-invoice basis. Strict contracts (for example, AppleCare+) should leave this off. Overrides are audit-logged on the invoice along with the acting administrator.
Billing integration
- Enrollment Invoice Item — the billing item charged to the client when they enroll in this policy (the annual premium). Pick from your existing invoice items, or leave blank if enrollment doesn't generate an invoice.
Device Cases tab
The Device Cases tab appears when the Cases module is enabled. It lists every case (sleeve, bumper, charging case, etc.) you stock and assign to devices.
Click Add to create a new case. Each case has a brand and a type/model — for example, "Brenthaven" / "Edge 360".
Settings tab
The Settings tab houses the district-wide inventory configuration that doesn't fit into the catalog tabs above.
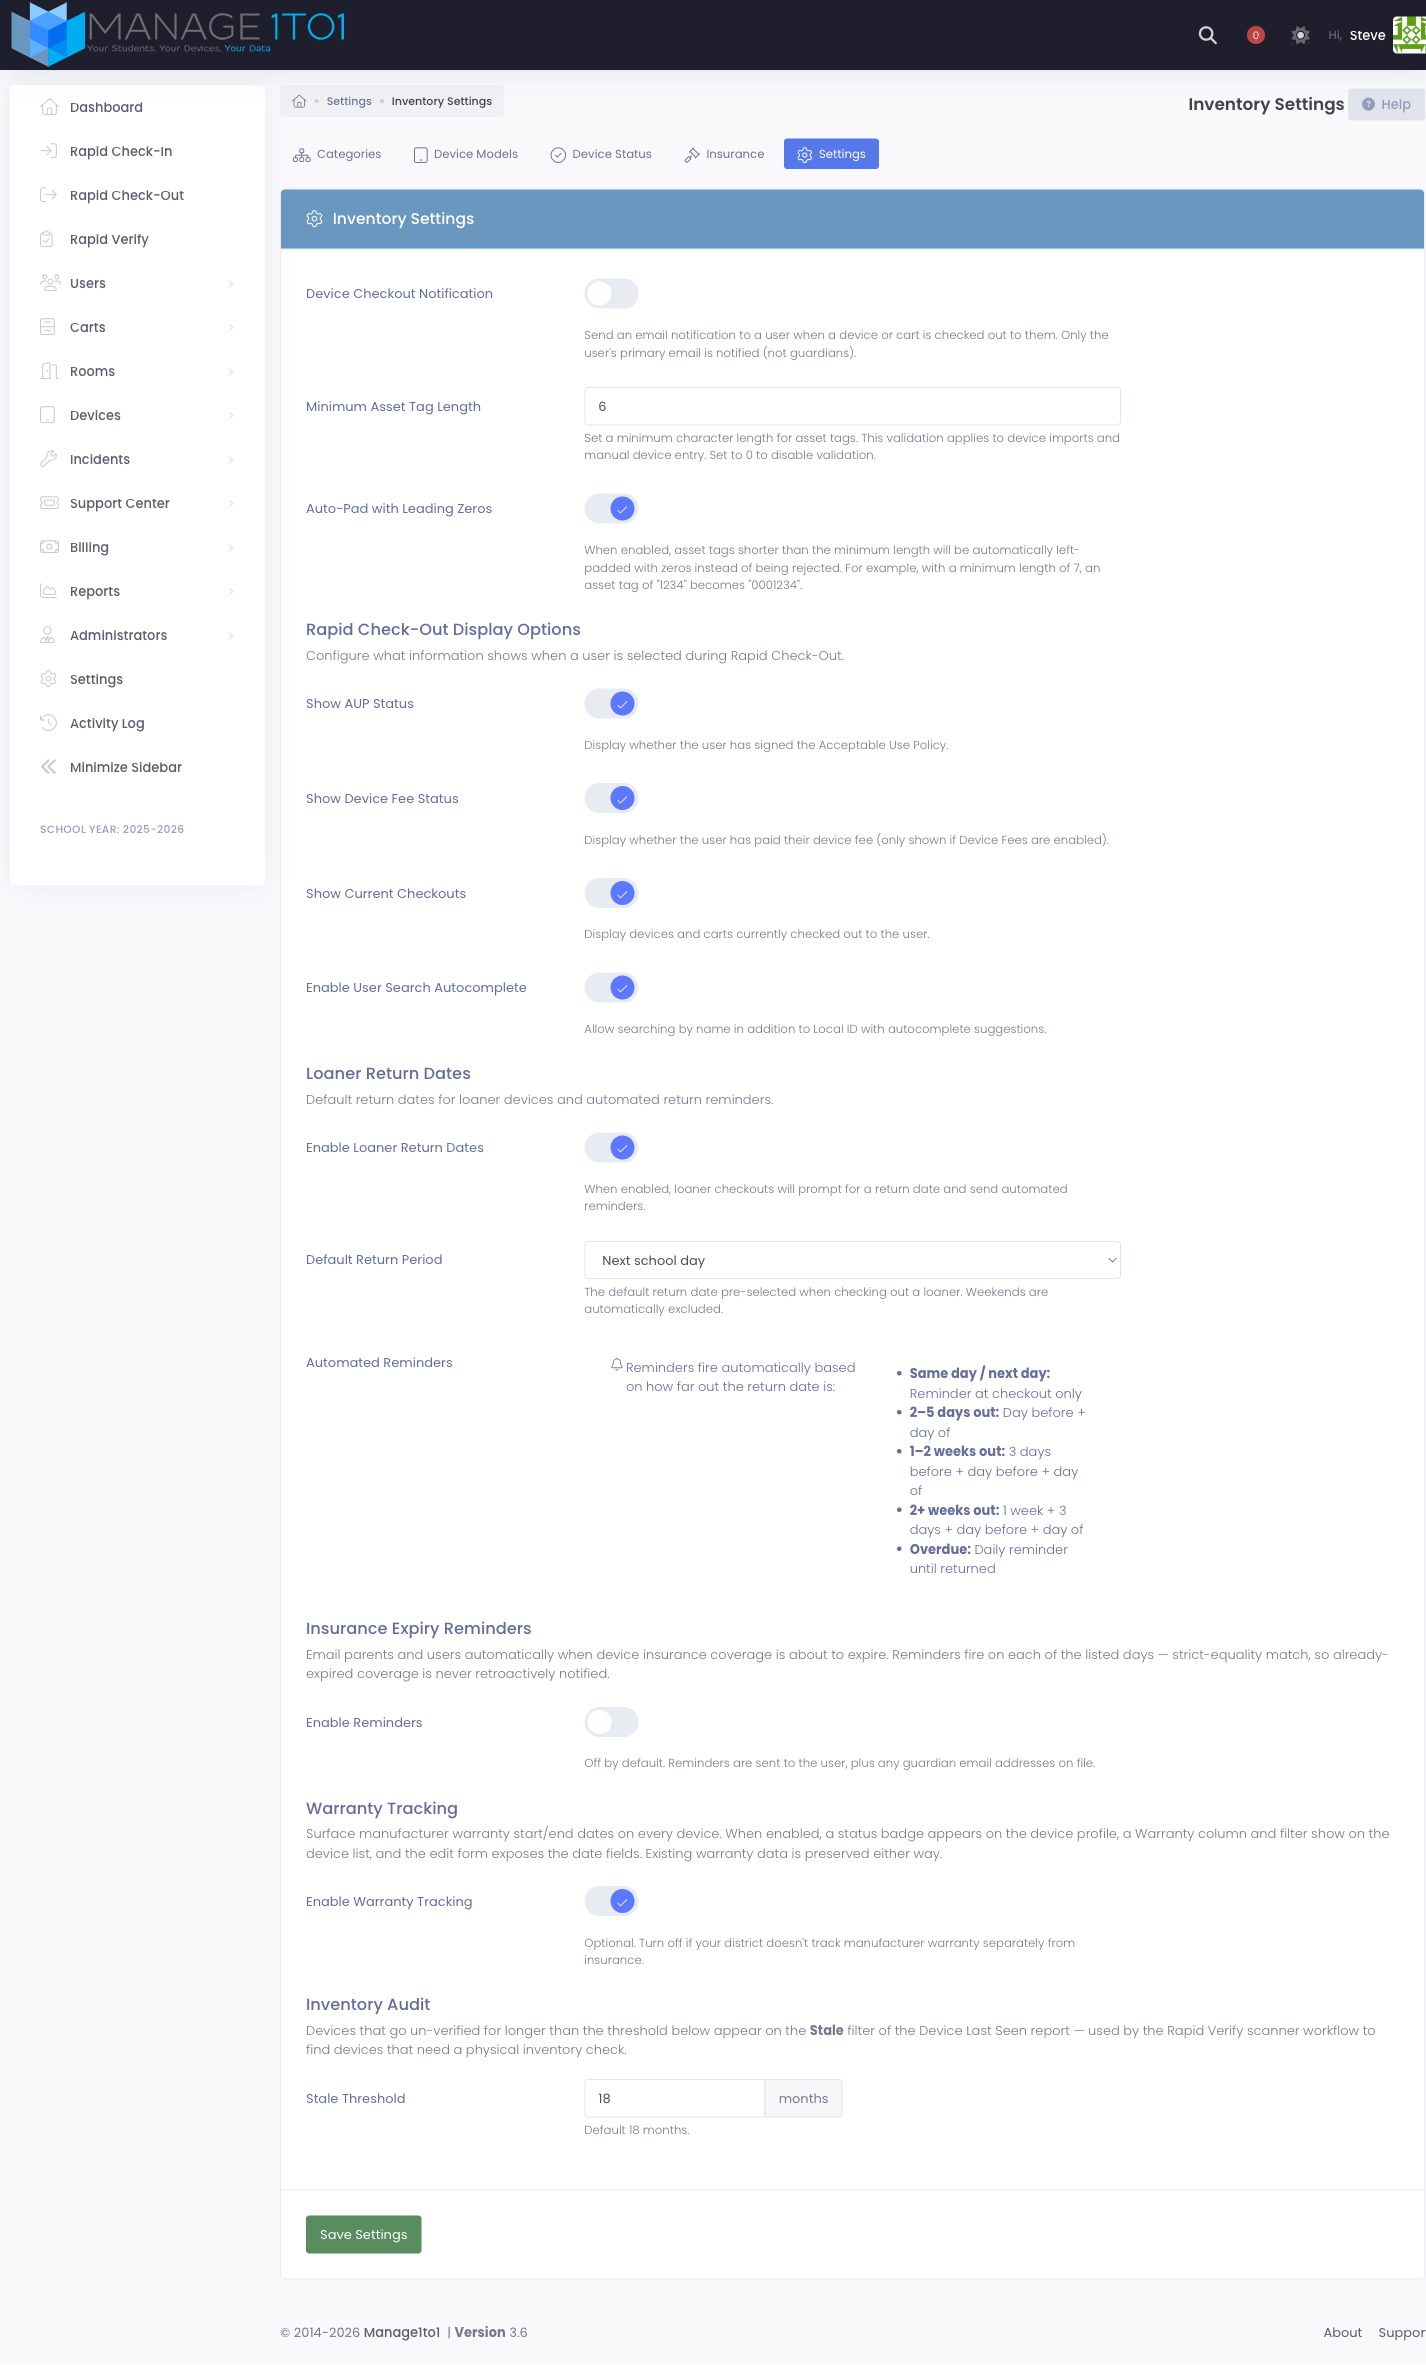
Device Checkout Notification
When enabled, the user being checked out receives an email notification each time a device or cart is assigned to them. Only the user's primary email is notified — not guardians.
Minimum Asset Tag Length
Enforces a minimum character length on asset tags during imports and manual device entry. Set to 0 to disable validation.
When the minimum is greater than zero, an additional Auto-Pad with Leading Zeros toggle appears. Turn it on to have short asset tags automatically left-padded with zeros instead of being rejected. For example, with a minimum length of 7, the tag 1234 becomes 0001234.
Rapid Check-Out Display Options
Four toggles control what information is shown when a user is selected during Rapid Check-Out:
- Show AUP Status — whether the user has signed the Acceptable Use Policy.
- Show Device Fee Status — whether the user has paid their device fee (only shown if Device Fees are enabled).
- Show Current Checkouts — devices and carts currently checked out to the user.
- Enable User Search Autocomplete — allow searching by name in addition to Local ID, with autocomplete suggestions.
Loaner Return Dates
When Enable Loaner Return Dates is on, loaner checkouts prompt the technician for a return date and send automated reminders to the user.
- Default Return Period — Same day, next school day, one week, or a custom number of school days. Weekends are automatically excluded.
- Custom School Days — appears when Default Return Period is set to "Custom". Pick how many school days out the default lands.
Reminders fire automatically based on how far out the return date is — same-day checkouts only get a reminder at checkout; longer loaners get an escalating cadence; overdue loaners get a daily reminder until returned.
Insurance Expiry Reminders
When enabled, devices with insurance coverage get an automatic email reminder before the policy expires. Reminder Days Before Expiry accepts a comma-separated list of days — the default 30,7 sends one reminder a month before and one a week before.
Reminders are sent to the user, plus any guardian emails on file. Strict-equality match — already-expired coverage is never retroactively notified.
Warranty Tracking
When enabled, every device gets a warranty status badge on its profile, a warranty column on the device list with a filter, and the device edit form exposes start/end date fields. Existing warranty data is preserved either way — disabling just hides the UI.
Inventory Audit Stale Threshold
Devices that go un-verified for longer than the threshold appear on the Stale filter of the Device Last Seen report. Used by the Rapid Verify scanner workflow to surface devices needing a physical inventory check. Default is 18 months.
After making any changes, click Save Settings at the bottom of the tab.