Invoice Settings
The Invoice Settings page is the single place where district administrators configure how invoices work — what shows on every printed invoice, how invoice statuses appear and behave, and the catalog of pre-defined items (fees, fines, insurance, replacements) that billing staff add to invoices.
Invoice configuration used to live under System Settings → Invoicing. It now has its own top-level Invoice Settings page in the main Settings area, and the old Sale Items screen is now the Items tab inside this page. Everything related to invoices is in one place.
You need the Manage Settings permission to open Invoice Settings, and the Manage Items permission to add, edit, or delete items in the catalog.
Opening Invoice Settings
From the main menu, click Settings. The Settings page lists every configurable area as a tile.
Click the Invoice Settings tile.

The page opens with three tabs across the top right: Settings, Statuses, and Items. Each is described below.
Settings tab
The Settings tab controls the defaults that appear on every printed or emailed invoice.
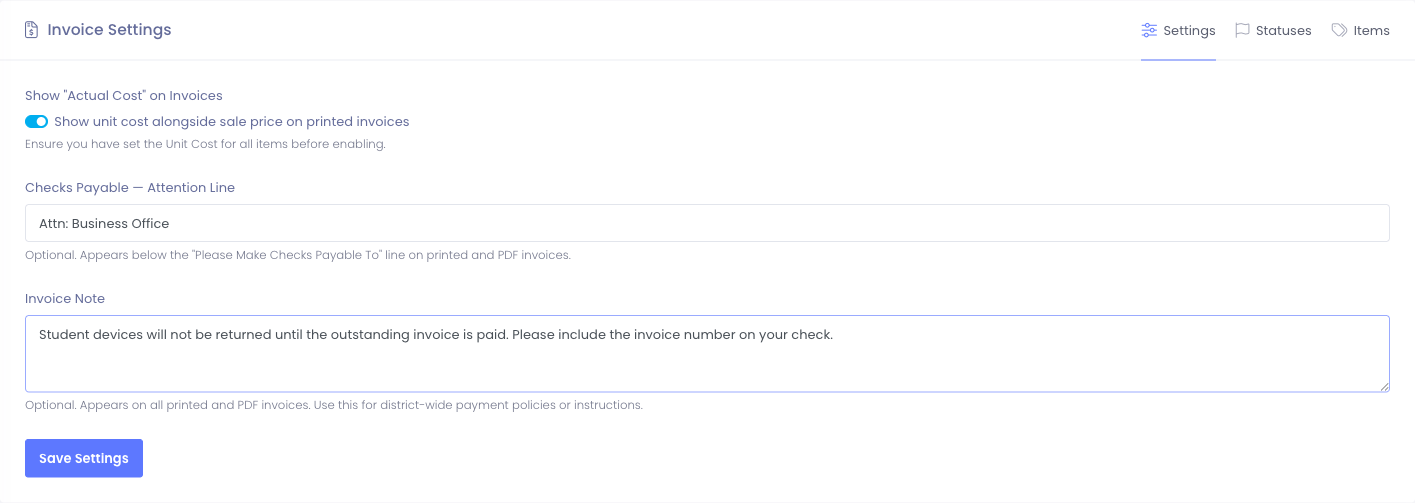
Show "Actual Cost" on Invoices
When this toggle is on, invoices display the unit cost recorded for each item alongside the sale price. This is useful for districts that bill students or staff for lost or damaged devices and want transparent cost documentation.
Before turning this on, make sure unit costs are recorded for the items you bill, otherwise invoices may show a blank or $0.00 unit cost.
Changes apply to invoices generated after the setting is saved. Existing invoices are not modified.
Checks Payable — Attention Line
An optional line that appears below "Please Make Checks Payable To" on printed and PDF invoices. Use this when checks need to be routed to a specific person or office, for example:
Attn: Business OfficeAttn: Accounts Receivable
Invoice Note
An optional message that appears at the bottom of every printed and PDF invoice. Use it for district-wide payment policies that should accompany every invoice, for example:
Student devices will not be returned until the outstanding invoice is paid.Please include the invoice number on your check. Payment is due within 30 days.
After making changes, click Save Settings.
Statuses tab
The Statuses tab lists every invoice status your district uses, with a color and a visibility toggle.
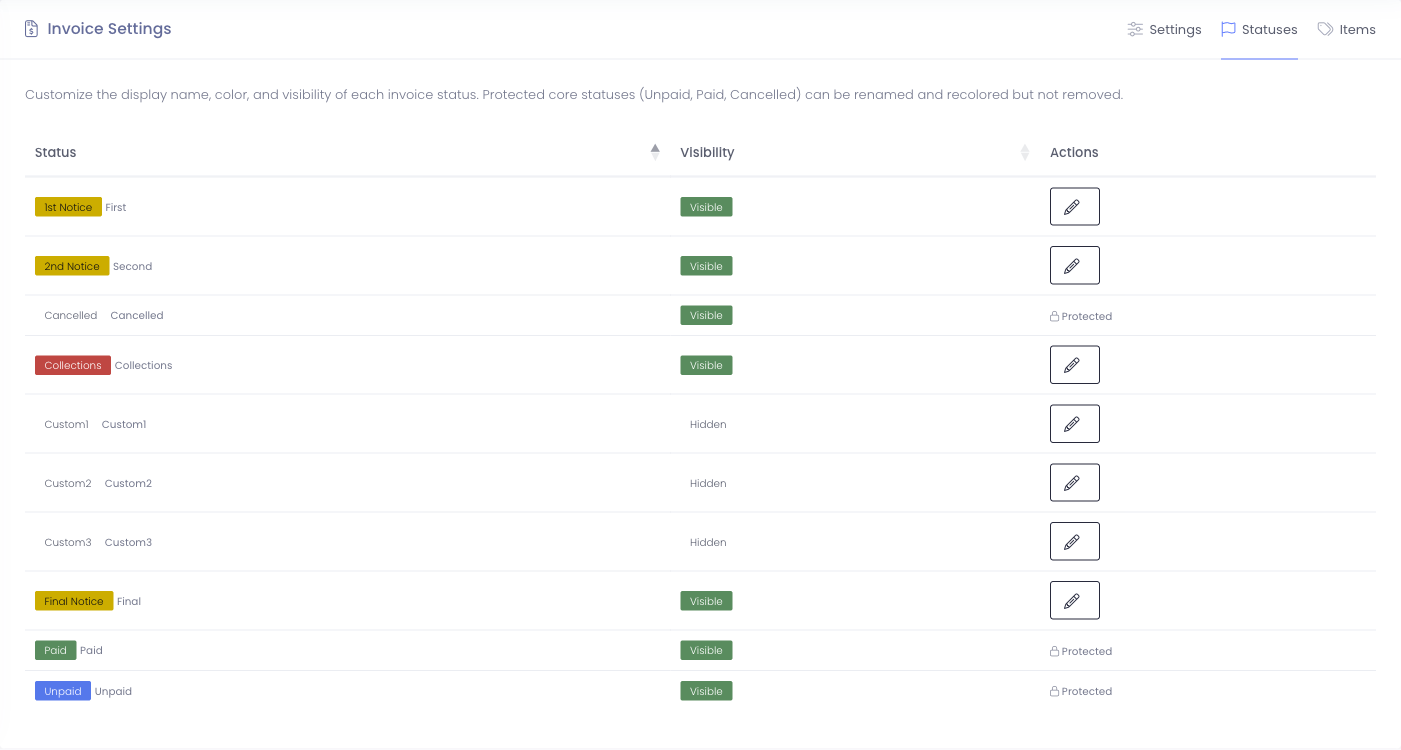
Statuses give billing staff a quick visual signal of where each invoice sits in its lifecycle. Typical defaults include 1st Notice, 2nd Notice, Final Notice, Collections, Paid, Unpaid, and Cancelled.
Editing a status
Click the pencil icon next to a status to open the edit dialog.
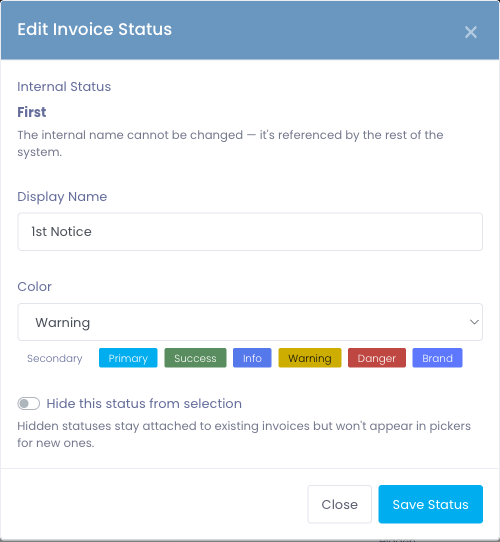
You can change:
- Display Name — what billing staff and parents see (the internal name stays the same so reports and automations keep working)
- Color — pick a color so the status stands out in tables and on invoice lists
- Hide this status from selection — keeps the status attached to existing invoices but removes it from new-invoice pickers
Three statuses are protected: Unpaid, Paid, and Cancelled. Their internal behavior is part of how Manage1to1 tracks balances, so they can be renamed and recolored but not removed.
Color coding tips
Consistent color coding makes overdue invoices stand out at a glance. A common pattern:
- Unpaid — yellow / warning
- 1st / 2nd Notice — orange / warning
- Final Notice / Collections — red / danger
- Paid — green / success
- Cancelled — gray / secondary
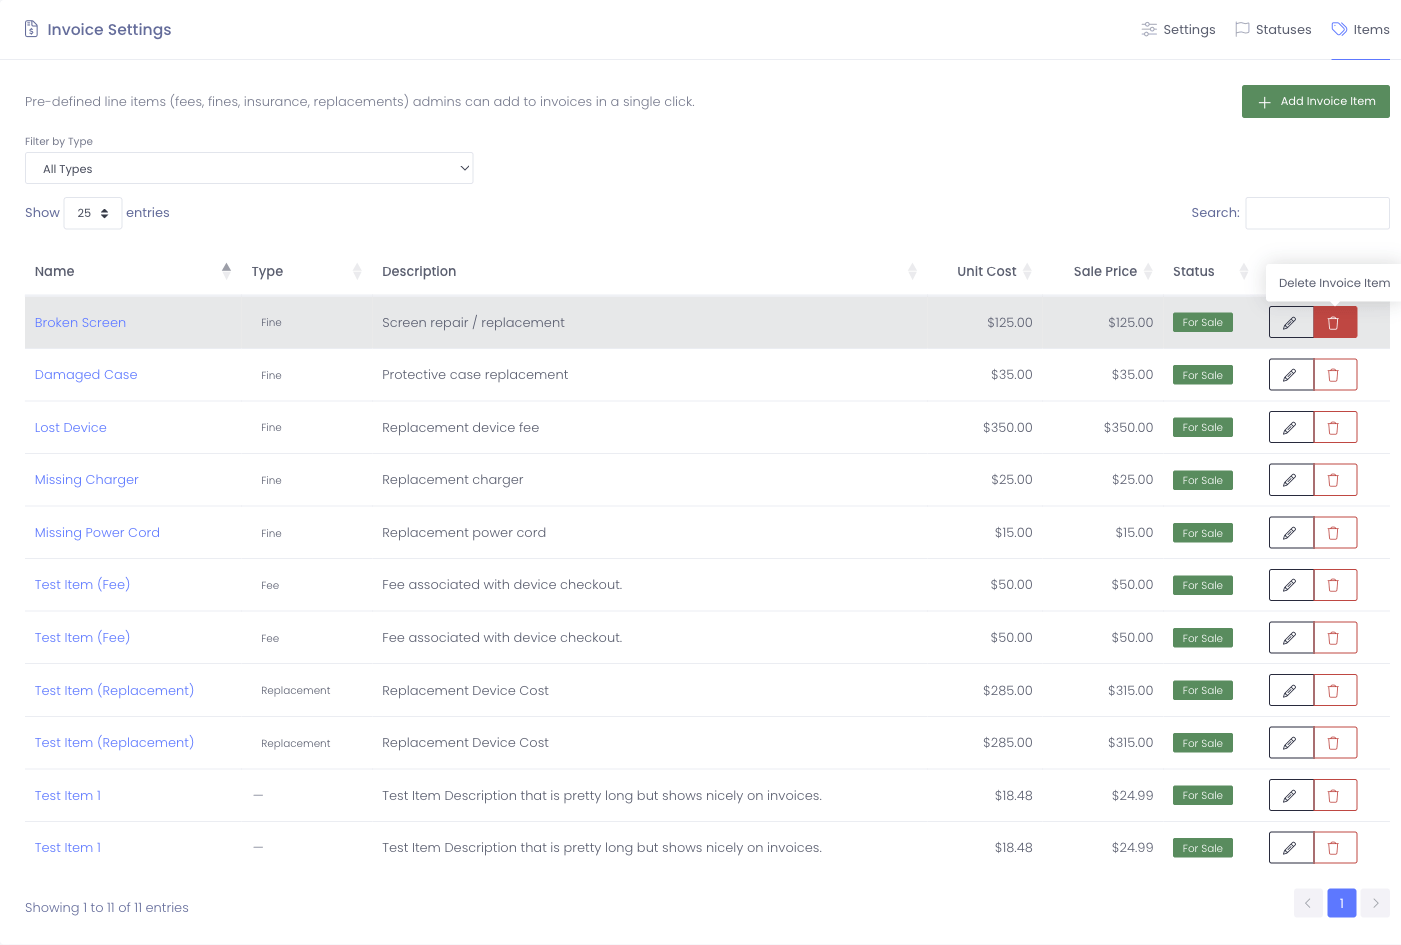
Items tab
The Items tab is the catalog of pre-defined line items billing staff can drop onto an invoice in a single click. Items are grouped by Type (Fee, Fine, Insurance, Replacement) so the right ones surface for the right situation.
Why pre-defined items matter
- Consistency — every "Broken Screen" charge has the same description and price across the district
- Speed — billing staff select from a list instead of typing description and price every time
- Accuracy — eliminates typos, math errors, and inconsistent pricing
- Reporting — you can analyze revenue by item type ("how much did we collect in fines last semester?")
Filtering the list
Use the Filter by Type dropdown above the table to narrow the list to a single category — handy when you have a long catalog.
The search box on the right filters by name or description.
Adding a new item
Click Add Invoice Item in the top right.
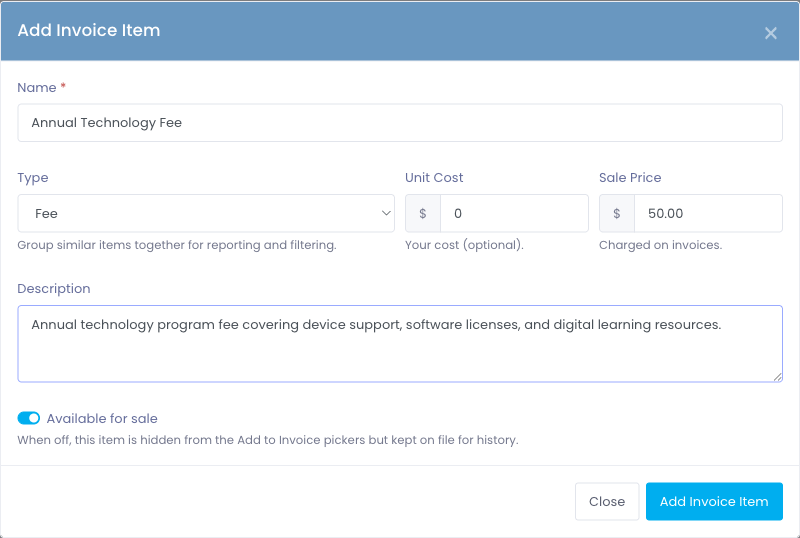
Fill in the fields:
- Name — what billing staff see in the picker. Keep it short and recognizable (e.g., "Broken Screen", "Annual Tech Fee", "Lost Charger").
- Type — pick the category that best fits. The available types are Fee, Fine, Insurance, and Replacement.
- Unit Cost — what the item costs the district. Optional; used only when "Show Actual Cost" is turned on.
- Sale Price — what billing staff charge by default. They can still adjust this on individual invoices for special circumstances.
- Description — appears on printed and emailed invoices. Write it for parents and guardians — clear, professional, no internal jargon.
- Available for sale — when off, the item stays on file for history but stops appearing in the Add-to-Invoice pickers. Use this instead of deleting outdated items.
Click Add Invoice Item to save. The new row appears in the table immediately.
Editing an existing item
Click the pencil icon next to a row, or click the item name itself. The same form opens, pre-filled with the current values.
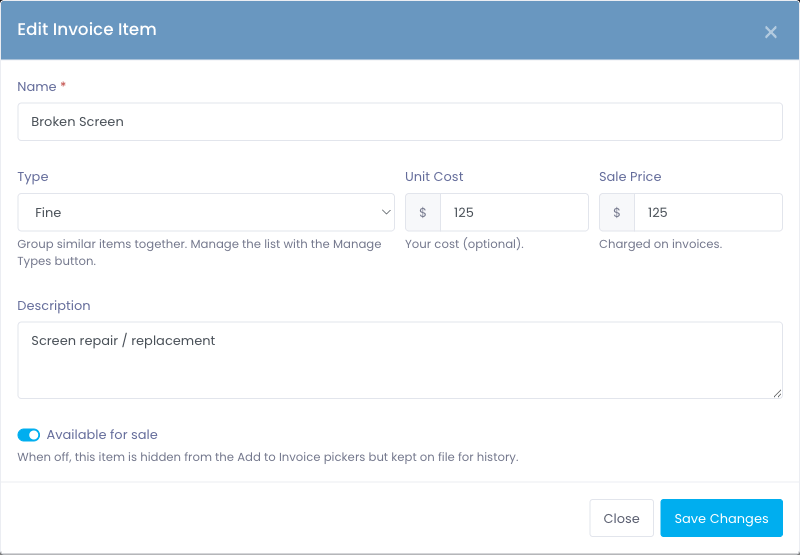
Edits apply to future invoices only. Existing invoices keep the description and price that was on them when they were created.
Removing an item
Click the trash icon next to a row. You'll be asked to confirm.

Best practice: if an item has been used on past invoices, turn off Available for sale instead of deleting it. This keeps invoice history intact and prevents billing staff from accidentally re-adding a retired item.
Item types
The four item types are fixed and reflect the four shapes of charges most districts bill:
- Fee — recurring or one-time charges like Annual Technology Fee or Late Return Fee
- Fine — penalty charges for missing or damaged items like Broken Screen, Missing Charger, Damaged Case
- Insurance — optional device insurance policies
- Replacement — full or partial replacement costs for lost or damaged hardware
You don't need to use every type — districts that only ever charge for damage might use only Fine and Replacement, for example.
Common Questions
Q: Where did "Sale Items" go? Sale Items have been renamed to Invoice Items and moved into the Invoice Settings page as the Items tab. The page works the same way, but everything related to invoicing is now in one place.
Q: Where did the Invoicing tab in System Settings go? Those settings moved out of System Settings into their own top-level Invoice Settings page. Everything you used to configure on the Invoicing tab is now on the Settings tab of Invoice Settings — same controls, same behavior.
Q: Can I make my own item type, like "Donation"? The four types (Fee, Fine, Insurance, Replacement) are fixed because reporting, automation, and integrations depend on them. If you have a charge that doesn't fit, pick the closest type and use a clear name to differentiate — for example a donation-style charge could be a Fee named "Annual Donation".
Q: If I edit the price of an Invoice Item, do existing invoices change? No. Existing invoices keep the original price and description. Only invoices created after the change use the new values.
Q: What's the difference between Unit Cost and Sale Price? Unit Cost is what the item costs the district (your internal cost). Sale Price is what gets charged on the invoice. Unit Cost only appears on invoices if you've turned on "Show Actual Cost" in the Settings tab.
Q: Can I delete an Invoice Item? Yes, but only if it hasn't been used on any existing invoices. Best practice is to turn off Available for sale instead — this hides the item from new-invoice pickers while keeping it linked to invoice history.
Q: How are Invoice Items different from Parts? Parts are physical inventory you stock and consume on repairs (screens, keyboards, chargers). Invoice Items are pre-defined charge templates billing staff drop onto invoices. The two often line up — a Part used on a repair is invoiced via a matching Invoice Item — but they're managed separately. See Parts Inventory in the Incidents section for parts management.
Q: Can different buildings have different prices? Invoice Items are district-wide. If you need building-specific pricing, create separate items with the building in the name (e.g., "Broken Screen — Elementary" vs. "Broken Screen — High School"), or adjust the sale price at invoice-creation time for the specific case.