Mosyle Manager
Mosyle Manager is the Apple-only MDM platform for K-12 schools. The Manage1to1 integration syncs your Apple device inventory from Mosyle into Manage1to1, enables Lost Mode on missing iPads, and pushes checkout assignments back to Mosyle so the User field on every device stays in sync with whoever has the device in Manage1to1.
Connection, Sync Options, Writeback, Device Import, and Removed-Device Handling behave the same across every MDM — Common Setup Options explains each, including how Device Import routes unknown devices into a review queue instead of adding them automatically. This page covers what's specific to Mosyle.
This page covers Mosyle Manager — the K-12 / education product at https://managerapi.mosyle.com/v2. If your district uses Mosyle Business instead, the integration works against the same endpoints with a different base URL; change the Mosyle API URL setting to point at your Business endpoint.
Before You Start
To set up the integration, you'll need:
- Administrator access to your Mosyle Manager console
- Permission to generate API credentials from My School → API Integration
- A Mosyle admin account (email + password) that Manage1to1 will use to authenticate — a dedicated service account is ideal
- A few minutes to enable the API Integration profile and copy the access token
Step 1: Generate Your Mosyle API Credentials
Manage1to1 authenticates with Mosyle using three pieces of information: an access token you generate in Mosyle, plus the email and password of a Mosyle admin account. Mosyle combines these into a secure session behind the scenes each time Manage1to1 connects.
- Sign in to your Mosyle Manager console
- Navigate to My School → API Integration
- Enable the API profile — if the profile isn't enabled, the access token won't work
- Copy the access token that appears once the profile is enabled
- Decide which Mosyle admin account Manage1to1 will authenticate as, and have its email and password ready
Rather than your personal login, create a dedicated Mosyle admin account for Manage1to1 to authenticate with. It keeps the integration working even if staff accounts change, and makes it easy to see the integration's activity separately in Mosyle.
Together, these credentials let Manage1to1 read your full device inventory, push user assignments to devices, and enable Lost Mode. Store them securely — Manage1to1 keeps them encrypted at rest, and you can rotate the access token any time by generating a new one in Mosyle and pasting the new value into your settings.
Step 2: Configure the Integration in Manage1to1
- Navigate to Settings → MDM Settings
- Find Mosyle Manager in the available modules list and click Manage (or Activate)
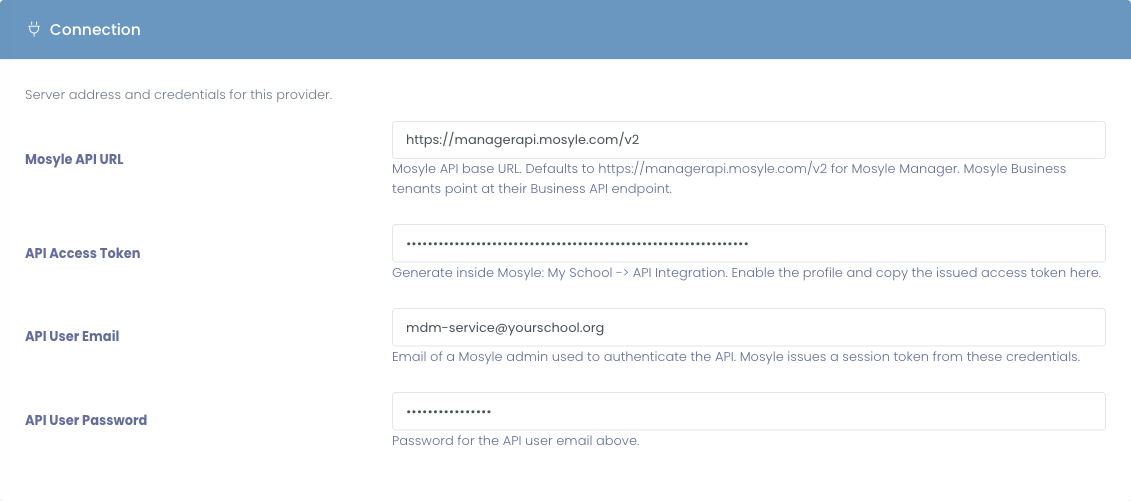
- Fill in the Connection settings:
| Setting | What to enter |
|---|---|
| Mosyle API URL | Leave as the default for Mosyle Manager. Business tenants point this at their Business endpoint. |
| API Access Token | Paste the token you generated in Step 1. |
| API User Email | The email of the Mosyle admin account Manage1to1 authenticates as. |
| API User Password | The password for that account. |
- Set your Sync Options as needed:
| Setting | What it does |
|---|---|
| Checkout Writeback | Push the assigned user back to Mosyle on every check-out and clear it on check-in. |
| Allow Disable Device | Surface the Disable Device button on device profiles. |
| Enable Lost Mode on Mark-Lost | Automatically issue Mosyle Lost Mode when a device is marked lost in Manage1to1 (supervised iPads only). |
| Lost Mode Message | The message shown on the lost device's lock screen. |
| Lost Mode Callback Phone | Phone number shown on the lock screen so a finder can call you. Optional but recommended. |
- Click Test Connection — Manage1to1 signs in to Mosyle with your credentials and reports whether they worked.
- Click Save Settings to enable the module.
Step 3: Initial Device Sync
Once the module is enabled, Manage1to1's MDM sync cron pulls your device inventory from Mosyle on the next scheduled run. Devices are matched to Manage1to1 records by serial number, so any device that's both in Manage1to1 and in Mosyle picks up the Mosyle data automatically.
The integration syncs three Mosyle device classes in sequence:
- iOS / iPadOS devices
- macOS computers
- tvOS Apple TVs
For each device, Manage1to1 stores:
- Device name, model, OS version
- Asset tag, tags
- Assigned user (when set in Mosyle)
- Last check-in timestamp
- IP address, Wi-Fi MAC
- Battery level
- Total / available storage
- Supervised status and enrollment type
- Lost Mode state (iOS / iPadOS)
You can re-run the sync on demand from any device's profile by clicking Refresh Now on the Mosyle info pane.
What the Integration Does
Device Inventory Pane
Every device that exists in both Mosyle and Manage1to1 gets a Mosyle Info pane on its profile page, showing the synced fields above. The pane includes a Refresh Now button that triggers an on-demand sync for that single device.
Checkout Writeback
When Checkout Writeback is enabled and a device is checked out in Manage1to1 to a user, the integration pushes the user's username, full name, and email to Mosyle so the device's User field stays current.
When the device is checked back in, the assignment is cleared on the Mosyle side too — your inventory pool stays clean.
Lost Mode
When a device is marked lost in Manage1to1 (and Enable Lost Mode on Mark-Lost is enabled), the integration automatically issues Mosyle's Lost Mode command. The configured Lost Mode Message and Callback Phone are sent so the lock screen shows your district's contact information.
You can also enable Lost Mode manually from the device profile by clicking the Disable Device button — that's especially useful when you want to lock a device that hasn't been formally marked lost yet.
When the device is recovered, mark it found in Manage1to1 and the integration sends a Lost Mode disable command to Mosyle.
Mosyle Lost Mode only works on supervised iPadOS / iOS devices. Unsupervised devices and macOS computers don't support the Lost Mode command. For macOS computers, the Disable Device path uses Mosyle's lock-device command instead.
Importing and Removing Devices
The sync normally only enriches devices that already exist in Manage1to1. If you'd like Mosyle to also pull in devices it knows about but Manage1to1 doesn't — or flag devices that disappear from Mosyle — turn on the Device Import and Removed-Device Handling options in the Mosyle settings. Both are optional, off by default, and route every change through a review step so nothing touches your inventory until you approve it. See MDM Device Review for how the review queue works.
Troubleshooting
Test Connection fails / Mosyle rejects the credentials
Manage1to1 couldn't sign in to Mosyle. Because the connection uses three pieces of information, check each one:
- The API profile is enabled in My School → API Integration
- You copied the full access token (it's long — easy to miss a character), and it hasn't been rotated since you copied it
- The API user email and password are correct and the account can still sign in to Mosyle
Fix whichever is off, then click Test Connection again.
Sync runs but no devices appear
Devices are matched by serial number. If Manage1to1 and Mosyle disagree on the serial format for a device, the match misses.
- Verify your Manage1to1 device records have the full serial number (no trailing whitespace, no abbreviations).
- Verify the same device exists in Mosyle with the same serial.
- If both sides look correct, the next scheduled sync will pick the device up.
Lost Mode command fires but the device doesn't lock
Lost Mode requires the device to be supervised and online. If a device hasn't checked in to Mosyle recently, the command sits queued until the next check-in.
Device action buttons don't appear on profiles
Confirm the relevant setting toggle is enabled on the Mosyle module configuration:
- Allow Disable Device — gates the Disable Device button
- Enable Lost Mode on Mark-Lost — gates the automatic Lost Mode issuance
Also confirm the admin has the matching permission on their role.
Rotating the Access Token
Mosyle access tokens are long-lived but you should rotate them periodically.
- Generate a new token in Mosyle's API Integration page (this invalidates the old one)
- Paste the new token into Settings → MDM Settings → Mosyle Manager → API Access Token
- Click Test Connection to confirm the new token works
- Click Save
There's no downtime — the integration uses the saved token on the next request, so the moment you save the new value the integration is using it.