Microsoft SCCM
The Microsoft SCCM integration brings Windows device data from your existing SCCM (now MECM — Microsoft Endpoint Configuration Manager) deployment into Manage1to1, so your help-desk staff can see device details, stats, and reports for your Windows fleet alongside everything else in the platform.
Unlike the cloud-based MDM integrations (JAMF Cloud, Google), SCCM almost always lives on-premise behind your district firewall. To respect that, the integration uses a small agent that runs inside your network, polls SCCM locally, and sends data outbound to Manage1to1 — there is no inbound connection from Manage1to1 into your network.
Connection and Sync Options behave the same across every MDM — see Common Setup Options. SCCM syncs one direction only, so it doesn't offer Device Import, Removed-Device Handling, or Writeback. This page covers what's specific to SCCM.
This integration is only meaningful if your district already runs SCCM/MECM. It does not replace SCCM — it surfaces SCCM data inside Manage1to1 so your help-desk staff can see it alongside your other device information.
What You Get
Once the agent is reporting:
- Per-device SCCM panel on the device profile, showing last logon user, OS version, IP/MAC, manufacturer, model, total and free disk, AD site, AD OU, and last hardware inventory date
- Stats and reports — Windows OS version distribution, manufacturer breakdown, agent reporting freshness, stale devices report, low disk space report, and a last-logon summary
Before You Start
You will need:
- An existing SCCM/MECM site
- A Windows server inside your network where the agent can run (typically the SCCM site server itself, but any Windows server with the right access works)
- Outbound HTTPS from that server to your Manage1to1 instance
- An IT staff member to install the agent (this is the only part that touches a server — everything else is web UI)
Step 1: Generate an API Key
- Navigate to Settings → MDM Settings
- Click Activate on the Microsoft SCCM card if it isn't already active
- Click Advanced Settings on the same card
- Click Generate API Key
- Copy the key shown in the popup — this is your only chance to capture it
The API key is only displayed once when generated. Copy it immediately and hand it to the IT staff member who will install the agent. If lost, generate a new one — the old one will keep working for 24 hours so you can update the agent without downtime.
Step 2: Install the Agent
The agent is a PowerShell script that you download once and configure with the API key from Step 1. The full installation walkthrough — including the configuration file format, scheduled-task setup, and prerequisites — ships with the agent download itself in README.txt.
Hand the API key and the agent download to your IT team. They handle the rest. You'll know it's working when the Devices Reported count on the SCCM Advanced Settings page shows a non-zero number and the Last Agent Push timestamp updates.
Each agent run is a full sync of every device — not a partial batch — and a full run is quick, so scheduling the task to repeat every 15 minutes keeps device data fresh and keeps the agent showing as connected. The README.txt in the download walks through the Task Scheduler setup.
Keeping the Agent Up to Date
From time to time a newer version of the SCCM agent is released with fixes and improvements. Because the agent runs on your own server, it does not update itself. You re-download and redeploy it whenever a new version is available.
The SCCM Advanced Settings page watches for this automatically. When the agent your server is running is older than the current release, an update banner appears at the top of the page letting you know a newer agent is available. When that happens:
- Generate a fresh agent download (the Install the Agent step above), or reuse your existing API key.
- Hand the updated download to your IT team.
- Replace the script on your SCCM server with the new one, keeping your existing configuration file.
The banner clears on its own once the updated agent checks in. If your server is already running the current agent, no banner appears.
Step 3: Choose Which Fields to Display
The SCCM module collects fifteen fields per device. By default, all of them appear on the device profile. You can hide fields you don't want shown (or rename their labels for your district's vocabulary) on the SCCM Advanced Settings page.
- Navigate to Settings → MDM Settings → SCCM → Advanced Settings
- Scroll to the Device Profile Fields card
- Uncheck any fields you'd like to hide
- Override labels in the Display Label column (optional)
- Click Save Field Display
Disabled fields are still collected by the agent — they just don't render on the device profile. You can re-enable them at any time.
Auto-Verify Inventory Audits
Unlike a cloud MDM, an on-prem SCCM client only checks in when the device is actually on your internal network. That makes a recent SCCM check-in real evidence that a device is present, which is exactly what an inventory audit sets out to confirm. Manage1to1 can use that signal to automatically clear a device from the audit worklist when SCCM shows it checking in recently.
This is off by default. To turn it on:
- Navigate to Settings → MDM Settings → SCCM → Advanced Settings.
- Scroll to the Inventory Audit card.
- Turn on Auto-verify inventory audits from SCCM check-ins, then click Save.
How it behaves:
- It only clears devices that are already overdue for an audit. A device that has been seen recently is left alone.
- It only counts a recent hardware scan (within the last 30 days) as presence. A device that has been sitting offline in SCCM for months never auto-clears an audit.
- Each auto-verified device gets a "Verified via SCCM check-in" entry in its history, so it reads distinctly from a hands-on Rapid Verify scan.
If your SCCM is co-managed with a Cloud Management Gateway, clients can check in over the internet rather than only on your internal network, which weakens the "checked in means on-site" assumption. Leave this setting off if your audit needs to be strictly physical presence.
Push Building as AD OU
If Manage1to1 is your source of truth for where a device lives, you can keep Active Directory in step with it: when a device's building changes in Manage1to1, the agent moves that device's AD computer object into the Organizational Unit you map to its building. The move runs on the agent host, so Manage1to1 never needs any inbound access to your network.
This is off by default, because moving computer objects between OUs is a privileged operation. Turning it on takes two deliberate steps, so a move never happens by accident:
- In Manage1to1, go to Settings → MDM Settings → SCCM, open the Push Building as AD OU card, turn the toggle on, map each building to its target OU, and click Save. Leave a building blank to never move its devices.
- On the agent host, enable OU moves in the agent's configuration. The account the agent runs as also needs permission to move computer objects between the OUs you mapped.
How it behaves:
- A building with no mapping is never touched, so you can roll this out one building at a time.
- A device already in its target OU is left alone.
- The move is applied on the agent's next check-in, the same way Lock, Restart, and other device actions are carried out.
You map each building to an Organizational Unit distinguished name (for example, OU=Lincoln,OU=Schools,DC=district,DC=local). If you are unsure of the exact value, your AD administrator can provide it.
Viewing Device Details
Once the agent starts reporting, each Windows device's SCCM data appears on its device profile — the same place you'd see JAMF or Google device information. Open any managed device and you'll find a Microsoft SCCM panel showing the fields you've enabled:
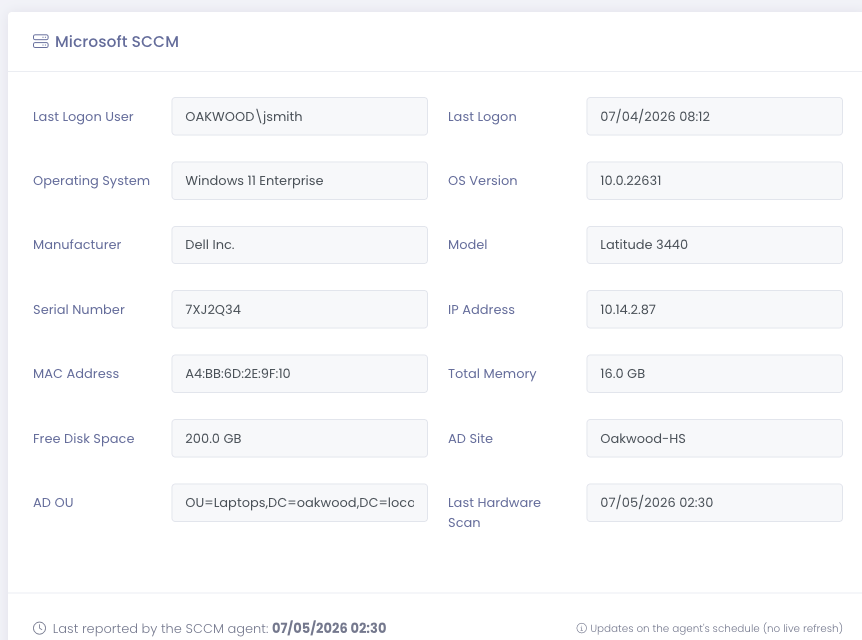
The panel lists identity and hardware details (serial, model, OS, memory, total and free disk, IP/MAC, AD site and OU) plus the last logon and last hardware-inventory times. A footer shows when the agent last reported for that device.
There's no "refresh now" button on the SCCM panel. Because the agent reaches out to Manage1to1 on its own schedule (rather than us reaching into your network), the panel always reflects the most recent batch the agent pushed — typically within your configured run interval.
Reports
Three SCCM-specific reports surface under Reports → MDM Reports:
- Stale Devices (30+ days) — devices the agent hasn't reported on in over 30 days. Useful for finding lost or off-network endpoints.
- Low Disk Space — devices running below 10% free disk
- Last Logon Summary — per-device last logon user, AD site, and AD OU. Useful for ownership reconciliation.
Three SCCM-specific stats appear on the MDM Stats dashboard:
- Windows OS Versions — pie chart of OS version distribution
- Manufacturers — pie chart of Dell / HP / Lenovo / etc.
- Agent Reporting Freshness — Fresh / Stale (30–89 days) / Critical (90+ days) / Unknown
Key Rotation and Expiration
API keys expire after 365 days. Manage1to1 will email administrators with the Manage Settings permission as the expiration approaches — at 30, 14, 7, 3, and 1 days out — so there's time to rotate.
To rotate:
- Navigate to Settings → MDM Settings → SCCM → Advanced Settings
- Click Rotate Key
- Copy the new key and update the agent configuration
The previous key keeps working for 24 hours after rotation, so you have a window to update the agent without any downtime.
You can also revoke a key immediately if you suspect it's been compromised — that takes effect on the agent's next poll.
Troubleshooting
The Devices Reported count stays at zero. The agent hasn't successfully pushed yet. Confirm with your IT team that the scheduled task is running, the agent has the correct API key, and outbound HTTPS to your Manage1to1 instance is allowed by your firewall.
Devices show "unmatched" in the agent log. The serial numbers SCCM reports don't match the serials in Manage1to1's device records. Check that the device serials in Manage1to1 match what SCCM has — this is most often a casing or whitespace difference.