Microsoft ADFS Sign-In
If your district runs on-premises Active Directory Federation Services (ADFS), your administrators can sign in to the Manage1to1 admin area with it. ADFS is a standard SAML 2.0 identity provider, so it connects through Manage1to1's SAML 2.0 Sign-In — this page walks the ADFS side: creating the Relying Party Trust and the claim rule that sends each admin's email.
This guide uses SAML 2.0, which ADFS on Windows Server 2016 and later supports fully. If you're on an older ADFS, upgrade or contact Support.
Manage1to1 matches the email address ADFS sends to an existing administrator account — there's no automatic account creation. Make sure each admin who will use ADFS already exists in Manage1to1 with the email address ADFS will send (see Step 3).
What you'll need
- ADFS administrator access to the ADFS Management console on your federation server.
- The Manage1to1 Manage Settings permission.
- Each Manage1to1 admin's email must match what ADFS sends.
Step 1: Get Manage1to1's service-provider details
In Manage1to1, go to Settings → SSO Settings and turn on SAML 2.0. The setup panel shows the three values ADFS needs to trust Manage1to1 (each is click-to-copy), plus a Download SP Metadata XML button:
- SP Entity ID — identifies Manage1to1 to ADFS
- ACS URL — where ADFS sends the sign-in assertion
- NameID Format — requests the user's email as the identifier
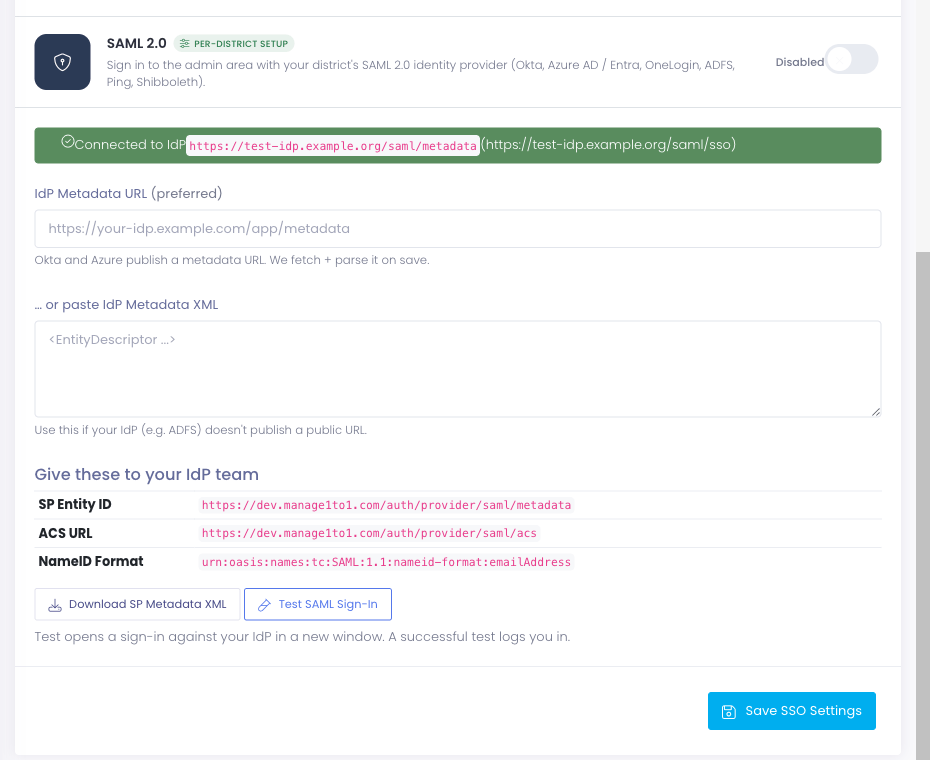
Keep this panel open (or download the SP metadata file) — you'll use these in the next step. The full Manage1to1-side walkthrough is in the SAML 2.0 Sign-In guide.
Step 2: Add a Relying Party Trust in ADFS
On your ADFS server, open AD FS Management → Relying Party Trusts → Add Relying Party Trust, then run the wizard:
- Choose Claims aware.
- For the data source, the quickest path is Import data about the relying party from a file and select the SP Metadata XML you downloaded in Step 1 — ADFS reads the SP Entity ID and ACS URL automatically. (If you prefer, choose Enter data manually and supply the SP Entity ID as the relying party identifier and the ACS URL as the SAML 2.0 assertion consumer endpoint.)
- Give the trust a display name such as Manage1to1.
- Choose your access-control policy (for example, Permit everyone, or restrict to a specific AD group of administrators).
- Finish the wizard and leave Configure claims issuance policy checked so you go straight into Step 3.
Manage1to1 requires the assertion to be signed — the default for ADFS SAML 2.0. No extra configuration is needed; just don't disable assertion signing on the trust.
Step 3: Add a claim rule that sends email
This is the step that makes or breaks ADFS sign-in: ADFS must send each admin's email address as the SAML NameID in email format. Two claim rules do it.
On the Manage1to1 relying party trust, open Edit Claim Issuance Policy → Add Rule:
Rule 1 — pull the email from Active Directory
- Rule template: Send LDAP Attributes as Claims.
- Attribute store: Active Directory.
- Map an LDAP attribute to the E-Mail Address outgoing claim type:
- E-Mail-Addresses → E-Mail Address (use this if your AD mailboxes are populated), or
- User-Principal-Name → E-Mail Address (use this if your users' UPN is their email address).
Rule 2 — send the email as the NameID
- Rule template: Transform an Incoming Claim.
- Incoming claim type: E-Mail Address.
- Outgoing claim type: Name ID.
- Outgoing name ID format: Email.
- Pass through all claim values.
Save the rules.
Whichever attribute you send (E-Mail-Addresses or UPN), it must exactly match the email on the administrator's Manage1to1 account. If they differ, ADFS will authenticate the user but Manage1to1 will decline the sign-in.
Step 4: Point Manage1to1 at ADFS
Back in Manage1to1's SSO Settings → SAML 2.0 panel, give it your ADFS federation metadata so it learns your entity ID, sign-on URL, and signing certificate:
- IdP Metadata URL — ADFS publishes federation metadata at
https://your-adfs-host/FederationMetadata/2007-06/FederationMetadata.xml. Paste that URL if Manage1to1's servers can reach it. - IdP Metadata XML — if that URL isn't reachable from the internet (common for internal ADFS), open it in a browser on your network, save the XML, and paste its contents instead.
Click Save SSO Settings. When the metadata reads correctly, the panel shows a green Connected to IdP banner with your ADFS entity ID and sign-on URL.
Step 5: Test it
Use Test SAML Sign-In in the setup panel — it opens a sign-in against ADFS in a new window; a successful test signs you in. Admins can then sign in from the Sign in with SAML button on the Manage1to1 login page, or from an ADFS-initiated link.
If you later turn on Force Single Sign-On, password sign-in is hidden. Always confirm ADFS sign-in works end-to-end first so you don't lock yourself out.
Troubleshooting
| Symptom | Likely cause |
|---|---|
| Sign-in bounces back to the login page | ADFS isn't sending email as the NameID (check the Step 3 claim rules), or the email it sends doesn't match an active Manage1to1 admin. |
| "Could not read the IdP metadata" on save | Manage1to1 couldn't reach the federation metadata URL (internal-only ADFS) — paste the metadata XML instead, and confirm it includes the token-signing certificate. |
| Works, then fails after a while | Your ADFS token-signing certificate rolled over. ADFS rotates it automatically; re-paste the current federation metadata so Manage1to1 picks up the new certificate. |
| Intermittent failures around sign-in time | Clock skew between ADFS and our servers — make sure your ADFS server's clock is accurate. |
If an email doesn't match, the attempt is recorded in the admin activity log so you can see which address ADFS sent.
What's covered today
- Admin-area sign-in via ADFS (SAML 2.0), matched to an existing admin by email.
- SP-initiated (from the Manage1to1 login page) and IdP-initiated sign-in.
- Signed assertions, with audience and timing validation.
Single Logout, automatic account creation, and group-to-role mapping aren't part of this release — reach out to Support if your district needs them.