Scheduled Reports
Scheduled Reports lets you set up recurring emails that Manage1to1 sends automatically. The most common use is delivering a weekly Campus Summary to principals so they can stay on top of device counts, spare inventory, and open incidents without logging in.
To open this page, your role needs the Manage Scheduled Reports permission.
What this page is for
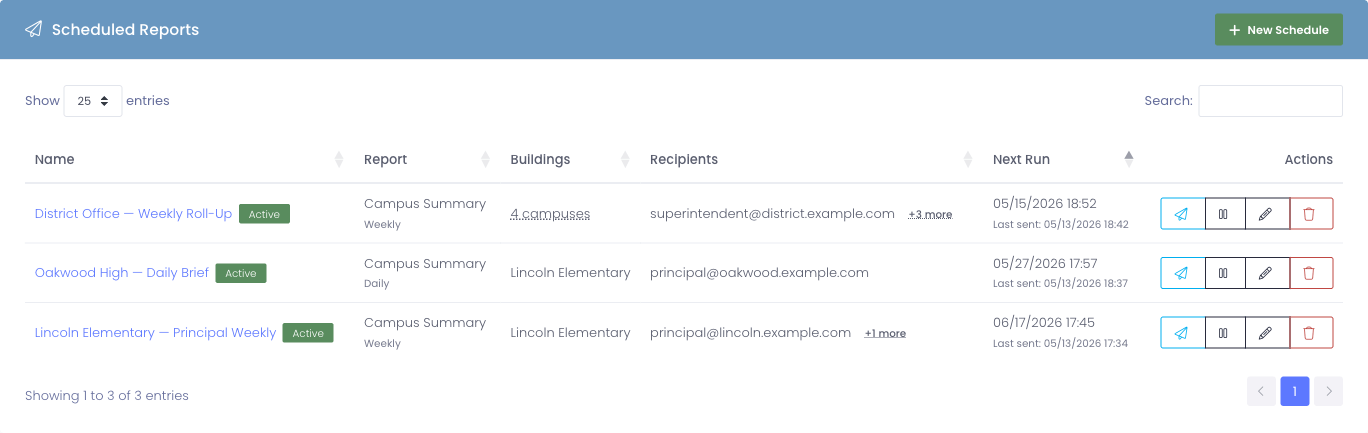
Each row on the Scheduled Reports list is one recurring delivery. A row controls:
- Who receives the email
- What report is included
- Which campuses the numbers are scoped to
- How often it goes out (daily, weekly, monthly)
Once a schedule is Active, Manage1to1 takes care of the rest — building the report, sending it to every address on the list, and queueing the next delivery on its own.
Creating a schedule
- Go to Settings → Scheduled Reports
- Click the New Schedule button in the top-right of the list
- Fill in the form fields described below
- Click Create Schedule

Schedule Name
A short label so other admins can recognize the schedule on the list. Examples:
- Elementary Principals — Weekly Summary
- District Office — Monthly Roll-Up
- Lincoln Elementary — Daily Brief
This name appears in the Activity Log and in your list of schedules — recipients never see it.
Report Type
Which report Manage1to1 builds when the schedule fires.
| Type | What's included |
|---|---|
| Campus Summary | Active assets, spare inventory, devices in repair, open incidents, and carts — broken out per campus, with a district total at the bottom when more than one campus is included |
More report types may be added in future releases. If only one type is available, this field will default to it.
Frequency
How often the report is sent.
- Daily — sends every 24 hours
- Weekly — sends every 7 days
- Monthly — sends every 30 days, anchored on the schedule's first send
Changing the frequency on an existing schedule resets the next-run timer.
Email Template
Optional. By default each report sends with its built-in email template. If you'd rather control the look and wording yourself, pick one of your Admin & Automation email templates here and it's used for this schedule instead. Leave it on Default to keep the built-in template.
Create and edit templates under Settings → Email Templates (choose the Admin & Automation type so they appear in this list). See Email Templates for how templates and merge variables work.
Campuses / Buildings
The campuses each delivery should cover. You can pick one, several, or leave the field empty to send a district-wide report (every campus rolled up). The chips you add here scope every number in the email — only data from those campuses is included.
Each recipient sees the same email, so put together the campus list that makes sense for the whole group. If two principals need different scopes, create two schedules.
Status
Use the Active / Paused switch to control whether the schedule actually sends. Paused schedules keep their configuration but stop delivering until you switch them back to Active. This is useful for end-of-year breaks or temporary pauses without losing the setup.
Recipients
The email addresses Manage1to1 sends each delivery to. Type an address and press Enter, comma, or space to add it as a chip. You can also paste a comma- or semicolon-separated list and Manage1to1 will split it into chips automatically.
To remove an address, click the × on its chip.
Editing or pausing a schedule
Each row on the Scheduled Reports list has four action buttons:
| Button | What it does |
|---|---|
| Send now (paper-plane icon) | Sends the report immediately to every recipient, then advances the next-run timer by the schedule's frequency |
| Pause / Resume | Stops or starts deliveries without losing the configuration |
| Edit (pencil icon) | Opens the same form you used to create the schedule, with current values pre-filled |
| Delete (trash icon) | Removes the schedule permanently. Past deliveries stay in the Activity Log |
You can also click a schedule's name in the list to open the edit form.
Use Send now to preview what recipients will see. The email goes out immediately, exactly as it would on the schedule's normal cadence — handy for the first run, or after editing recipients.
What recipients see
The Campus Summary email contains:
- A header with the campus scope (one campus name, a short list, or N Campuses when there are four or more) and the cadence (Daily / Weekly / Monthly)
- A table with one row per campus, showing Active, Spare, In Repair, Open Incidents, and Carts
- A District Total row at the bottom when more than one campus is in scope
- A button linking back to Manage1to1
- A short footer explaining how to opt out (the district admin disables or edits the schedule)
Recipients don't need a Manage1to1 account to receive the email — they just need a working email address.
Customizing the email template
The wording, colors, and layout of the Campus Summary email come from an editable email template named Scheduled Campus Summary, available under Settings → Email Templates. You can edit the subject line, header copy, footer text, button label, or anything else — and your changes apply to every Scheduled Report that uses the default template going forward.
To give a single schedule its own look without touching the shared default, create a custom Admin & Automation template and select it in the schedule's Email Template field (described above).
The template uses merge fields that Manage1to1 fills in at send time. The available fields are listed at the bottom of the template editor; the most useful ones are:
| Merge field | What it becomes |
|---|---|
{$building_name} | The scope label (campus name, short list, or N Campuses) |
{$frequency_label} | Daily, Weekly, or Monthly |
{$report_date} | The date the email was sent |
{$campus_breakdown} | The per-campus stats table |
{$total_active_assets} | District-wide active count (and similar totals for the other stats) |
{$dashboard_url} | A link back to your Manage1to1 dashboard |
Tracking deliveries
Every schedule action — Created, Updated, Paused / Resumed, Sent Now, Deleted — is recorded in the Activity Log with the admin who performed it. Automated sends from the schedule itself also appear in the log so you can confirm that deliveries are going out as expected.