Remote Support
Remote Support lets a technician initiate a screen-share session with a user directly from a ticket. The system posts the steps for the user inside the ticket, emails them with a link, and gives you an inline control strip where you enter the user's access code and end the session when you're done.
The first supported provider is Chrome Remote Desktop. Additional providers (Splashtop, TeamViewer, and others) can be added in future releases without changing the workflow.
How it works
Chrome Remote Desktop requires the user to explicitly share their screen — Google doesn't allow silent screen-share. So the workflow is guided rather than fully automatic: you click a button, the system tells the user exactly what to do, and you take it from there once they share a code with you.
The full flow:
- From a ticket, you click Remote Support
- The system posts a styled "Remote support requested" reply inside the ticket and emails the user with the same instructions
- The user opens
remotedesktop.google.com/supporton their device, generates a 12-digit code, and replies to the ticket with it - You paste the code into the inline strip on the ticket and click Connect — Chrome Remote Desktop opens
- The user clicks Share on their device — you have control
- When you're done, you click End Session in the inline strip — the system posts a "Session ended" reply with the duration
Before you turn it on
Two things need to happen before users can share their screens via Chrome Remote Desktop:
- Enable Remote Support in your Help Desk settings (next section)
- Deploy the Chrome Remote Desktop extension to your fleet via the Google Admin Console — Chromebooks need it pre-installed before the share flow will work end-to-end
If your district manages Chromebooks through Google Workspace, you can push the Chrome Remote Desktop extension to all your devices via Apps & extensions in the Google Admin Console. The user no longer has to install anything — they just open the URL and click Generate Code.
Turning it on
Go to Settings → Help Desk and pick the Remote Support tab.
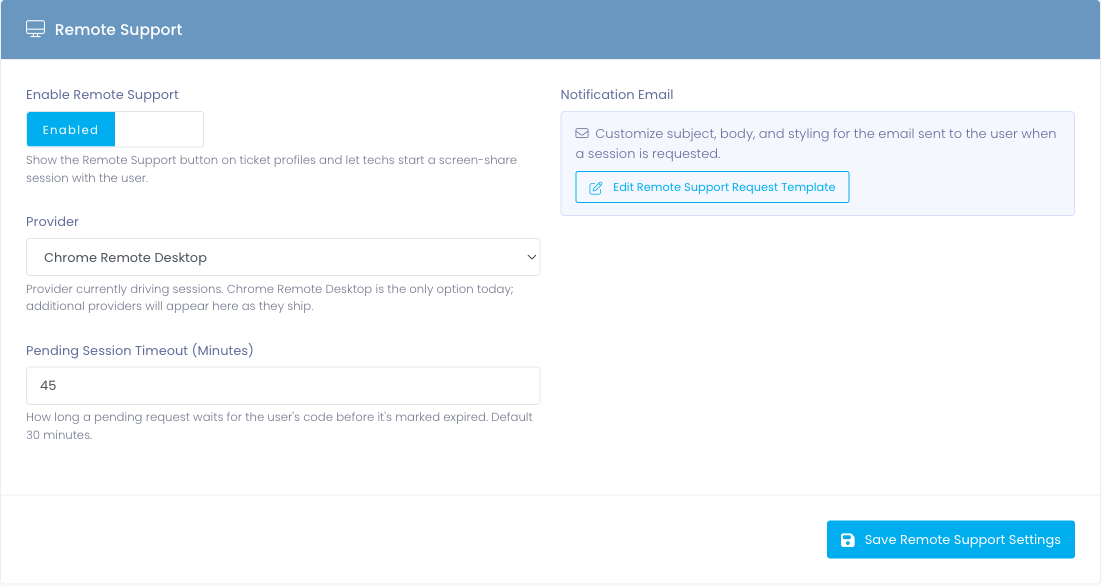
Toggle Enable Remote Support to Enabled. The Remote Support button appears on every ticket from that point on for any admin who has the Initiate Remote Support permission (granted by default to every role that can view tickets).
Settings on this tab
- Enable Remote Support — master switch. Off by default.
- Provider — which screen-share product drives sessions. Chrome Remote Desktop is the only option today.
- Pending Session Timeout — how long a request waits for the user's code before the system marks it expired. Default 30 minutes.
- Notification Email — clicking Edit Remote Support Request Template takes you to the email template editor where you can customize the subject, body, and styling of the message users receive.
Initiating a session
Open the ticket you want to provide remote support on. The Remote Support button sits at the right end of the watchers strip, opposite the Watch toggle.

Click it. A confirmation dialog explains what happens next:

Click Send Request. The system:
- Creates a session record on the ticket
- Posts a styled "Remote support requested" reply with step-by-step instructions for the user
- Emails the user with the same instructions and a link back to the ticket
- Shows you the inline session strip so you can finish the handoff
The pending session strip
After you send the request, the ticket shows an inline strip at the top of the conversation:

From here:
- Open Chrome Remote Desktop opens
remotedesktop.google.com/supportin a new tab so you're ready to enter the code the moment the user gives it to you - Paste the user's 12-digit code — once the user replies to the ticket with their code, paste it into this field
- Connect marks the session active and stamps the start time
- Cancel Request closes the session without taking control (the system posts a "Session cancelled" reply on the ticket)
What the user sees in the ticket
The system posts a system-event reply inside the ticket the moment you send the request. The user sees it the next time they open the ticket — either by clicking the link in the email or browsing to the ticket directly from their device.

The reply is visually distinct from a normal admin reply: it has a blue left border, a "System / Automated" label in place of an avatar, and no Edit or Delete buttons. End users can't dismiss or edit system events.
During the session
When the user shares their access code (by replying to the ticket with it), you paste it into the inline strip and click Connect. The strip swaps to its active state:

The strip shows a live elapsed-time counter so you can keep an eye on how long the session has run. While the session is active, you and the user are connected through Chrome Remote Desktop in your respective browser tabs — Remote Support stays out of your way.
Ending the session
When you're done, click End Session in the inline strip. A confirmation dialog appears — click End Session again to confirm.
The system:
- Stamps the end time on the session record
- Posts a "Remote support session ended" system-event reply with the duration
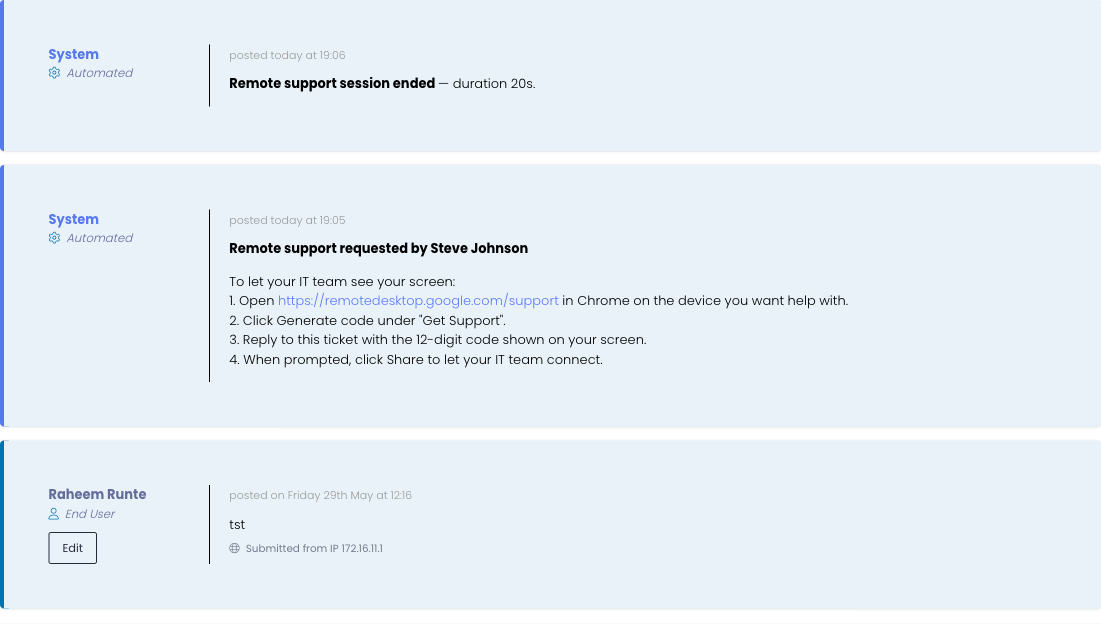
Both system events stay in the ticket history permanently as part of the audit trail.
Permissions
The Initiate Remote Support permission gates the button on the ticket and the lifecycle actions. By default, every role that can already view tickets gets this permission — Technology Director, Technology Coordinator, Technician, and any custom roles you've created with view-tickets.
To restrict who can start sessions:
- Go to Administrators → Roles
- Open the role you want to adjust
- Find Initiate Remote Support under the Support category and toggle it off
- Save
Customizing the notification email
The email users receive is a standard email template — you can edit the subject, body, and HTML styling the same way you customize every other transactional email in the product.
From the Remote Support settings tab, click Edit Remote Support Request Template.
The template uses the standard merge fields you're already familiar with from other email templates:
{$firstname}/{$fullname}— the user's name{$ticketId}— the ticket number (e.g.EFS-865221){$ticketUrl}— the link back to the ticket in the User Portal{$ticketSubject}— the ticket title
Plus three Remote-Support-specific fields:
{$rsAdminName}— the technician who initiated the session{$rsProviderName}— the screen-share product driving the session (e.g. "Chrome Remote Desktop"){$rsSupportUrl}— the URL the user opens to share their screen