Creating a Workflow
This page walks through creating a workflow rule end-to-end — from the rule list to a saved, enabled rule. Conditions and actions are covered in their own pages; this one is just the Settings tab and the surrounding navigation.
The rule list
Navigate to Support Center → Ticket Workflows. The rule list shows every workflow you've authored, with a status pill in the header showing how many are active versus total.
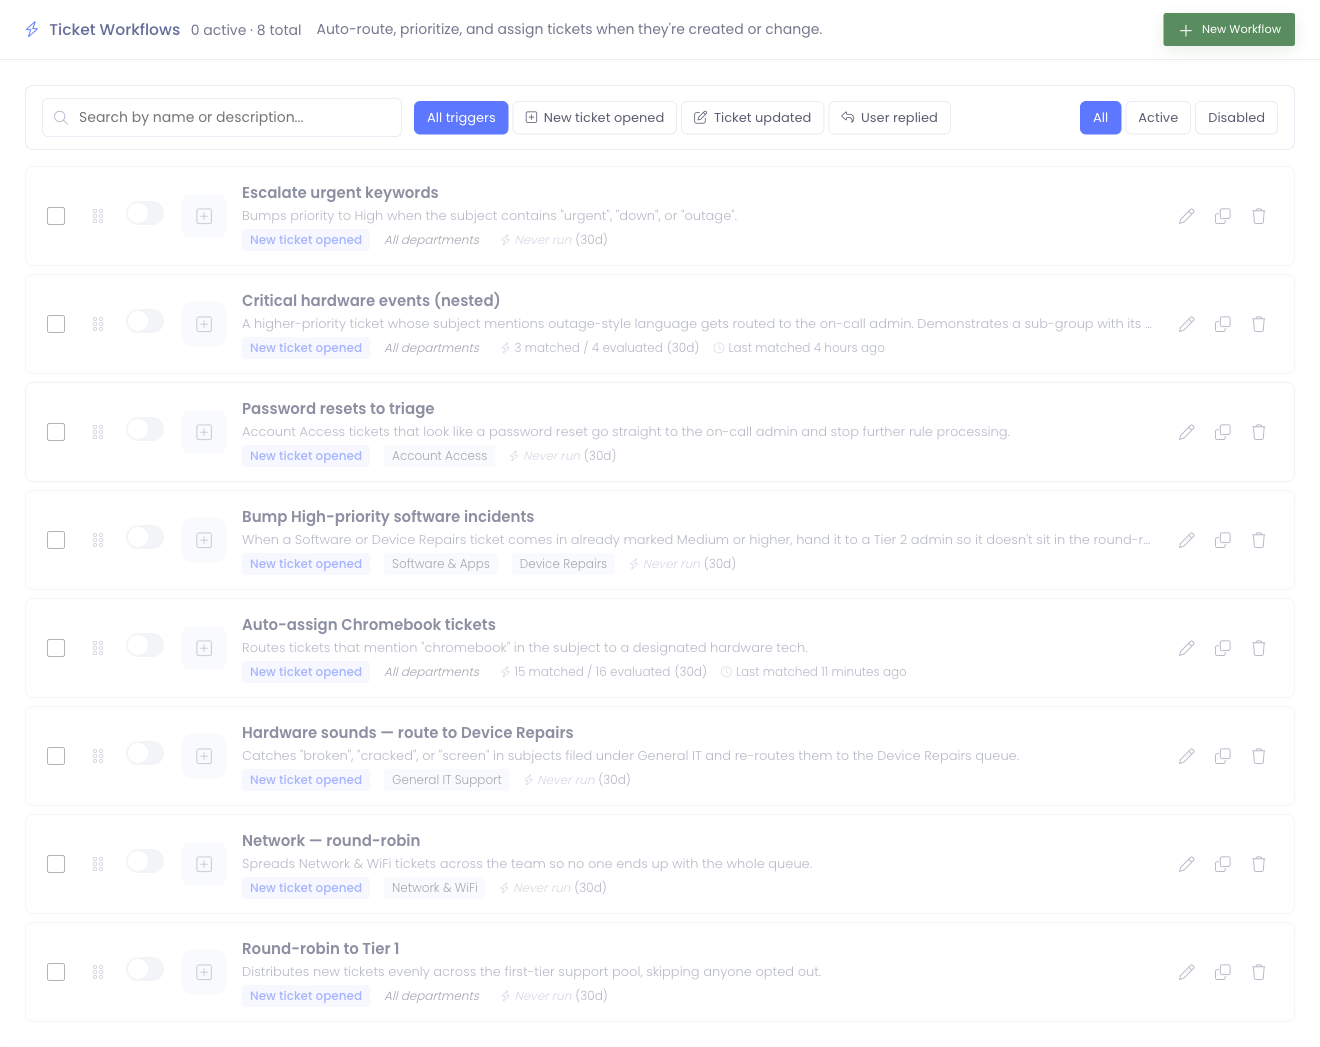
Each row shows:
- Selection checkbox on the far left — used for bulk actions (see below)
- Drag handle — drag rows up or down to change priority order
- Enabled toggle — flip without opening the rule
- Trigger icon — a quick visual cue for which event kicks off the rule
- Name and description — the title links into the editor
- Chips — the trigger label, plus department scope (or "All departments" if unscoped)
- 30-day stats — how many tickets the rule has evaluated and matched in the last 30 days
- Last matched — relative timestamp, only shown if the rule has matched at least once
- Edit / Duplicate / Delete buttons on the right
Filtering and search
The toolbar above the list lets you narrow what you see:
- Search box matches against rule name and description
- Trigger filter pills show only rules tied to a specific trigger (when more than one trigger exists in your environment)
- State filter pills — All, Active, Disabled — useful when reviewing what's currently running versus what's parked
Filters combine, so you can look for "active rules with the Ticket Created trigger that mention Chromebook" without scrolling.
Reordering
Priority controls evaluation order — lower numbers run first. Drag rows by the grip handle on the left to reorder. The new order is saved automatically; a confirmation toast appears once it's persisted.
If you have many rules with the same trigger, the order matters most when one rule's actions might supersede another's. Put the most specific rule first. See Building Actions for how Stop actions interrupt the chain.
Duplicating a rule
The duplicate button (clone icon, second from the right on each row) creates an exact copy of the rule — name suffixed with (copy), all conditions and sub-groups, all actions, same trigger and department scope — and opens the new copy in the editor immediately. The clone is disabled by default so you can edit it freely without firing on real tickets while you're tweaking.
Run history is intentionally not copied. The clone starts with a clean History tab; the original keeps its own log.
Useful for:
- Authoring variant rules that share most of the structure (e.g. you have a "Network outage → notify Networking lead" rule and want to fork it into a similar one for the Hardware department — duplicate, change the department scope, edit the recipient, save).
- Trying alternate condition logic without losing the original.
Bulk actions
The selection checkbox on the far left of each row enables bulk operations. Once one or more rows are selected, an action bar appears above the list:
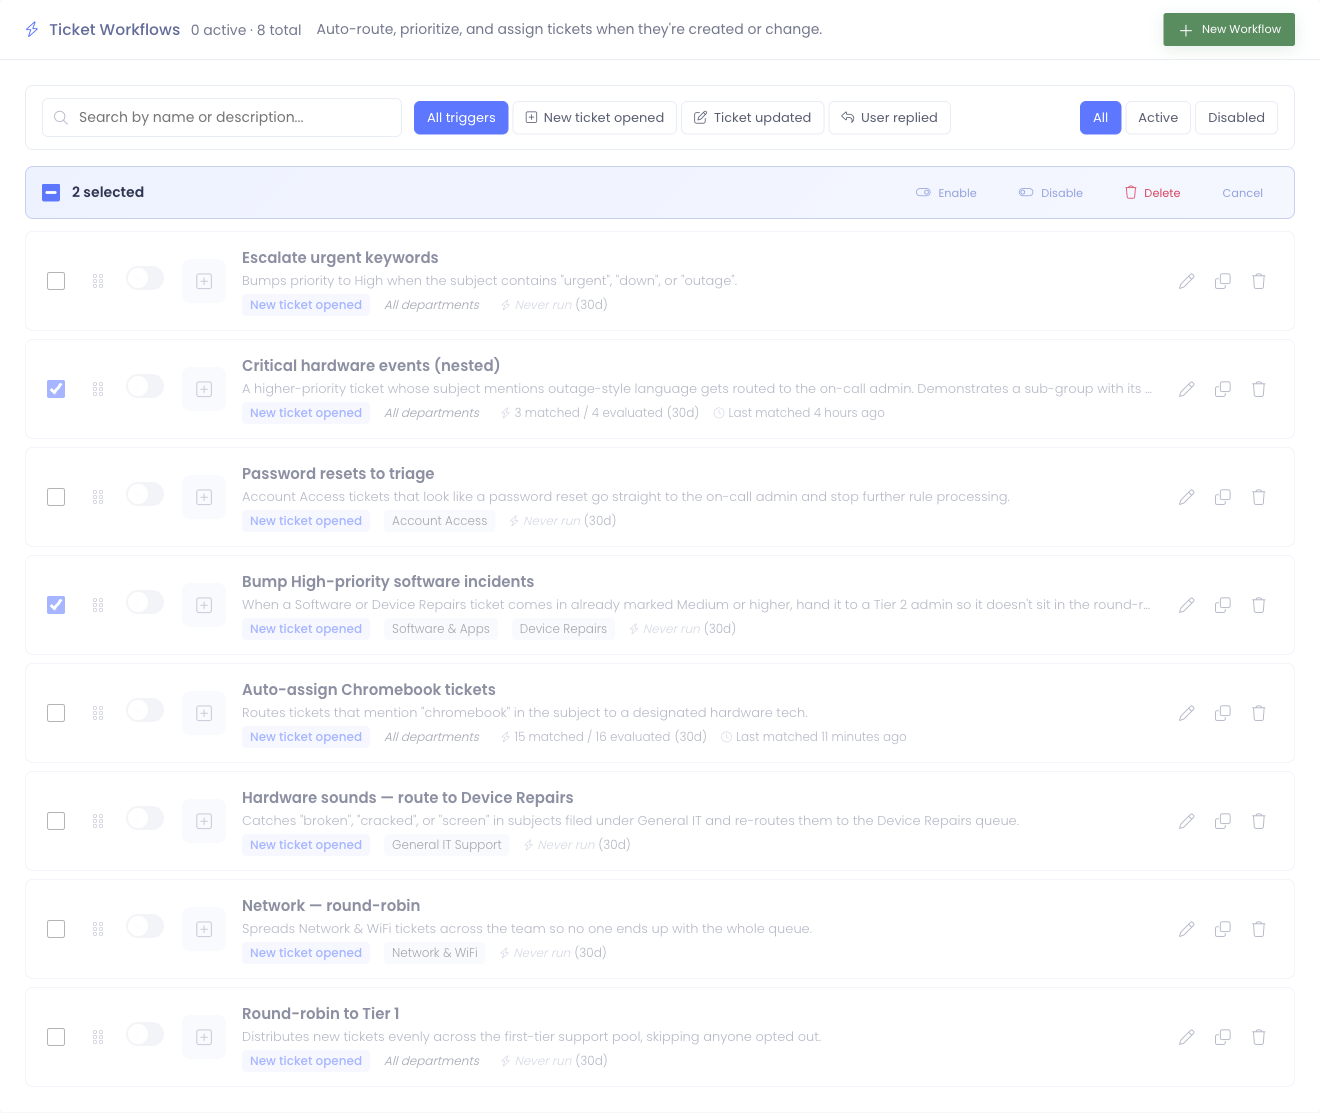
- Enable — flip the enabled flag on every selected rule. Already-enabled rules are no-ops; the toast message reports how many were actually changed.
- Disable — same, in reverse.
- Delete — confirm-prompted; cascades through the selected rules' conditions, actions, and run history. Pending wait actions queued by deleted rules linger in the queue and mark themselves superseded on the next cron sweep, so live timers don't disappear silently.
- Cancel — clears the selection and hides the bar.
The checkbox in the action bar acts as select all visible — handy after narrowing the list with the search or filter pills. Combined: filter to "Disabled", select all, click Enable to bulk-activate a set of rules you'd previously parked.
Empty state
The first time you visit the page, you'll see an empty state with three quick-start examples — Auto-assign by topic, Round-robin a team, Escalate by keyword. The big Create your first workflow button takes you into the editor.
Business hours
Above the rule list there's a collapsible Business hours card. The summary line shows the current open window at a glance — which weekdays are open and the start/end time.
![]()
Click the chevron to expand the card and edit the schedule:
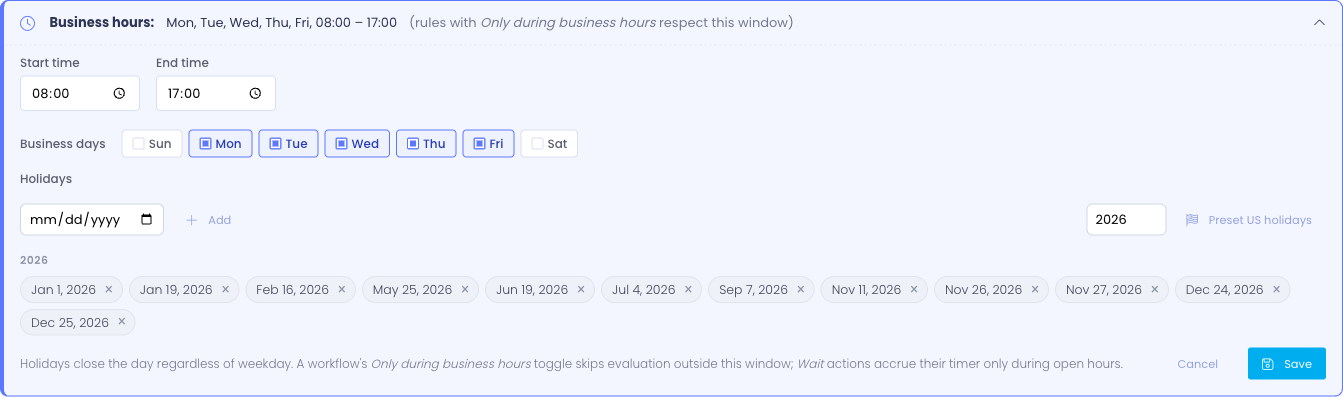
The form has three fields:
- Start time / End time — the daily open window in the system timezone. Defaults to 08:00–17:00.
- Business days — the days of the week the office is open. Defaults to Monday through Friday.
- Holidays — specific calendar dates when the office is closed regardless of weekday. Pick a date and click Add to drop it in as a removable chip (click the ✕ on a chip to remove it). The Preset US holidays button fills in the standard federal holidays for the year you choose — New Year's Day, MLK Day, Presidents Day, Memorial Day, Juneteenth, Independence Day, Labor Day, Veterans Day, Thanksgiving and the day after, plus Christmas Eve and Christmas Day — so you don't have to enter them one by one. Chips are grouped by year and sorted by date.
The schedule applies to every rule with Only during business hours turned on (set on each rule's Settings tab). Rules without that toggle ignore business hours entirely and fire whenever their trigger matches.
Two effects when a rule respects business hours:
- Evaluation is skipped outside the open window — no run-log row, no actions, no cooldown decrement.
- Wait actions accrue their timer only during open hours. A Wait 2 hours, then escalate sequence queued at 6 pm Friday lands at 10 am Monday — eight o'clock open plus two hours of business time — not at 8 pm Friday.
Holidays close the day completely. If you queue a wait that would land mid-holiday, it slides forward to the next open business day.
Add recurring closures (federal holidays, the week between Christmas and New Year's) to the Holidays list at the start of the year so they apply to every rule automatically — the Preset US holidays button gets the federal set in for the year in one click, and you can add or remove individual dates from there.
For ad-hoc closures (an unexpected snow day announced that morning), it's easier to flip the affected rule's Only during business hours toggle off temporarily, or disable the rule for the day, than to update the holiday list. The list is meant for known-in-advance closures.
Opening the editor
Click New Workflow (top right of the rule list) or click any rule's title or pencil icon to edit it. The editor opens to the Settings tab.
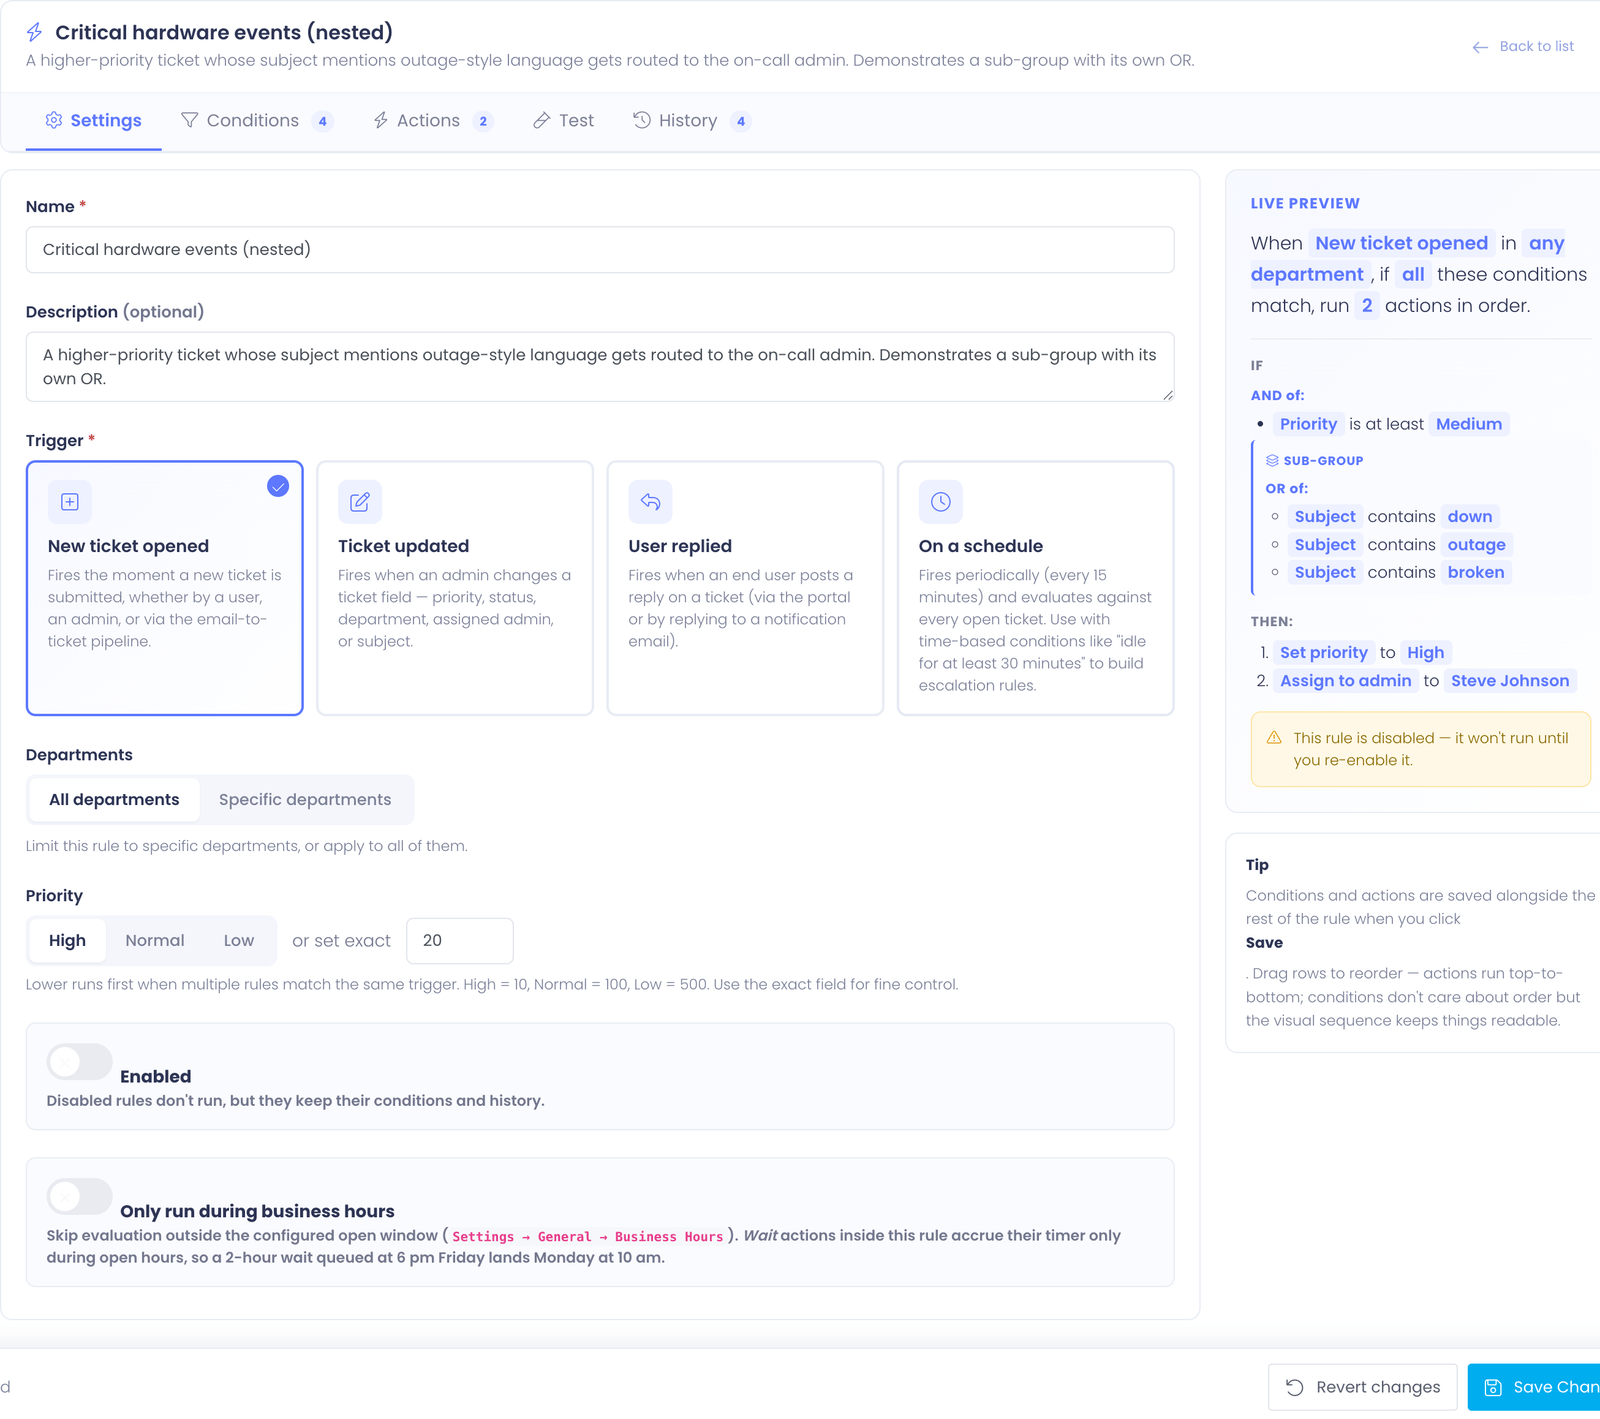
The editor is a single page with five tabs across the top:
- Settings (this page)
- Conditions — see Building Conditions
- Actions — see Building Actions
- Test — see Testing and Run History
- History — same page
The Test and History tabs are disabled when creating a brand-new rule until you've saved it for the first time. Both tabs need a saved rule to act on.
Naming and describing the rule
Name (required)
A short, action-oriented title. The name is what shows up in the rule list, in run history, and on the editor breadcrumb. Aim for something a teammate would understand without context — Route Chromebook tickets to Tier 1 is much more useful than Workflow 3.
Description (optional)
A longer explanation of what the rule does and why. Use it to leave context for whoever maintains the rule next — what it was originally written to solve, any quirks worth knowing.
The description appears under the rule name on both the rule list and the run history rows.
Choosing a trigger
The Trigger picker is a card grid. Click a card to select it — the active card has a colored outline.
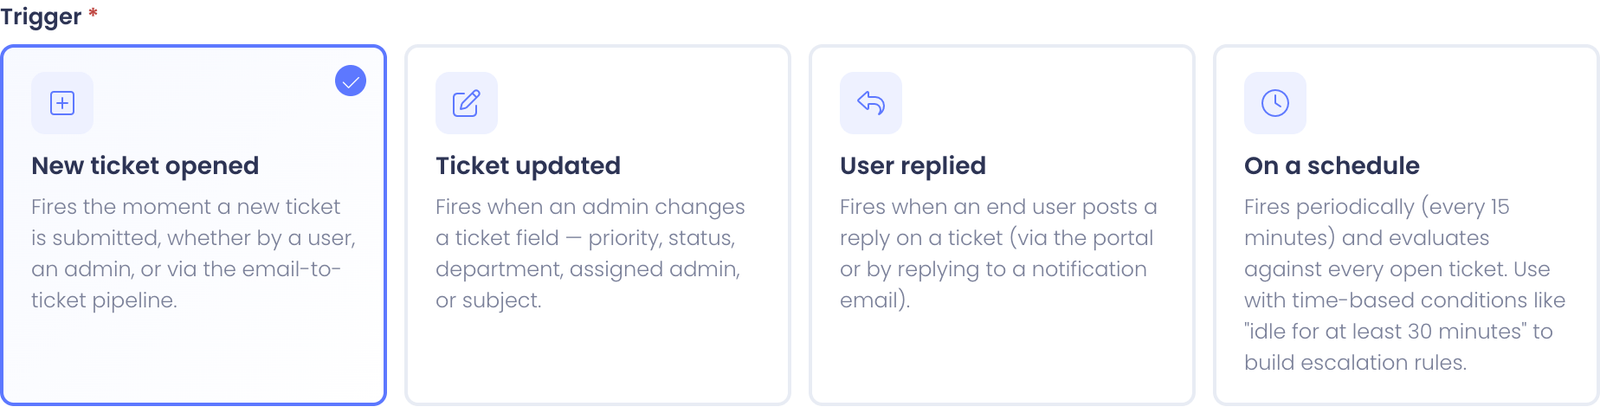
The trigger answers "when should this rule even consider running?" Three triggers are available:
- New ticket opened — fires the moment a new ticket is opened, whether through the user portal, an admin opening it on someone's behalf, or the inbound email pipeline. Most rules live here.
- Ticket updated — fires when an admin changes a ticket field (priority, status, department, assigned admin, subject). Conditions see the post-change state.
- User replied — fires only when an end user posts a reply (not an admin reply). At evaluation time the ticket's status will already be User Replied.
Triggers are required, and a rule can only have one. To act on multiple events, create separate rules — for example, an "auto-route by keyword" rule on New ticket opened and a separate "reopen closed tickets on user reply" rule on User replied.
Scoping to departments
The Departments field controls which tickets the rule even looks at, based on the ticket's department.

Two modes:
- All departments — the rule applies to every incoming ticket regardless of department
- Specific departments — the rule applies only to tickets in the departments you select
Use department scope to keep a rule's blast radius tight. A rule that auto-assigns Chromebook tickets to your hardware tech probably shouldn't fire on tickets in the Networking department — even if the subject mentions "Chromebook" — because Networking has its own triage workflow. Scoping the rule to the Hardware department prevents that crossover.
When Specific departments is selected with no departments picked, the rule will never match anything. The Live Preview will warn you about this.
Setting priority
Priority controls evaluation order when more than one rule could match the same ticket. Lower numbers run first.

Three preset buckets cover most cases:
- High — runs first (priority 10)
- Normal — default (priority 100)
- Low — runs last (priority 500)
For finer control, type an exact integer in the or set exact field. The exact value lives alongside the buckets — they're two ways of editing the same number.
Priority only matters when multiple rules with the same trigger could match the same ticket. If your rules all target distinct ticket shapes (different keywords, different departments), priority barely matters. It becomes important when one rule should "win" over another — for example, an emergency-keyword escalation rule should run before any general round-robin distributor.
You can also reorder rules visually on the rule list by dragging — that updates priorities in lock-step with the visual order, so you don't need to think in numbers.
Enabling the rule
The Enabled toggle at the bottom of the Settings tab controls whether the rule actually runs. It's on by default for new rules, but turning it off is useful when:
- You want to draft a rule across multiple sessions before turning it on
- You're temporarily pausing automation while you investigate a problem
- You're keeping a rule for reference but don't want it firing right now
Disabled rules are skipped entirely — they don't accrue run history while disabled, and conditions and actions stay intact. Re-enabling a rule resumes evaluation immediately on the next matching trigger.
Live Preview
The right side of the editor has a Live Preview card that summarizes the rule in a single sentence as you edit. As you change the trigger, the department scope, or add and remove conditions and actions, the sentence rewrites itself.
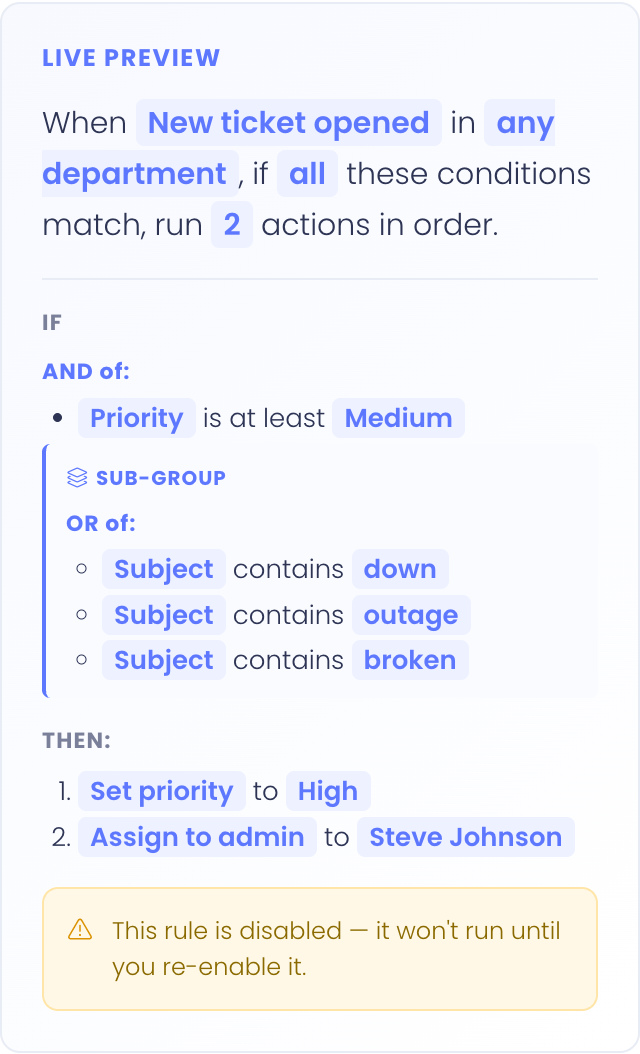
For example:
When a ticket is created in Hardware, if all of these conditions match, run 2 actions in order.
The card also surfaces warnings if the rule is missing something important — for example, if Specific departments is selected but no departments are picked, or if the rule has actions but no conditions (which means it would run on every single triggering event).
The preview is read-only — it's a sanity check, not a way to edit the rule. Click into the relevant tab to make changes.
Saving
The Save bar at the bottom of the editor sticks to the viewport so it's always reachable. It includes:
- Status indicator on the left — Saved (green check) when the form is in sync with what's stored, Unsaved changes (orange dot) the moment you make any edit
- Revert button — discards everything you've changed since the last save and reloads the editor with stored values. A confirmation prompt protects against accidental clicks
- Save Changes button — persists every tab's contents at once. Conditions and actions save alongside Settings; you don't save tabs individually
For new rules, the buttons read Discard and Create Workflow instead.
If you try to navigate away from the editor with unsaved changes — by clicking the Back to list link, hitting the browser back button, or closing the tab — you'll see a confirmation prompt to prevent losing work.
Testing the rule
The Test tab dry-runs the saved rule and shows whether it would match — nothing is written, no actions fire, and no run-log row is created. There are two modes:
- Synthetic ticket — describe a hypothetical ticket (subject, department, priority, custom field values) and see whether the rule would match it. Good for "what if" scenarios.
- Real ticket — search for an existing ticket by number or subject, pick it, and dry-run the rule against its actual department, priority, status, and custom-field values. This answers the most common question — "would this rule have fired on this real ticket?" — without rebuilding the ticket by hand.
In Real ticket mode the selected ticket shows a read-only summary card (number, subject, status, assignee, age, idle time). Click Run test to see the verdict, the per-condition pass/fail breakdown — so you can spot exactly why a condition matched or didn't — and the actions that would run.
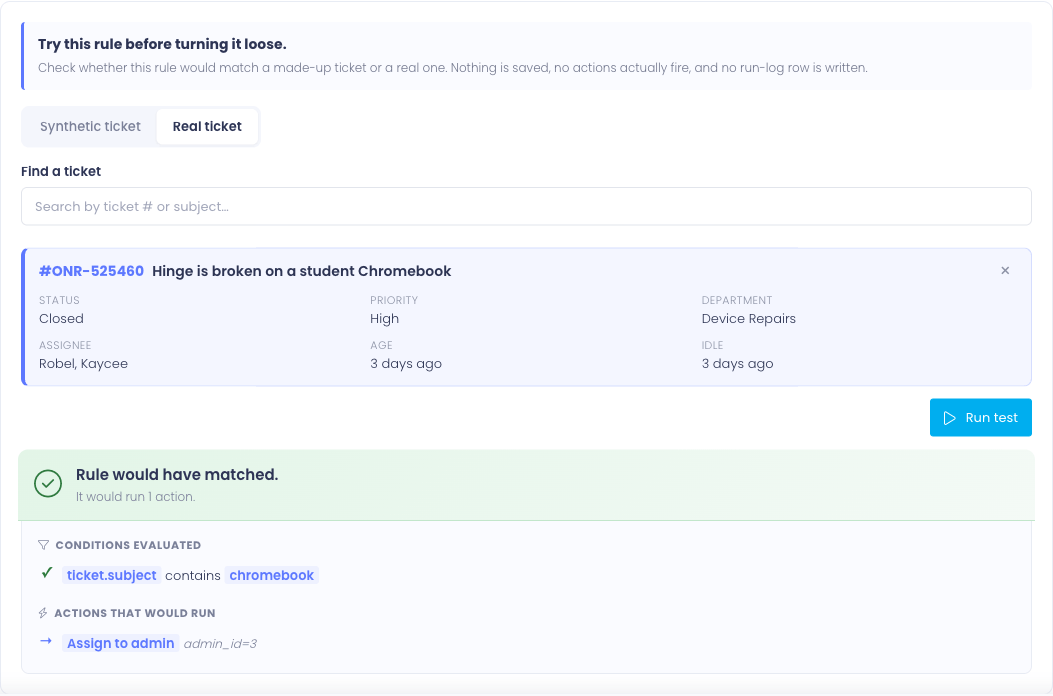
The Test tab runs against the last saved version of the rule. If you have unsaved edits on the Settings, Conditions, or Actions tabs, save first so you're testing what's on screen.
Common Questions
Q: Can I copy an existing rule to use as a starting point? Yes — the Duplicate button on each row of the rule list creates an exact copy with all conditions and actions intact. The copy lands disabled (so you can edit safely), with (copy) appended to the name, and the editor opens to it immediately.
Q: Why is my new rule's Test tab disabled? The Test tab needs a saved rule to dry-run against. Save the rule first (even with empty conditions and actions), and the tab becomes available.
Q: I changed the priority but the rule still runs in the same order. Why? Reordering only affects rules with the same trigger. Rules tied to different triggers evaluate on different events and don't share an ordering. Within a single trigger, lower priority runs first.
Q: What happens to run history if I rename a rule? History is tied to the rule's identity, not its name. Renaming the rule keeps every prior history row intact, and they update to show the new name.
Q: Can I edit a rule while it's running on tickets? Yes. Saving updates the rule mid-flight; the next ticket that triggers it uses the new configuration. Tickets already mid-evaluation when you save are not affected — workflow evaluation is fast and atomic per ticket.