Add Administrator
The Add Administrator page is where you create new administrative accounts for staff who need access to Manage1to1. This includes defining their login credentials, assigning their role (permissions), and specifying which buildings they can manage.
You can access this page from Administrators > View Administrators and clicking the Add Administrator button.
To create and edit administrators, you need the Manage Administrators permission assigned to your role.
Understanding Administrator Access Control
Manage1to1 uses a two-factor access control system to determine what each administrator can do:
1. Role (What They Can Do)
A role is a collection of permissions that defines which features and actions an administrator can access.
Examples:
- Technology Admin - Full access to devices, users, incidents, carts, settings
- Building Admin - Access to users and basic device operations
- Billing Clerk - Access to invoices and payments only
- Help Desk - Access to support tickets and basic user information
Think of a role as job function permissions. It answers: "What tasks is this person allowed to perform?"
2. Building Access (What They Can See)
Building access limits which school/site data an administrator can view and manage.
How it works:
- Administrators can only see users, devices, carts, and incidents from their assigned buildings
- This creates data boundaries between schools
- An administrator with no buildings assigned won't be able to see most system data, even if their role has broad permissions
Think of building access as data visibility. It answers: "Which school's data can this person see?"
Both role AND building access are required for full functionality. An administrator with broad role permissions but no building access will have an essentially non-functional account. Always assign at least one building!
Adding a New Administrator
Step-by-Step Process
- Navigate to
Administrators > View Administrators - Click the Add Administrator button (top right)
- Fill out the form fields (explained below)
- Click Add to create the account
The new administrator can log in immediately using the email and password you specified.
Form Fields Explained
Basic Information
First Name (Required)
- Administrator's legal first name
- Used in the system interface and audit logs
- Example:
John
Last Name (Required)
- Administrator's legal last name
- Used in the system interface and audit logs
- Example:
Smith
Email (Required)
- Administrator's login username
- Must be a valid email address
- Must be unique - cannot already exist in the system
- Example:
jsmith@district.edu
The email address IS the login username. Administrators will use this email to log in, not a separate username.
Password (Required)
- Initial login password for the administrator
- Minimum 7 characters
- Should be complex and secure
- Best practice: Set a temporary password and have the administrator change it on first login
Confirm Password (Required)
- Must match the password field exactly
- Prevents typos during password creation
Generate Password
Click Generate Password under the Confirm Password field to have Manage1to1 build a secure initial password for the administrator. A small modal opens with a preview:
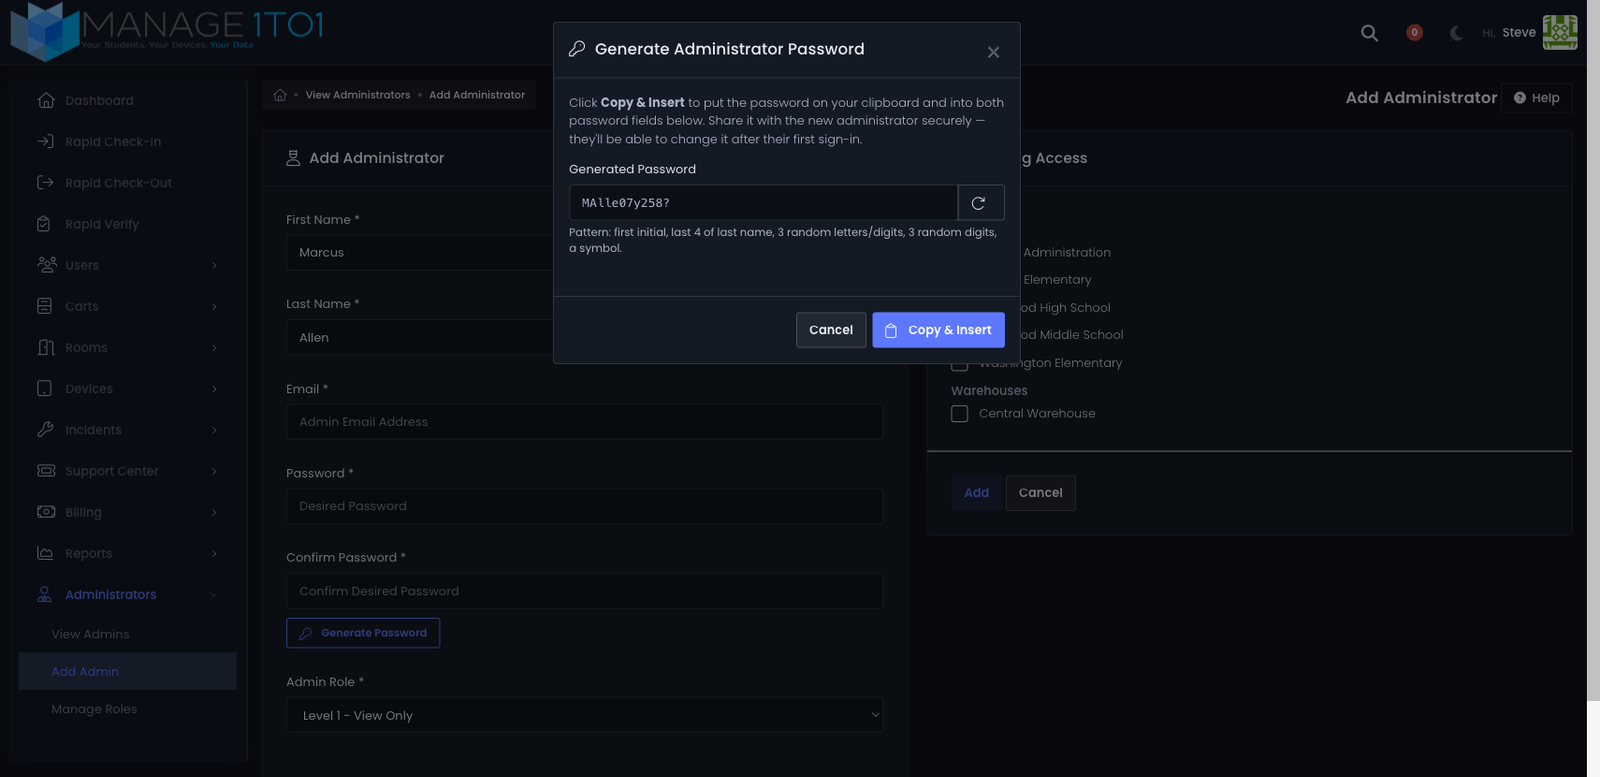
The generator combines the administrator's first initial and the first four letters of their last name with random letters, digits, and a symbol — readable enough to communicate verbally for the first login, but unique to that administrator.
- Click the circular arrow in the password field to regenerate if you'd like a different one.
- Click Copy & Insert to copy the password to your clipboard and fill both the Password and Confirm Password fields in one step.
Share the generated password with the administrator over a secure channel (e.g. a password manager invitation or in person). They can change it after their first sign-in from My Profile.
The generated password is shown only once in this modal — after you click Copy & Insert, the modal closes and Manage1to1 stores the password as a hash, so it can't be retrieved later. Paste it somewhere safe before you save the form if you'll need to send it on later.
Role Assignment
Role (Required)
- Dropdown showing all available roles
- Defines what permissions this administrator has
- Format:
Role Name - Description - Example:
Technology Administrator - Full system access
How to choose the right role:
- Identify their job function - What will they actually need to do?
- Follow least privilege - Grant only the permissions they need
- Use existing roles when possible - Don't create custom roles unnecessarily
- Consider district policies - Some roles may require approval
Example role selections:
- Building secretary who checks out devices → Building Administrator
- IT technician who manages devices and repairs → Technology Administrator
- Accounts payable staff who process invoices → Billing Clerk
- Help desk staff who respond to tickets → Help Desk Support
If the role you need doesn't exist, you'll need to create it first under Administrators > Manage Roles. See Manage Roles for details.
Building Access
Buildings (Required - select at least one)
- Checkboxes for all schools/sites in your district
- Check every building this administrator should be able to manage
- They will only see users, devices, carts, and incidents from checked buildings
Common building access scenarios:
| Staff Role | Building Access | Reasoning |
|---|---|---|
| District IT Director | All buildings | Oversees technology for entire district |
| High School Principal | High School only | Only needs access to their building |
| Elementary Tech | Elementary schools only | Manages devices for elementary level |
| Central Office Billing | All buildings | Processes invoices district-wide |
| Building Secretary | Their building only | Manages checkouts for their school |
If you don't check any buildings, the administrator will have an essentially non-functional account. They'll be able to log in but won't see any users, devices, carts, or incidents (even if their role grants those permissions).
Special Flags (Super Admins Only)
These checkboxes only appear if you're logged in as a Super Administrator. Regular district administrators don't see or modify these.
POC (Point of Contact)
- Designates this administrator as the district's primary contact
- Used by Manage1to1 support for system notifications
- Typically checked for the Technology Director or IT Manager
- Usually only one POC per district
Reseller
- System-level designation for Manage1to1 reseller/partner accounts
- Not used by district administrators
- Leave unchecked for all regular district staff
Most district administrators will never see these fields. They're reserved for system-level account management.
Common Use Cases
Scenario 1: New Building Secretary Needs Device Checkout Access
A new secretary started at Lincoln Elementary and needs to check out devices to students:
- Click Add Administrator
- Enter their information:
- First Name:
Sarah - Last Name:
Johnson - Email:
sjohnson@district.edu - Password:
TempPass123!(they'll change it) - Role:
Building Administrator(has checkout permissions) - Buildings: Check Lincoln Elementary only
- First Name:
- Click Add
- Email them their credentials and instructions to change password
Result: Sarah can log in, see only Lincoln Elementary data, and check out/check in devices.
Scenario 2: District IT Technician Needs Full Device Access
A new IT technician will manage device repairs and incidents across all schools:
- Click Add Administrator
- Enter their information:
- First Name:
Mike - Last Name:
Chen - Email:
mchen@district.edu - Password:
TechStart2024! - Role:
Technology Administrator(full device/incident access) - Buildings: Check all buildings (needs district-wide visibility)
- First Name:
- Click Add
Result: Mike can manage devices, incidents, carts, and repairs for all schools in the district.
Scenario 3: Help Desk Staff Needs Ticket Access Only
A student worker will help answer support tickets but shouldn't access devices or student records:
- Click Add Administrator
- Enter their information:
- First Name:
Alex - Last Name:
Martinez - Email:
amartinez@district.edu - Password:
HelpDesk2024! - Role:
Help Desk Support(tickets only, no device/user access) - Buildings: Check all buildings (tickets come from all schools)
- First Name:
- Click Add
Result: Alex can view and respond to support tickets but cannot access user records, devices, or incidents.
Scenario 4: Billing Clerk Needs Invoice Access
Accounts payable needs someone to manage invoices and payments:
- Click Add Administrator
- Enter their information:
- First Name:
Linda - Last Name:
Williams - Email:
lwilliams@district.edu - Password:
Billing2024! - Role:
Billing Clerk(invoice and payment access only) - Buildings: Check all buildings (invoices are district-wide)
- First Name:
- Click Add
Result: Linda can create invoices, record payments, and run billing reports, but cannot access devices or user records.
Scenario 5: Principal Needs Read-Only Access for Reporting
A middle school principal wants to view reports about their building but not manage devices:
- Click Add Administrator
- Enter their information:
- First Name:
Dr. Robert - Last Name:
Taylor - Email:
rtaylor@district.edu - Password:
Principal2024! - Role:
Reports Viewer(read-only access to reports) - Buildings: Check Washington Middle School only
- First Name:
- Click Add
Result: Dr. Taylor can run and view reports for Washington Middle School but cannot modify devices, users, or incidents.
Editing Existing Administrators
The Edit Administrator page uses the same form as Add Administrator, with a few additions:
Additional fields when editing:
- Active checkbox - Uncheck to disable login access (mark inactive)
- All other fields work the same way
To edit an administrator:
- Go to
Administrators > View Administrators - Find the administrator in the table
- Click Edit next to their name
- Make changes
- Click Save
Common edits:
- Change role when job duties change
- Add/remove buildings when assignments change
- Mark inactive when staff leave
- Update email if it changes
- Reset password if they forget it — leave both password fields blank to keep the existing password, or use Generate Password to roll a new one
Password Management
Setting Initial Passwords
Best practices:
- Use a strong temporary password (minimum 7 characters)
- Include uppercase, lowercase, numbers, and symbols
- Don't use easily guessable passwords like "Password123"
- Don't reuse passwords from other systems
Recommended approach:
- Set a complex temporary password when creating the account
- Provide the password securely (in person or encrypted email)
- Require the administrator to change it on first login
- Don't write passwords in plain text emails
Resetting Passwords
When editing an existing administrator:
- Leave the password fields blank to keep their current password
- Enter a new password (and confirm it) to change their password
- The administrator can also change their own password from their profile
Validation and Error Messages
The form validates your input before creating the account:
Common validation errors:
| Error | Cause | Solution |
|---|---|---|
| "This email is already in use by an Administrator Account. Try another." | Email address already exists | Use a different email or edit the existing account |
| "Field is required" | Missing required field | Fill in all required fields |
| "Passwords must match" | Password and confirm don't match | Re-enter the passwords carefully |
| "Minimum 7 characters" | Password too short | Use a longer password |
| "Invalid email format" | Email address malformed | Use a properly formatted email (user@domain.com) |
Tips for Creating Administrator Accounts
✅ Do:
- Use official work email addresses (not personal emails)
- Create individual accounts for each person (never shared accounts)
- Assign the minimum role needed for their job function
- Check only the buildings they actually need to access
- Set strong temporary passwords and require them to change it
- Document why administrators have specific permissions
- Test the account by logging in as them (with permission)
- Verify building access is working correctly
❌ Don't:
- Create "test" or "shared" accounts for multiple people
- Give everyone the same broad role for convenience
- Assign all buildings unless genuinely needed
- Use weak or easily guessable passwords
- Leave password fields blank (account won't work)
- Skip role assignment (account will be non-functional)
- Forget to check at least one building
- Share login credentials between multiple staff
Security Considerations
Principle of Least Privilege:
- Grant only the permissions needed for the administrator's actual job duties
- Don't give "extra" permissions "just in case" - add them later if needed
- Review access regularly to ensure it still matches job responsibilities
Building Access Security:
- Principals and building staff typically need access only to their building
- District-level staff may need access to all buildings
- Don't assign all buildings to everyone for convenience
- Building access creates important data boundaries
Account Management:
- Create accounts as close to the start date as possible (not months early)
- Disable accounts immediately when staff leave or change roles
- Never share administrator login credentials between people
- Each person should have their own individual account for audit trail purposes
Common Questions
Q: What happens if I don't assign any buildings? The administrator will be able to log in, but they won't see any users, devices, carts, or incidents - even if their role grants those permissions. Always assign at least one building.
Q: Can I create an administrator without a role?
No, role assignment is required. If an appropriate role doesn't exist, you'll need to create it first under Administrators > Manage Roles.
Q: Can an administrator change their own password later? Yes, administrators can update their own password from their profile settings. The password you set when creating the account is just their initial password.
Q: What's the difference between role and building access?
- Role = What they can DO (permissions like "View Devices", "Edit Users", "Create Incidents")
- Building Access = What they can SEE (which school's data they can view and manage)
Both are required for full functionality.
Q: Can I edit an administrator after creating them?
Yes! Go to Administrators > View Administrators, find them in the table, and click Edit. You can change their role, building access, password, or any other field.
Q: Why does the form show POC and Reseller checkboxes for some admins but not others? Those fields only appear if you're logged in as a Super Administrator. Regular district administrators don't see them because they're system-level designations.
Q: What if I make a mistake and create the wrong account? If you just created it and it has no associated records in the system, a Super Admin can delete it. Otherwise, just mark it Inactive to disable login access.
Q: Do administrators get email notifications when I create their account? Not automatically. You'll need to manually provide them with their login credentials (email address and temporary password).
Q: Can one person have multiple administrator accounts? Technically possible but strongly discouraged. Each person should have exactly one administrator account. Multiple accounts make auditing difficult and create security risks.
Q: What happens if I assign a role with no permissions? The administrator can log in but won't be able to do anything. They'll see a limited interface with no functional access. Always assign a role with appropriate permissions.
Next Steps
- To view all administrators: See View Administrators
- To create or modify roles: See Manage Roles
- To review administrator actions: Check the Activity Log
Remember: Administrator access control requires both an appropriate role AND building access assignments to function properly.