View Administrators
The View Administrators page provides a complete roster of everyone who has access to your Manage1to1 administrative interface. This is where you review who can log in, what permissions they have, and manage their account status.
You can access this page from the main navigation under Administrators > View Administrators.
To view and manage administrators, you need the Manage Administrators permission assigned to your role.
Understanding Administrator Accounts
Think of administrator accounts as keys to your system. Each administrator represents a person on your staff who needs access to manage users, devices, incidents, reports, or other system functions.
Administrator accounts control:
- Who can log in - Only active administrators with valid credentials
- What they can do - Determined by their assigned role
- What they can see - Limited by their building access assignments
Key concepts:
- Active Administrators - Can log in and perform actions within their permissions
- Inactive Administrators - Cannot log in, but their historical records remain intact
- Roles - Define what actions an administrator can perform (permissions)
- Building Access - Limits which school/site data an administrator can view and manage
What You'll See on the Page
The View Administrators page displays two tables:
Active Administrators Table
Shows administrators who currently have login access.
| Column | What It Shows |
|---|---|
| Name | Administrator's first and last name |
| Login email address | |
| Role | Assigned role (defines permissions) |
| Departments | Support ticket departments they manage |
| Actions | Edit button, plus a Delete button for administrators who have the Delete Administrator permission |
Example:
Name           Email                   Role              Departments      Actions
John Smith     jsmith@district.edu     Technology Admin  Help Desk, IT    Edit
Mary Johnson   mjohnson@district.edu   Building Admin    None             Edit
Inactive Administrators Table
Shows administrators whose accounts have been disabled.
Why keep inactive administrators?
- Preserves historical records (who created devices, who processed incidents, etc.)
- Maintains audit trail integrity
- Keeps reporting data accurate
- Can be reactivated if staff member returns
Common Use Cases
Scenario 1: Annual Access Review
Your IT security policy requires reviewing administrator access quarterly:
- Open View Administrators
- Review the Active Administrators table
- For each administrator:
- Click Edit to view their role and building access
- Verify they still need this level of access
- Check if their building assignments are current
- Deactivate any administrators who no longer need access
- Update roles/buildings for anyone whose responsibilities changed
Result: Up-to-date access control that follows principle of least privilege.
Scenario 2: Staff Member Leaves District
A building secretary who managed device checkouts just resigned:
- Open View Administrators
- Find the staff member in the Active Administrators table
- Click Edit next to their name
- Uncheck the Active checkbox
- Save changes
Result: They can no longer log in, but all their historical records (checkouts, incidents, etc.) remain attributed to them for audit purposes.
Scenario 3: Troubleshooting "Why Can't They See Devices?"
A building principal says they can't see any devices when they log in:
- Open View Administrators
- Find the principal in the Active table
- Click Edit to view their profile
- Check two things:
- Role - Do they have "View Devices" permission? (Check role details)
- Buildings - Are the correct buildings checked?
- Common issue: Role has device permissions, but no buildings assigned
Result: Identify whether it's a role problem or building access problem.
Scenario 4: Finding Who Has Specific Access
You need to know which administrators can delete incidents:
- Open View Administrators
- Click Edit on each administrator
- Note their assigned role
- Go to
Administrators > Manage Roles - Check which roles have "Delete Incidents" permission
- Cross-reference with your administrator list
Result: Complete list of who has that specific permission.
Scenario 5: Reactivating a Returning Staff Member
A technology coordinator left the district but is returning after a year:
- Open View Administrators
- Look in the Inactive Administrators table
- Find the staff member
- Click Edit
- Check the Active checkbox
- Update their email if it changed
- Reset their password
- Review and update role/building access as needed
- Save changes
Result: They can log in with all their historical records preserved.
Administrator Actions
Edit Administrator
Click the Edit button next to any administrator to:
- Update their name or email
- Change their password
- Modify their assigned role
- Adjust building access
- Mark them active or inactive
- (Super Admins only) Change POC or Reseller flags
See Add Administrator for detailed field explanations (Edit uses the same form).
Delete Administrator
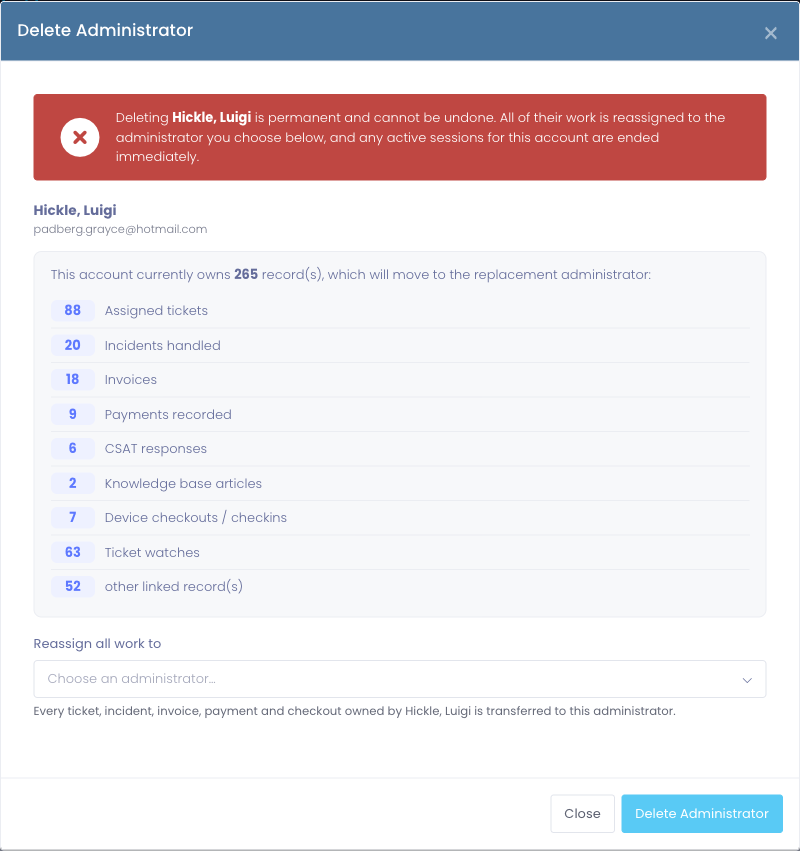
Deleting an administrator removes the account for good. Before it is removed, all of their work is reassigned to another administrator you choose, and any sessions they have open are ended immediately. There is no undo.
Deleting an administrator requires the Delete Administrator permission on your role. When you have it, a Delete button appears next to eligible accounts in both the active and inactive tables.
In most situations you should mark an administrator inactive instead, so their name stays attached to the records they created. Deleting is the right choice when you truly need the account gone, for example a duplicate account, or a person who has permanently left and whose open work should be handed to someone else.
How it works
- Click Delete next to the administrator you want to remove.
- The Delete Administrator window opens with a red warning that the action is permanent and cannot be undone, and that any active sessions for the account end immediately.
- Review the work preview. The window shows the administrator's name and email, then a count of everything the account currently owns, grouped by type (such as assigned tickets, incidents, invoices, payments, and device checkouts), so you can see exactly what will be handed off. If the account owns nothing, the window tells you it can be deleted cleanly.
- Choose the administrator who should receive all of that work from the Reassign all work to list. Start typing a name or email to filter it. The confirm button stays disabled until you pick someone.
- Click Delete Administrator to confirm. The work moves to the administrator you chose, the account is removed, and the deleted administrator is signed out everywhere.
When deletion isn't offered
Some accounts can never be deleted, and the Delete button won't appear for them:
- Reserved Manage1to1 system accounts
- Super Administrator, Point of Contact, and Reseller accounts (deactivate these from the edit screen instead)
- The account you are currently signed in as
If you open the window for one of these protected accounts, it explains that reserved and protected accounts can only be deactivated from the edit screen, and no delete option is shown.
If no other active administrator is available to receive the work, deletion is paused until you create or reactivate one: the window tells you to create or reactivate another administrator first.

Searching and Filtering
Use the search box above the table to quickly find administrators:
- Search by name
- Search by email address
- Search by role name
The table automatically filters as you type.
Example searches:
- Type "Smith" - finds John Smith, Sarah Smith-Jones, etc.
- Type "admin" - finds all administrators with "Admin" in their role name
- Type "@highschool" - finds all administrators with that email domain
Understanding Department Assignments
The Departments column shows which support ticket departments an administrator manages. This is separate from permissions and controls email notifications for support tickets.
How it works:
- Configured in the administrator's role settings
- Administrators receive emails when tickets are created in their departments
- Does not grant or restrict access - permissions do that
- One administrator can manage multiple departments
Examples:
- "Help Desk, IT" - receives notifications for both departments
- "None" - does not receive support ticket notifications
- "Building Maintenance" - only gets maintenance ticket alerts
Tips for Managing Administrators
✅ Do:
- Conduct regular access reviews (quarterly or annually)
- Mark staff inactive when they leave rather than deleting
- Document why administrators have specific permissions
- Use meaningful role names that reflect job functions
- Assign only the buildings each administrator needs to see
- Update email addresses when staff email changes
- Verify building access matches current assignments
❌ Don't:
- Delete administrators with historical records in the system
- Give everyone the same broad role "just in case"
- Assign all buildings to everyone for convenience
- Leave former staff members active indefinitely
- Grant administrator access without proper training
- Share administrator accounts between multiple people
- Forget to remove access during staff transitions
Security Best Practices
Access Control:
- Only grant administrator access to staff who genuinely need it
- Follow principle of least privilege - minimum permissions for their job
- Building access should match actual building assignments
- Review access regularly, not just when issues arise
Account Management:
- Each person should have their own individual administrator account
- Never share login credentials between multiple staff
- Disable accounts immediately when staff leave or change roles
- Use complex passwords that aren't reused from other systems
Audit Trail:
- Keep inactive administrators in the system for historical accuracy
- Review administrator activity logs periodically
- Document permission changes and why they were made
- Maintain records of who had what access when
Common Questions
Q: Can I delete an administrator who left years ago? Yes. When you delete an administrator, all of their work is reassigned to another administrator you choose, so nothing is lost. That said, many districts prefer to keep former staff marked Inactive so their own name stays attached to the records they created. Delete when you want the account fully gone and its open work handed to someone else.
Q: Why does the Delete button only show for some administrators? The Delete button appears for administrators whose role has the Delete Administrator permission. It is also hidden for accounts that can't be deleted: reserved Manage1to1 system accounts, Super Administrators, Points of Contact, Resellers, and the account you are currently signed in as.
Q: What happens to the deleted administrator's tickets, invoices, and checkouts? They are transferred to the administrator you pick in the Reassign all work to list, before the account is removed. The delete window shows you a full count of what will move, so there are no surprises.
Q: What's the difference between Inactive and Deleted?
- Inactive - Account is disabled (cannot log in), but all historical records remain intact and attributed to them
- Deleted - Account is permanently removed, and its work is reassigned to another administrator you choose during deletion
Q: If I mark someone Inactive, can I reactivate them later? Yes! Inactive administrators appear in the Inactive Administrators table. Click Edit, check the Active checkbox, and save. All their historical records and settings are preserved.
Q: How do I know what permissions a specific administrator has?
Click Edit next to their name and note their assigned Role. Then go to Administrators > Manage Roles and view that role to see the complete list of permissions.
Q: Can an administrator have access to some buildings but not others? Yes! That's the purpose of building access. When editing an administrator, you check only the buildings they should be able to see and manage. They will only see users, devices, carts, and incidents from those specific buildings.
Q: What happens to records created by an Inactive administrator? Nothing changes. Devices they added, incidents they created, checkouts they performed - all remain in the system with their name attached. This preserves the historical audit trail.
Q: Can an administrator edit their own account? They can access their own profile to change some settings (like email and password), but they typically cannot change their own role or permissions. This prevents privilege escalation.
Q: What are POC and Reseller flags? These are system-level designations only visible and modifiable by Super Administrators. They're used for Manage1to1 support purposes and district Point of Contact designation. Regular district administrators don't need to worry about these.
Next Steps
- To add a new administrator: See Add Administrator
- To understand roles and permissions: See Manage Roles
- To review who changed what: Check the Activity Log
Regular administrator access reviews are a best practice for maintaining system security and ensuring proper data access controls.