View Users
The View Users page provides a centralized view of all students and staff in your Manage1to1 system. This is where you review user information, search for specific users, and perform common user management actions.
You can access this page from the main navigation under Users > View Users.
To view users, you need the View Users permission assigned to your role.
Understanding Users
Think of users as the people in your technology program - students who receive devices, staff who use district technology, anyone who needs to be tracked in your device management system.
Users represent:
- Students (K-12, by grade level)
- Staff members (teachers, administrators, support staff)
- Anyone who might check out a device
- Anyone who needs billing, incident tracking, or support tickets
What user records contain:
- Basic information (name, ID numbers, email)
- School/building assignment
- Grade level (for students)
- Device checkout history
- Incident history (damage, repairs)
- Billing/invoice history
- Support ticket history
- Notes and custom fields
What You'll See on the Page
The View Users page displays a searchable, filterable table of all users you have access to (based on your building permissions).
Default Columns
| Column | What It Shows |
|---|---|
| Name | User's full name (Last Name, First Name format) |
| Local ID Number | Student ID or staff ID from your SIS |
| User Type | Student or Staff |
| Grade | Grade level for students, "Staff" for staff members |
| Building | School or location the user is assigned to |
| Actions | View, Edit, Delete buttons (based on your permissions) |
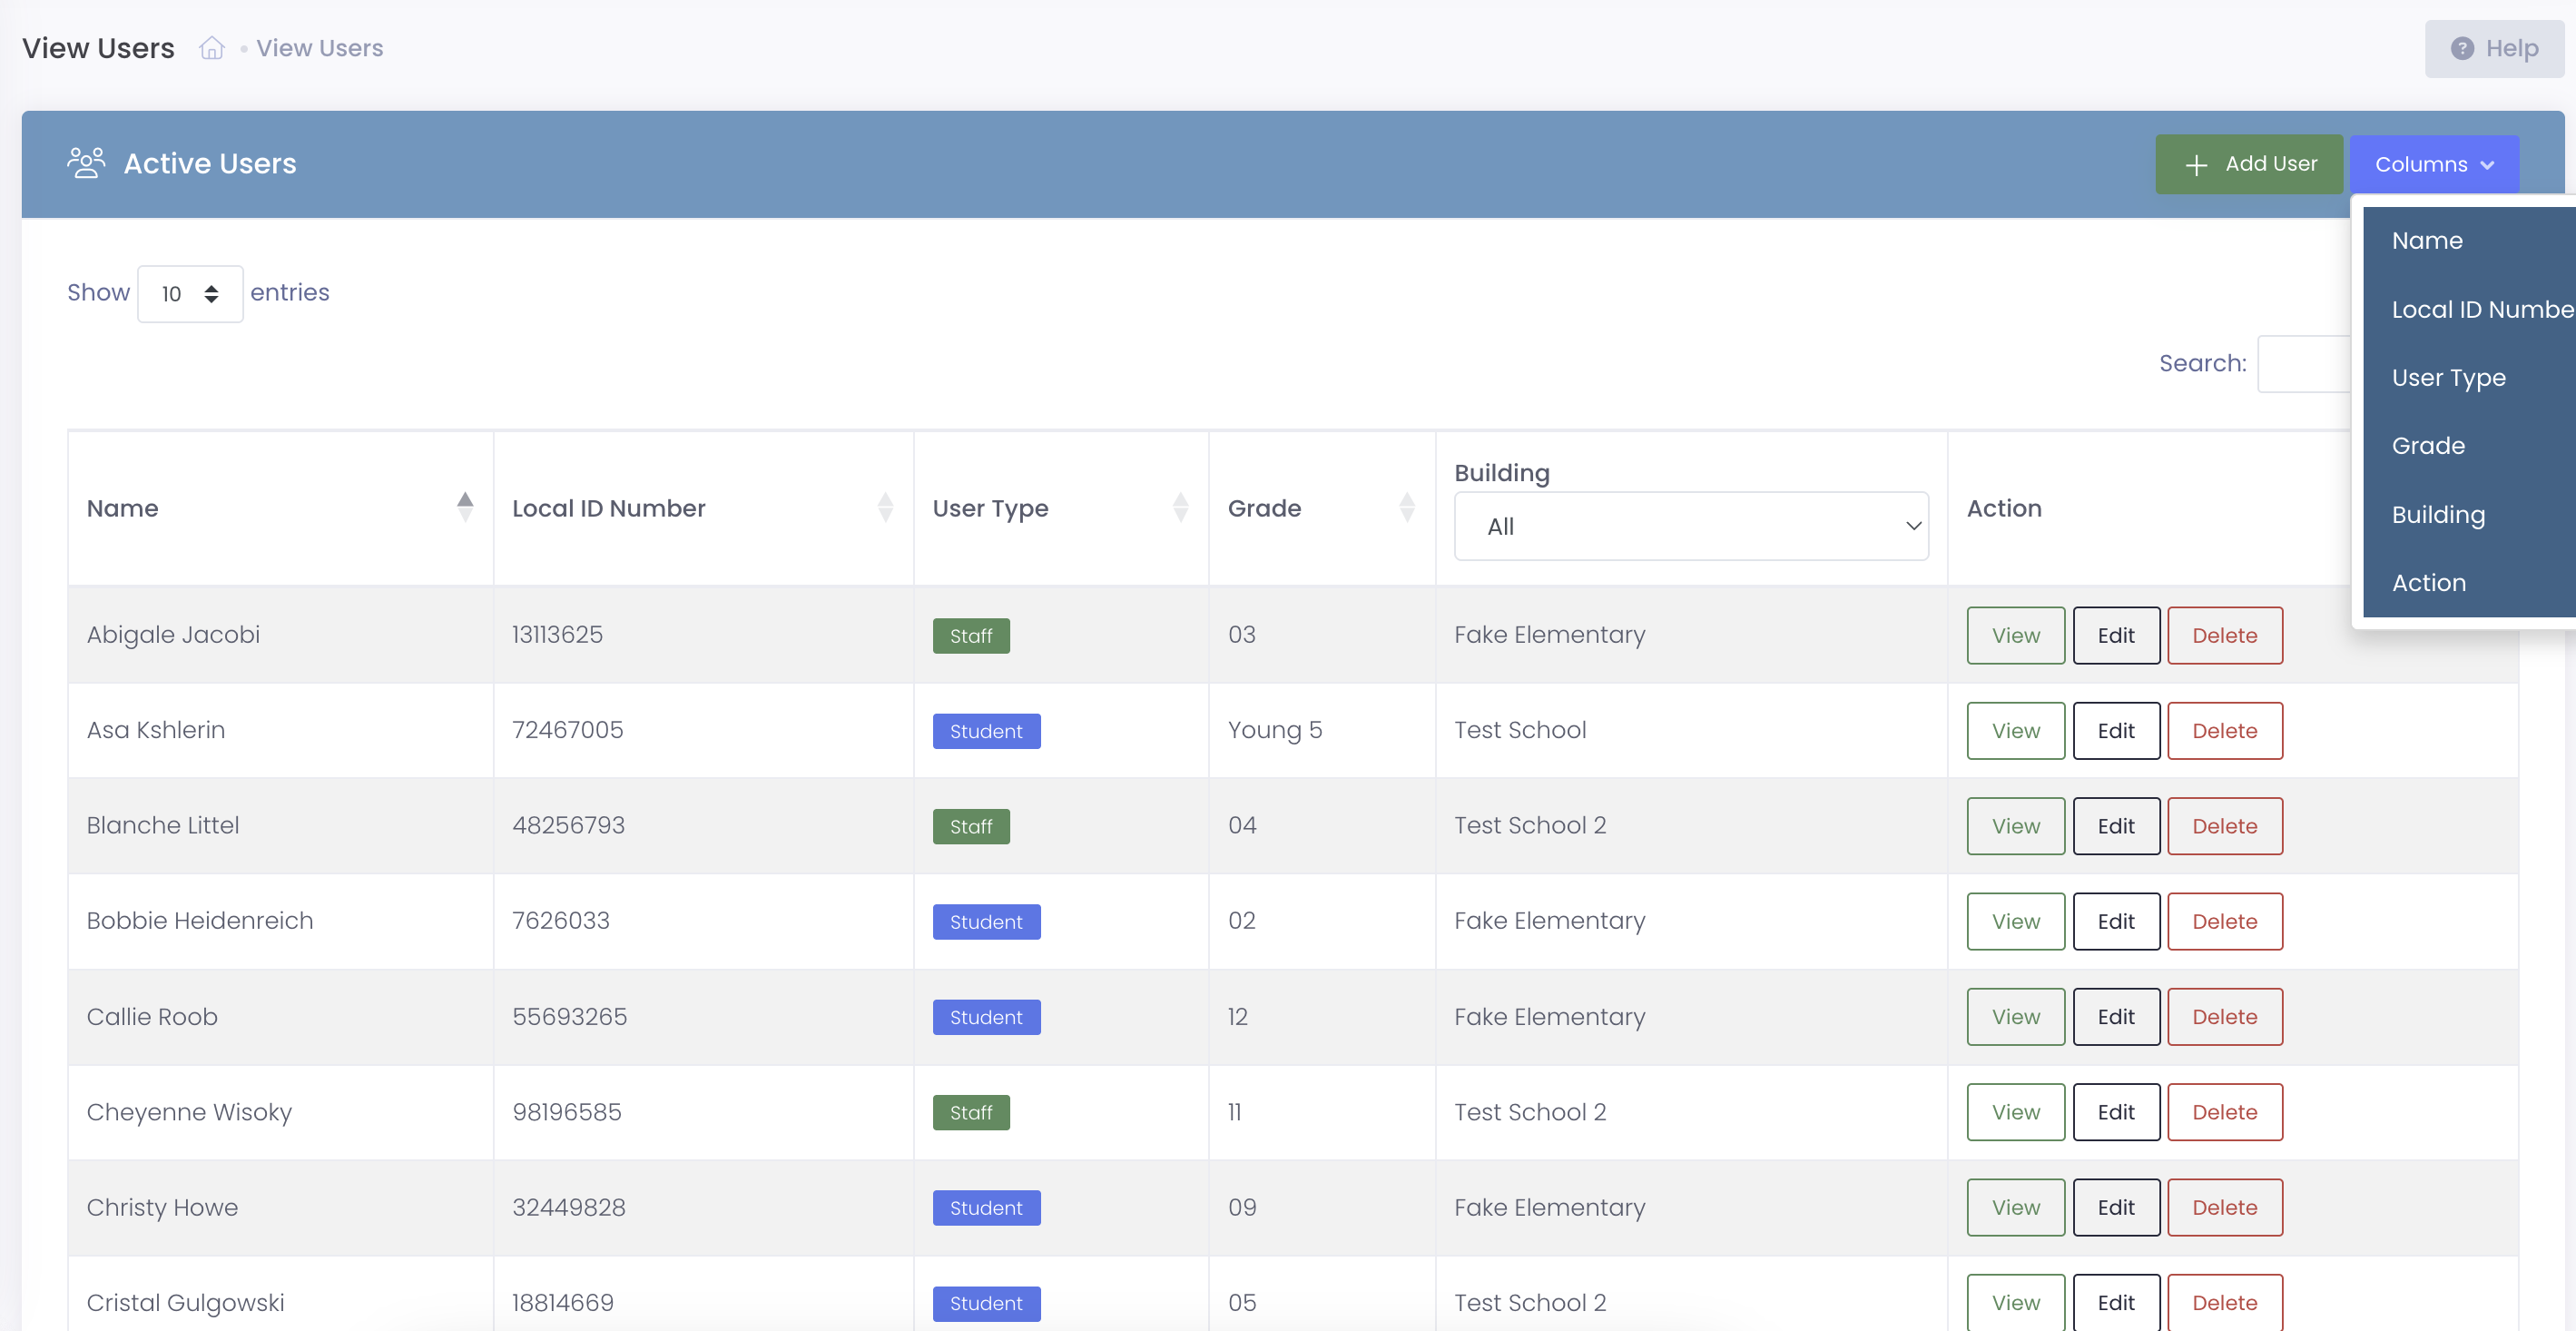
Additional Available Columns
Click the Columns button to show/hide additional fields:
Identification:
- State ID Number
- Username
- Email Address
Status:
- Active/Inactive status
- User Type
Academic:
- Homeroom
- Grade Level
Technology:
- Current device checkout status
- AUP signed status
Billing:
- Fee paid status
- Outstanding balance
Custom Fields:
- Any custom fields configured for your district
Customizing Your View
Show/Hide Columns
- Click the Columns button in the table header
- Check/uncheck the columns you want to display
- Your preferences are saved for future sessions
Use cases:
- Building secretaries - Show grade, device status, AUP status
- Finance staff - Show fee paid, outstanding balance, email
- IT staff - Show username, email, device status
- Principals - Show homeroom, grade, building
Filtering and Searching
Quick search:
- Type in the search box to filter by name, ID, email, or username
- Search is instant - results filter as you type
Column filters:
- Click the dropdown in column headers (Grade, Building, User Type)
- Select specific values to narrow results
- Combine multiple filters for precise searches
Examples:
- Filter Grade: "9" + Building: "High School" = All 9th graders at high school
- Filter User Type: "Staff" = All staff members
- Search "Smith" + Filter Grade: "12" = All 12th grade students named Smith
Repeat Offenders Filter
Above the user table you'll find a Repeat Offenders only checkbox. Turn it on to narrow the list to users who currently meet or exceed any incident-flag threshold (such as the default three Physical Damage incidents in the current school year). Affected rows also show a small red Repeat badge next to the name so they stand out at a glance.

Which flags count toward this filter — and at what threshold — is set under Settings → System Settings → Incidents Tab → Incident Flags.
Sorting
Click any column header to sort:
- Name - Alphabetical order (last name, first name)
- Local ID - Numerical order
- Grade - Grade level order (K, 1, 2, ... 12, Staff)
- Building - Alphabetical by building name
Click again to reverse sort order.
Common Use Cases
Scenario 1: Finding a Specific Student
A parent calls asking about their child's device checkout status:
- Open View Users
- Type the student's name in the search box
- Results filter automatically
- Click View next to the student's name
- Check the Checkout History tab on their profile
Result: Quickly locate the student and answer the parent's question.
Scenario 2: Identifying Students Without Devices
You need to know which 6th graders still need devices assigned:
- Open View Users
- Click Columns and enable "Device Status" column
- Filter Grade: "6"
- Filter Building: "Middle School" (if needed)
- Look for students showing "No Device Assigned"
- Export the list or manually review
Result: Action list of students who need devices.
Scenario 3: AUP Compliance Check
Administration wants to know which students haven't signed the Acceptable Use Policy:
- Open View Users
- Click Columns and enable "AUP Signed" column
- Filter Building: "Elementary School" (or specific building)
- Look down the AUP Signed column for "No" entries
- Export this list for follow-up
Result: List of students needing AUP signatures.
Scenario 4: New Student Verification
Several new students enrolled this week and you need to verify they're in the system:
- Open View Users
- Search for each student's name
- If found, click View to verify their information is correct
- If not found, click Add User to create their record
Result: Confirmed all new students are properly set up in Manage1to1.
Scenario 5: End of Year Inactive Status Review
Summer is approaching and you need to mark graduating seniors as inactive:
- Open View Users
- Filter Grade: "12"
- Filter Building: "High School"
- Review the list of seniors
- For each graduating senior:
- Click Edit
- Change status to "Inactive"
- Save
- Or use bulk import to update many at once
Result: Graduating seniors marked inactive, preventing accidental device checkouts next year.
User Actions
View User
Click the View button to open the user's profile page.
What you can see:
- Complete user information
- All tabs (Checkout History, Incident History, Billing, Tickets, Notes, Activity Log)
- Device assignments
- Complete history and records
See User Profiles for complete details.
Edit User
Click the Edit button to modify user information.
Editing users requires the Edit Users permission.
What you can modify:
- Name, ID numbers
- Email, username, password
- Building, grade, user type
- Active/inactive status
- Custom fields
Common edits:
- Correcting misspelled names
- Updating grade levels at year-end
- Changing building when students transfer
- Marking users inactive when they leave
- Updating email addresses
Tip: For bulk updates (like promoting all students to next grade), use the bulk import feature instead of editing individually.
Delete User
Click the Delete button to permanently remove a user.
Deletion is permanent and irreversible. Deleted users and their associated records are lost forever.
Deleting users requires the Delete Users permission.
When you CAN delete:
- User was just created by mistake
- User has no associated records (no devices, incidents, invoices, tickets)
When you CANNOT delete:
- User has device checkout history
- User has incidents or repairs
- User has invoices or payments
- User has support tickets
- User has any historical records
What to do instead: Mark the user Inactive rather than deleting them. This:
- Prevents future device checkouts
- Prevents them from logging in (if they have portal access)
- Preserves all historical records for audit trails
- Can be reversed if needed (just mark active again)
How to mark inactive:
- Click Edit next to the user
- Change status to "Inactive"
- Save
Active vs. Inactive Users
Active Users
Characteristics:
- Currently enrolled students or employed staff
- Can be assigned devices
- Can have invoices created
- Can create support tickets
- Appear in normal user searches
When to keep active:
- Current students enrolled in your district
- Current staff employed by your district
- Anyone actively using district technology
Inactive Users
Characteristics:
- Former students (graduated, transferred) or staff (resigned, retired)
- Cannot be assigned new devices
- Historical records remain intact
- Don't appear in default searches (unless you filter for inactive users)
When to mark inactive:
- Students who graduated or transferred out
- Staff who resigned or retired
- Users who left the district
To see inactive users, you need the View Inactive Users permission. Filter the user list or use the inactive users view option.
Why keep inactive users:
- Preserves checkout history (who had what device when)
- Maintains incident history (damage accountability)
- Keeps billing records intact
- Supports audits and compliance requirements
- Can be reactivated if user returns to district
Building Access and User Visibility
Your administrator account has building access configured - this determines which users you can see.
How it works:
- You only see users from buildings you have access to
- Building principals see only their building's users
- District IT sees all buildings' users (if granted access to all)
Example:
- Lincoln Elementary Principal - Only sees Lincoln Elementary students/staff
- District Technology Director - Sees all buildings across the district
This ensures data privacy and appropriate access control.
Tips for Using View Users
✅ Do:
- Use search and filters to narrow results before scrolling
- Export user lists for offline analysis or distribution
- Customize columns to show what you need for your role
- Mark users inactive rather than deleting them
- Verify user information when parents/staff report issues
- Use bulk import for mass updates (grade promotions, building changes)
- Review inactive users periodically to ensure accuracy
❌ Don't:
- Delete users who have any historical records
- Forget to mark graduating/transferring students inactive
- Create duplicate user records (search first to check)
- Share exported user lists broadly (contain sensitive student data)
- Leave obvious data errors uncorrected (wrong building, wrong grade)
- Assume user data is always current (verify against SIS periodically)
Exporting User Lists
Most user tables include an export option (CSV download):
How to export:
- Apply desired filters (building, grade, etc.)
- Click the Export button
- Open the CSV file in Excel or Google Sheets
Common export uses:
- Device distribution planning (users without devices)
- AUP compliance tracking (who hasn't signed)
- Parent contact lists (email addresses)
- Grade-level reports
- Building rosters
Exported user lists contain sensitive student/staff data (names, IDs, email addresses). Store securely and delete when no longer needed.
Common Questions
Q: Why don't I see all the users in my district? You only see users from buildings you have access to (configured in your administrator account). If you need access to additional buildings, contact your system administrator.
Q: What's the difference between Local ID Number and State ID Number?
- Local ID Number - Your district's student/staff ID (SIS ID)
- State ID Number - State-assigned identifier (only required in some states)
Most districts primarily use Local ID Number for day-to-day operations.
Q: Can I change a user's name? Yes, if you have Edit Users permission. Click Edit next to the user, update their name, and save. Common reasons include legal name changes or correcting data entry errors.
Q: How do I find users who graduated or transferred out? Filter for Inactive users (requires View Inactive Users permission). Inactive status indicates former students/staff who are no longer in the district.
Q: Why can't I delete a user? Users with any associated records (device checkouts, incidents, invoices, tickets, etc.) cannot be deleted to preserve historical data integrity. Mark them Inactive instead.
Q: Can I undo marking a user inactive? Yes! Edit the user and change their status back to Active. All their historical records remain intact.
Q: What happens to a user's device checkout when I mark them inactive? Existing device checkouts remain until you manually check them back in. Inactive status prevents new checkouts but doesn't automatically return devices.
Q: How often should user data be updated? Best practice is to sync with your SIS regularly (nightly or weekly automated imports). This ensures Manage1to1 reflects current enrollment, grade levels, and building assignments.
Q: Can I have duplicate users (same person, two records)? Technically possible but strongly discouraged. Duplicates cause confusion, split historical records, and create data integrity issues. Search thoroughly before creating new users.
Q: What's the difference between username and email address?
- Username - Used for logging into student/staff portal
- Email - Email address for communications
They may be the same (e.g., jsmith@district.edu) or different depending on your district's configuration.
Regular user management ensures your Manage1to1 system stays synchronized with current enrollment and provides accurate data for device deployment, billing, and support operations.