Moving and Assigning Carts
Moving a cart assigns the entire cart and all its devices to a teacher, staff member, room, or student in one action. This is perfect for classroom sets, mobile labs, or shared device pools that move together as a unit.
Instead of checking out 30 individual devices to a teacher, you move one cart — and all the devices in it are automatically assigned to that person or location. When the cart returns, sending it Home with the same Move Cart action releases everything and snaps devices back to the cart's default location.
To move carts, you need the Checkout Device permission assigned to your administrator role.
Note: Cart moves use the same permission as device checkouts. There is no separate "Checkout Cart" permission.
Understanding Cart Assignments
When you move a cart to a destination:
- The entire cart is assigned to that person, room, or student
- All devices in the cart are considered "in use" at that destination
- The cart shows as on the move on the cart list and cart device page
- The destination becomes responsible for the cart and its contents
This is different from individual device checkouts:
- Device checkout: One device assigned to one person
- Cart move: One cart (containing multiple devices) assigned to one person, room, or student
Move Destinations
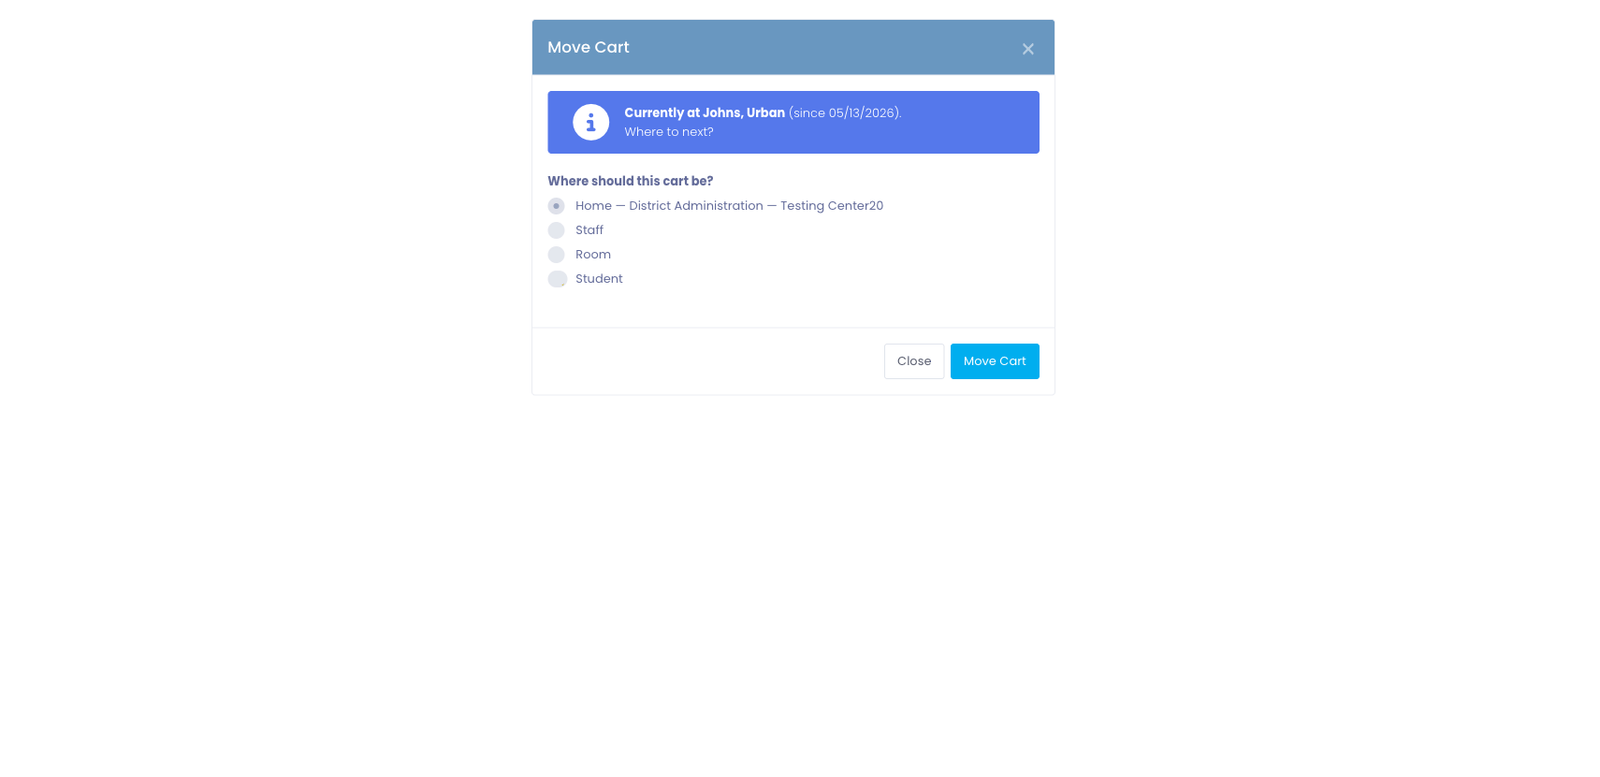
The Move Cart picker offers four destinations:
| Destination | When to pick it |
|---|---|
| Home | The cart's done with its assignment and is heading back to its default location. |
| Staff | The cart is going to a teacher, instructor, or other staff member. |
| Room | The cart is parked in a specific classroom or lab. Pick the building first, then the room. |
| Student | Rare — a student is taking the entire cart. The modal warns you to confirm district policy allows this. |
The Home option only appears when the cart has a Home Building set (see What "Home" means). If Home isn't set yet, the radio is disabled with a pointer to Edit Cart.
How to Move a Cart
-
Navigate to
Carts > View Cartsin the main menu. -
Find the cart you want to move in the table.
-
Click the View Devices button in the Actions column to open the cart's devices page.
-
In the Cart Summary card, click the Move Cart button in the footer (next to Edit Cart).

-
In the modal, pick a destination type — Home, Staff, Room, or Student.
-
Use the picker that appears for that destination type to choose where the cart is going.
-
Click Move Cart in the modal's footer to confirm.
The Move Cart modal handles both halves of the old check-out / check-in cycle: starting a new assignment, or ending the current one by going Home.
The Move Cart picker
When you click Move Cart, a modal opens with the destination radio buttons at the top and the matching picker underneath:
- Staff — type-ahead search by name, email, or local ID. Only staff in buildings you can manage appear.
- Room — pick a building first (filtered to buildings you can manage), then pick a room inside it.
- Student — type-ahead search like Staff, but with an extra warning explaining that handing a full cart to one student is unusual.
- Home — no picker; just send it home.
If the cart is currently assigned, you'll see a callout near the top of the modal showing where it is right now and when the assignment started — so you know what you're moving the cart from before you pick where it's going next.
The dropdown searches are powered by ajax and trigger after you type two or three characters. Use the local ID number as a fallback if a name search is too broad in a large district.
After Moving a Cart
Once you complete a move, several things happen automatically:
Cart Status Changes
- The cart's row on the View Carts list shows the active destination
- The cart device page shows a two-line callout: where the cart is now, and where it'll return when it goes Home
- The Move Cart button stays available — moving an already-moving cart starts a new assignment in one step (no separate check-in needed)
Destination Gets All Devices
- All devices in the cart are considered assigned to the destination
- The user profile (for Staff/Student) or room detail page shows the cart assignment
- Individual device profiles show as checked out via the cart and inherit the destination's location
Who Can Receive Cart Checkouts
Carts can be checked out to staff members, students, or rooms in your system:
Staff Members:
- Teachers, instructors, substitutes
- Administrative staff
- Most cart checkouts go to teachers for classroom use
Rooms:
- Classrooms, labs, offices, or other physical locations
- Perfect for carts that stay in one location
- Rooms show the building name as their identifier
- Great for tracking which room has which cart
Students:
- Individual students can receive cart checkouts
- Not shown by default - use the "Include Students" toggle
- Useful for student assistants managing classroom carts
- Less common than staff or room checkouts
Building Restrictions:
- You can only check out carts to users and rooms in buildings you have access to
- The cart's building assignment doesn't restrict who can receive it
- Building permissions control who can manage the cart, not who can receive it
Room checkouts are ideal when equipment stays in a specific location rather than being assigned to a person. For example, a cart of Chromebooks that lives in the Science Lab would be checked out to "Science Lab" rather than to a specific teacher. This way, when teachers rotate through that room, the cart assignment stays consistent.
Sending a Cart Home
When a cart's assignment is done — the teacher returned it, the classroom doesn't need it anymore, the substitute is gone — you send it home with Move Cart → Home. That ends the active assignment and snaps every device in the cart back to the cart's Home Building and Home Room.
Home process
- Navigate to
Carts > View Cartsin the main menu. - Find the cart in the table and click the View Devices button in the Actions column.
- On the cart's devices page, the Cart Summary shows the current destination in the "Currently at …" line.
- Click the Move Cart button in the Cart Summary card's footer.
- Choose Home in the destination picker (already selected by default when the cart is currently assigned).
- Click Move Cart in the modal's footer to confirm.
The cart returns to idle status and all devices update to the Home location.
If Home isn't set yet, the Home radio is disabled. To set a Home: navigate to Carts > View Carts, click Edit on the cart in the Actions column, and fill in Home Building and Home Room. Otherwise pick a different destination (Staff/Room/Student) to move the cart somewhere new instead.
Out-of-scope Home buildings
If a cart's Home Building is in a building you don't have permission to manage, you can still send the cart home. The Move Cart modal warns you that the cart will leave your lists once it's there — which is the intended outcome, since whoever manages that building takes the cart from there. The action is still recorded with your name in Assignment History.
Cart Status Indicators
Throughout the system, you'll see indicators showing whether a cart is idle or actively assigned.
On the View Carts List
| Currently Assigned column | Meaning |
|---|---|
| None | Cart is idle and sitting at its Home location |
| Smith, John | Cart is currently assigned to John Smith |
| Room 205 — Lincoln Elementary | Cart is currently assigned to a room |
On the Cart Devices Page
When idle (at Home):
- Cart Summary shows the Home Building and Home Room
- Move Cart button is visible
- No callout appears at the top of the page
When assigned:
- A two-line callout reads "Currently at destination (since date). Home location when returned: home label."
- Move Cart button is visible — same button, different starting destination
- All other cart functions remain available (viewing devices, editing cart, etc.)
- On the Edit Cart form, the Home Building and Home Room dropdowns are locked while the cart is on the move, with a banner explaining why
Understanding Device Relationships
Cart checkouts interact with individual device checkouts in specific ways.
All Devices Move Together
When you check out a cart:
- All devices in the cart are assigned to the user
- This assignment happens through the cart, not individual device checkouts
- The devices "belong" to the cart, and the cart belongs to the user
Adding Devices to Checked Out Carts
You can still add or remove devices from a cart while it's checked out (if you have Edit Carts permission):
- Add a device → It immediately becomes part of the user's assignment
- Remove a device → It's released from the cart and from the user
Checking In Individual Devices from a Cart
If you check in a single device that's part of a checked-out cart:
- The device is released from the cart
- The cart checkout remains active for the remaining devices
- The cart is NOT automatically checked in
Example:
- Cart has 30 devices, checked out to Teacher A
- Student breaks device #15
- You check in device #15 individually to send it for repair
- Cart remains checked out to Teacher A with 29 devices
- Device #15 is now available separately
When you check in a device that's part of a cart checkout, you're removing it from the cart - not just checking it in. The device will no longer be part of that cart. If you want the device to remain in the cart but just be temporarily unavailable, consider using incidents or device status changes instead.
Common Workflows
Scenario 1: First Day of School Cart Assignment
A teacher needs the English Lab cart for the entire year:
- Open
Carts > View Carts - Find "English Lab Cart A" in the list
- Verify the Devices column shows the expected count (30/30)
- Click View to open the cart device page
- Review the Assigned Devices table to confirm all devices are present
- Click Move Cart
- Pick Staff, then search for the teacher's name
- Click Move Cart to confirm
- Cart is now assigned to that teacher for the school year
- Teacher can pick up the physical cart from the technology office
Scenario 2: Substitute Teacher Short-Term Assignment
A substitute needs a cart for two days:
- Find an idle cart (Currently Assigned column shows "None")
- Open the cart device page
- Verify the cart has devices in it
- Click Move Cart, pick Staff, search for the substitute's name, confirm
- Two days later, substitute returns the cart
- Click Move Cart again, pick Home, confirm
- Cart is back at its Home location and ready for the next assignment
Scenario 3: End of Year Inventory Return
At the end of the school year, all carts need to go back to their Home locations for summer storage:
- Open
Carts > View Carts - Sort by the Currently Assigned column to see all carts still on the move
- Open the first assigned cart
- Click Move Cart → Home → confirm
- Physically verify all devices are present in the cart
- Move to the next assigned cart
- Repeat until every row shows "None" in the Currently Assigned column
Scenario 4: Cart Reassignment Mid-Year
One teacher's class size decreased, so their cart moves to a different teacher:
- Open the cart currently assigned to Teacher A
- Click Move Cart, pick Staff, search for Teacher B, confirm
- The cart's active assignment moves from Teacher A to Teacher B in one step — no separate check-in
- Notify both teachers of the change
- Physically move the cart from Room 101 to Room 205
Scenario 5: Shared Cart Rotation Schedule
A mobile science lab cart rotates between three teachers on different days:
- Monday morning: Move cart to Teacher A (Staff)
- Monday afternoon: Move cart Home
- Tuesday morning: Move cart to Teacher B
- Tuesday afternoon: Move cart Home
- Wednesday morning: Move cart to Teacher C
- View the cart's Assignment History portlet to see the full rotation pattern with timestamps and the admin who moved it each time
Tips for Managing Cart Assignments
✅ Do:
- Verify cart contents before moving the cart to a destination
- Communicate with users when sending their assigned carts back home
- Send carts back Home promptly when they're physically returned
- Review the Assignment History portlet periodically to find forgotten assignments
- Keep cart assignments updated when teachers change rooms or leave
❌ Don't:
- Move empty carts (verify devices are present first)
- Forget to send carts Home at year-end (they'll show as assigned forever)
- Mark carts as Home without physically verifying they've been returned
- Leave carts assigned to users who no longer need them
Permissions and Access Control
Checkout Device Permission
Every cart move — to a destination or back Home — requires the Checkout Device permission. This is the same permission used for checking out individual devices.
With this permission, you can:
- Move carts to staff, rooms, or students
- Send carts back Home
- View assignment history for carts
- See where any cart currently is
Without this permission, you cannot:
- Assign carts to destinations
- Send carts back Home
- The Move Cart button won't appear on the cart device page
Related Permissions
While Checkout Device is primary, these other permissions affect cart workflows:
- View Carts: Required to see the cart list and open cart device pages
- Edit Carts: Needed to add/remove devices from carts, including assigned ones
- View Devices: Lets you view individual device profiles for devices in carts
Common permission combinations:
- View Carts only: Can see where carts are, but can't assign them
- View + Checkout Device: Can manage cart assignments but not modify cart contents
- View + Edit + Checkout: Full cart management (most common for cart administrators)
Understanding Assignment History
Every time you move a cart, a record is created. This history helps you:
Track Cart Usage Patterns
- Which teachers use which carts most frequently
- How long carts are typically assigned out
- Seasonal usage patterns (more assignments during certain months)
Generate Reports
- Cart utilization reports
- Teacher assignment history
- End-of-year return verification
Audit Trail
- Who had a cart when it was lost or damaged
- Which administrator moved a cart to which destination
- Proof of when carts were returned Home
The assignment history is permanent — even after a cart goes Home, every past assignment row remains. This ensures you always have an audit trail of cart movement.
Troubleshooting Common Issues
"I can't find the Move Cart button"
Possible reasons:
- You don't have the Checkout Device permission
- The cart has no devices in it (some districts disable moves on empty carts)
Solution: Check your permissions and ensure the cart has devices.
"The user I want isn't in the picker"
Possible reasons:
- The user is inactive or archived
- The user is in a building you don't have permission to manage
- You're searching for a nickname instead of their official name
- The user was recently added and hasn't synced yet
Solution: Try searching by local ID number, confirm your building permissions cover their building, and verify the user is active.
"The Home option is disabled"
Reason: The cart doesn't have a Home Building set yet.
Solution: Open Edit Cart and set a Home Building (and optionally a Home Room) first. Or, pick a different destination (Staff/Room/Student) if you want to move the cart somewhere new instead of sending it home.
"I sent a cart Home but it still shows as assigned"
Possible reasons:
- The page hasn't refreshed — reload the cart list
- There was an error completing the move — check for error messages
- Browser cached old data
Solution: Refresh the page, try the move again, clear browser cache if needed.
"Can I assign a cart to multiple users?"
No. A cart can only be assigned to one destination at a time. If multiple teachers need to share devices:
- Check out individual devices to each teacher, OR
- Use a rotation schedule and move the cart between them as needed, OR
- Split devices into multiple carts for separate assignments
Common Questions
Q: Can I assign a cart to a classroom/room instead of a user? Yes! In the Move Cart picker, choose Room. Pick a building first, then the room inside it. Learn more about room assignments →
Q: What happens to devices in a cart when I move it? All devices in the cart are automatically considered assigned to the destination. They don't get individual checkout records — they're part of the cart's active assignment.
Q: Can I add devices to a cart while it's assigned? Yes, if you have the Edit Carts permission. Any devices you add immediately inherit the destination's location.
Q: What if a teacher loses a device from their cart? Open the cart device page, remove the lost device from the cart, then update that device's status to "Lost" on its device profile. The cart's active assignment continues with the remaining devices.
Q: How do I see all carts currently assigned out?
Go to Carts > View Carts and sort by the Currently Assigned column. All carts showing a name are assigned; those showing "None" are at Home.
Q: Can I change who a cart is assigned to without sending it Home first? Yes. Click Move Cart on an already-assigned cart, pick the new destination, and the old assignment is closed and a new one opens in one step. The full history is preserved in the Assignment History portlet.
Q: Does sending a cart Home automatically release all devices? Yes. Every device in the cart snaps back to the cart's Home Building and Home Room. The destination's hold on those devices is released.
Q: Can users move carts themselves, or do administrators do it? Only administrators with the Checkout Device permission can move carts. Users cannot self-assign carts.
Next Steps
Now that you understand cart moves and assignments, explore related topics:
- Managing Cart Devices - Add and remove devices from carts
- Viewing Carts - Find and filter your cart inventory
- Adding Carts - Create new cart records
- Room Assignments - Learn about assigning carts to rooms
Cart moves simplify managing shared device collections. Instead of tracking 30 individual checkouts, you manage one cart assignment — making it easier to support mobile labs and classroom device sets!