Managing Cart Devices
The Cart Devices page is where you add and remove devices from a cart, monitor capacity, and manage slot assignments. This is your workspace for building and maintaining cart inventories.
You access this page by clicking the View or Devices button on any cart from the View Carts list, or after creating a new cart.
To view cart devices, you need the View Carts permission assigned to your administrator role.
Additional permissions may be required for specific actions:
- Edit Carts - To add or remove devices from the cart
- Checkout Device - To check out the cart to a user
Understanding the Cart Devices Page
The page is divided into three main sections:
- Cart Summary - Shows cart details, capacity, and checkout status
- Add Device Form - Where you attach devices to the cart (if you have permission)
- Assigned Devices Table - Lists all devices currently in the cart
Together, these sections give you everything you need to manage the cart's device inventory.
Cart Summary Section
The left side of the page displays key information about the cart:
Basic Information

- Name: The cart's name (like "English Lab Cart A")
- Asset Tag: The physical cart's tracking number (if assigned)
- Building: The school building where the cart lives
- Room: The specific room the cart calls home, if one is set
- Devices: Current device count vs. maximum capacity
- Example:
15 / 30means 15 devices out of 30 capacity - Shows
Unlimitedif capacity is set to 0
- Example:
- Mode: How the cart manages devices
Understanding Cart Modes
The Mode field tells you how the cart operates. There are three possible modes:
Unlimited capacity, no slot tracking
- Cart can hold any number of devices
- Devices don't need specific slot assignments
- Most flexible option
Limited to X devices, no slot tracking
- Cart has a maximum capacity (like 30 devices)
- Devices can be added in any order
- Once full, you must remove a device before adding another
Limited to X slots, one device per slot
- Cart has numbered slots (1, 2, 3, etc.)
- Each device must be assigned to a specific slot
- Good for carts with physically numbered charging bays
- Helps ensure devices are returned to the correct position
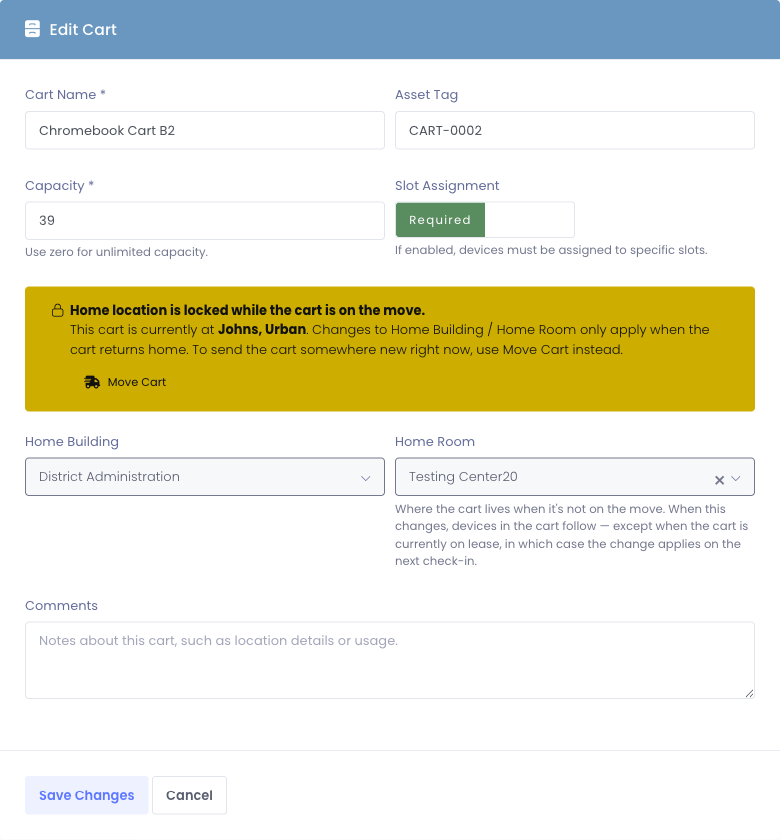
Where the Cart Is Right Now
The Cart Summary always tells you, at a glance, where the cart is sitting today. If the cart is on the move, you'll see a two-line callout:
Currently at Room 205 — Lincoln Elementary (since 05/13/2026) Home location when returned: Lincoln Elementary — Computer Lab 1023
That distinguishes the cart's active location (where it is right now, driven by an assignment) from its home (where it lives when it's not on the move). Both matter, but they're separate concepts — see What "Home" means below.
Quick Actions
The Cart Summary section also provides action buttons (depending on your permissions):
- Edit Cart: Opens the cart settings where you can change name, capacity, home location, etc.
- Move Cart: Opens the unified Move Cart picker for sending the cart to a staff member, a room, a student, or back to its home.
Learn more about moving carts →
What "Home" means
Every cart has two location concepts, and they answer two different questions:
| Home | Currently At | |
|---|---|---|
| What it answers | "Where does this cart belong when nobody has it?" | "Where is this cart right now?" |
| Where it's set | Edit Cart → Home Building / Home Room | Move Cart → pick a destination |
| When it cascades to devices | Only when the cart is not on the move | Every time the cart is moved |
A cart's Home is a slow-changing default — typically the room where the cart lives most of the time. When a teacher checks the cart out for the week, the cart's Home doesn't change; only its Currently At does. When the cart comes back, the devices snap back to Home in one step.
Because Home only matters when nothing more recent is in effect, the Home Building and Home Room fields on Edit Cart are locked while the cart is on the move. You'll see a banner explaining that, with a shortcut to Move Cart if what you really want is to send it somewhere new right now.
Before this change, carts had a single "location" that did double duty — sometimes meaning "currently at," sometimes meaning "home." When a teacher checked the cart out, the cart's location either stayed put (and was wrong) or moved with them (and lost track of home). The lease-as-truth model fixes both: the cart's active assignment is always the source of truth for where it physically is, and Home is what kicks in when no assignment is active.
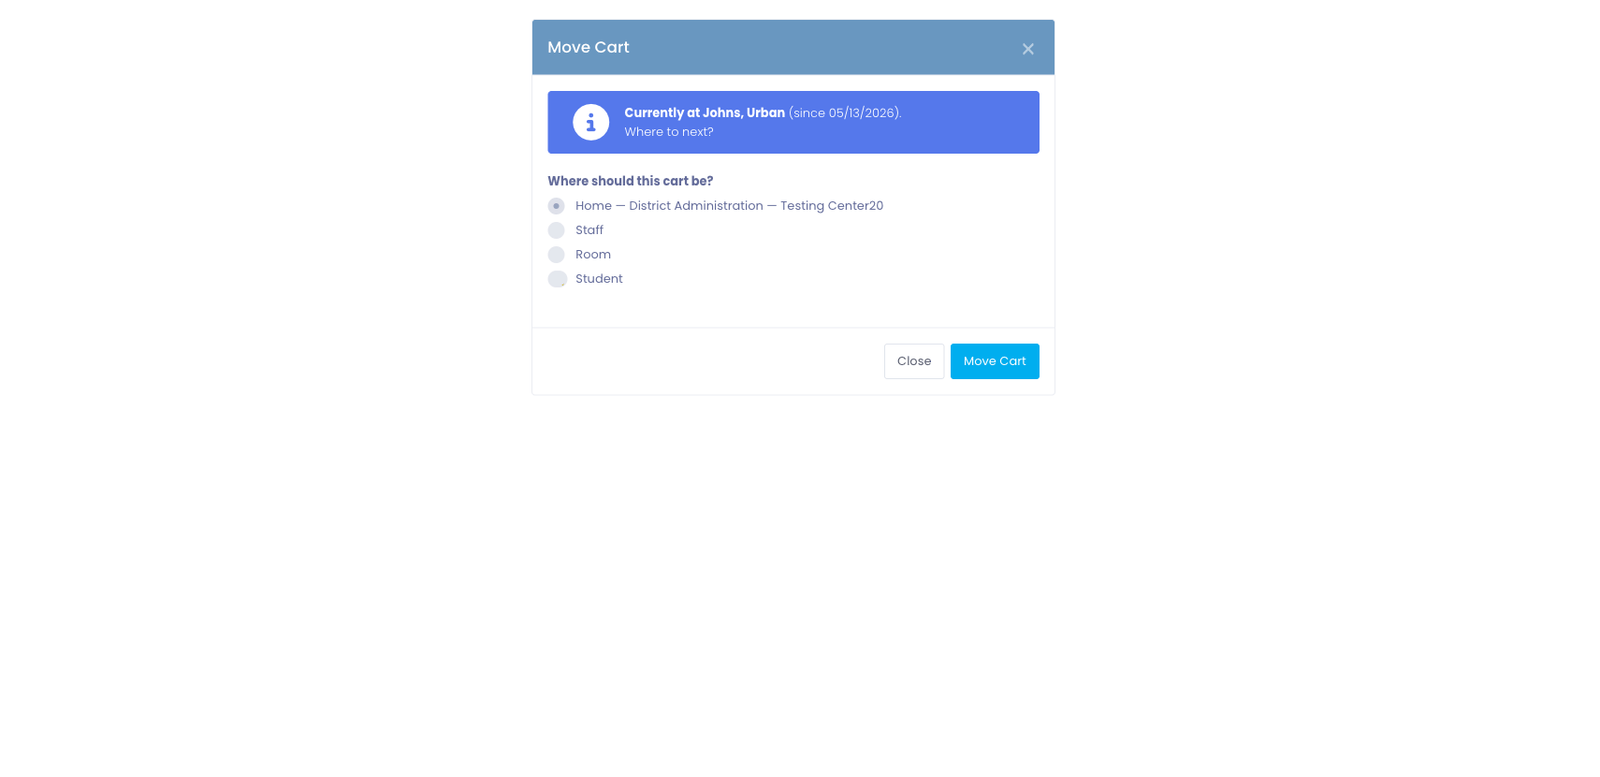
Moving the Cart to Another Location
Carts are physical things — they get rolled into different rooms, handed to substitute teachers, parked back in storage. Move Cart is the one action that handles all of those without you needing to memorize three different buttons.
How it works
- Navigate to
Carts > View Cartsin the main menu. - Find your cart in the table and click the View Devices button in the Actions column.
- On the cart's devices page, click the Move Cart button in the Cart Summary card's footer (next to Edit Cart).
- Choose a destination in the modal:
- Home — sends the cart back to its home Building/Room (only if Home is set).
- Staff — assigns the cart to a teacher or other staff member.
- Room — assigns the cart to a specific room. You pick the building first, then the room.
- Student — assigns the cart to a single student. This is unusual; you'll see a warning explaining that students normally receive single devices, not whole carts.
- Click Move Cart to confirm.
Every device assigned to the cart follows the move automatically — no per-device edit needed. Their location records update at the same time the cart's active assignment changes.
Each affected device gets its own activity-log entry showing the move came from the cart. If you ever ask "why did Device #123 change rooms?" the answer is on the device's history, including the cart name that took it there.
Sending the cart Home
When a cart is on the move and you're ready to close out the assignment:
- Navigate to
Carts > View Cartsand click View Devices on the cart you want to send home. - Click the Move Cart button in the Cart Summary card's footer.
- Pick Home in the modal (it's preselected when the cart is on the move).
- Click Move Cart to confirm.
That ends the current assignment, marks the cart as idle, and snaps every device back to the cart's Home Building and Home Room in one step.
If Home isn't set yet, the Home radio is disabled. To set one: navigate to Carts > View Carts, click Edit on the cart, and fill in Home Building / Home Room. Otherwise pick any non-Home destination to move the cart somewhere new instead.
Permission-aware destinations
The Move Cart picker only shows destinations you actually have permission to manage:
- The Building dropdown for the Room option is filtered to buildings in your scope.
- The Staff and Student searches scope to users in your buildings.
- The one exception is sending the cart Home: even if Home is in a building outside your scope, you can still complete the move. The modal warns you that the cart will leave your lists once it's home — which is the intended outcome, since whoever manages that building takes it from there.
Where the cart's location shows up
Once the move is complete, the new state shows up across the system:
- On the Cart list, the Building cell shows the cart's active location, with Home shown as a small subtitle when the cart is idle.
- On a device's profile, the Current Checkout panel includes the cart's active location so a technician scanning a device can immediately see which room to walk to.
- In a device's Checkout History, past cart leases display as "Cart Name (in Room)" so you can trace where a device lived over time.
Permanent Fixtures: Charging Hubs and Other Cart Accessories
Some devices belong to a cart but never go home with a student — charging hubs, barcode scanners, document cameras bolted into the cart's frame. They're cart accessories, not lease inventory.
Manage1to1 calls these permanent fixtures. They live alongside leased devices in the cart but follow different rules:
| Student lease | Permanent fixture | |
|---|---|---|
| How it gets attached | "Check out" — handed to a user or room | "Permanently attach" — bolted to the cart |
| Can be checked out to a student? | Yes | No, ever |
| Shows up on a student's record? | Yes | No |
| Rides with the cart when it moves rooms? | Yes (cascade) | Yes (cascade) |
| Where it appears on the cart page | Assigned Devices table | Permanent Fixtures table |
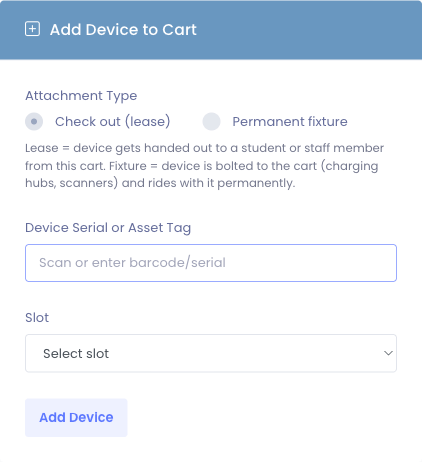
How to attach a fixture
- Open the cart's devices page.
- In the Add Device to Cart form, choose Permanent fixture instead of Check out (lease).
- Scan or type the fixture's asset tag or serial.
- Click Attach Fixture.
The device's Building and Room snap to the cart's location automatically, and it appears in the new Permanent Fixtures table below the Assigned Devices table.
Because a fixture isn't a lease, the Capacity and Slot numbers only count student leases. A 30-device cart with 30 Chromebooks leased and 2 charging hubs attached as fixtures still shows 30 / 30 — the hubs ride along without taking up student slots.
How to detach a fixture
Click Detach next to the fixture in the Permanent Fixtures table. The device keeps its current location (it doesn't snap back to anywhere), and the Permanent fixture flag is cleared so it can be leased to a student again if you want.
Cart Assignment History
Every time this cart has been moved — to a user, to a room, or back to home — Manage1to1 keeps that record. The Cart Assignment History portlet at the bottom of the cart devices page shows the full timeline:
- Destination — who or where the cart went
- Checked Out — when the assignment started
- Returned — when it ended, or Currently checked out for the active one
- Checked Out By / Checked In By — the admin who handled each end
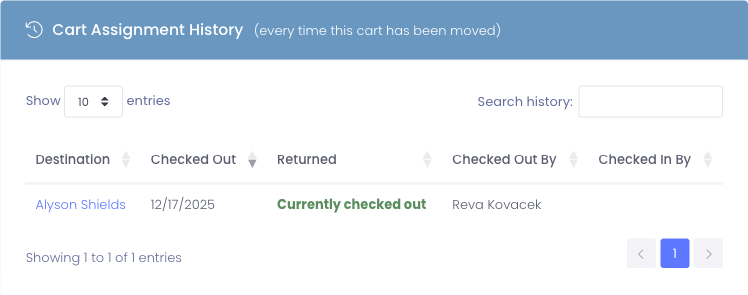
Sorted newest first by default. Past assignments stay in the record forever — the table is your audit trail for the cart.
This is the table to use when an end-of-year question lands on your desk like "who had the science cart in April?" or "did the math department ever return Cart 5?" The active row is also the one summarized in the callout at the top of the same page, so you always see the current status without having to dig.
Adding Devices to a Cart
The Add Device to Cart form appears on the right side of the page if you have the Edit Carts permission.
How to Add a Device
- Click in the device identifier field (it has focus by default for quick scanning)
- Scan the device barcode, or type the asset tag or serial number
- If the cart requires slot assignment, select an available slot from the dropdown
- Click Add Device
The page will reload and the device will appear in the Assigned Devices table below.
Device Identification
You can add devices using any of these identifiers:
- Asset tag (your school's inventory number)
- Serial number (manufacturer serial)
- Barcode (if you're using barcode scanners)
The system will find the device regardless of which identifier you use.
Slot Selection (When Required)
If your cart uses slot tracking, you'll see a Select slot dropdown next to the device identifier field.
How slot selection works:
- The dropdown shows only available (empty) slots
- Occupied slots don't appear in the list
- You must select a slot before adding the device
- Each slot can hold only one device
Example: If your cart has capacity 30 and slots 1-10 are occupied, the dropdown will show slots 11-30.
The device identifier field is automatically focused when you load the page, making it fast to scan multiple devices. After adding a device, the page reloads and the field is focused again - ready for the next scan. This makes adding 20-30 devices quick and efficient.
Capacity Warnings
The system prevents you from exceeding a cart's capacity. When a cart reaches its limit, you'll see a warning message.
When Cart is at Capacity (No Slot Tracking)
If the cart has reached its maximum device count, you'll see:
⚠ This cart is at capacity. Remove a device to add another.
The Add Device form remains visible, but adding a device will fail until you remove one. This ensures carts don't exceed their physical limits.
When All Slots are Full (With Slot Tracking)
If every slot is occupied, you'll see:
⚠ All slots are currently in use. Remove a device to free up a slot.
The slot dropdown will be empty, and you cannot add devices until you remove one from a slot.
Unlimited Capacity Carts
If the cart capacity is set to 0 (unlimited), these warnings never appear. You can add as many devices as needed.
Assigned Devices Table
The Assigned Devices table lists every device currently in the cart. This is your inventory view showing what's actually in the cart.
Table Columns
The table displays different columns depending on the cart mode:
| Column | When Shown | What It Shows |
|---|---|---|
| Slot | Only if slot tracking is enabled | The slot number this device occupies (1, 2, 3, etc.) |
| Asset Tag | Always | Device's inventory tracking number (clickable link to device profile) |
| Serial | Always | Manufacturer serial number |
| Model Number | Always | Device model (like "iPad Air 5th Gen" or "Chromebook 14 G6") |
| Status | Always | Current device status (Active, Available, Lost, etc.) |
| Action | Only if you have Edit Carts permission | Remove button to detach the device |
Empty Cart Display
If the cart has no devices assigned, the table shows:
No devices are currently assigned to this cart.
This appears when you first create a cart or after removing all devices.
Viewing Device Details
Click any Asset Tag in the table to open that device's profile in a new page. This lets you quickly check device details, checkout history, or incidents without leaving the cart management page.
Removing Devices from a Cart
To remove a device from the cart, click the Remove button in the Action column for that device.
Removal Process
- Click the Remove button next to the device
- Confirm the removal in the popup dialog
- The page reloads and the device is removed from the cart
The device is not deleted from your inventory - it's simply detached from this cart. The device returns to "available" status and can be assigned to another user or cart.
When Removal Isn't Available
You won't see Remove buttons if:
- You don't have the Edit Carts permission
- The cart is checked out and your district has configured restrictions on modifying checked-out carts
Slot Assignment After Removal
If the cart uses slot tracking, removing a device frees up that slot. The slot becomes available in the dropdown for adding new devices.
Example: Remove device from Slot 5 → Slot 5 appears in the "Select slot" dropdown → You can add a different device to Slot 5
Use caution when removing devices from carts that are currently checked out to users. Removing a device changes what the user has access to. Make sure you communicate with the user if you're making changes to their assigned cart.
Common Workflows
Scenario 1: Building a New Cart from Scratch
You've just created a 30-device iPad cart and need to add all the devices:
- Open the cart's device management page
- Have all 30 iPads physically in front of you
- Scan the first iPad's barcode (or enter asset tag)
- If using slots, select Slot 1
- Click Add Device
- Page reloads, ready for the next device
- Scan the second iPad
- Continue until all 30 devices are added
- The capacity will show
30 / 30when full
Scenario 2: Swapping Out a Broken Device
A device in the cart is damaged and needs to be replaced:
- Open the cart device page
- Find the broken device in the Assigned Devices table
- Note the slot number (if applicable)
- Click Remove next to the broken device
- Confirm removal
- Add the replacement device using the same slot number
- The cart now has the working device instead of the broken one
Scenario 3: Preparing a Cart for Deployment
At the start of the school year, you need to verify a cart's inventory:
- Open the cart device page
- Review the Assigned Devices table
- Physically check each device against the list
- Remove any devices that are missing or no longer in the cart
- Add any devices that are physically in the cart but not in the system
- Update the cart capacity if needed (Edit button)
- Once verified, check out the cart to the teacher
Scenario 4: Managing Slot Assignments
You have a cart with 30 numbered charging bays and need to reorganize:
- Open the cart device page (slot tracking must be enabled)
- Current devices show their assigned slots in the table
- To move a device to a different slot:
- Remove the device from its current slot
- Re-add the device and select the new slot
- Use the Assigned Devices table to verify slot assignments
- Ensure students know which slot number matches their device
Scenario 5: Checking Cart Capacity Before Adding Devices
A teacher wants to add 5 more devices to their classroom cart:
- Open the cart device page
- Check the Capacity field in the Cart Summary
- Example: Shows
25 / 30(5 slots available)
- Example: Shows
- Since there's room, proceed to add the 5 devices
- After adding, capacity shows
30 / 30(now full) - If capacity was already full, you'd need to either remove devices or increase the cart capacity (Edit → change capacity setting)
Tips for Managing Cart Devices
✅ Do:
- Use a barcode scanner for quick device addition (much faster than typing)
- Keep the Assigned Devices table accurate - it's your source of truth
- Use slot tracking for carts with physical numbered bays
- Verify capacity matches the physical cart size
- Check cart contents before checking out to a user
- Remove damaged or missing devices promptly to keep inventory accurate
❌ Don't:
- Add devices to the wrong cart - always verify you're on the correct cart page
- Forget to assign slots when slot tracking is required
- Exceed capacity by removing and immediately re-adding different devices rapidly (defeats the purpose of capacity limits)
- Leave devices in a cart that are physically elsewhere
- Modify checked-out carts without communicating with the user who has it
Understanding Permissions and Access
Your ability to manage cart devices depends on your role permissions:
View Carts Permission
With View Carts only, you can:
- See the cart summary
- View the list of assigned devices
- Click device links to view device profiles
- See who the cart is checked out to
You cannot:
- Add devices to the cart
- Remove devices from the cart
- Edit cart settings
- Check out or check in the cart
Edit Carts Permission
With View Carts + Edit Carts, you can:
- Everything from View Carts, plus:
- Add devices to the cart
- Remove devices from the cart
- Edit cart settings (name, capacity, slots, etc.)
Checkout Device Permission
With View Carts + Checkout Device, you can:
- Check out the cart to a user
- Check in the cart when it's returned
Common permission combinations:
- View only: See cart contents but can't modify
- View + Edit: Manage cart inventory but can't assign to users
- View + Edit + Checkout: Full cart management (most common for cart administrators)
If you need additional cart permissions, contact your system administrator.
Common Questions
Q: Can I add the same device to multiple carts? No. A device can only be assigned to one cart at a time. If you try to add a device that's already in another cart, you'll get an error message.
Q: What happens if I scan a device that doesn't exist? You'll see an error message saying the device wasn't found. Double-check the asset tag or serial number, or verify the device exists in your inventory.
Q: Can I change a device's slot assignment after adding it? Yes, but you have to remove the device from the cart and re-add it with the new slot number. There's no direct "edit slot" function.
Q: Does removing a device from a cart check it back into inventory? Removing a device from a cart just detaches it - it doesn't change the device's checkout status. If the device was checked out to a user as part of the cart, it will still show as checked out until the cart is checked in.
Q: Why don't I see the Add Device form? You need the Edit Carts permission to add or remove devices. If you only have View Carts, you can see the device list but can't modify it.
Q: Can I add devices to a cart that's currently checked out? This depends on your district's configuration. Some districts allow modifications to checked-out carts, while others restrict changes. If you're blocked, check in the cart first, make your changes, then check it back out.
Q: What's the difference between cart capacity and slot tracking?
- Capacity: Maximum number of devices the cart can hold (can be unlimited)
- Slot tracking: Whether devices must be assigned to specific numbered positions
You can have capacity without slots (just counts devices), or capacity with slots (each device has a numbered position).
Q: How do I enable or disable slot tracking? Click the Edit button on the cart device page, then toggle the Slot Assignment setting. Note that changing this setting may affect existing device assignments.
Next Steps
Now that you know how to manage devices in a cart, you might want to learn about:
- Checking Out Carts - Assign carts to users
- Viewing Carts - Find and filter carts in your inventory
- Adding Carts - Create new cart records
Managing cart devices is the core of cart inventory management. Keeping your cart contents accurate ensures smooth device distribution and helps track your 1:1 program inventory!