Device Profile Overview
The Device Profile is like a complete file folder for a single device. Everything you need to know about a device - its history, current status, who's had it, what's happened to it - lives in one place on this page.
Think of the device profile as the device's "home base" in Manage1to1. Whether you're checking who currently has a device, reviewing past repairs, or adding notes for other administrators, you'll do it here.
To view device profiles, you need the View Devices permission assigned to your administrator role.
Admins with the Check Out Loaners Only permission (and not Check Out Devices) only see loaner device profiles — direct links to non-loaner devices redirect back to the device list with an explanation. Mark Lost and Mark Found are also hidden for these admins. See Setting up a Student Worker Role.
How to Access a Device Profile
There are several ways to open a device's profile page:
From the Device List
- Navigate to
Devices > View Devices - Find the device you want to view (use search or filters if needed)
- Click the View button (often shown as an eye icon) in the Actions column
From Search Results
If you use the quick search in View Devices, click on any device in the filtered results to open its profile.
From Direct Links
Some areas of Manage1to1 include direct links to device profiles. For example:
- User profiles show links to devices checked out to that user
- Incident records link to the device involved
- Reports often include clickable device identifiers
Understanding the Profile Layout
The device profile page is organized into two main areas:
The Device Snapshot (Left Sidebar)
This sidebar stays visible no matter which tab you're viewing. It shows a quick summary of the most important device information:
- Device model (brand and model name)
- Part of indicator (if this device is permanently attached to a cart or another device — see below)
- Current status (Available, Checked Out, In Repair, etc.)
- Building assignment
- Loaner number (if applicable)
- Insurance status (if insurance tracking is enabled)
- Device type (iPad, Chromebook, Laptop, etc.)
- Serial number
- Asset tag
- Purchase date
- Total incident count
Think of the snapshot as the "at-a-glance" view - the information you most frequently need is right here without having to hunt through tabs.
Permanent Fixtures: the "Part of" indicator
Some devices are bolted to another asset — a camera mounted on an interactive display, or a charging hub installed in a mobile cart. Those devices aren't lease inventory and never get handed to a user. When you open one of their profiles, you'll see a small Part of: indicator right under the device model showing what it's attached to (with a link to the parent's page).
When a device shows the "Part of" indicator, two things change in the snapshot:
- The Check-Out to User / Room / Cart buttons are hidden — the device is a fixture, so checking it out doesn't apply.
- A small "Permanent fixture" badge replaces them so the state is obvious at a glance.
To attach a device as a fixture, open the parent's page (the cart or host device) and scan the fixture's asset tag into its "Add Device" or "Child Assets" form. To detach, use the Detach button on the parent's table or the small "Part of" pill on the child profile.
Quick Actions (Bottom of Snapshot)
Below the device information, you'll see action buttons for common tasks:
- Check-Out to User: Assign the device to a student or staff member (only appears if the device is available)
- Edit Device: Modify device details like status, building, or other properties
- Report Incident: Create a new incident record for this device
- Mark Lost: Flag the device as lost (requires appropriate permission)
- Mark Found: Remove the lost flag from a device (requires appropriate permission)
The buttons you see depend on:
- The device's current state (can't check out a device that's already checked out)
- Your administrator permissions
- Whether certain features are enabled in your system
If a device has been marked as lost, a prominent warning banner appears at the top of the page to alert you. This helps prevent accidentally checking out or modifying a device that should be tracked as missing.
Understanding the Tabs
The main area of the device profile contains tabs that organize different types of information about the device. Each tab focuses on a specific aspect of the device's record:
Device Information Tab
The default tab that opens when you access a device profile. This shows all the core details about the device itself - everything from its model and serial number to custom fields your district has configured.
This is where you'll go to see complete device specifications and details.
Learn more about the Device Information tab →
Incident History Tab
Shows all incidents (repairs, damage reports, technical issues) that have been reported for this device throughout its lifetime. The tab badge shows how many incidents exist for this device.
Use this tab to review the device's repair history, recurring problems, or maintenance patterns.
Learn more about the Incident History tab →
Insurance Tab
This tab only appears if your district has insurance tracking enabled.
Displays insurance coverage information for this device, including enrollment status, deductible amounts, and claims history.
Device Cases Tab
This tab only appears if your district tracks protective cases separately from devices.
Shows information about the protective case assigned to this device, if applicable. Some districts track cases as separate inventory items that can be swapped between devices.
Checkout History Tab
Displays a complete chronological record of every time this device has been checked out to a user and returned. The tab badge shows how many checkouts have occurred.
This is invaluable for understanding device usage patterns, troubleshooting issues, or identifying when problems might have started.
Learn more about the Checkout History tab →
Child Assets Card
This card only appears for devices that act as a parent — typically an interactive display, document camera, or any device that has accessories mounted on it. The card lists the devices currently attached as children (mounted cameras, soundbars, etc.) with a quick-scan input to attach new ones and a Detach action per row.
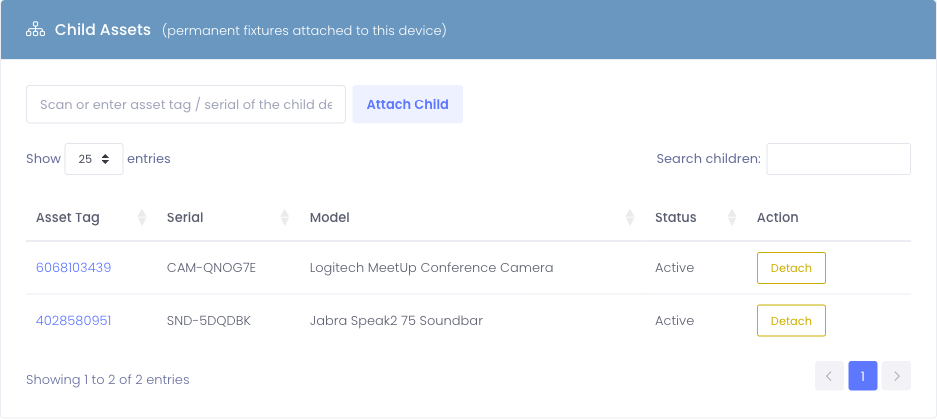
When you move this device to a new Building or Room, every device in the Child Assets table moves with it automatically. Useful for keeping a complete classroom setup (board + camera + soundbar) together when furniture gets reshuffled.
Notes Tab
This tab only appears if you have the View/Post Device Notes permission.
A space for administrators to leave notes about this specific device. Notes are visible to all administrators who can view the device and are useful for documenting quirks, configurations, or important information that doesn't fit elsewhere.
Learn more about the Notes tab →
Activity Log Tab
Shows a detailed audit trail of every action taken on this device - who added it, who edited it, status changes, checkouts, and more. This is the complete history of everything that's happened to the device in Manage1to1.
Perfect for accountability, troubleshooting, or understanding the device's timeline.
Learn more about the Activity Log tab →
Tab Badges
You'll notice small numbered badges on some tabs - for example, "Incident History (3)" or "Checkout History (47)". These badges show how many records exist in that tab, giving you a quick count without having to click through.
What the numbers mean:
- Incident History badge: Total number of incident records for this device
- Device Cases badge: Total number of case associations (usually 0 or 1)
- Checkout History badge: Total number of times the device has been checked out
Common Workflows Using the Device Profile
Here are some typical scenarios where you'll use the device profile:
Scenario 1: Student Reports a Problem
A student comes to you saying their device isn't working:
- Search for the device by asset tag on View Devices
- Open the device profile
- Check the Incident History tab to see if this is a recurring issue
- Review the Checkout History tab to confirm when they received it
- Click Report Incident to document the new problem
- Change the device status to "In Repair" if needed
Scenario 2: Checking Out a Device
You need to assign a device to a new student:
- Find an available device on View Devices
- Open the device profile
- Verify it's in good condition (check snapshot shows "Available" status)
- Click Check-Out to User button
- Select the student and complete the checkout
If the selected user has an active Restricted Plan, a red Technology Restriction banner appears on the checkout page so you can confirm the assignment is appropriate before completing it. If the device's custom fields have any alerts configured for checkout, a popup will list each fired alert and require acknowledgment before the checkout commits.
Scenario 3: Investigating Device History
A teacher asks when a student got their device and whether it's had problems:
- Open the device profile
- Check the Checkout History tab to see when it was assigned
- Review the Incident History tab to see any reported problems
- Check the Notes tab to see if other administrators have left relevant information
Scenario 4: Annual Inventory Check
During your annual inventory, you're physically checking each device:
- Scan or look up the asset tag
- Open the device profile
- Verify the serial number matches what's on the device
- Confirm the building assignment is correct
- Check the status matches reality (if it says "Available" but a student has it, update it!)
- Leave a note in the Notes tab if you notice anything unusual
Editing Device Information
Most of the information on the device profile can be edited if you have the appropriate permissions:
To Edit Basic Device Details
- Click the Edit button (usually near the top or in the quick actions area)
- Update the fields you need to change
- Click Save to commit your changes
Changes are immediately reflected on the device profile and are logged in the Activity Log tab.
If you change a device's building assignment, make sure you have permission to the new building. Once changed, the device will only be visible to administrators with access to that building.
Tips for Using Device Profiles Effectively
✅ Do:
- Check the device snapshot first - it often has the information you need without opening tabs
- Review incident history before checking out a device to ensure it's in good shape
- Use the notes tab to communicate with other administrators about device issues
- Pay attention to tab badges - they give you quick context about device history
❌ Don't:
- Forget to check if a device is marked as lost before taking action on it
- Skip reviewing checkout history when troubleshooting problems
- Leave cryptic notes - be clear and detailed for your colleagues
- Modify device details without understanding what you're changing
Understanding Conditional Tabs
Not every device profile will show every tab. Some tabs only appear when:
- Specific features are enabled: Insurance and Device Cases tabs only show up if your district uses those features
- You have certain permissions: The Notes tab requires the note-device permission
- There's relevant data: Some tabs might be hidden if they're empty (this depends on your system configuration)
If you're not seeing a tab you expect, check with your system administrator about feature settings and your role permissions.
Mobile and Responsive Access
The device profile works on tablets and phones, but the layout adapts:
- On mobile devices, the device snapshot collapses into a header that you can expand
- Tabs stack vertically on smaller screens
- Action buttons might be reorganized for touch access
The functionality is the same regardless of device, just presented differently for the screen size.
Next Steps
Now that you understand the overall device profile structure, dive deeper into specific tabs:
- Device Information Tab - Core device details and specifications
- Checkout History Tab - Who's had the device and when
- Incident History Tab - Repairs and problems over time
- Notes Tab - Internal notes and documentation
Each tab has its own detailed guide explaining what information you'll find and how to work with it.
Common Questions
Q: Can I view device profiles for devices in buildings I don't have access to? No. You can only view device profiles for devices in buildings your administrator account has permission to access.
Q: What's the difference between the device snapshot and the Device Information tab? The snapshot shows the most critical information at a glance. The Device Information tab shows complete details including custom fields, operating system, and other extended information.
Q: Can I print a device profile? Most browsers support printing the current view using File > Print or Ctrl+P (Windows) / Cmd+P (Mac). The system should format appropriately for printing.
Q: Why don't I see the Edit button? You need the edit-device permission to modify device records. Check with your system administrator if you need this capability.
Q: Can I see who made changes to a device? Yes! The Activity Log tab shows every action taken on the device, including who made each change and when.
The device profile is one of the most frequently used pages in Manage1to1. Taking time to familiarize yourself with its layout and features will make your daily device management tasks much faster and easier!