View Devices
The View Devices page is your central hub for managing all the devices in your school's technology inventory. Whether you're looking for a specific device, checking which devices are available, or reviewing checkout status, this is where you'll start.
Think of this as your device directory - similar to how you might browse contacts in your phone, except here you're browsing iPads, Chromebooks, laptops, and other technology your school manages.
You can access this page from the main navigation under Devices > View Devices.
To view this page, you need the View Devices permission assigned to your administrator role.
Understanding the Device List
When you first open the View Devices page, you'll see a table displaying all devices that you have permission to view. The devices shown depend on which buildings your administrator account has access to - you'll only see devices from buildings you're authorized to manage.
The table shows both active devices (currently in use or available) and inactive devices (retired or no longer in service) unless you apply filters to narrow your view.
What You'll See in the Table
By default, the device table displays these columns:
- Asset Tag: The unique barcode or identification number assigned to the device (often a sticker on the device itself)
- Category: The asset category the device belongs to (Laptop, Tablet, Chromebook, etc.) — pulled from the category assigned to the device's model. Filtering by a parent category in the toolbar also includes every nested subcategory.
- Brand: The device manufacturer (for example, Apple, Dell, HP, or Lenovo)
- Model: The specific model (for example, "iPad Air 4" or "Chromebook 3100")
- Serial Number: The manufacturer's serial number for the device
- Status: The current status of the device (such as "Available", "Checked Out", "In Repair", etc.)
- Building: Which school building the device is assigned to
- Assigned To: If the device is checked out, this shows who (or which cart or room) currently has it
- Actions: Quick action buttons to view more details or perform actions on the device
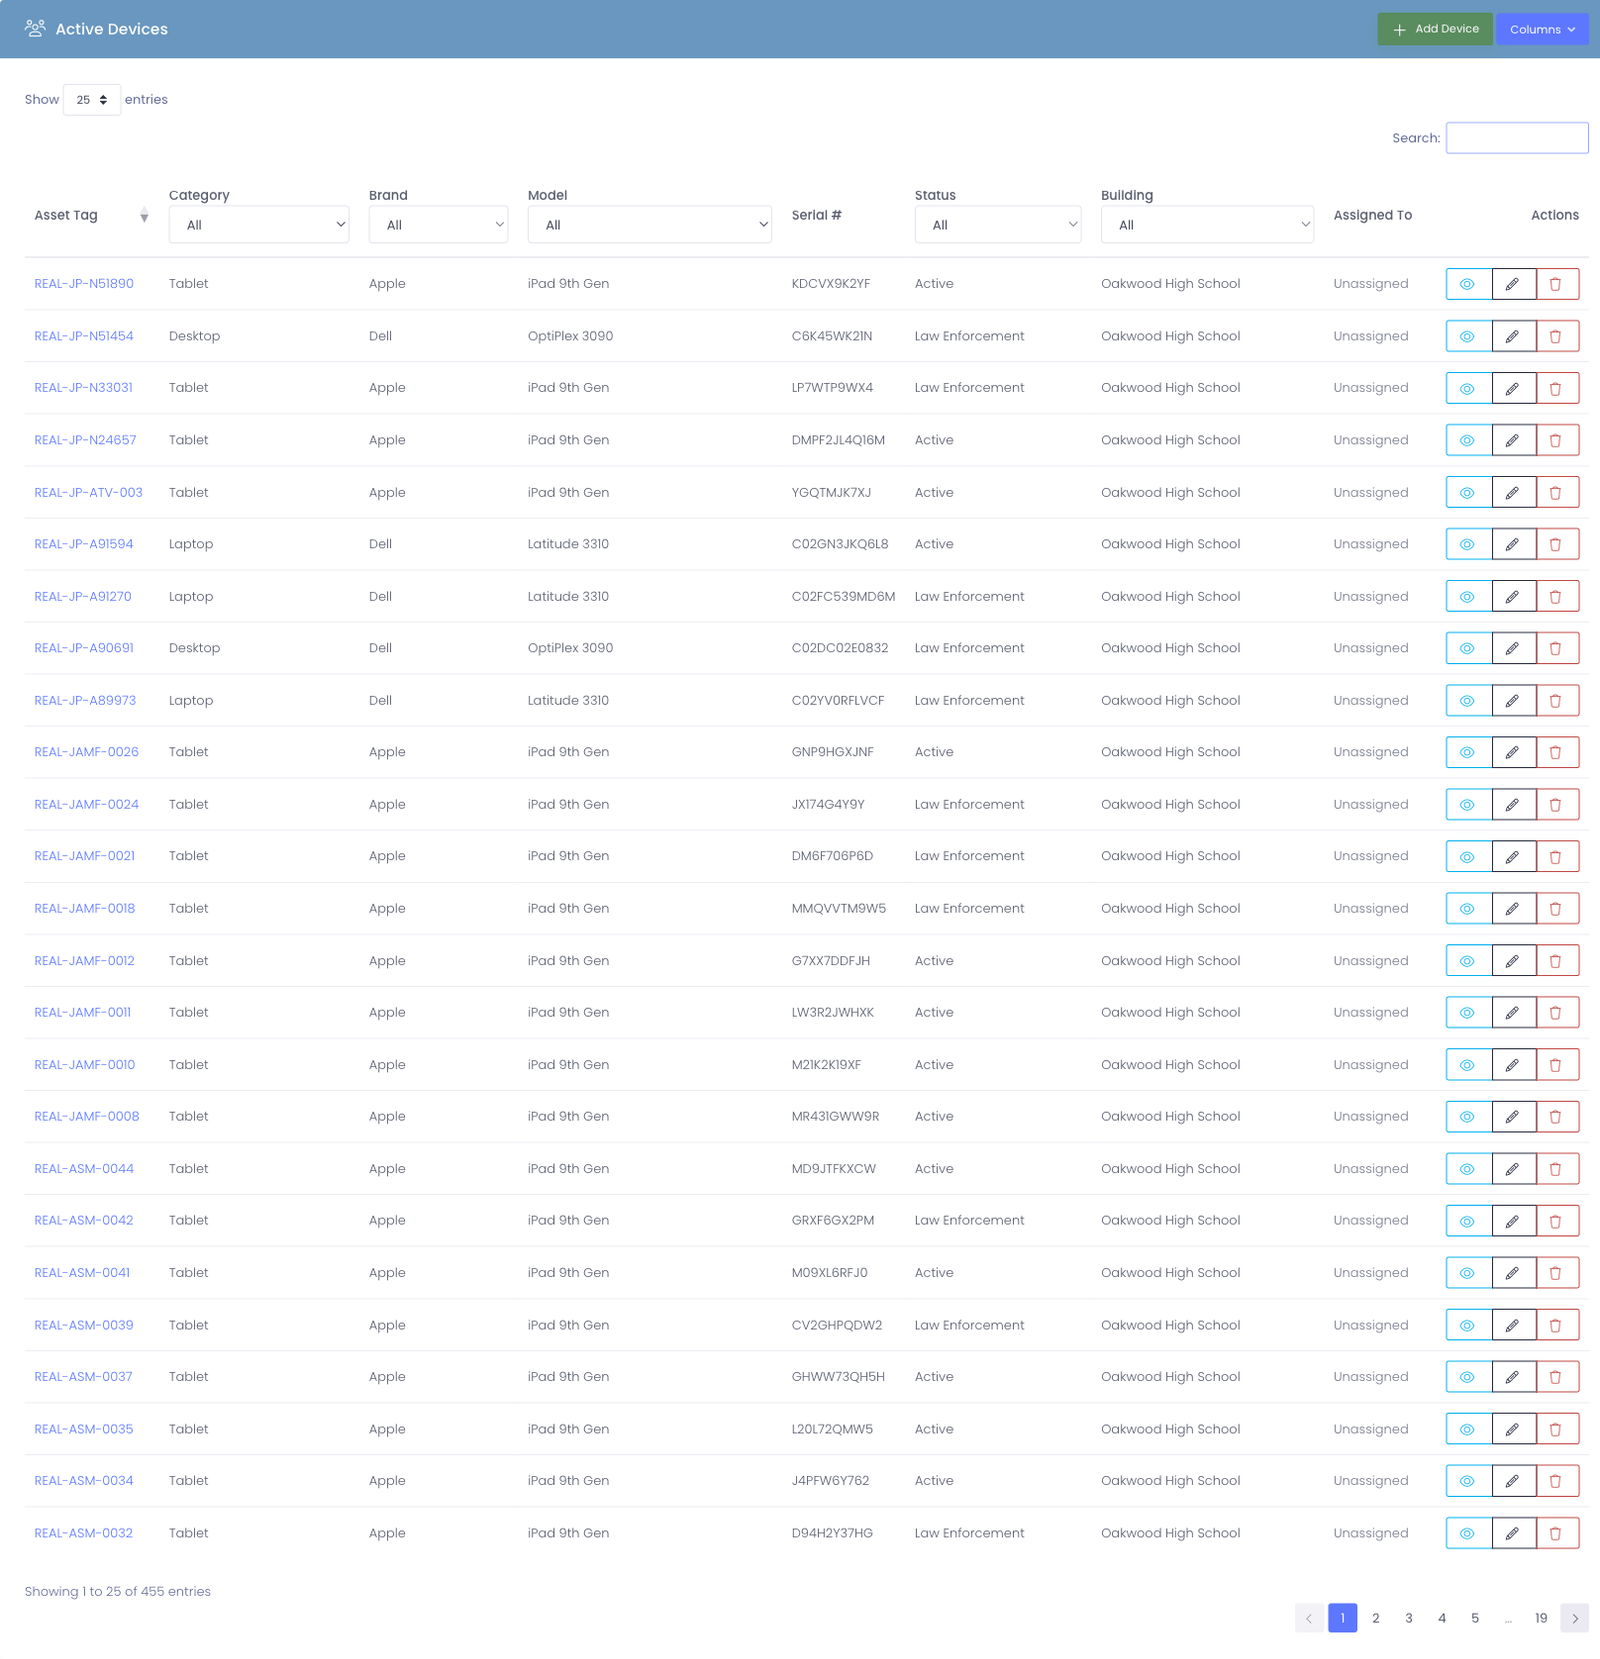
Brand and Model are shown as separate columns so you can scan and filter each one on its own — for example, to pull every Apple device regardless of model.
Customizing Your View
Just like you can customize the layout in many modern apps, you can adjust which columns appear in your device table to match your workflow.
Showing or Hiding Columns
To customize which information appears in your table:
- Look for the Columns button at the top of the device table
- Click it to see a dropdown list of all available columns
- Check or uncheck the boxes next to each column name to show or hide them
- The table will update immediately to reflect your choices
This is helpful if you're focusing on a specific task. For example, if you're doing a physical inventory, you might want to show only Asset Tag, Model, Building, and Status to keep things simple.
The system remembers your column preferences, so you won't have to adjust them every time you visit the page!
Searching for Devices
There are several ways to find specific devices in your inventory. Think of these as different "lenses" you can use to look at your devices.
Quick Search (Search Bar)
The search bar at the top of the table is your fastest way to find a specific device. You can type in:
- An asset tag or serial number
- A device category (for example, "Chromebook", "Tablet", or "Laptop")
- A brand or model name (for example, "Apple" or "iPad Air 4")
- A user's name (if you're looking for who has a device)
- A cart or room name
As you type, the table automatically filters to show only matching results. This is perfect when you know exactly what you're looking for.
Example: If a student comes to you and says "I need help with device A12345", just type "A12345" in the search box and their device will appear.
Filtering by Building
If your district has multiple schools and you want to focus on devices at a specific location:
- Click the Building filter dropdown
- Select the school you want to view
- The table will update to show only devices from that building
This is especially useful if you're a district administrator managing devices across multiple locations but need to focus on one school at a time.
Filtering by Status
Device statuses help you understand what's happening with each device. To filter by status:
- Click the Status filter dropdown
- Choose the status you're interested in (like "Available" or "In Repair")
- Only devices with that status will be displayed
Common use case: If you need to see all available devices for checkout, filter by "Available" to see exactly what's ready to be assigned to students or staff.
Filtering by Brand or Model
The Brand and Model columns each have their own filter dropdown in the table header, and they work independently:
- Click the Brand or Model dropdown at the top of that column
- Choose the value you want to focus on
- The table updates to show only matching devices
You can combine them with the Category, Status, and Building filters to narrow things down — for example, all Apple devices that are In Repair at a specific building.
Common use case: pull up every Apple device at once, regardless of model.
Device statuses are customizable labels that track what state a device is in. Common examples include Available, Checked Out, In Repair, Lost, or Retired. Your system administrator can create custom statuses that match your school's workflow. These are configured in Settings > System Settings > Devices Tab.
Taking Action on Devices
Each device row has an Actions column with buttons that let you do things with that device.
Viewing a Device Profile
To see all the details about a specific device, click the View button (often shown as an eye icon) in the Actions column. This opens the device's full profile page, where you can see:
- Complete device information
- Who has checked it out and when
- Any incidents or repairs associated with it
- Notes from other administrators
- And much more
We'll cover the device profile in detail in the Device Profile section.
Other Common Actions
Depending on your permissions, you might also see:
- Edit: Modify device details like asset tag, status, or building assignment
- Check Out: Assign the device to a user
- Mark Lost/Found: Update the status if a device goes missing or is recovered
The actions available to you depend on the permissions assigned to your administrator role. If you don't see an action button you need, contact your system administrator about your role permissions.
Working with Multiple Devices
Sometimes you need to do the same thing to multiple devices at once - like changing the building assignment for a cart of iPads, or marking several devices as available. The device table supports bulk actions to make this easier.
Selecting Multiple Devices
- Look for the checkbox at the beginning of each device row
- Click the checkboxes next to each device you want to work with
- Or, click the checkbox in the table header to select all devices on the current page
Once you've selected devices, additional action buttons will appear above the table.
Common Bulk Actions
- Bulk Edit: Change the building, status, or other properties for all selected devices at once
- Export: Download information about the selected devices to a spreadsheet
When performing bulk actions, double-check your selections before confirming. It's much easier to select the right devices initially than to undo changes across dozens of records!
Understanding Permissions
Not all administrators see the same devices or have access to the same actions. Manage1to1 uses a permission system to control what you can see and do.
What Affects What You See
Two main things control your view:
- Building Permissions: You only see devices from buildings your account is authorized to access
- Role Permissions: Your administrator role determines which actions you can perform
For example, you might be able to view devices from all elementary schools in your district, but only edit devices at the specific school where you work.
Need More Access?
If you need to view devices from additional buildings or perform actions that aren't available to you, reach out to your district's Manage1to1 administrator. They can adjust your building assignments and role permissions.
Next Steps
Now that you know how to find and view devices, you might want to learn about:
- Adding Devices - How to create new device records in the system
- Device Profile - Understanding all the information available for each device
- Bulk Device Import - Adding many devices at once using a spreadsheet
Have questions? Don't hesitate to explore the system - you can't break anything just by clicking around and viewing devices!