Bulk Device Import and Process
Bulk Device Import and Process lets you create or update device inventory in bulk using a CSV file — upload the file, review a full preview of exactly what will happen, then confirm.
This allows you to prepare device changes ahead of time, upload them for staging, review the outcome before anything is written, and process them when you're ready.
Uploading and clicking Preview & Process only shows you what will happen — a summary of new versus existing devices, any unrecognized device models awaiting a decision, and any rows that will be skipped. No device records are created or updated until you click Confirm & Import on the preview screen.
To access System Utilities, you need the Manage Settings permission assigned to your role.
Understanding Bulk Device Import
Think of bulk device import as manual CSV-based device inventory management - you prepare a device data file, upload it for staging, and then process it to create or update device records in batch.
What this utility does:
- Uploads a device CSV into a staging area
- Processes the CSV to create or update device records
- Handles device models, statuses, buildings, and assignments
- Provides a safe "delete file" option if the wrong CSV is uploaded
When to use:
- Initial device inventory setup
- Bulk device updates from MDM or asset management export
- Adding new device shipments
- Updating device statuses or locations in batch
When NOT to use:
- MDM sync is enabled (use MDM integration instead)
- Adding single devices (use manual device creation)
- Making small corrections (edit devices directly)
The Workflow
Step 1: Upload the Device CSV
Upload prepares the file for processing but does not make changes yet.
How to upload:
- Navigate to Settings → System Utilities → Devices tab
- Locate Bulk Device Import
- Download the CSV Import Template
- Populate the template with your device data
- Upload the CSV using the upload area
What happens:
- File is validated for format
- CSV is staged in system for processing
- No device records are created or modified yet
Step 2: Preview the Import
Clicking Preview & Process Device Import reads the staged file and shows you a summary — it does not write anything yet.
How to preview:
- Confirm the system shows a file is present (timestamp displayed)
- Click Preview & Process Device Import
- Review the preview screen (covered in Reviewing the Preview below)
Step 3: Confirm the Import
When the preview looks right, click Confirm & Import to apply the changes.
What happens:
- Device records are created or updated
- Any device models you chose to create are added
- Building and status assignments applied
- Inventory counts updated
- Rows flagged as skipped are left untouched
If anything looks wrong, click Cancel instead — nothing is written and you can fix and re-upload the CSV.
Reviewing the Preview
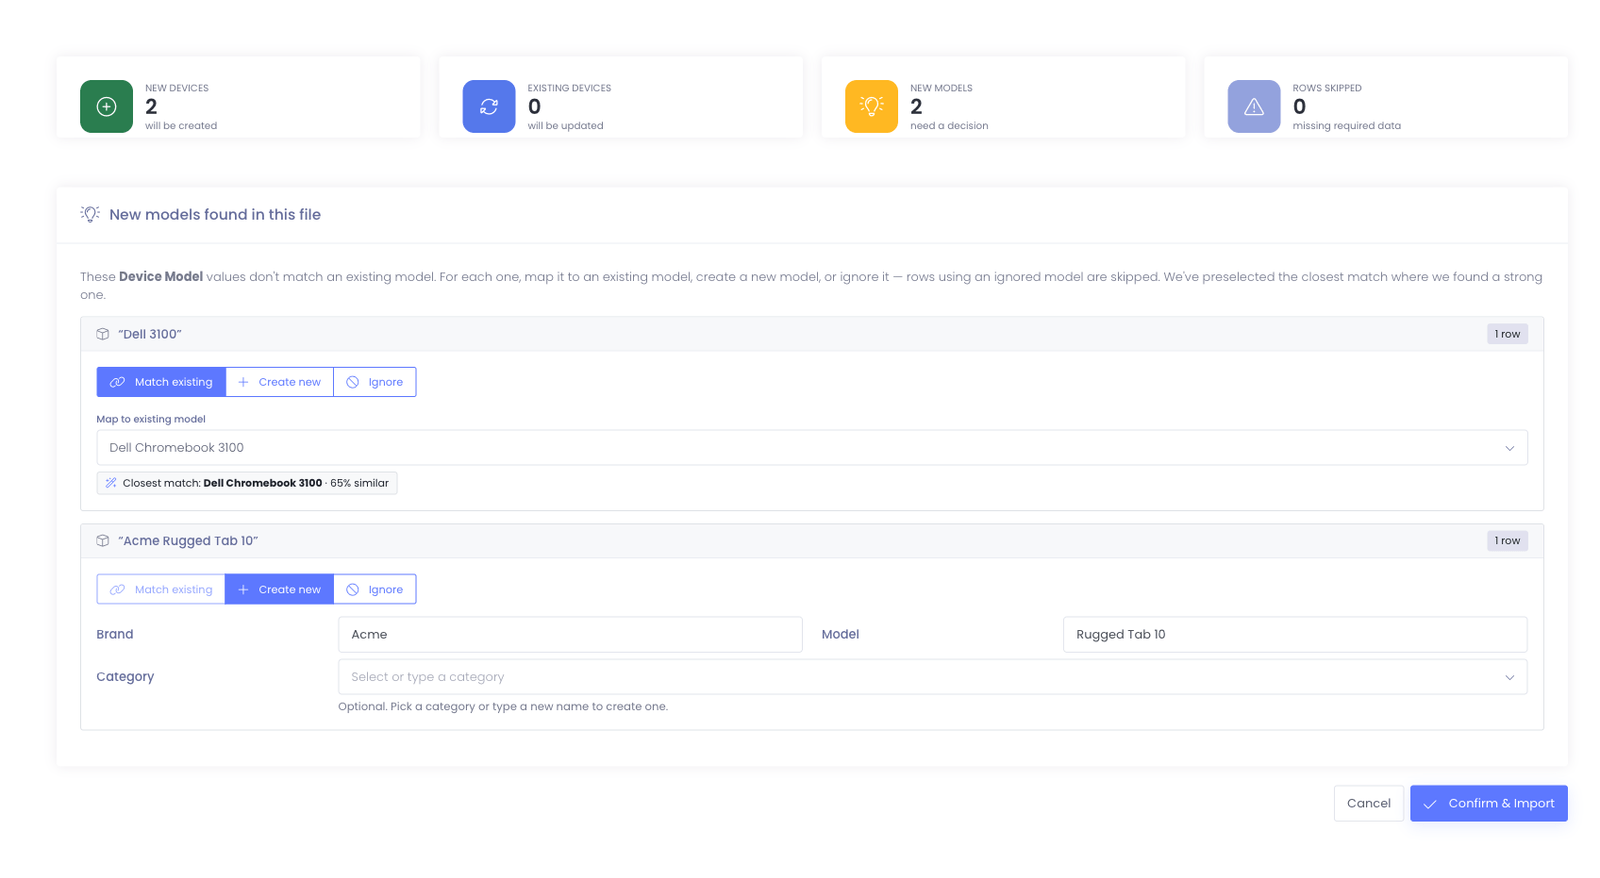
The preview screen is the heart of the import. It opens after you click Preview & Process Device Import and summarizes exactly what confirming will do.
Summary cards
The cards across the top give you the totals at a glance:
- New Devices — records that will be created
- Existing Devices — records already in your inventory that will be updated
- New Models — device model names in the file that don't match an existing model and need a decision from you
- Rows Skipped — rows missing required data; these are left out of the import
New-model decisions
When a Device Model value in your file doesn't exactly match a model you already have, Manage1to1 doesn't silently create a duplicate — it asks. Each unrecognized model gets a card with three choices:
- Match existing — map the file's value to a model you already have. When we find a close match, we preselect it and show how similar it is (for example, Dell 3100 preselects Dell Chromebook 3100 · 65% similar). Pick a different existing model from the dropdown if the suggestion isn't right.
- Create new — add a brand-new model. The brand and model name are filled in from the file; you can also pick or type a Category.
- Ignore — skip every row using this model. Those rows are not imported.
This is what prevents near-duplicate models like HP 210G1 and HP Chromebook 210G1 from piling up — map the new spelling onto the model you already keep, or deliberately create it if it really is different.
Custom fields: putting extra CSV columns onto device records
Your CSV can carry columns beyond the standard device fields — a funding source, a purchase-order number, a grant code — and the importer turns each one into a custom field on the device record. You don't set anything up in advance: add the column to your CSV, and the preview asks what to do with it.
When a column isn't a standard field or a device custom field you already have, Manage1to1 doesn't guess — it lists the column under Unrecognized columns in this file and gives you three choices per column:
- Match existing — map the column to a device custom field you already have. Use this when you've imported this data before (the field already exists) and just want to keep filling it.
- Create new — create a brand-new device custom field. The Field name is pre-filled from your column header, and you pick a Type (Text, Textarea, Dropdown, Checkbox, Link, or Password). The field is created when you confirm the import; you can fine-tune it later under Settings → System Settings → Custom Fields.
- Ignore — skip that column entirely. It isn't imported and no field is created.
Worked example. Say your CSV has two extra columns, Funding Source and PO Number:
| Serial Number | Device Model | Building | Funding Source | PO Number |
|---|---|---|---|---|
| 5CD1234ABC | CR-5 Pro | Oakwood HS | Title I | PO-88213 |
| 5CD1234XYZ | CR-5 Pro | Oakwood HS | Bond 2025 | PO-88214 |
On the preview, both Funding Source and PO Number appear as unrecognized columns:
- For
Funding Source, choose Create new and keep the type Text — it becomes a Funding Source custom field on every device in the file. - For
PO Number, if you already created a PO Number field in a prior import, choose Match existing and point it there so the values land in the same field instead of a duplicate.
After you click Confirm & Import, open any device in the file and you'll see Funding Source → Title I and PO Number → PO-88213 on its record.
The importer matches on the column header. If you called the column PO Number last time and Purchase Order this time, it treats the second one as a new unrecognized column. Reuse the exact header (or use Match existing to point it at the right field) to avoid creating duplicates.
Skipped rows
Rows missing required data (such as a serial number) are grouped into a collapsible rows will be skipped notice. Expand it to see which rows were left out, fix them in your CSV, and re-upload if you want them included.
CSV Template and Field Values
CSV Import Template
Use the CSV Import Template button to download the expected format.
Common columns:
- Serial Number (required)
- Asset Tag
- Device Model (the model's Import Name, e.g.
CR-5 Pro, or its numeric Value) - Device Type
- Status
- Building (the building name or its SIS/OneRoster ID)
- Checked Out To (optional)
- Loaner (optional) — set to
Yes(or1) to mark the device as a loaner - Loaner Number (optional) — the loaner tag to store, applied when Loaner is set
Column requirements:
- Headers must match template exactly
- Serial numbers must be unique (primary identifier)
- Device models must match a model's Import Name or Value
- Buildings must match an existing building name or SIS/OneRoster ID
Small differences are handled for you. A building or device model that differs only in capitalization, spacing, or punctuation is matched automatically, and common school abbreviations are understood, so oakwood high school, Oakwood HS, and 311 G1 versus 311G1 all resolve to the right record without a manual step.
Apple product names are recognized too. A model like MacBook Air (13-inch, M4, 2025), iPad Pro, or Mac mini is filed under the Apple brand automatically, with the full name kept as the model — so you can paste exactly what Apple or your MDM reports without splitting the brand out yourself.
When a device model is close but not an exact match, it is never guessed at silently. It is listed on the preview with the closest suggestion pre-selected for you to confirm.
Field Values
Use Field Values to confirm acceptable values for key columns. This is especially important for columns that require exact spelling or system-defined values.
What Field Values shows:
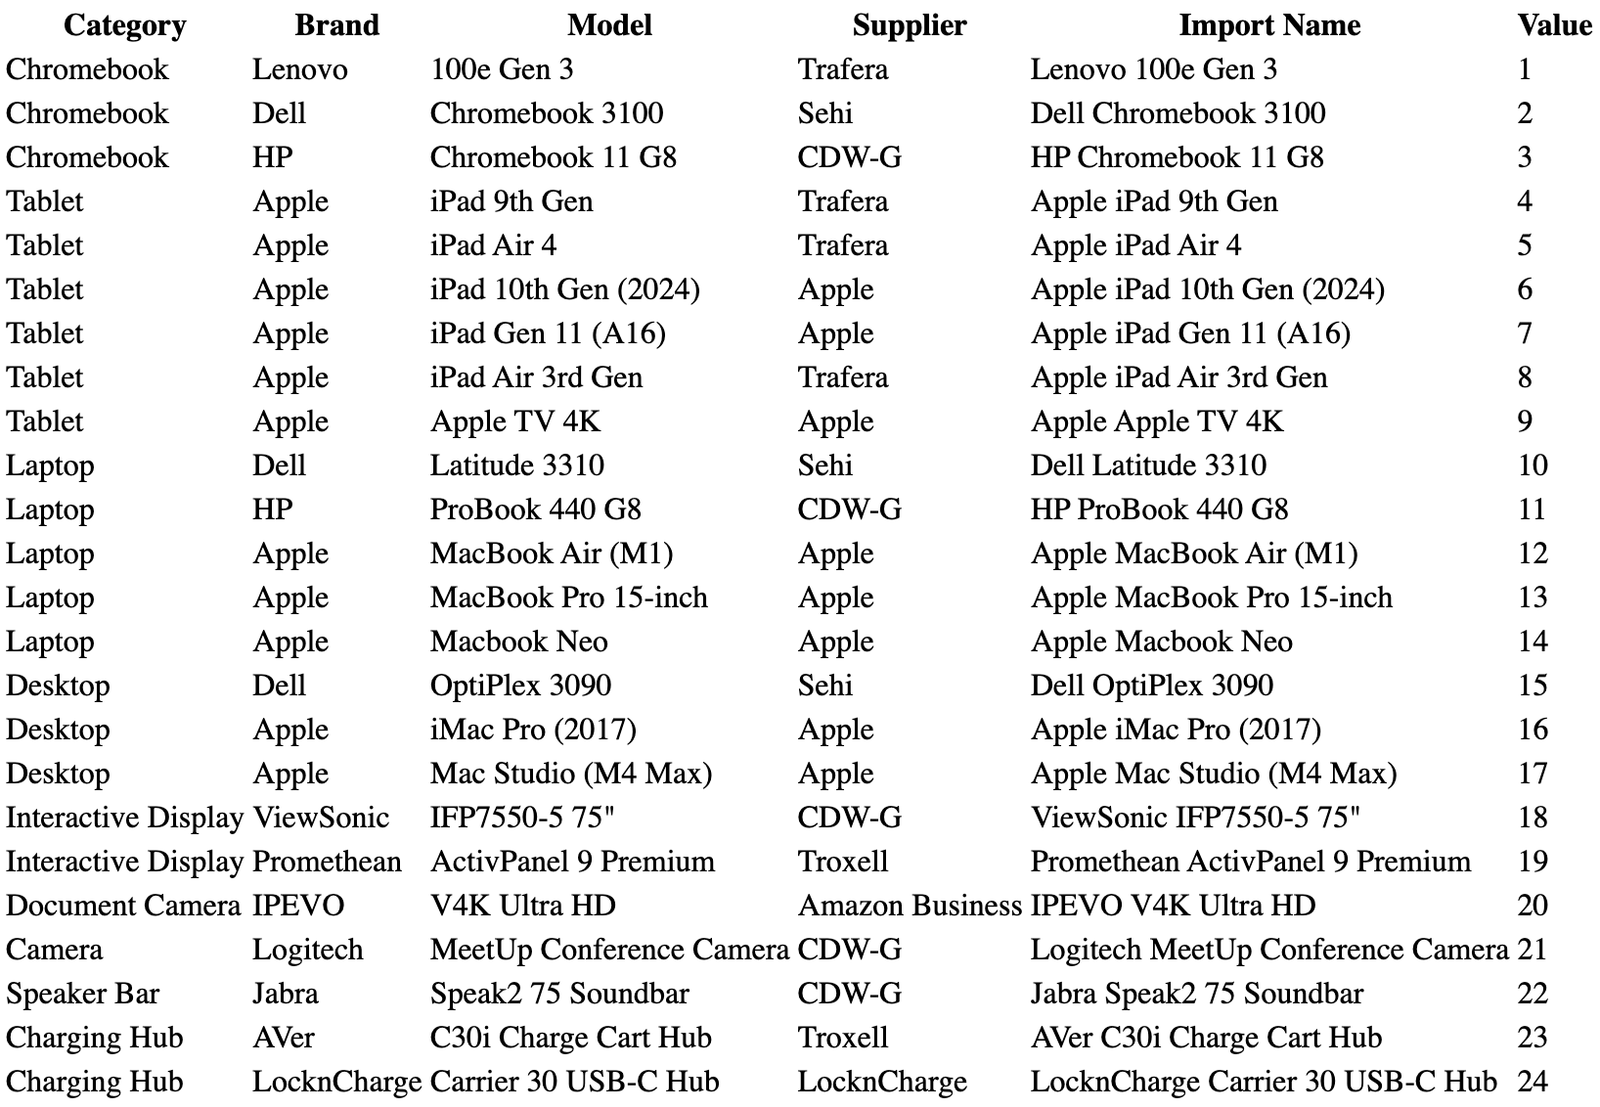
- The device model table, listing each model's Category, Brand, Model, and Supplier alongside its Import Name and numeric Value — either the Import Name or the Value works in your CSV, and two models that differ only by supplier are easy to tell apart
- Valid statuses (Active, Inactive, Damaged, Lost, etc.)
- Valid building codes
- Any other enumerated field options
Why this matters:
In the Device Model column of your CSV, enter either the model's Import Name (for example CR-5 Pro) or its numeric Value — both resolve to the same model. The Building column accepts either the building's name or its SIS/OneRoster ID. Statuses must match a configured value. A value that matches none of these can cause the row to be skipped.
Best practice: Review Field Values before populating CSV to ensure exact matches.
Before You Upload
Checklist:
- ✓ Confirm required columns exist and match the template exactly
- ✓ Confirm device identifiers are correct (serial number, asset tag)
- ✓ Confirm building or location values match configured building records
- ✓ Verify device types and statuses match Field Values exactly
- ✓ Remove test rows or header comments
- ✓ Ensure file is saved as CSV (not Excel .xlsx)
Common mistakes to avoid:
- Duplicate serial numbers (creates conflicts)
- Misspelled device types or statuses
- Building codes that don't exist
- Missing required fields (rows will be skipped)
Delete Option
If the uploaded file is incorrect, delete it and re-upload.
How to delete:
- Locate Bulk Device Process
- Click Delete Device CSV File
- File is removed from staging
- Re-upload the correct file using Bulk Device Import
When to delete:
- Wrong file uploaded
- Realized errors in CSV after uploading
- Need to make changes before processing
Important: Delete must be done BEFORE processing. Once processed, changes are applied and cannot be undone by deleting the CSV.
Verification Steps
After processing, confirm changes were applied correctly.
What to check:
- A sample set of devices were created or updated correctly
- Key fields (status, location, type, assignments) match expectations
- Serial numbers imported correctly
- Building assignments are accurate
- Device counts match expected totals
Recommended verification:
- Run device inventory report
- Check 10-15 device records manually
- Verify serial numbers and asset tags
- Confirm building assignments
- Check device statuses
If problems found:
- Review CSV for errors
- Check Field Values alignment
- Verify building ID matching
- Contact Manage1to1 Support if import results are unexpected
Best Practices
✅ Do:
- Download template from your environment
- Review Field Values before populating CSV
- Test with small CSV (10-20 devices) before processing full file
- Verify serial numbers are unique
- Confirm building IDs match exactly
❌ Don't:
- Click Confirm & Import without reading the preview summary and resolving every new-model decision
- Use device types that don't match Field Values exactly
- Include duplicate serial numbers
- Upload CSV with thousands of rows without testing
- Process same file multiple times (creates duplicates)
Common Questions
Q: What happens to existing devices not in the CSV? Nothing. Bulk import only affects devices included in the CSV. Existing devices not in the file remain unchanged.
Q: Can I update existing devices with this utility? Yes. If a serial number already exists, the import updates that device's fields with values from the CSV.
Q: How do I import custom fields (extra columns like funding source or PO number)? Just add the column to your CSV. On the preview it appears under Unrecognized columns in this file, where you choose to match it to an existing device custom field, create a new one, or ignore it. See Custom fields: putting extra CSV columns onto device records for a worked example. Nothing is imported until you confirm.
Q: What if a device has a building that doesn't exist? The device may be created without a building assignment, or the import may skip that row. Check import results carefully.
Q: Can I upload multiple CSV files before processing? No. Only one CSV can be staged at a time. Process or delete the current file before uploading another.
Q: How long does processing take? Depends on file size. Small files (100 devices): seconds. Large files (5000+ devices): several minutes.
Q: What if I process the same CSV twice? Devices already in the system will be updated again with the same values. This is generally harmless but unnecessary.
Q: Can I include checked-out devices in the CSV? Yes. If your template has a "Checked Out To" column, you can specify the user the device is assigned to.
Q: Can I mark devices as loaners in bulk?
Yes. Add a Loaner column and set it to Yes (or 1) on each loaner row, and optionally a Loaner Number column for the loaner tag. This flags the devices as loaners on import — no need to set them one by one on the Add Device form. Both columns are optional; a file without them leaves loaner status untouched.
Q: What happens if a device model in my file isn't recognized? The preview lists it under New models found in this file and asks you to decide: map it to an existing model, create it as a new model, or ignore it. Nothing is created until you confirm — so you'll never end up with an accidental duplicate model.
Q: Can I still cancel after clicking Preview & Process? Yes. The preview writes nothing. Click Cancel to walk away with no changes, or Confirm & Import to apply what the preview shows.
Bulk Device Import and Process provides efficient device inventory management for initial setup, bulk updates, and device shipment processing.