Bulk Staff Import and Process
Bulk Staff Import and Process lets you create or update staff accounts in bulk using a CSV file — upload the file, review a full preview of exactly what will happen, then confirm.
This workflow is typically used for mass staff updates tied to SIS or HR exports when automated staff imports are not configured.
Uploading and clicking Preview & Process Staff Import only shows you what will happen — a summary of new versus existing staff, any unrecognized CSV columns awaiting a decision, and any rows that will be skipped. No staff accounts are created or updated until you click Confirm & Import on the preview screen.
To access System Utilities, you need the Manage Settings permission assigned to your role.
If your HR system can export a nightly CSV, point it at SFTP and let Manage1to1 import it automatically every night — no clicking required. See Uploading Student, Staff & Guardian CSVs via SFTP. The column layout below applies to the SFTP staff.csv file too.
The SFTP path adds two behaviors the in-app utility doesn't have, both configured at Settings → System Automation:
- Enable Automatic Staff Import — runs the nightly import.
- Override Staff Passwords... — replaces existing passwords with what's in the CSV (off by default).
Unlike students and guardians, there is no missing-staff deactivation toggle. Staff who leave the district must be deactivated manually or via your own process — the importer never auto-deactivates a staff record just because they fall out of the file.
Understanding Bulk Staff Import
Think of bulk staff import as manual CSV-based staff account management - you prepare a staff data file from your HR system or SIS, upload it for staging, and then process it to create or update staff user accounts.
What this utility does:
- Uploads a staff CSV into a staging area
- Processes the CSV to create or update staff user records
- Handles building assignments and profile fields
- Provides a delete option if the wrong file is uploaded
When to use:
- OneRoster/automated staff imports are not configured
- One-time staff data corrections needed
- Beginning of year staff additions from HR export
- Bulk updating staff profile fields or building assignments
When NOT to use:
- OneRoster is enabled for staff (use OneRoster sync instead)
- Automated CSV staff imports are configured (use Automation Settings)
- Adding single staff member (use manual staff creation)
The Two-Step Workflow
Step 1: Upload the Staff CSV
Upload prepares the file for processing but does not make changes yet.
How to upload:
- Navigate to Settings → System Utilities → Users tab
- Locate Bulk Staff Import/Update
- Download the CSV Import Template
- Populate the template with staff records
- Upload the CSV using the upload area
What happens:
- File is validated for format
- CSV is staged in system for processing
- No staff accounts are created or modified yet
Step 2: Preview the Import
Clicking Preview & Process Staff Import reads the staged file and shows you a summary — it does not write anything yet.
How to preview:
- Locate Bulk Staff Process
- Confirm the system shows a file is present (timestamp displayed)
- Click Preview & Process Staff Import
- Review the preview screen (covered in Reviewing the Preview below)
Step 3: Confirm the Import
When the preview looks right, click Confirm & Import to apply the changes.
What happens:
- Staff accounts are created or updated
- Any custom fields you chose to create are added
- Building assignments applied
- Profile fields populated
- Rows flagged as skipped are left untouched
If anything looks wrong, click Cancel instead — nothing is written and you can fix and re-upload the CSV.
Reviewing the Preview
The preview screen is the heart of the import. It opens after you click Preview & Process Staff Import and summarizes exactly what confirming will do.
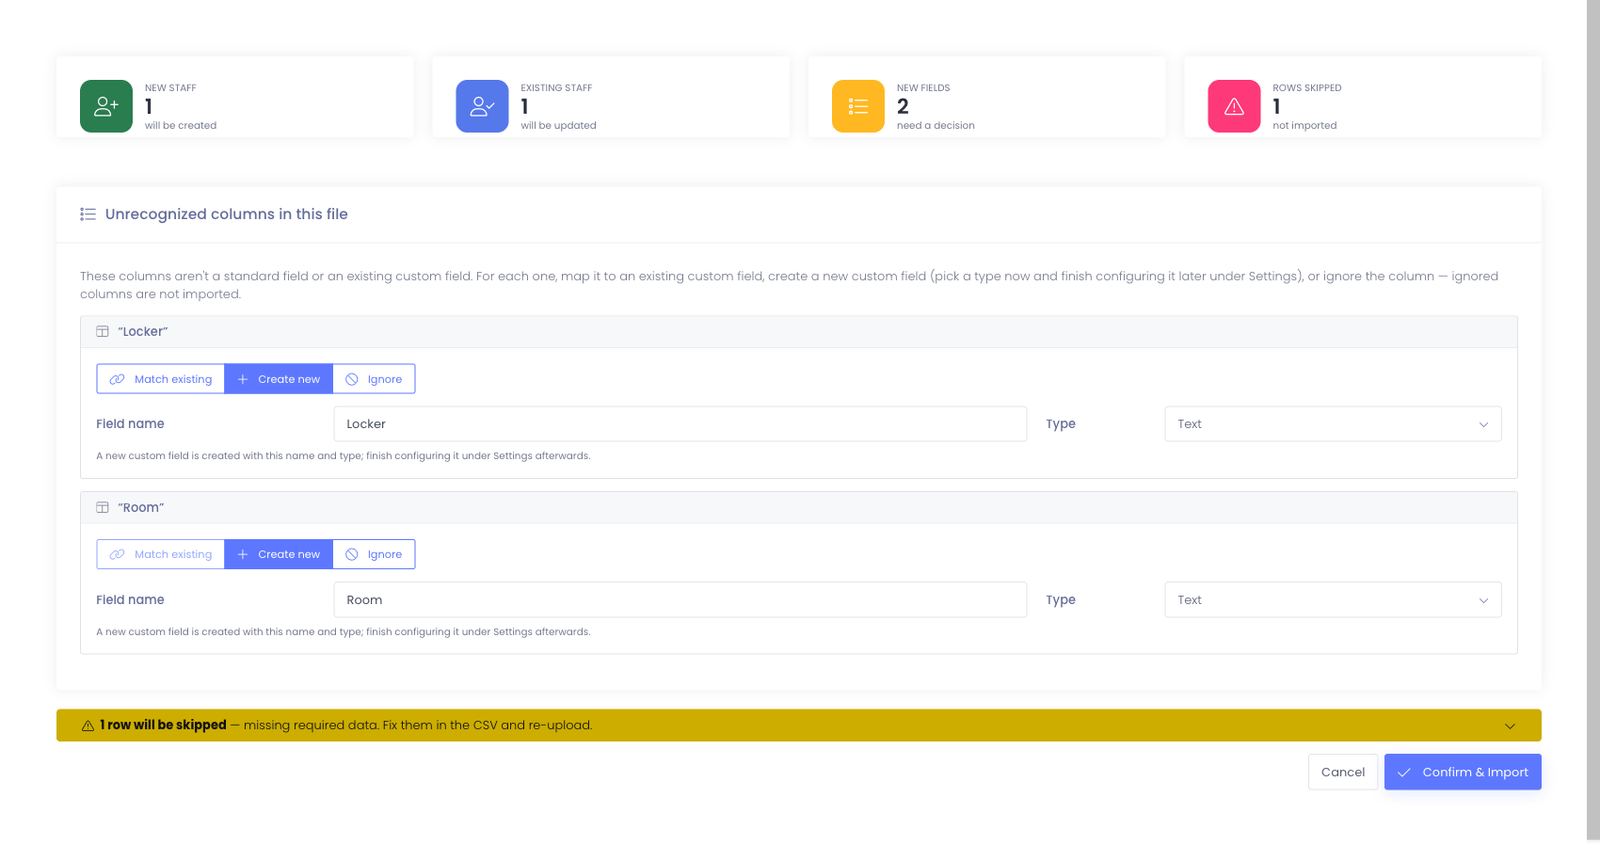
Summary cards
The cards across the top give you the totals at a glance:
- New Staff — accounts that will be created
- Existing Staff — accounts already in Manage1to1 that will be updated
- New Fields — columns in the file that don't match a standard field or an existing custom field and need a decision from you
- Rows Skipped — rows missing required data; these are left out of the import
Custom fields: putting extra CSV columns onto staff records
Your CSV can carry columns beyond the standard staff fields — an employee ID, a department, a job title — and the importer turns each one into a custom field on the staff record. You don't set anything up in advance: add the column to your CSV, and the preview asks what to do with it.
When a column isn't a standard field or a custom field you already have, Manage1to1 doesn't guess — it lists the column under Unrecognized columns in this file and gives you three choices per column:
- Match existing — map the column to a custom field you already have. Use this when you've imported this data before (the field already exists) and just want to keep filling it.
- Create new — create a brand-new custom field. The Field name is pre-filled from your column header, and you pick a Type (Text, Textarea, Dropdown, Checkbox, Link, or Password). The field is created when you confirm the import; you can fine-tune it later under Settings → System Settings → Custom Fields.
- Ignore — skip that column entirely. It isn't imported and no field is created.
Worked example. Say your CSV has two extra columns, Employee ID and Department:
| First Name | Last Name | Employee ID | Department | |
|---|---|---|---|---|
| Dana | Whitfield | dwhitfield@example.org | E-4471 | Mathematics |
| Marcus | Reyes | mreyes@example.org | E-4472 | Facilities |
On the preview, both Employee ID and Department appear as unrecognized columns:
- For
Employee ID, choose Create new and keep the type Text — it becomes an Employee ID custom field on every staff member in the file. - For
Department, if you already created a Department field in a prior import, choose Match existing and point it there so the values land in the same field instead of a duplicate.
After you click Confirm & Import, open any staff member in the file and you'll see Employee ID → E-4471 and Department → Mathematics on their profile.
The importer matches on the column header. If you called the column Employee ID last time and Emp ID this time, it treats the second one as a new unrecognized column. Reuse the exact header (or use Match existing to point it at the right field) to avoid creating duplicates.
Skipped rows
Rows missing required data are grouped into a collapsible rows will be skipped notice. Expand it to see which rows were left out, fix them in your CSV, and re-upload if you want them included.
CSV Template and Requirements
Download the Template
Use the CSV Import Template button to download the expected format.
Important: Template columns vary by district configuration. Always download the template from your environment.
Common columns:
- Staff ID (required)
- First Name
- Last Name
- Email Address
- Building ID
- Role or Department
- Username
- Password (optional)
Column requirements:
- Headers must match template exactly
- Staff IDs must be unique
- Building IDs must match existing buildings in Manage1to1
- Email addresses should be valid
Before You Upload
Checklist:
- ✓ Confirm required columns match the template exactly
- ✓ Confirm building or location values match configured buildings
- ✓ Confirm staff identifiers are consistent with your authoritative export
- ✓ Remove test rows or header comments
- ✓ Ensure file is saved as CSV (not Excel .xlsx)
Common mistakes to avoid:
- Misspelled building codes
- Duplicate staff IDs
- Missing required fields
Delete Option
If the uploaded file is incorrect, delete it and re-upload.
How to delete:
- Locate Bulk Staff Process
- Click Delete Staff CSV File
- File is removed from staging
- Re-upload the correct file using Bulk Staff Import/Update
When to delete:
- Wrong file uploaded
- Errors found in CSV after uploading
- Need to make changes before processing
Important: Delete must be done BEFORE processing. Once processed, changes are applied and cannot be undone by deleting the CSV.
Verification Steps
After processing, confirm changes were applied correctly.
What to check:
- Staff accounts were created or updated correctly
- Role, permissions, and building assignments reflect expectations
- Email addresses are correct
- Staff count matches expected total
Recommended verification:
- Run staff user report
- Check 5-10 staff profiles manually
- Verify building assignments
- Test staff logins for sample accounts (if applicable)
If problems found:
- Review CSV for errors
- Check building ID alignment
- Verify required fields were populated
- Contact Manage1to1 Support if import results are unexpected
Best Practices
✅ Do:
- Download template from your environment
- Test with small CSV (5-10 staff) before processing full file
- Verify building IDs match Manage1to1 buildings exactly
- Review uploaded file timestamp before processing
- Coordinate with staff before changing login credentials
❌ Don't:
- Click Confirm & Import without reading the preview summary and resolving every unrecognized-column decision
- Use building codes that don't exist in Manage1to1
- Upload CSV with hundreds of rows without testing
- Process same file multiple times
- Include sensitive HR data not needed for Manage1to1
Common Questions
Q: What happens to existing staff not in the CSV? Nothing. Bulk import only affects staff included in the CSV. Existing staff not in the file remain unchanged.
Q: Can I update existing staff with this utility? Yes. If a staff ID already exists, the import updates that staff member's profile fields with values from the CSV.
Q: A row says "Local ID conflict" and the staff member wasn't created. Why? A Local ID identifies exactly one person, and this staff member's Local ID is already assigned to a student record. Rather than risk changing the wrong person, Manage1to1 holds the row back — your existing student record is left untouched — and flags it as a Local ID conflict. Correct the duplicate Local ID in your source system so each person has their own, then re-run the import.
Q: Will this give staff admin access to Manage1to1? No. Bulk staff import creates staff user accounts (for device checkouts, support tickets, etc.). To grant admin access, use Administrator management separately.
Q: Can I upload multiple CSV files before processing? No. Only one CSV can be staged at a time. Process or delete the current file before uploading another.
Q: How long does processing take? Depends on file size. Small files (50 staff): seconds. Large files (500+ staff): 1-2 minutes.
Q: What if I process the same CSV twice? Staff already in the system will be updated again with the same values. This is generally harmless but unnecessary.
Q: Can staff import assign admin roles? No. Staff import creates basic staff user accounts. Admin role assignment must be done separately through Administrator management.
Q: How do I import custom fields (extra columns like employee ID or department)? Just add the column to your CSV. On the preview it appears under Unrecognized columns in this file, where you choose to match it to an existing custom field, create a new one, or ignore it. See Custom fields: putting extra CSV columns onto staff records for a worked example. Nothing is imported until you confirm.
Q: Can I still cancel after clicking Preview & Process Staff Import? Yes. The preview writes nothing. Click Cancel to walk away with no changes, or Confirm & Import to apply what the preview shows.
Bulk Staff Import and Process provides efficient staff account management for initial setup, annual updates, and HR system integration when automated imports are not available.