MDM Settings
MDM Settings is where a district enables optional device management integrations that enrich device records inside Manage1to1. These integrations are designed to complement your existing inventory and checkout workflows by adding device level telemetry and management metadata that typically lives inside a district’s MDM.
Districts can enable one or more providers depending on the device platforms they manage. Over time, additional providers can be enabled from this same area without changing how staff work day to day inside Manage1to1.
Once configured, MDM device data enhances device profiles throughout Manage1to1 and powers the MDM Statistics dashboard available under Reports.
Where MDM Data Appears
After configuring an MDM provider and syncing devices, MDM data appears in two main locations:
Device Profile Pages
Each device profile includes an MDM Information section on the Device Information tab. This section displays key fields from your MDM provider such as organizational unit, last sync time, OS version, and storage usage. A View Full Details button opens a popup with the complete MDM record.
Storage and battery levels display as color-coded progress bars for quick visual assessment. Green indicates healthy levels, yellow indicates warning thresholds, and red indicates critical levels requiring attention.
The fields shown vary by provider. Google Devices shows Org Unit and auto-update expiration dates. JAMF providers show management status, FileVault encryption, and battery levels where applicable.
MDM Statistics Dashboard
The MDM Statistics page under Reports provides aggregate views of your MDM data including OS version distribution, storage usage patterns, and device sync health across your fleet.
Accessing MDM Settings
Navigate to System Settings > MDM Settings.
This page lists the MDM providers currently available to your district. Each provider has its own tile and status indicator so you can quickly see what is active versus inactive.
How MDM Providers Work in Manage1to1
An MDM integration in Manage1to1 is intentionally not a second inventory system. Manage1to1 remains the source of truth for which devices your district actively tracks, assigns, checks out, and audits. The MDM integration simply attaches additional device details to the records you already maintain.
Because of that, the MDM sync process follows a strict rule:
Manage1to1 does not pull devices from your MDM to create new inventory records.
A device must already exist in Manage1to1 before Manage1to1 will request data for it from the MDM provider.
Districts usually prefer this behavior for two reasons. First, it protects data integrity by avoiding accidental reintroduction of retired devices, lost devices, staging inventory, or other “junk” that may still exist in the MDM. Second, it helps manage API utilization so districts are not spending calls on devices that are not relevant to active workflows.
This is the default. If you do want Manage1to1 to bring in devices the MDM knows about, you can opt in with Device Import — but even then, new devices land in a review queue for you to approve, never straight into inventory. See Common Setup Options.
Activating a Provider
When a provider is inactive, the tile includes an Activate button. Activating a provider enables its configuration and authorization workflow inside Manage1to1.
Most districts will activate a provider once, complete authorization, then use periodic syncs to keep device data current. If a provider is deactivated, Manage1to1 stops syncing and stops requesting data from that provider.
Common Setup Options
Every provider's configuration is organized into the same set of sections, so once you've set up one MDM the rest feel familiar. Not every provider offers every section — see the availability table below.
| Section | What it does |
|---|---|
| Connection | The server address and credentials for the provider. |
| Sync Options | How the MDM keeps your existing devices in sync — for example allowing a device to be locked/disabled through the MDM, or auto-disabling a device when it's marked lost. |
| Writeback | Optionally push device details (assigned user, asset tag, location) back to the provider as devices are checked in and out, so the MDM stays current too. |
| Device Import | Optionally pull devices the MDM has but Manage1to1 doesn't into a review queue. Off by default. |
| Removed-Device Handling | Optionally flag devices that disappear from the MDM's feed into a review queue so you can change their status. Off by default. |
Device Import: how it works
By default, a sync only updates devices you already track — it never creates new inventory from the MDM (see the rule above). Turning on Import New Devices adds one extra step: any device the MDM reports that Manage1to1 doesn't recognize is placed in a review queue for you to approve or dismiss. Nothing is ever added to your inventory automatically, and nothing is ever removed automatically.
When you approve an imported device, it's created using the default type, status, and building you chose in the Device Import section (the model is matched to an existing device type where possible; otherwise your default type is used).
Removed-Device Handling works the same review-first way: after a complete sync (a partial or timed-out sync never flags anything), any device previously synced from that MDM that no longer appears is placed in a removal review queue. Approving it applies the status you configured (for example, Disposed); dismissing it leaves the device unchanged. Manage1to1 never changes or "releases" a device's status on its own.
The review queues live at Devices → MDM Device Review and require the Review MDM Device Changes permission.
Which providers support what
| Capability | Apple School Manager | Google Devices | JAMF Pro | JAMF School | Mosyle | SCCM |
|---|---|---|---|---|---|---|
| Connection & Sync Options | ✅ | ✅ | ✅ | ✅ | ✅ | ✅ |
| Device Import (review queue) | — | ✅ | ✅ | ✅ | ✅ | — |
| Removed-Device Handling | — | — | ✅ | ✅ | ✅ | — |
| Remote lock (Loaner Auto-Lock) | — | ✅ | ✅ | ✅ | ✅ | — |
If a section isn't listed for your provider, that provider doesn't support that capability, so it won't appear when you configure it. In particular: Apple School Manager and SCCM offer neither Device Import nor Removed-Device Handling, and Google Devices offers Device Import but not Removed-Device Handling.
Loaner Auto-Lock
If your district lends out loaner devices, Manage1to1 can automatically lock an overdue loaner through your MDM and unlock it again once it's returned — a hands-off way to encourage timely returns.
This builds on the loaner return dates configured under Inventory Settings: when a loaner passes its return date (plus an optional grace period) without being checked back in, Manage1to1 sends a lock command through the MDM that device is enrolled in — as long as that MDM can lock and has device locking turned on. When the device is later checked in, it's automatically unlocked.
Requirements
Auto-lock only takes effect when these are in place:
- Loaner return dates are enabled (Inventory Settings), so loaners have a due date to measure against.
- An MDM that can lock is active. Remote lock is supported by JAMF Pro, JAMF School, Google Devices, and Mosyle. (Apple School Manager and SCCM can't lock a device, so they're never used for auto-lock.)
- That MDM has "Disable Device" turned on in its own provider settings — the same switch that lets Manage1to1 lock or unlock a device manually.
The Loaner Auto-Lock panel tells you which providers will do the locking and — if a lock-capable provider isn't included yet — how to add it. If a requirement is missing entirely, it shows a reminder.
Turning it on
On the MDM Settings page, find the Loaner Auto-Lock panel at the top:
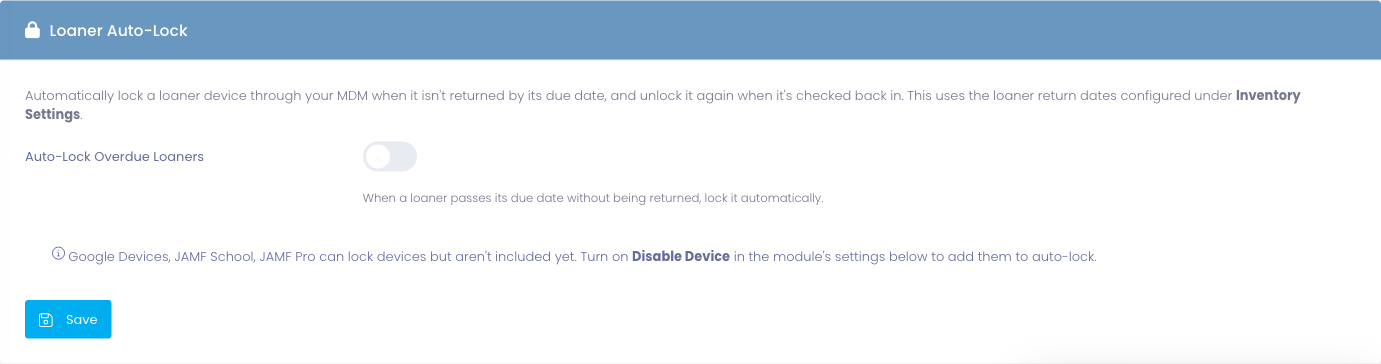
- Switch on Auto-Lock Overdue Loaners.
- Set the grace period under Lock After — a number plus a unit (hours, days, or weeks), measured from the device's due date. Leave it at 0 to lock as soon as the due date passes.
- Click Save.
The panel also lists which of your MDMs will do the locking — the ones that support lock and have Disable Device enabled. If a capable provider isn't included yet, the panel names it and points you to turn on Disable Device in that provider's settings.
From then on, any loaner that goes past its due date plus the grace period is locked automatically through those MDMs, and unlocked the moment it's checked back in. Every lock and unlock is recorded in the activity log.
Provider Specific Documentation
Each provider has its own setup guide. Use the links below to configure the provider you plan to enable.
- Apple School Manager - Apple device sync and AppleCare coverage from Apple School Manager
- Google Devices - ChromeOS device sync from Google Admin Console
- JAMF Pro - Apple device sync from JAMF Pro
- JAMF School - Apple device sync from JAMF School
- Mosyle - Apple device sync from Mosyle
- SCCM - Windows device sync from Microsoft SCCM / Configuration Manager
Shared setup (Connection, Sync Options, Writeback, Device Import, Removed-Device Handling) is documented once under Common Setup Options; each provider guide covers only what's specific to that platform.
Permissions and Visibility
MDM Settings is typically limited to district administrators. If MDM Settings or a specific provider tile is not visible, confirm the logged in user has the appropriate administrative permissions for System Settings.
If a district enables an MDM provider, it will affect device detail screens and may surface additional data fields throughout the platform. Limiting access to authorized staff helps avoid unintended configuration changes.