Google Devices
Google Devices enables ChromeOS device data synchronization from Google Admin. This integration is intended for districts that manage Chromebooks through Google Admin Console and want richer device detail inside Manage1to1 without changing how inventory is managed.
Google Devices is used for device sync only. Google single sign on is not configured here.
Before You Start
Most districts complete setup with a dedicated Google account rather than a personal administrator account. The account used to create and authorize the project should be one the district will retain long term.
The Google account that owns the Google Cloud project is difficult to change later without reauthorization. Districts should plan for continuity before completing setup.
Step 1: Create a Google Cloud Project
- Visit the Google Cloud Console and sign in with the account your district will use for this integration.
- Use the project selector to create a new project.
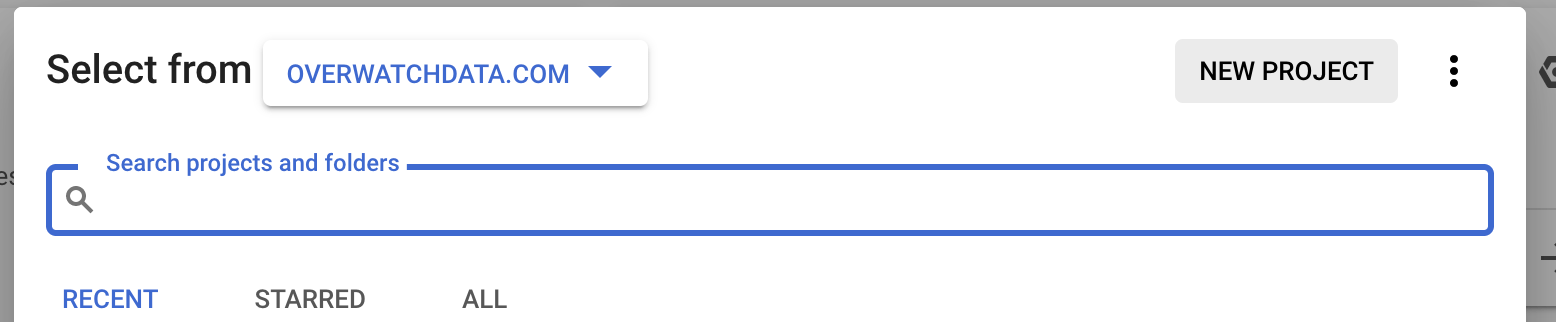
Under the Project selector, choose Create project
- Give the project a name that is meaningful to your district. The project name is not public facing.
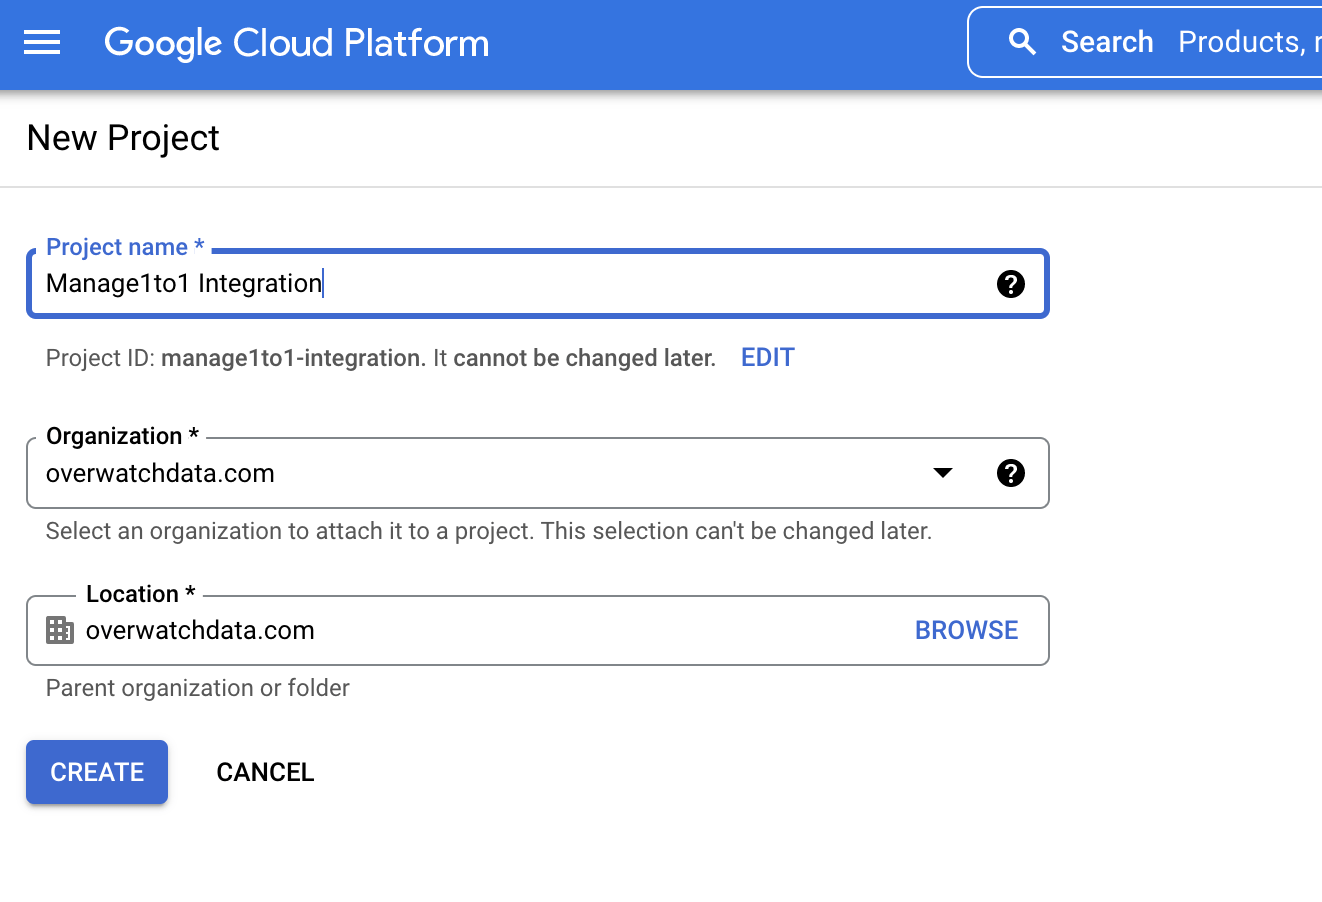
Enter a Project Name and click Create (This name is private to you)
Many districts name the project something like Manage1to1 Device Sync so it is easy to identify later.
Step 2: Configure OAuth Consent
Google requires an OAuth consent configuration even if the integration is used only by district staff. This is where the name shown during authorization comes from.
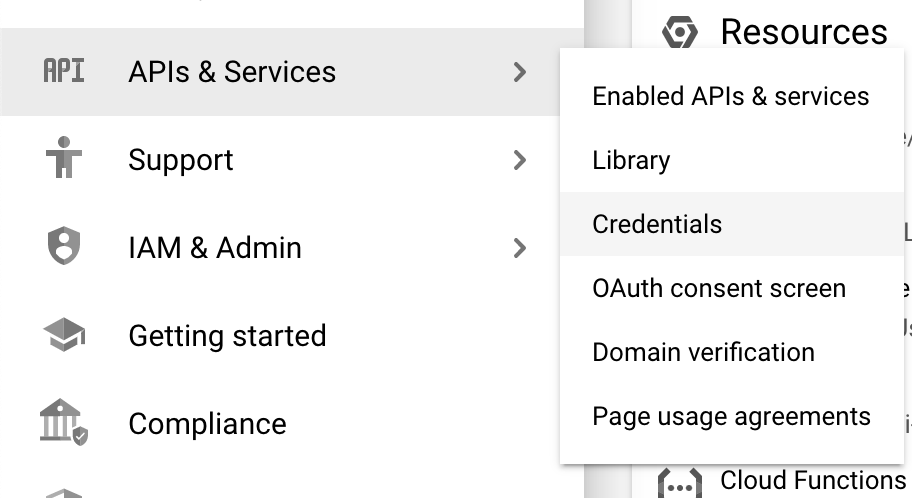
- In the Google Cloud Console, open
APIs & Services.
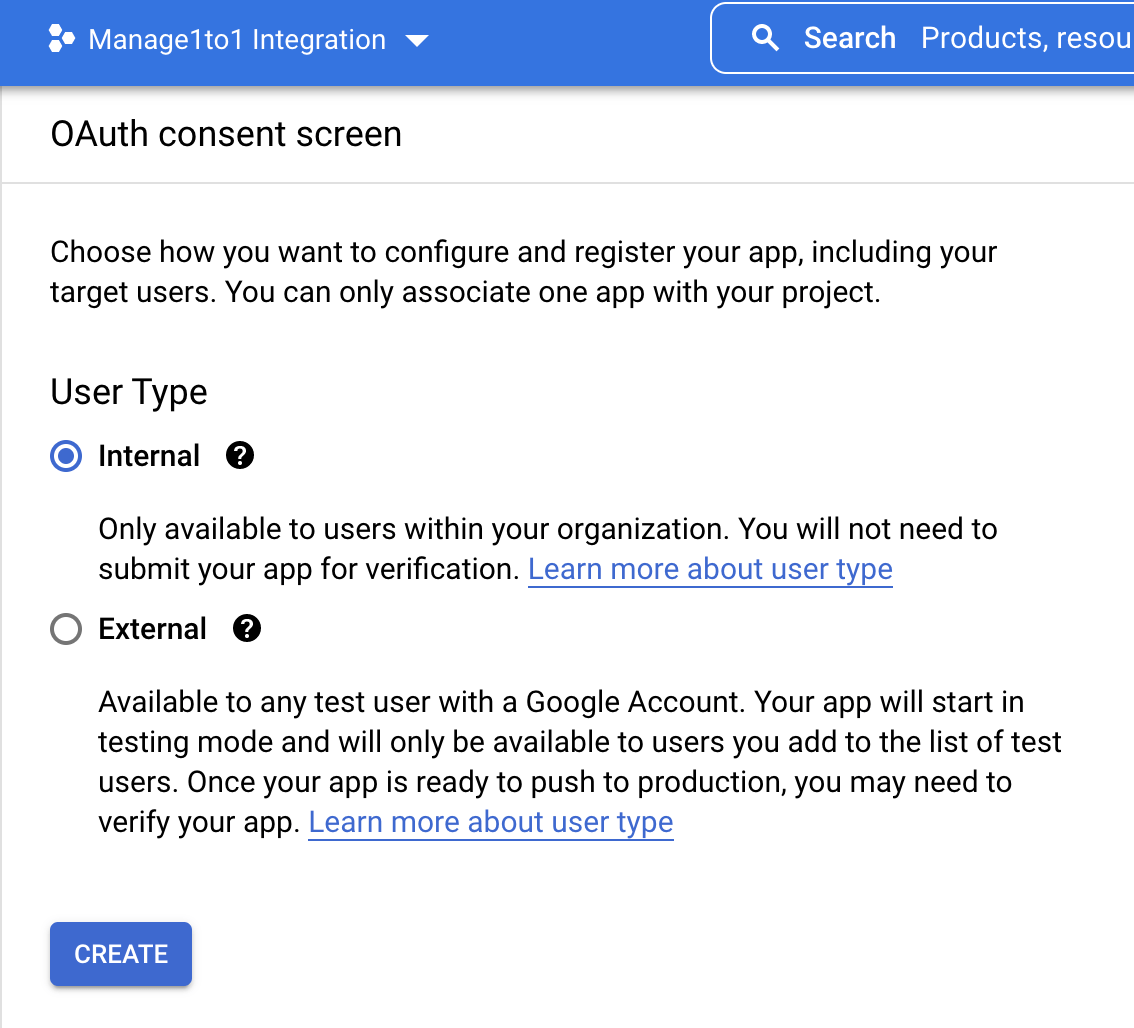
Choose Internal as the User Type for the integration and press Create
- Select OAuth consent configuration.
Next you will be taken to the project dashboard. From here, select API’s & Services >> Credentials in the left sidebar
- Choose Internal as the user type.
- Enter an app name and a homepage URL. Districts typically use their district homepage.
- Add
manage1to1.comas an authorized domain. - Save and continue through the remaining steps without adding additional scopes unless your district has a specific requirement.
Step 3: Create OAuth Credentials
Next, create the OAuth client used for authorization.
- Navigate to
APIs & Services > Credentials. - Choose
Create credentials > OAuth client ID. - Select Web application.
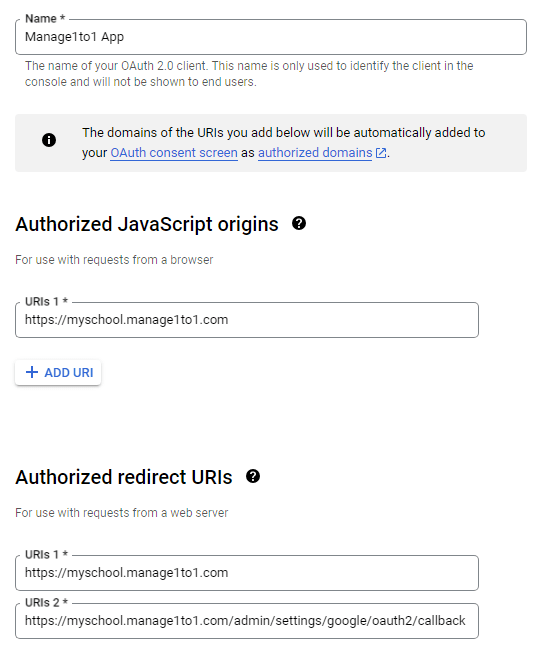
Provide a Name for the credential set (this is not visible to the public) and the authorized JavaScript origins and redirect URIs. Enter your full URL for Manage1to1 (do not include the /admin) in both the authorized JavaScript origin and redirect URI boxes. In the example here we are using “https://yourschoolurl.manage1to1.com”.
- Add the authorized JavaScript origin for your Manage1to1 URL:
https://YOURDISTRICT.manage1to1.com - Add the same url above as an authorized redirect URI as well.
After creation, Google will display a Client ID and Client Secret. Store these securely.
Treat the Client Secret like a password. Districts should store it in a secure location and restrict access to staff who manage platform configuration.
Step 4: Activate Google Devices in Manage1to1
Return to Manage1to1 and navigate to:
System Settings > MDM Settings
Locate the Google Devices tile and select Activate.

To activate, Manage1to1 will prompt for the Google OAuth credentials from the earlier steps.
- Enter the Client ID.
- Enter the Client Secret.
- Choose Test Configuration to verify the credentials.
- Save the configuration.
You will then be presented with an OAuth2 Callback URL. Please take note of this URL as it will need to be added in the URL Redirect alongside the main URL in the previous step. The format will be similar to this: https://YOURDISTRICT.manage1to1.com/admin/settings/mdm/oauth2/GoogleDevices/callback
Step 5: Enable Admin SDK API
Google Devices sync relies on Admin SDK API access.
- In the Google Cloud Console, open
APIs & Services > Library. - Search for Admin SDK API.
- Select it and click Enable.
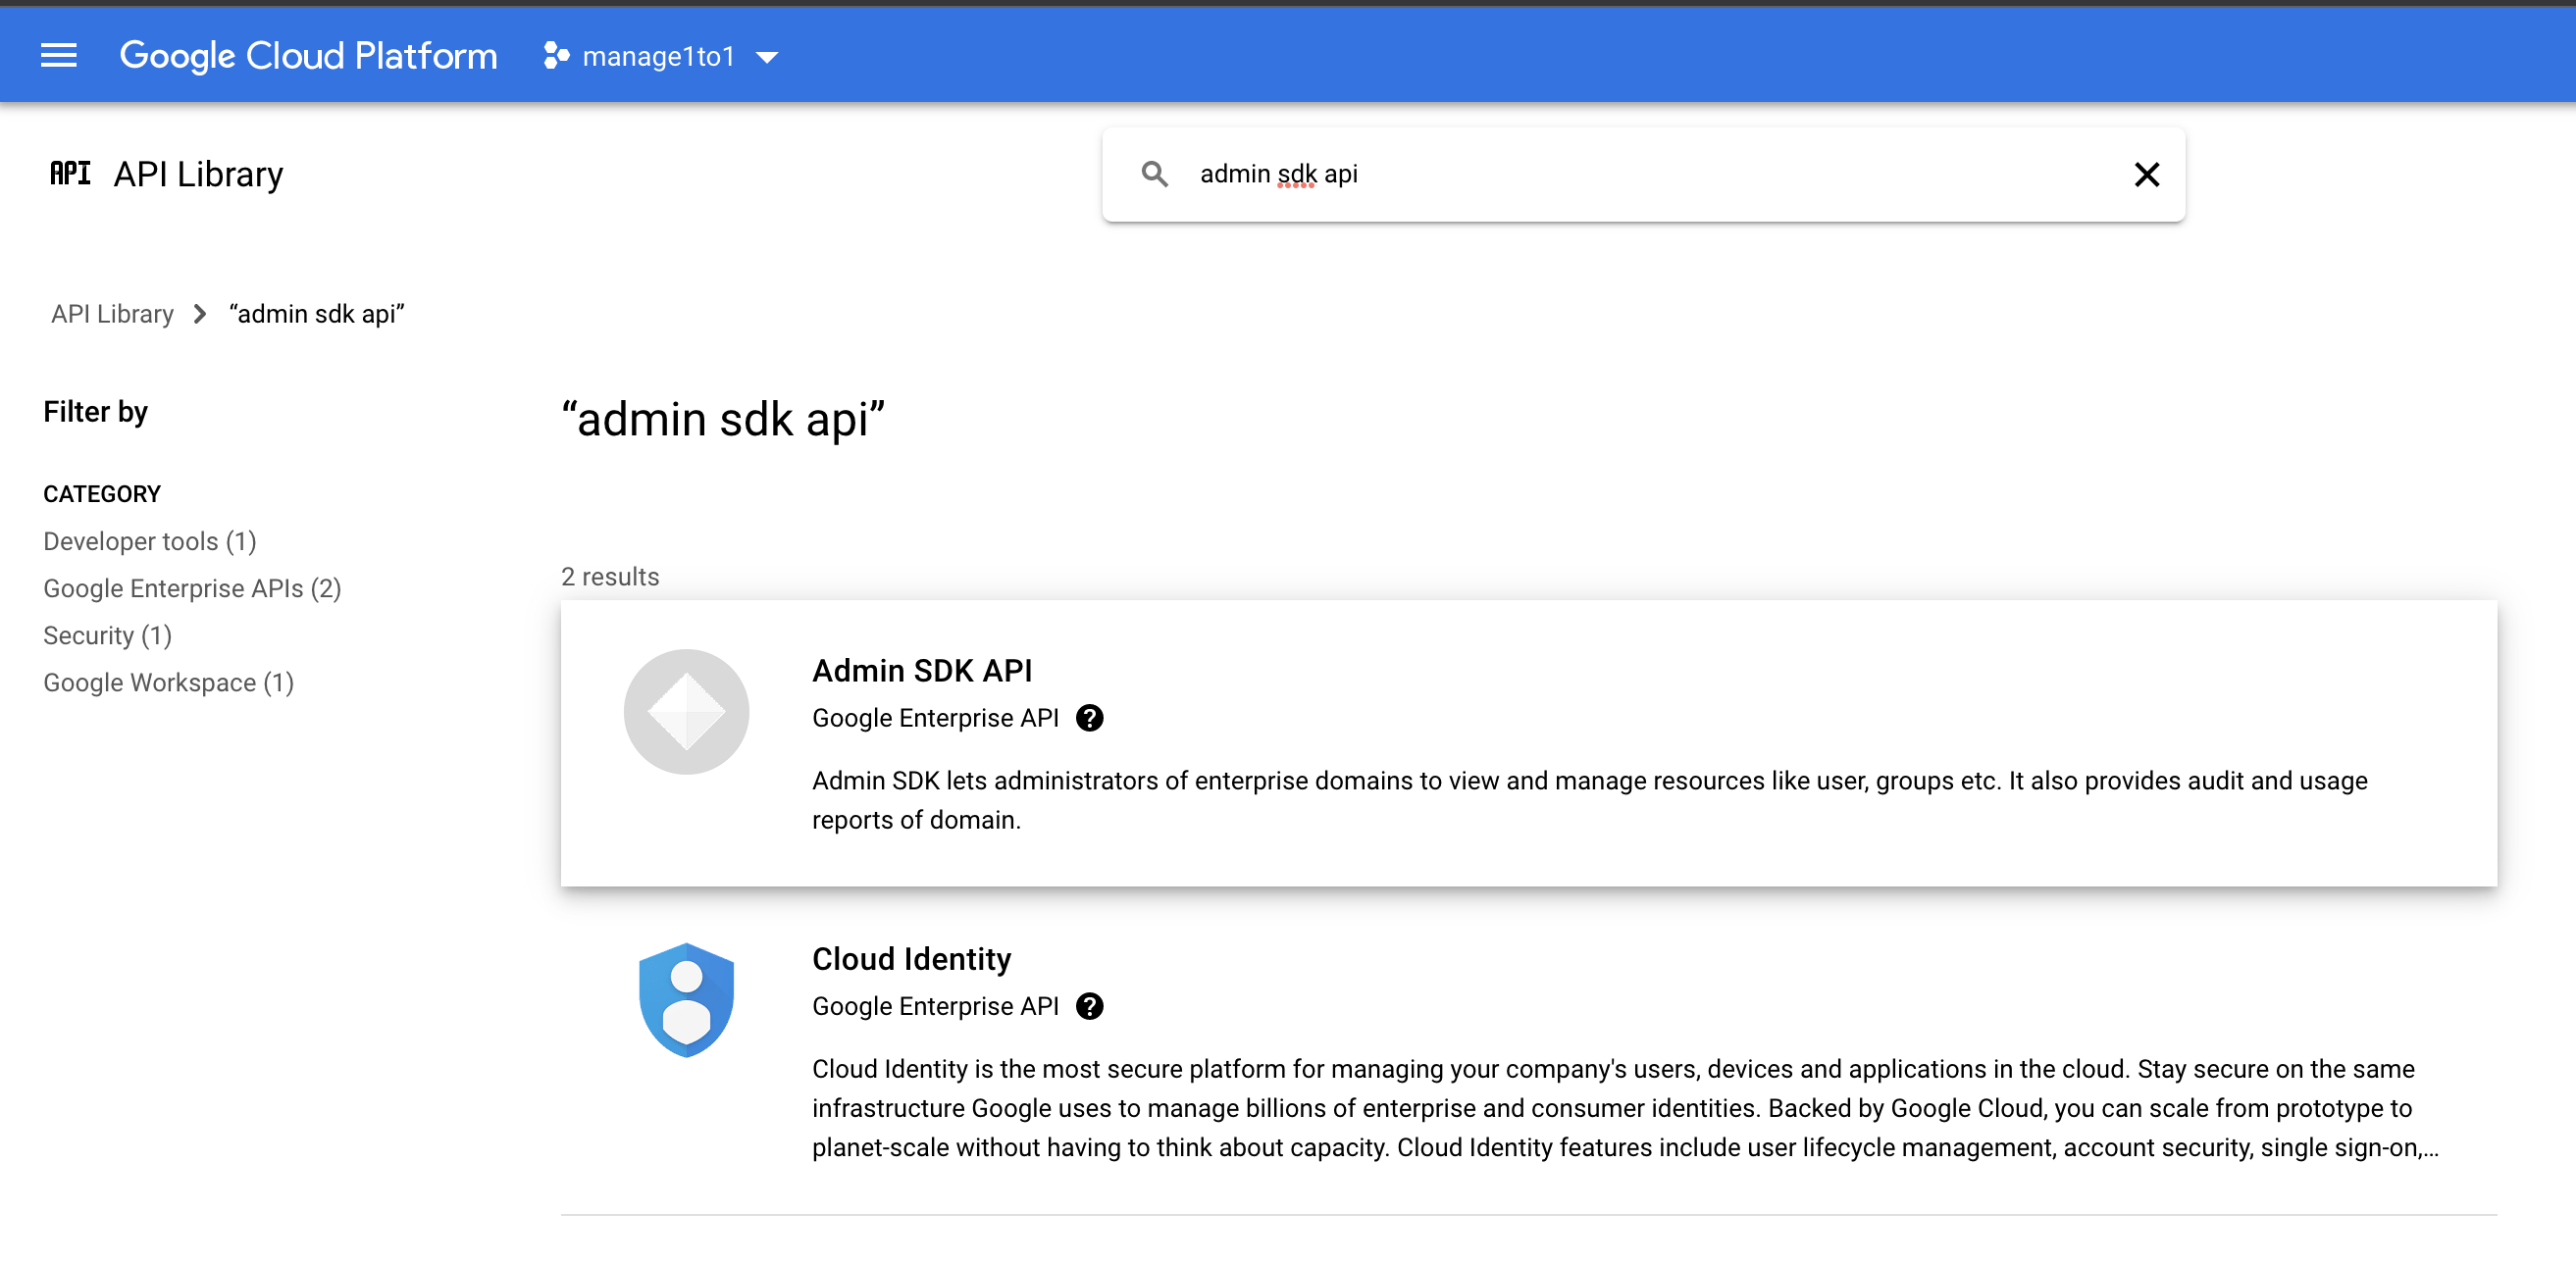
Search for admin sdk api and choose the Admin SDK API from the results screen
If Admin SDK API is not enabled, authorization may succeed but device sync will fail.
Step 6: Authorize Device Sync
After credentials are saved, head back to Manage1to1 and click the Authorize button to authorize the connection to Google.
When you select Authorize, Manage1to1 opens a Google authorization window. Sign in using a Google administrator account that has sufficient permissions to access ChromeOS device data in Google Admin.
Once authorization is complete, Manage1to1 will store an access token for the integration and enable sync actions.
Step 7: Sync Device Data
After authorization, device data will begin syncing automatically. Manage1to1 syncs with Google periodically throughout the day in small batches to keep device data current without impacting performance.
You can also view the latest Google data for any individual device by opening the device info panel and selecting Refresh Now.
A sync updates Google device fields for devices that already exist in Manage1to1. This includes only devices that Manage1to1 can match to your inventory.
Manage1to1 syncs Google device data only for devices that already exist in Manage1to1.
A Chromebook that exists only in Google Admin will not be pulled into Manage1to1 automatically. It must exist in Manage1to1 before syncing.
Districts typically prefer this approach because it prevents old, staged, lost, or retired devices from being added back into inventory unintentionally. It also keeps API utilization focused on devices that are actively tracked, checked out, or audited.
Matching Behavior and Data Integrity
Google device sync is designed to be additive. It enhances device records that your district already owns inside Manage1to1.
When a device does not match, Manage1to1 skips it rather than creating a new record. This protects districts from two common issues:
- Inventory drift caused by old devices that still appear in Google Admin
- Excessive API utilization on devices that are not relevant to current workflows
Serial number matching is case-insensitive — a serial entered in any casing in Manage1to1 will match the corresponding device in Google Admin. Devices with an auto-hide status in Manage1to1 are excluded from sync automatically.
If a district expects a device to sync and it does not, the device should be reviewed in Manage1to1 first to confirm it exists, is not hidden, and has the correct identifier stored.
Common Troubleshooting
Authorization succeeds but sync fails
Confirm that Admin SDK API is enabled in the Google Cloud project. This is required for the device level calls used during sync.
Devices are not updating
- Verify the device exists in Manage1to1 and that the identifier stored in Manage1to1 matches what Google Admin reports for the same device
- Check that the device is not hidden in Manage1to1 (devices with an auto-hide status are excluded from sync)
The authorization window uses the wrong Google account
Districts often have multiple Google accounts signed in at once. Use an incognito window or sign out of other accounts before authorizing.