Bulk Insurance Import and Process
Bulk Insurance Import and Process lets you apply insurance information to users or devices in batch using a CSV file — upload the file, review a preview of exactly what will happen, then confirm.
This workflow is used when insurance information needs to be set or updated in bulk, such as when insurance enrollment data comes from an external system.
Uploading and clicking Preview & Process Bulk Insurance only shows you what will happen — whether the file targets users or devices, how many insurance records will be created or updated, and any rows that will be skipped. No insurance data is applied until you click Confirm & Import on the preview screen.
To access System Utilities, you need the Manage Settings permission assigned to your role.
Understanding Bulk Insurance Import
Think of bulk insurance import as mass insurance data application - you prepare insurance enrollment data, upload it, and process it to apply insurance status, policy numbers, or coverage details to users or devices in batch.
What this utility does:
- Uploads an insurance CSV into a staging area
- Processes the file and applies insurance data according to the template used
- Updates insurance fields for users or devices
- Provides a process action once the file is present
When to use:
- Applying insurance enrollment data from insurance provider
- Updating insurance policy numbers in batch
- Beginning of year insurance setup
- Mid-year insurance enrollment updates
When NOT to use:
- Adding insurance to single users/devices (use manual edit)
- Insurance provider integration handles this automatically
The Workflow
Step 1: Upload the Insurance CSV
Upload prepares the file for processing but does not apply insurance data yet.
How to upload:
- Navigate to Settings → System Utilities → Billing tab
- Locate Bulk Insurance Import
- Download the appropriate insurance template (user or device)
- Populate the CSV file with insurance data
- Upload the file using the upload area
What happens:
- File is validated for format
- CSV is staged in system for processing
- No insurance data is applied yet
Step 2: Preview the Import
Clicking Preview & Process Bulk Insurance reads the staged file and shows you a summary — it does not apply any insurance data yet.
How to preview:
- Locate Bulk Insurance Process
- Confirm the system shows a file is present
- Click Preview & Process Bulk Insurance
- Review the preview screen (covered in Reviewing the Preview below)
Step 3: Confirm the Import
When the preview looks right, click Confirm & Import to apply the insurance data.
What happens:
- Insurance fields updated for matching users/devices
- Insurance status applied
- Policy numbers or coverage details populated
- Rows flagged as skipped are left untouched
If anything looks wrong, click Cancel instead — nothing is written and you can fix and re-upload the CSV.
Reviewing the Preview
The preview screen opens after you click Preview & Process Bulk Insurance and summarizes exactly what confirming will do. It also confirms whether the file targets users or devices, so you can catch a wrong template before applying it.
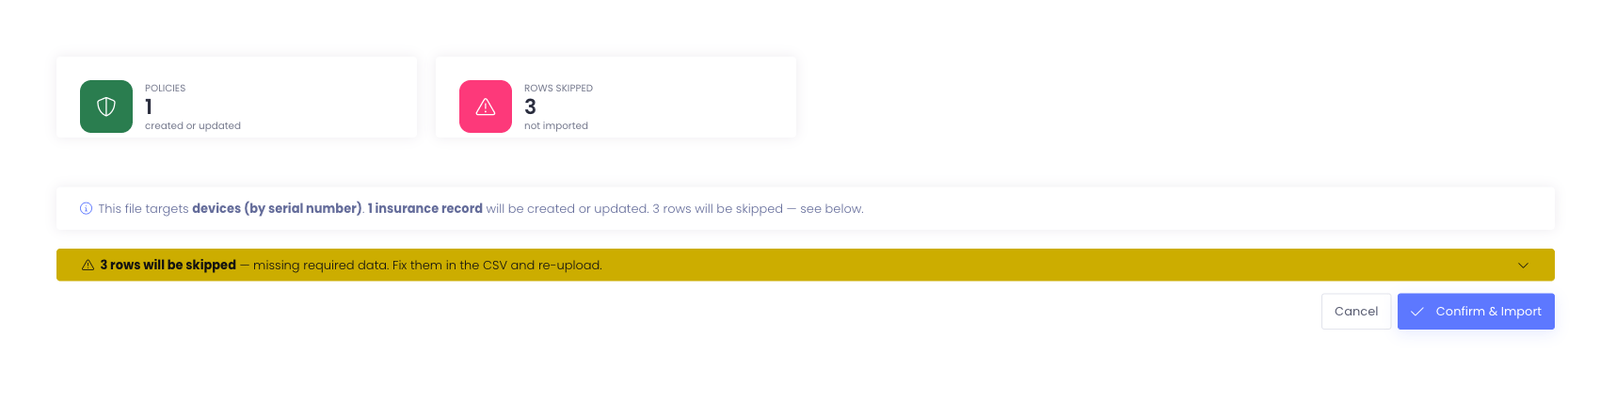
Summary cards
The cards across the top give you the totals at a glance:
- Policies — insurance records that will be created or updated
- Rows Skipped — rows missing required data; these are left out of the import
Skipped rows
Rows missing required data are grouped into a collapsible rows will be skipped notice. Expand it to see which rows were left out, fix them in your CSV, and re-upload if you want them included.
Templates
Depending on your environment, you may have multiple templates available:
User insurance import template:
- Applies insurance data to student or staff users
- Common fields: User ID, Insurance Status, Policy Number, Coverage Start Date
Device insurance import template:
- Applies insurance data to device records
- Common fields: Device Serial, Insurance Status, Policy Number, Coverage Amount
Which template to use: Use the template buttons shown in your System Utilities page to download the correct format for your needs.
CSV Requirements
Common columns (varies by template):
- User ID or Device Serial (required - to match record)
- Insurance Status (Yes/No or Enrolled/Not Enrolled)
- Policy Number
- Coverage Amount or Type
- Effective Dates
Column requirements:
- Headers must match template exactly
- User IDs or device serials must match existing records
- Insurance status values must match expected format
Before You Upload
Checklist:
- ✓ Download correct template (user vs device)
- ✓ Verify IDs match existing records in Manage1to1
- ✓ Confirm insurance status values match expected format
- ✓ Remove test rows or header comments
- ✓ Ensure file is saved as CSV (not Excel .xlsx)
Common mistakes to avoid:
- Using wrong template type
- IDs that don't match existing records
- Incorrect insurance status values
- Missing required fields
Verification Steps
After processing, confirm insurance data was applied correctly.
What to check:
- The expected insurance fields are populated
- The correct record types were updated (users vs devices)
- A sample set of records reflect the intended insurance settings
- Policy numbers are accurate
- Insurance status is correct
Recommended verification:
- Run report showing insurance status
- Check 10-15 records manually
- Verify policy numbers populated correctly
- Confirm only intended records were updated
- Check insurance dates are accurate
If problems found:
- Review CSV for ID matching errors
- Check that IDs matched existing records
- Verify insurance status format
- Contact Manage1to1 Support if import results are unexpected
Best Practices
✅ Do:
- Download correct template for your needs
- Test with small CSV (10-20 records) before processing full file
- Verify all IDs exist in Manage1to1
- Coordinate with insurance provider on data format
- Keep backup of insurance CSV for reference
❌ Don't:
- Use wrong template type (user vs device)
- Click Confirm & Import without reading the preview summary first
- Include IDs that don't exist
- Upload CSV with thousands of rows without testing
- Process same file multiple times
Common Questions
Q: Can I cancel after clicking Preview & Process Bulk Insurance? Yes. The preview writes nothing. Click Cancel to walk away with no changes, or Confirm & Import to apply what the preview shows.
Q: What's the difference between user and device insurance templates? User templates apply insurance to student/staff accounts. Device templates apply insurance to device inventory records. Use the template that matches your insurance coverage type.
Q: What if an ID in the CSV doesn't exist? That record will be skipped. Other valid IDs in the CSV will still be processed. Review results to identify skipped records.
Q: Can I upload multiple CSV files before processing? No. Only one CSV can be staged at a time. Process or delete the current file before uploading another.
Q: How long does processing take? Depends on file size. Small files (100 records): seconds. Large files (2000+ records): 1-2 minutes.
Q: Can I update insurance for some users/devices and leave others unchanged? Yes. Only users/devices included in the CSV will be updated. Records not in the CSV remain unchanged.
Q: Will this overwrite existing insurance data? Yes. If a user/device already has insurance data, the import will update it with values from the CSV.
Q: What insurance fields can be imported? Depends on your district configuration. Check the template to see available fields (status, policy number, coverage amount, dates, etc.).
Bulk Insurance Import and Process provides efficient insurance data management for applying insurance enrollment information from external providers or updating insurance status in batch.