View Reports
View Reports is where you access structured reports for users, devices, and administrative activity. Each report opens a detailed view, typically with filters and export options.
You can access this page from the main navigation under Reports > View Reports.
To access View Reports, you need the Stats/Exports permission assigned to your role. Some administrative reports may also require the Administrative Reports permission.
Available Reports
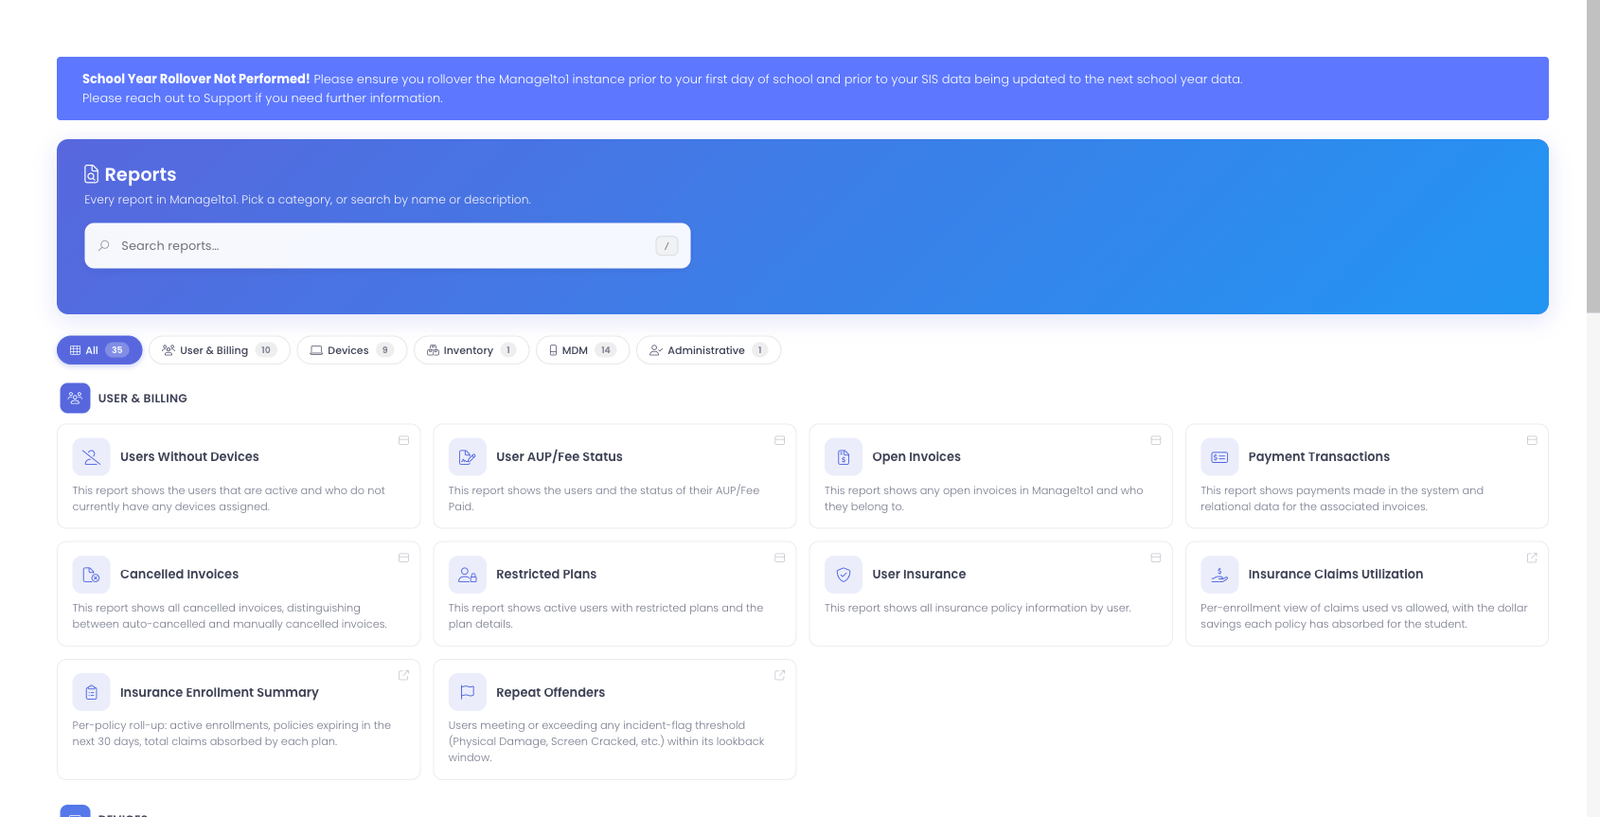
The View Reports page presents every report available in your environment as a searchable catalog of cards, grouped by category.
How to Use This Page
- Search — start typing in the search box at the top to filter reports instantly by name or description. Matching text is highlighted. Press / anywhere to jump to the search box, or Esc to clear it.
- Filter by category — use the chips (All, User & Billing, Devices, Inventory, MDM, Administrative) to show just one group of reports.
- Open a report — select any report card to open it. A small icon in the top corner of each card tells you how it opens:
- A window icon means the report opens in a pop-up window on this page.
- An arrow icon means the report opens on its own full page.
- Apply filters to narrow results (building, date range, status, etc.), and export to CSV where available.
The categories and reports you see depend on your permissions and which integrations are configured, so your catalog may show more or fewer reports than the examples below.
User Based Reports
User based reports focus on users, billing status, and account level activity.
Users Without Devices
Shows active users who do not currently have devices assigned.
What you'll see:
- User name
- Grade level
- Building
- Current status (active, inactive)
Common uses:
- Identify users who still need a device assigned
- Verify deployment progress by school, grade, or program
- Create action lists for device distribution teams
- Track 1:1 program completion rates
Typical workflow:
- Open the report
- Filter by building and/or grade
- Export the list to CSV
- Use it to coordinate device assignments
Open Invoices
Shows invoices that are still open and the associated users.
What you'll see:
- Invoice number
- User name
- Amount owed
- Date created
- Building
Common uses:
- Support billing follow up with parents/guardians
- Reconcile unpaid balances
- Confirm invoice activity for a date range
- Identify accounts needing payment plans
Typical workflow:
- Filter by building or date range
- Sort by amount or age of invoice
- Export list for finance department
- Create follow-up action lists
Cancelled Invoices
Shows all cancelled invoices with automatic distinction between auto-cancelled (via billing automation) and manually cancelled invoices.
What you'll see:
- Invoice number
- User name and student ID
- Grade level
- Building
- Invoice date
- Due date
- Cancelled date
- Invoice amount
- Cancellation type (Auto-Cancelled or Manual)
- Days overdue (for auto-cancelled invoices)
Common uses:
- Monthly audit of automatic cancellations from billing automation
- Review write-off patterns and amounts
- Track uncollectible invoices by building or time period
- Support financial reconciliation and reporting
- Verify automation is cancelling invoices appropriately
- Identify students/families with multiple cancelled invoices
Typical workflow:
- Open the report to view all cancelled invoices
- Review cancellation type to distinguish auto vs manual
- Filter by building or date range if needed
- Sort by amount or days overdue to identify patterns
- Export to Excel/CSV for accounting or board reports
- Use days overdue data to evaluate automation threshold settings
Export options:
- Excel (.xlsx)
- CSV (.csv)
- PDF (.pdf)
- Copy to clipboard
Invoices marked "Auto-Cancelled" were cancelled automatically by the billing automation system when they exceeded the configured threshold (default: 60 days after final notice). You can adjust this threshold in Settings → Automation Settings → Billing Settings.
For more information, see Automated Invoice Reminders and Billing Settings Tab.
Restricted Plans
Shows active users with restricted plans and their plan details.
What you'll see:
- User name
- Local ID
- Grade
- Building
- Restricted On — the date the restriction was first applied
- Last Updated — the date the restriction was last changed
- Restricted plan details
The Restricted On and Last Updated dates let you spot restrictions that have been in place a long time or haven't been reviewed recently. Both dates come along when you export the report to CSV or PDF.
Common uses:
- Review active restrictions and validate assignments
- Audit restriction patterns by building or cohort
- Verify restrictions are still appropriate
- Document disciplinary technology restrictions
Restricted Students with Devices
A narrower, action-oriented companion to Restricted Plans: only restricted students who currently have a device checked out, grouped by grade. Built as a roster for device swaps and collections so a restricted device never slips through. The grade is included in the CSV/PDF/Excel export.
See Restricted Students with Devices for the full walkthrough.
User AUP and Fee Status
Shows user compliance and fee paid status.
What you'll see:
- User name
- AUP signed status (yes/no)
- Fee paid status (yes/no)
- Date signed/paid
- Building
Common uses:
- Track AUP completion status
- Verify fee status for billing and compliance workflows
- Identify users who need to complete AUP before device assignment
- Generate compliance reports for administration
Payment Transactions
Shows payment records and related invoice information.
What you'll see:
- Transaction ID
- User name
- Amount paid
- Payment date
- Payment method
- Related invoice number
Common uses:
- Reconcile payment processing
- Validate transaction history for a specific user or period
- Support audit requests for payment records
- Verify payments were applied to correct invoices
User Insurance
Lists every user with active or historical insurance enrollment.
What you'll see:
- User name
- Local ID
- Grade
- Policy (vendor name + term label)
- Start and end dates
Common uses:
- Confirm enrollment lists at the start of the school year
- Identify users whose policy expires soon
- Cross-check enrollment data against a vendor's roster
Device Coverage
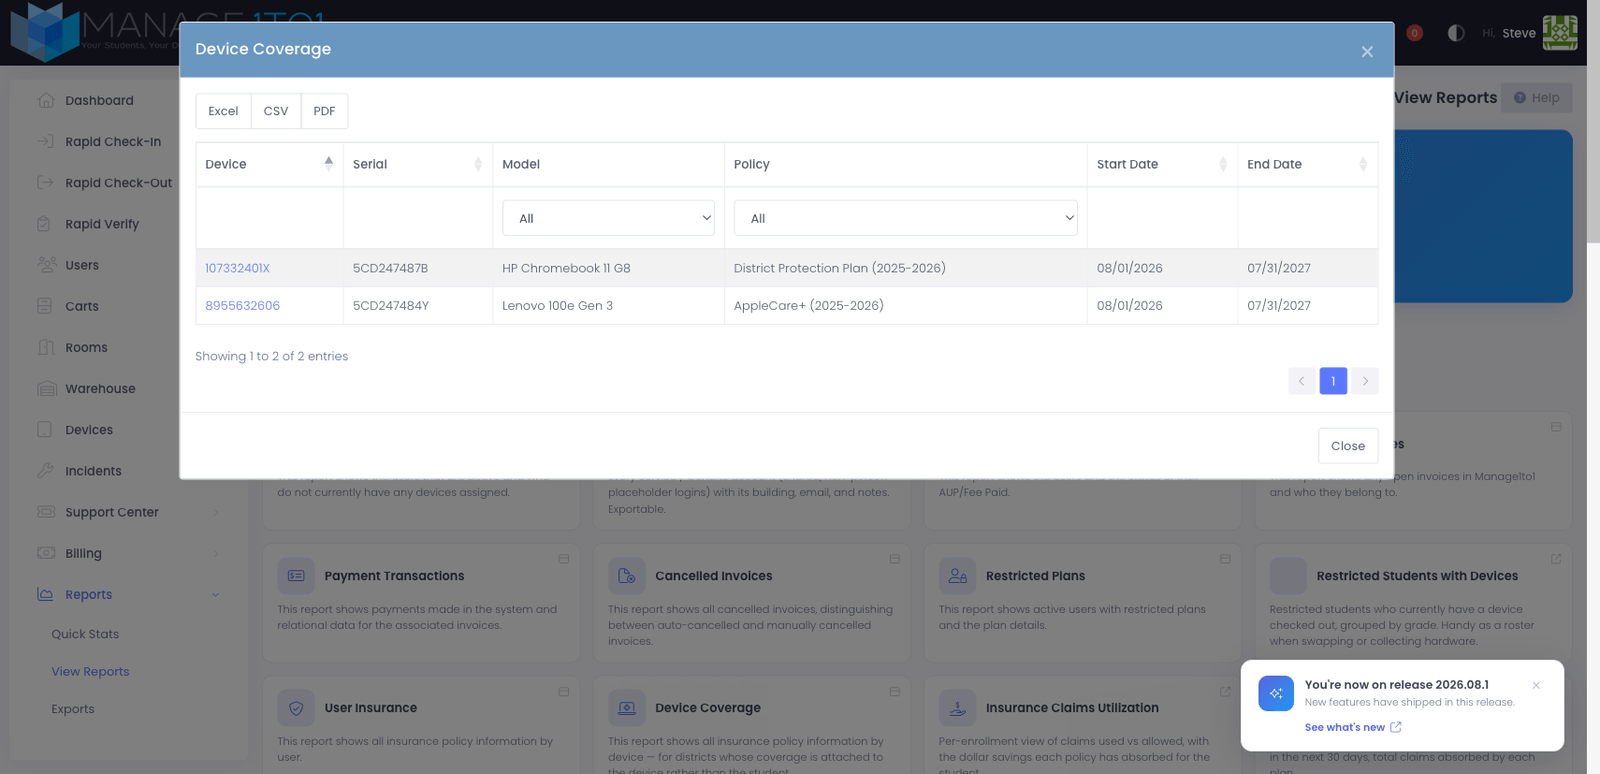
The device-keyed companion to the User Insurance report, for districts whose insurance is attached to the device rather than the student.
What you'll see:
- Device (asset tag, links to the device profile)
- Serial number
- Model
- Policy (vendor name + term label)
- Start and end dates
Common uses:
- List every insured device and its coverage window
- Spot devices whose coverage is expiring
- Cross-check hardware coverage against a vendor's roster
Insurance Claims Utilization
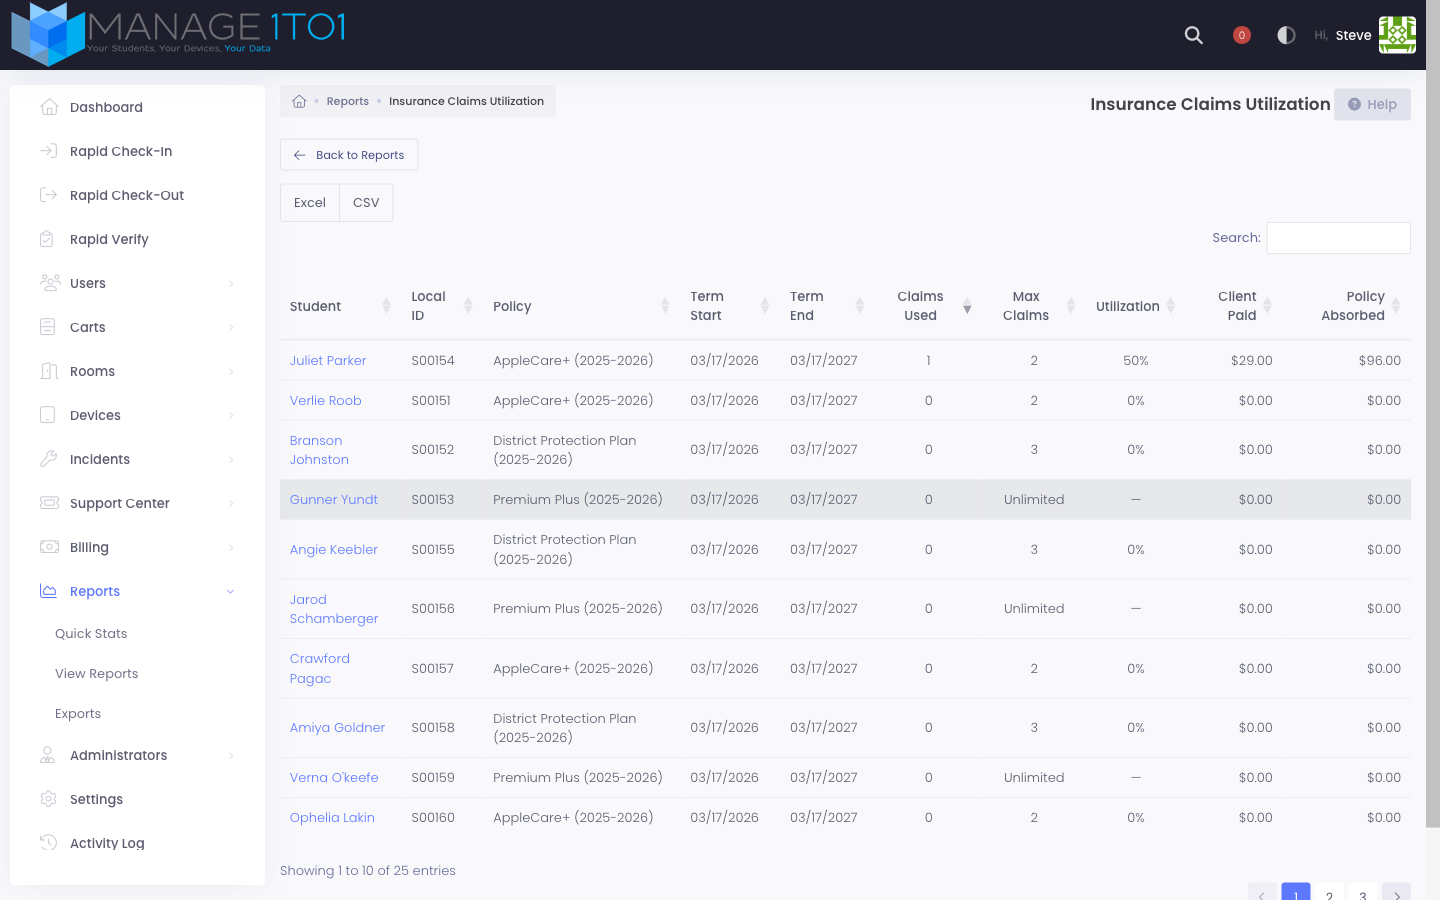
Per-enrollment view of how many claims have been drawn against each policy plus the dollar savings the policy has absorbed for the student.
What you'll see:
- Student name (linked to the user profile)
- Local ID
- Policy
- Term Start / Term End dates
- Claims Used vs. Max Claims (or Unlimited when no cap)
- Utilization percentage
- Client Paid total
- Policy Absorbed total
Common uses:
- Identify families approaching their claim cap before the next incident
- Show the value of the insurance program to parents or the school board
- Spot policies that are under-utilized (low % utilization across enrollments)
- Plan next year's policy terms based on observed claim patterns
Insurance Enrollment Summary
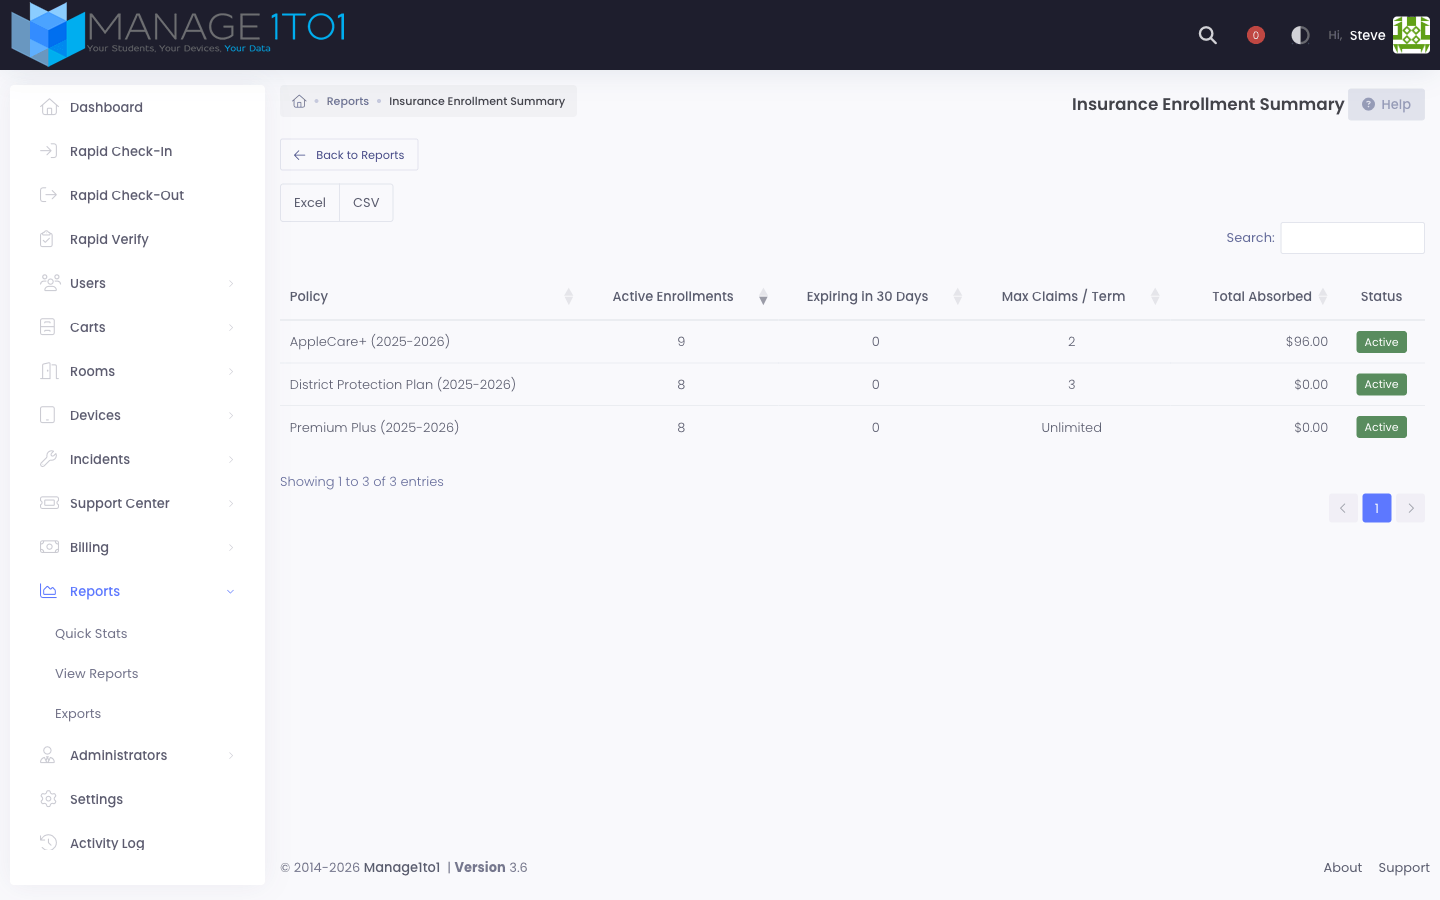
Per-policy roll-up suitable for non-technical leaders — the business office, principals, or the board.
What you'll see:
- Policy name (with term label)
- Active Enrollments count
- Expiring in 30 Days count
- Max Claims / Term
- Total Absorbed dollars (sum across every claim in that policy's term)
- Status (Active / Disabled)
Common uses:
- Quick health check of every active offering
- Forecast renewal outreach by the Expiring in 30 Days column
- Report total dollars absorbed back to the families and the budget owner
Repeat Offenders
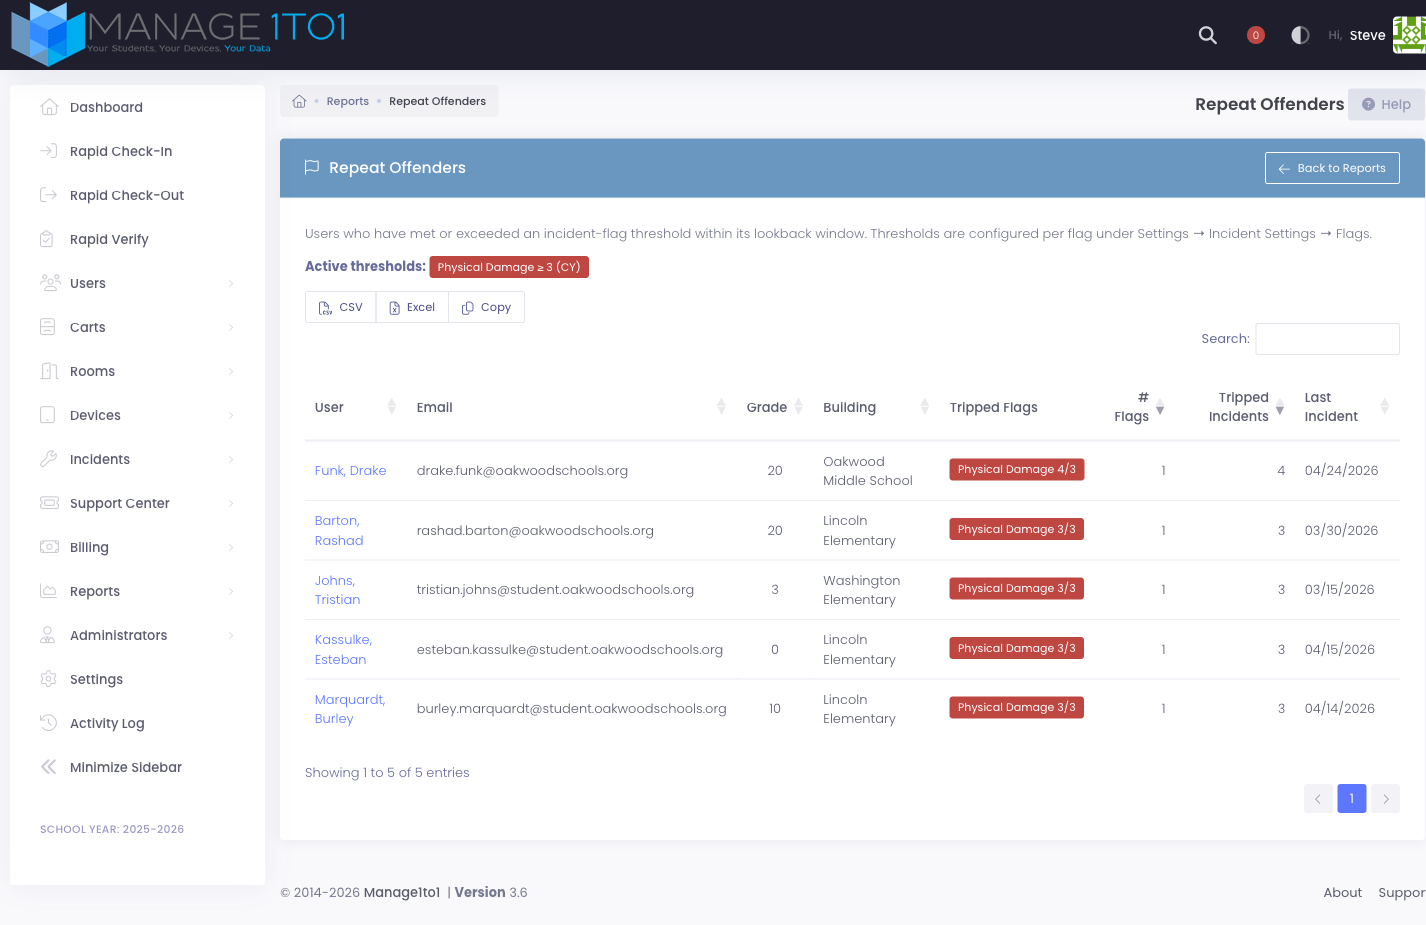
Lists every user who has met or exceeded an incident-flag threshold within that flag's lookback window. Pairs with the per-flag thresholds you configure under Settings → Incident Settings → Flags — a user appears here as soon as their incident count reaches the threshold for any flag.
What you'll see:
- User (links to the user profile)
- Grade
- Building
- Tripped Flags — colored badges showing the flag name and current count vs threshold (e.g., Physical Damage 4/3)
- Number of flags tripped
- Total tripped incidents (sum across all tripped flags)
- Date of most recent incident
Active thresholds banner: Above the table, a banner lists every flag currently configured with a threshold so you can verify which signals this report is checking. If no flags have thresholds set, the report displays an info notice with a link to the settings page.
Common uses:
- Identify students who need a conversation about device care
- Prioritize repair-cost recovery outreach to families
- Hand a principal a building-scoped list before a parent meeting
- Quick CSV export for the dean of students
Sorting & filtering:
- Default sort surfaces the most flags tripped first, then the highest total tripped incidents
- Use the search box to narrow by name, building, or flag
- The list is automatically scoped to the buildings you have access to
A flag must be marked Show on profile and have a non-empty Threshold for users to appear in this report. Newly-installed systems start with Physical Damage as the only thresholded flag — add more under Settings → Incident Settings → Flags when you want to track Screen, Liquid, Wireless, or any custom signal.
Device Based Reports
Device based reports focus on inventory state, checkout status, and device level tracking.
Checked Out Devices
Shows devices currently checked out and who they are assigned to.
What you'll see:
- Device asset tag/serial number
- Device model
- User assigned to
- Checkout date
- Building
Common uses:
- Confirm current assignments
- Identify devices that should be returned
- Support building level inventory checks
- Generate checkout reports for specific date ranges
Typical workflow:
- Filter by building
- Sort by checkout date to find oldest checkouts
- Export list for device recovery campaigns
- Cross-reference with expected checkout duration
Checked In Devices
Shows devices that are currently checked in and available.
What you'll see:
- Device asset tag/serial number
- Device model
- Status
- Location
- Building
Common uses:
- Identify available stock for new deployments
- Support device redistribution and replacements
- Verify inventory counts
- Identify excess inventory in specific buildings
Typical workflow:
- Filter by building and device model
- Export list for inventory reconciliation
- Identify devices available for redistribution
- Plan deployments based on available stock
Outstanding Loaners
Shows loaners that are still checked out.
What you'll see:
- Loaner device asset tag
- User assigned to
- Checkout date
- Expected return date
- Building
Common uses:
- Track loaners that should be returned
- Identify users who may need follow up
- Ensure loaner pool has adequate available devices
- Monitor loaner program utilization
Typical workflow:
- Filter by checkout date (find overdue loaners)
- Export list for follow-up
- Contact users with overdue loaners
- Update loaner pool inventory
Device Last Seen
Shows every device sorted by when an admin last physically interacted with it — useful for finding devices that haven't been touched in months and may need a physical inventory check.
What you'll see:
- Asset tag (clickable to open the device profile)
- Model and serial number
- Building
- Last Seen (relative timestamp like "3 months ago", or Never)
- Last Seen By (admin name)
- Context (deployed / check-in / check-out / incident logged / cart move / audit scan)
Common uses:
- End-of-year inventory sweeps to find dormant or potentially missing devices
- Verifying that all devices in a building have been processed through normal workflows
- Surfacing devices with no physical touches recorded since being added
Typical workflow:
- Open the report (default sort is oldest-seen first)
- Devices marked Never appear at the top — these have never been physically processed
- Filter by building or context using the dropdowns
- Use the Stale only filter (3 / 6 / 12 / 18+ months / Never) to surface devices overdue for verification — the default threshold matches your district's Inventory Audit setting
- Export to Excel/CSV as a physical search worksheet
For more detail on what counts as a touch and how the timestamp is updated, see Device Last Seen. For the audit-scan workflow that pairs with the Stale filter, see Inventory Audit.
Devices Not in MDM
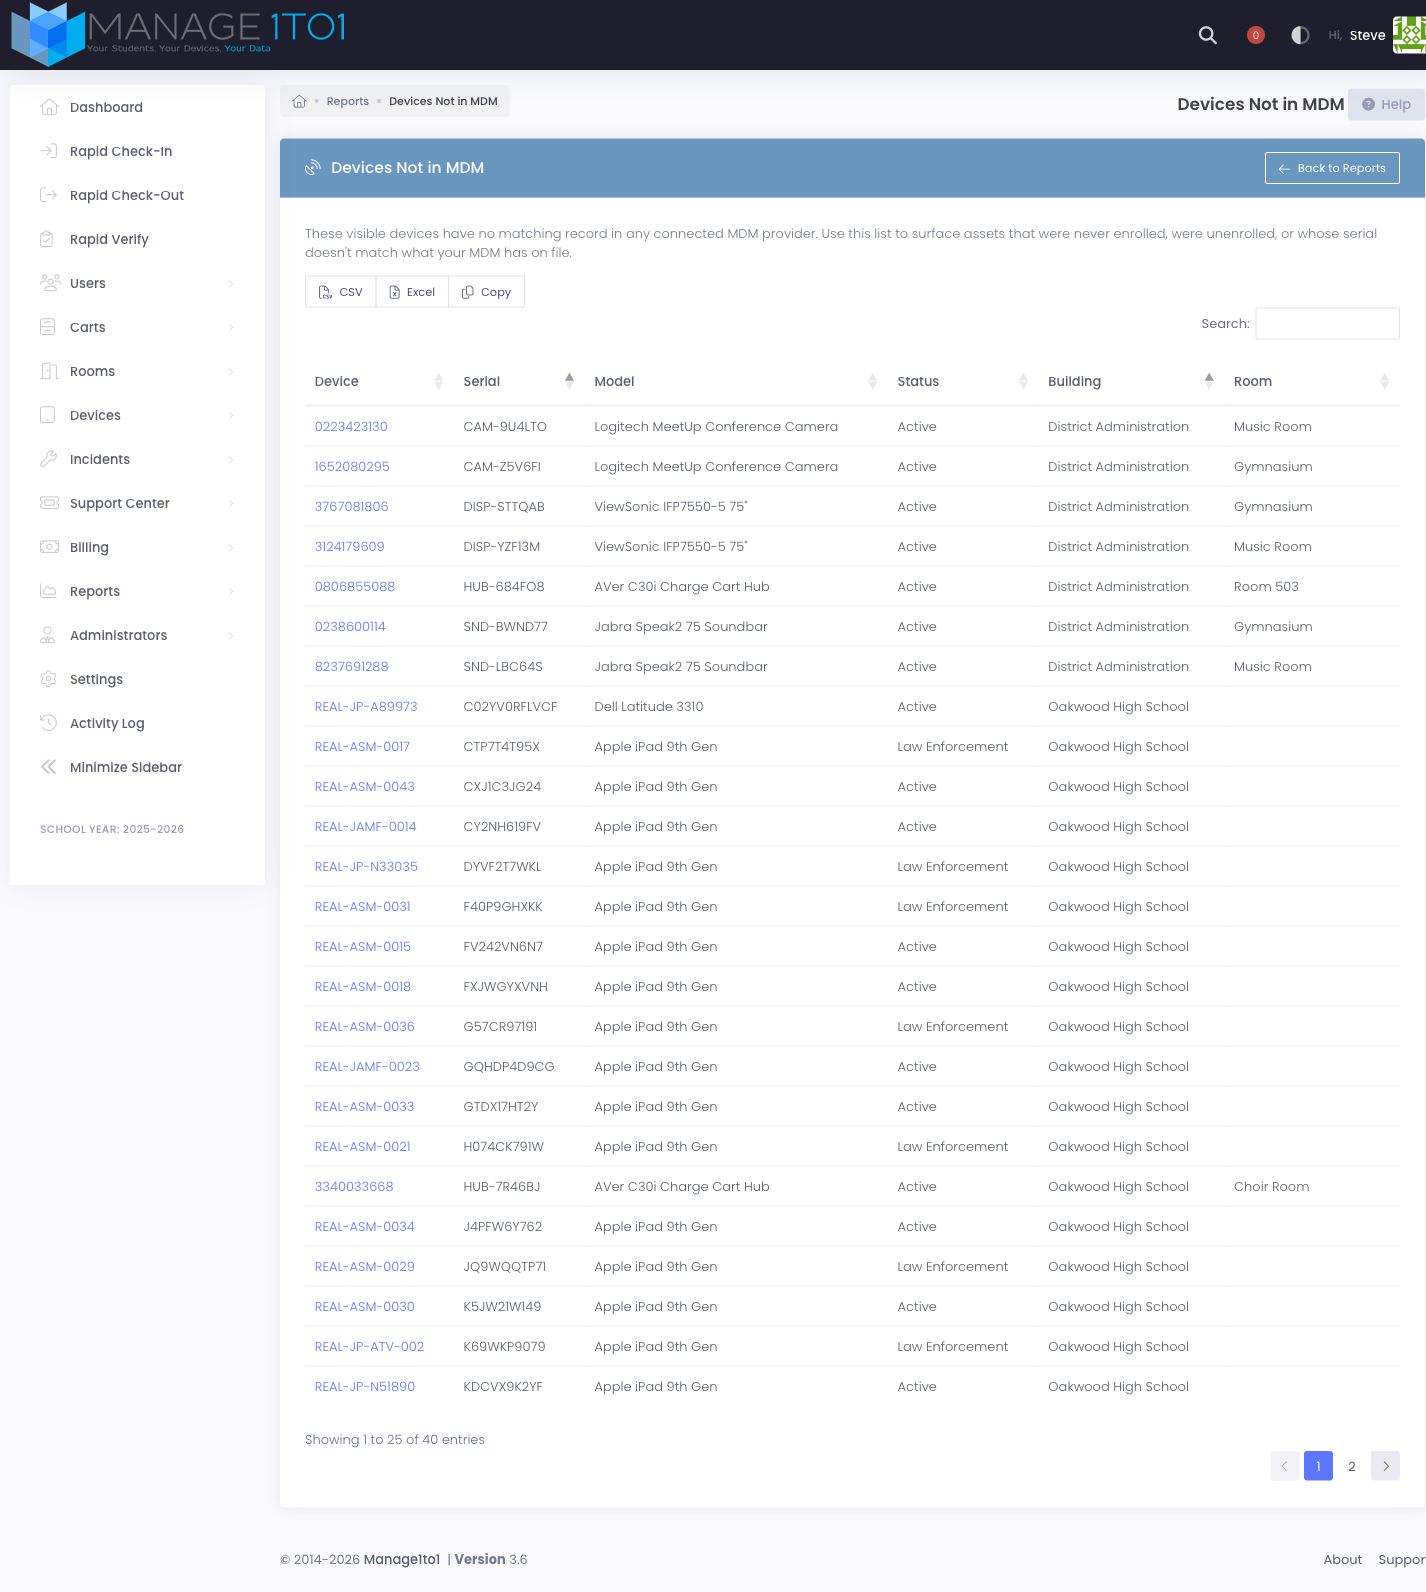
Lists visible devices that have no matching record in any connected MDM provider. Use this report to surface assets that were never enrolled, were unenrolled, or whose serial number doesn't match what your MDM has on file.
What you'll see:
- Asset tag / barcode (links to the device profile)
- Serial number
- Model
- Current status
- Building and room
Common uses:
- Before a campus walk: print or export the building-scoped list, then verify each device in person
- Catching newly-imaged devices that never finished MDM enrollment
- Reconciling serial numbers between an inventory import and an existing MDM sync
Filters and export:
- The list is automatically scoped to the buildings you have access to
- Use the search box to narrow by serial, asset tag, or model
- Use the CSV, Excel, or Copy buttons to export the full filtered list
A device counts as "not in MDM" when no connected MDM module has it on file. Network-only devices (cameras, charging hubs, projectors) will appear here legitimately — that's expected, since they aren't typically MDM-managed. The report is most useful when a device that should be in MDM shows up unexpectedly.
Device Status
Shows devices and their statuses with filtering.
What you'll see:
- Device asset tag/serial number
- Device model
- Current status (Active, Repair, Lost, Sold, etc.)
- Building
- Last modified date
Common uses:
- Audit devices by status (lost, repair, active, retired, etc.)
- Support end of year reconciliation and clean up
- Track devices through repair process
- Identify devices ready for disposal/sale
Filtering options:
- Status (Active, Repair, Lost, Sold, Parts, Law Enforcement, etc.)
- Building
- Device model
- Date range
Inventory Reports
Inventory reports provide visibility into parts and supplies used for device repairs.
To access Inventory Reports, you need the View Parts Inventory permission assigned to your role, in addition to Stats/Exports.
Parts Inventory
Shows all parts in the inventory system with stock levels, costs, and location breakdowns.
What you'll see:
- Part name (with low stock indicator if applicable)
- SKU/part number
- Cost (your internal acquisition cost)
- Sale price (from linked Invoice Item, if configured)
- Total quantity across all locations
- Reorder level threshold
- Location breakdown (showing quantity at each location)
- Status (Active/Inactive)
Common uses:
- Monitor current stock levels across all locations
- Identify parts that need reordering (low stock indicators)
- Review cost and pricing information for parts
- Audit inventory distribution across locations
- Export inventory data for purchasing or budgeting
- Verify inventory counts match physical counts
Typical workflow:
- Open the report to see all parts
- Look for red "Low Stock" badges indicating parts below reorder level
- Use the Status filter to show only Active parts
- Search for specific parts by name or SKU
- Export to Excel/CSV for purchasing decisions or inventory audits
Export options:
- Excel (.xlsx)
- CSV (.csv)
- PDF (.pdf)
Report columns explained:
| Column | Description |
|---|---|
| Part Name | Part name with clickable link to part details. Shows "Low Stock" badge if below reorder level |
| SKU | Part number or manufacturer SKU for reference |
| Cost | Your internal cost to acquire this part |
| Sale Price | Customer-facing price from linked Invoice Item, or "-" if not billable |
| Quantity | Total stock across all locations |
| Reorder Level | Threshold that triggers low stock alerts |
| Locations | Breakdown of quantities by storage location |
| Status | Active (available for use) or Inactive (hidden from selection) |
Parts shown with a red "Low Stock" badge have total inventory below their configured reorder level. Click the part name to view details and make inventory adjustments. Configure reorder levels on each part to match your typical usage and lead times.
For more information, see Low Stock Alerts.
Administrative Reports
Administrative reports focus on staff level operational activity.
Note: These reports may require the Administrative Reports permission in addition to Stats/Exports.
Staff Incidents
Provides a breakdown of incidents created by staff, typically by month.
What you'll see:
- Administrator name
- Number of incidents created
- Time period
- Building (if filtered)
Common uses:
- Review workload distribution across technicians
- Support operational planning and staffing decisions
- Identify training opportunities based on patterns
- Recognize high-performing staff or identify staff needing support
Typical workflow:
- Select time period (month, quarter, year)
- Filter by building if needed
- Review distribution of incident creation
- Identify outliers (very high or very low activity)
- Use data to inform staffing and training decisions
MDM Reports
If you have MDM providers configured (Google Admin, JAMF Pro, or JAMF School), the View Reports page displays an MDM Reports section with provider-specific reports.
The MDM Reports section only appears when you have at least one MDM provider configured and actively syncing device data.
Available Reports
The specific reports available depend on which MDM providers you have configured and what data they provide. Common MDM reports include:
- Expiring Devices - Chromebooks approaching their auto-update expiration date
- Low Storage Devices - Devices with storage usage above a threshold
- Stale Devices - Devices that haven't synced with the MDM provider recently
Using MDM Reports
- Click View Report next to the desired report
- Review the device list with relevant details
- Export to CSV for further action or analysis
MDM reports only include devices that exist in both Manage1to1 and your MDM provider, matched by serial number.
For visual charts and statistics from your MDM data, click the View MDM Stats button to access the MDM Statistics page.
Report Filtering and Export
Common Filter Options
Most reports support filtering by:
- Building - Only buildings you have access to
- Date Range - Start and end dates for time-bound data
- Status - Active/inactive, open/closed, etc.
- Grade Level - For user-based reports
- Device Model - For device-based reports
Exporting Reports
Most View Reports can be exported to CSV:
- Apply desired filters
- Click the Export or Download button
- Open the CSV file in Excel, Google Sheets, or similar
- Use for further analysis, pivot tables, or sharing with stakeholders
Export tips:
- Name files descriptively (e.g., "Checked-Out-Devices-Lincoln-Elementary-2024-05.csv")
- Document filters used when saving exports
- Treat exported files as sensitive data (student/staff information)
- Delete exports when no longer needed
Common Questions
Q: Why don't I see some of the reports mentioned here? Report visibility depends on your permissions and building access. You need Stats/Exports permission for most reports, and Administrative Reports permission for staff-level reports. Contact your system administrator if you're missing expected reports.
Q: Can I save filter presets for reports I run frequently? Reports don't save filter presets, but most browsers allow you to bookmark the report URL with filters applied. Alternatively, document your common filter combinations for quick reference.
Q: How current is the data in View Reports? View Reports show real-time or near real-time data, typically updated within minutes of changes in the system.
Q: Can I schedule reports to run automatically? View Reports are interactive only. For scheduled reports, use the Exports section which supports automation through system settings.
View Reports provides the detailed, filterable data you need for operational management, action list creation, and in-depth analysis of your Manage1to1 environment.