Parent Portal Settings
Parent Portal Settings control whether the Parent Portal is available to guardians and which portal features are enabled. The Parent Portal provides families with self-service access to view invoices, make payments, acknowledge policies, and access device information.
To access Parent & AUP Portals, you need the Manage Settings permission assigned to your role. This is typically restricted to district administrators and system administrators.
Understanding the Parent Portal
The Parent Portal is a family-facing website where guardians can:
- View their child's device checkout information
- See and pay invoices online
- Review billing history and outstanding balances
- Acknowledge Acceptable Use Policies (AUP)
- View incident history
- Access student account information
Key benefits:
- Self-service - Parents access information 24/7 without calling the office
- Payment convenience - Online payment reduces office workload
- Communication - Automated emails notify parents of invoices and policies
- Compliance - Track AUP acknowledgements digitally
- Transparency - Families see complete device and billing history
Accessing Parent Portal Settings
- Navigate to
Settings > Parent & AUP Portals - Select the
Generaltab - Configure Parent Portal and Payment options
Parent Portal Setting
Enable/Disable Parent Portal
What it does: Controls whether guardians can access the Parent Portal website.
Options:
- Enabled - Parents can log in and access portal features
- Disabled - Portal login page shows "Portal not available" message
When to enable:
- District wants to provide self-service family access
- Online payments are being used
- Digital AUP acknowledgement is required
- Reducing office workload is a priority
When to disable:
- During initial system setup (before you're ready for parent access)
- If district doesn't use parent-facing features
- Temporarily during major system changes or data migrations
Note: Disabling the portal does NOT disable the standalone AUP enrollment URL (/enroll). See AUP Management settings for AUP-specific controls.
Payment Settings
Payment Options
What it does: Controls which online payment methods are available in the Parent Portal.
Common payment options:
- Credit/Debit Card - Parents pay with Visa, Mastercard, Discover, American Express
- ACH/Bank Transfer - Direct bank account payments
- Payment Portal Integration - Third-party payment processors
Configuration: Payment processors must be configured by Manage1to1 Support. Contact support to:
- Enable payment processing
- Configure payment gateway (Stripe, PayPal, etc.)
- Set up merchant account integration
- Test payment processing
Important: If you enable the Parent Portal but haven't configured payment options with Manage1to1 Support, the portal will display: "Payment options must be enabled by Manage1to1 Support. Please contact your district administrator."
Payment Workflows
How parents pay invoices:
- Parent logs into Parent Portal
- Navigates to Billing or Invoices section
- Views outstanding invoices
- Clicks "Pay Invoice" button
- Selects payment method (card or ACH)
- Enters payment information
- Submits payment
- Receives confirmation email
- Payment is automatically recorded in Manage1to1
Administrator view:
- Payment appears on invoice profile immediately
- Transaction ID and payment method recorded
- Remaining balance updates automatically
- Email notification sent to billing staff (if configured)
Two ways for guardians to sign in
The Parent Portal supports two complementary sign-in paths under the same /portal URL. Both are gated by the single Parent Portal toggle above.
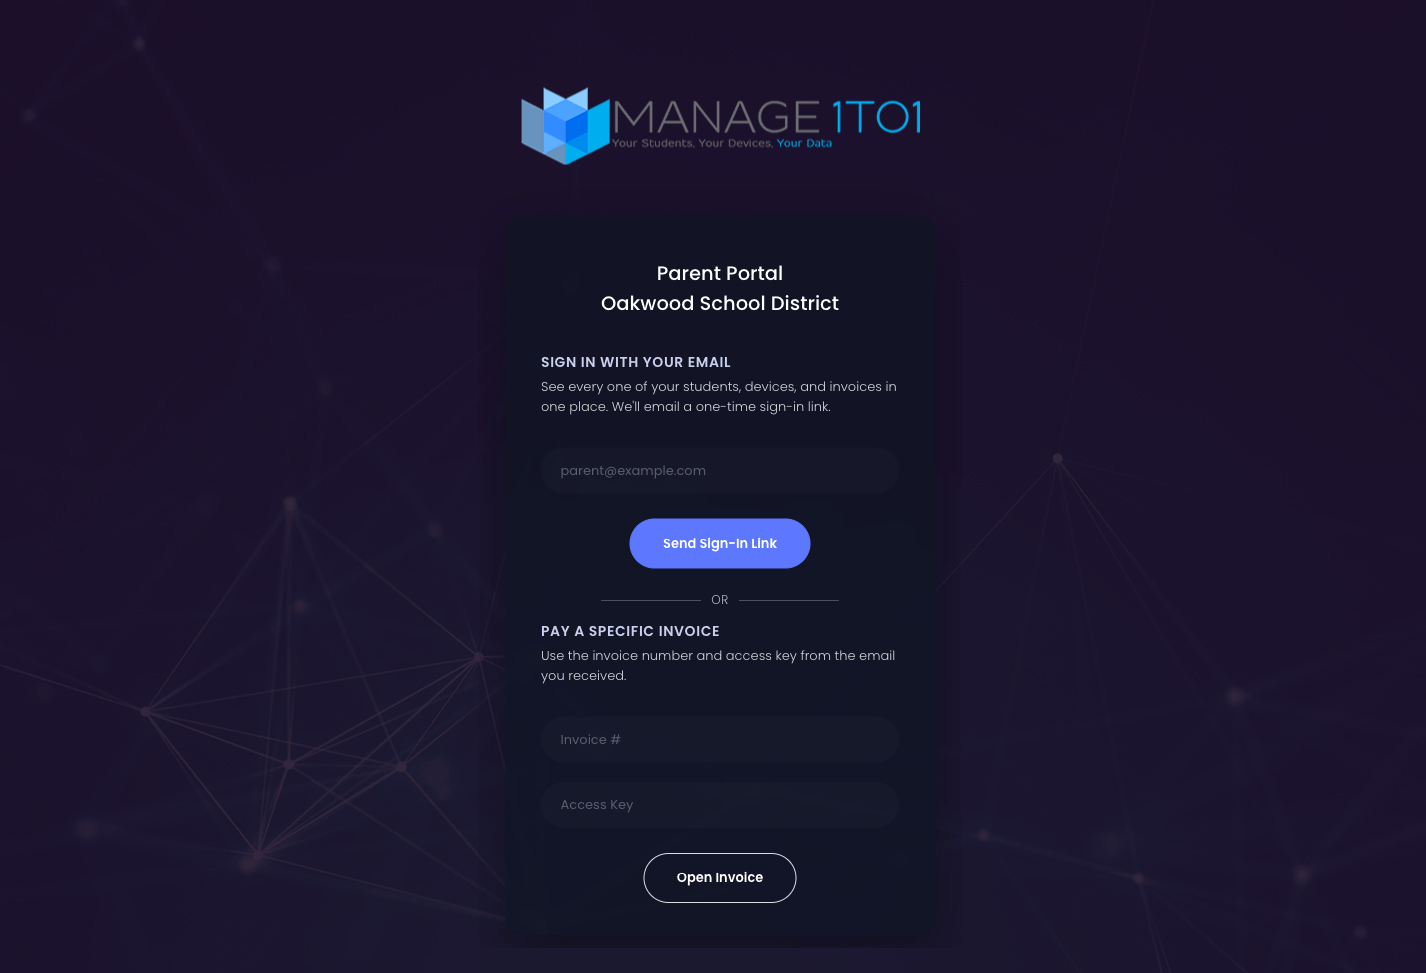
1. Sign in with your email (recommended) The guardian enters the email you have on file and receives a one-time sign-in link. After clicking the link they land on a dashboard that shows every student linked to that email — devices, invoices, and outstanding balance per child.
2. Pay a specific invoice The legacy entry point. When you email a guardian a specific invoice link from Manage1to1, the URL embeds the invoice number and a one-time access key. Clicking the link takes them straight to that invoice's pay page. This is the path payment gateways are integrated against and it continues to work exactly as it always has.
Districts can rely on either path or both. There's nothing to configure beyond turning the Parent Portal on.
The family dashboard
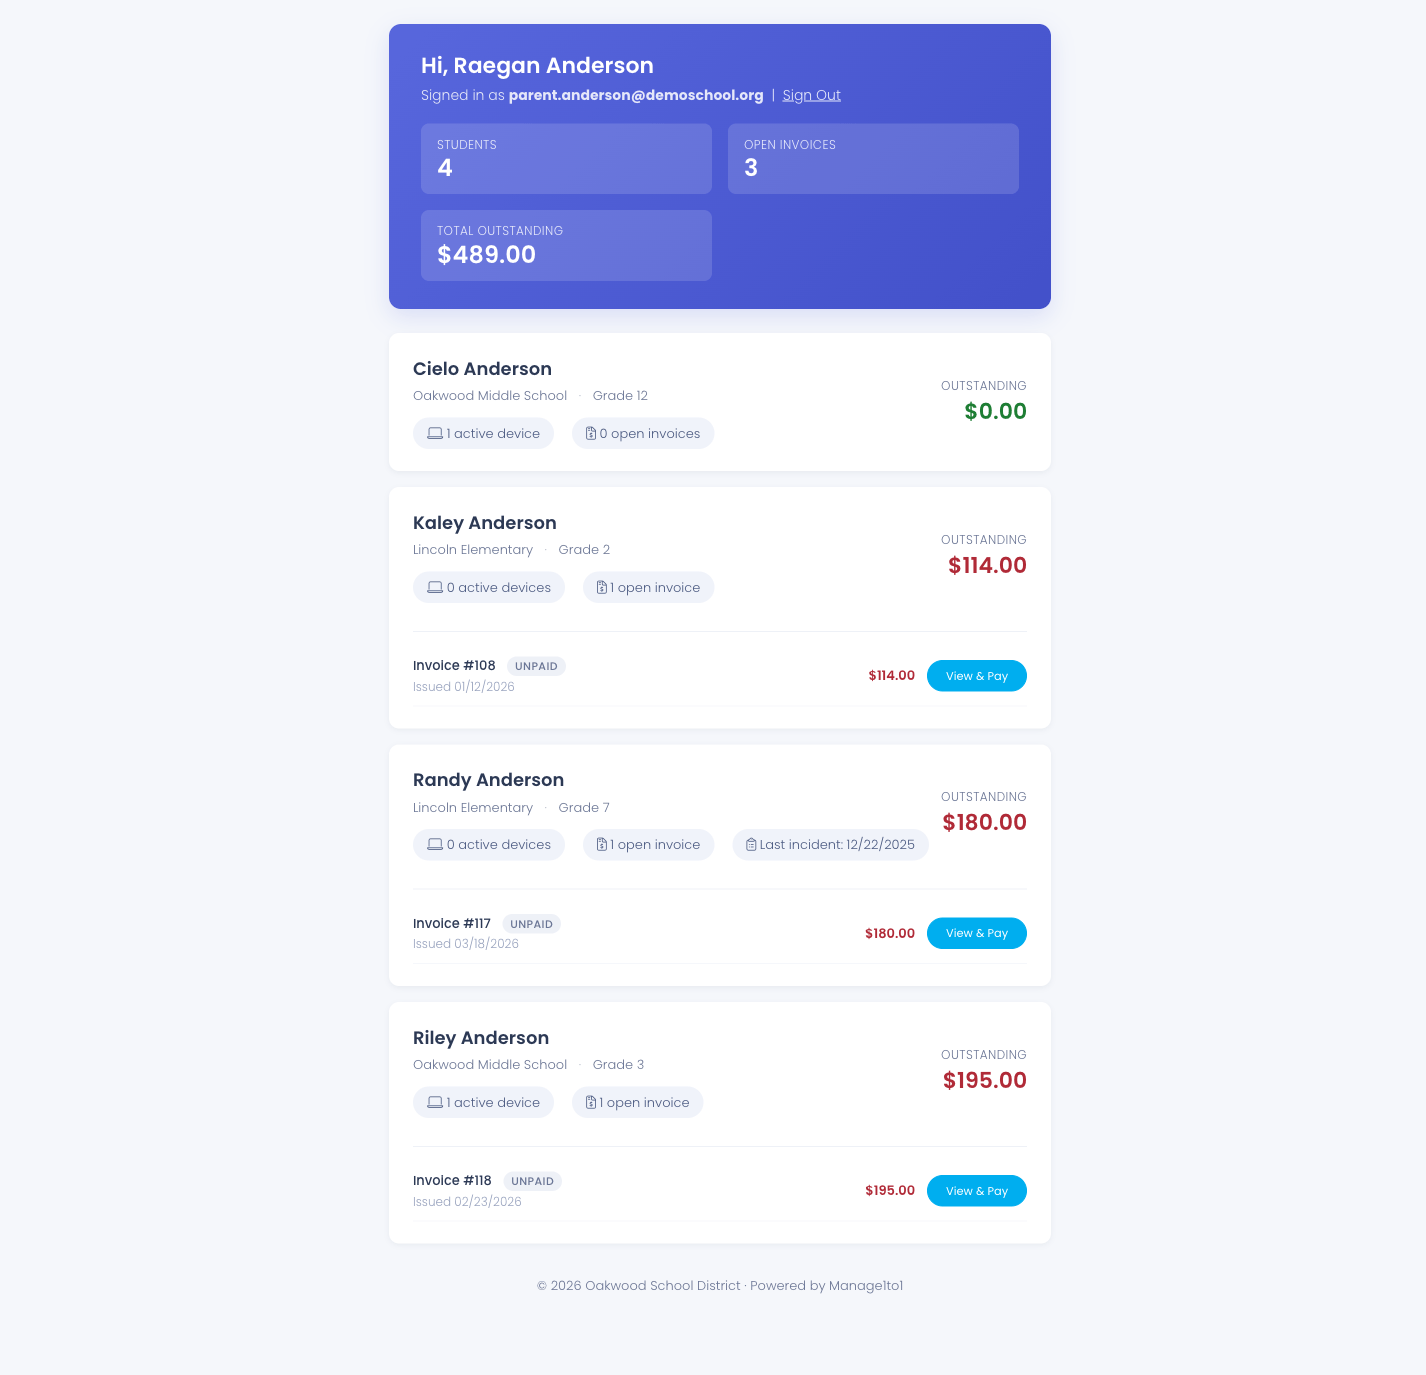
After signing in with their email, a guardian sees:
- A summary card at the top: # of students, # of open invoices, and total outstanding across the family
- One card per student with:
- Name, school, and grade
- Number of devices currently checked out
- Number of open invoices
- Most recent incident date (if any)
- Outstanding balance, color-coded green when at zero or red when due
- A list of open invoices with a View & Pay button per invoice that opens the same pay page payment gateways already integrate against
How sign-in works
The email sign-in uses one-time magic links — no password storage on guardian records.
- Guardian visits
/portaland enters their email - The system looks for that email in the guardians table on any student record
- If matched, a one-time sign-in link is emailed to that address (valid for 30 minutes)
- Guardian clicks the link → they land on their family dashboard
- The link becomes invalid after a single use
To avoid email enumeration, the page shows the same "If we recognize that email, a sign-in link is on its way" message whether or not the email matched.
Linking siblings to one login
The dashboard treats email as the family key. Any student whose guardian record carries the same email shows up under that login.
To link siblings:
- Open each student's profile under Users
- Add a Guardian with the same email on each sibling
- The next time that guardian signs in, all linked students appear on their dashboard
If your SIS is synced via OneRoster, no manual sibling linking is needed. OneRoster pushes the same guardian email onto each student's record, and the dashboard picks them up on the next sign-in.
What the dashboard never shows
The privacy boundary is strict by design:
- Invoice "carbon-copy" addresses are never part of authorization. If Johnny's invoice was incidentally CC'd to Billy's parents, Billy's parents cannot see it — they can only see invoices belonging to students they're explicitly a guardian for.
- Only students whose guardian record carries the signed-in email and is not portal-blocked (see below) appear.
- Guardians cannot edit student data from the portal — it is strictly read-only.
- Sessions auto-expire after 1 hour of inactivity.
Annual Fees opt-in from the portal
When you have Annual Fees policies configured, guardians can enroll their students directly from the dashboard — no admin step required.
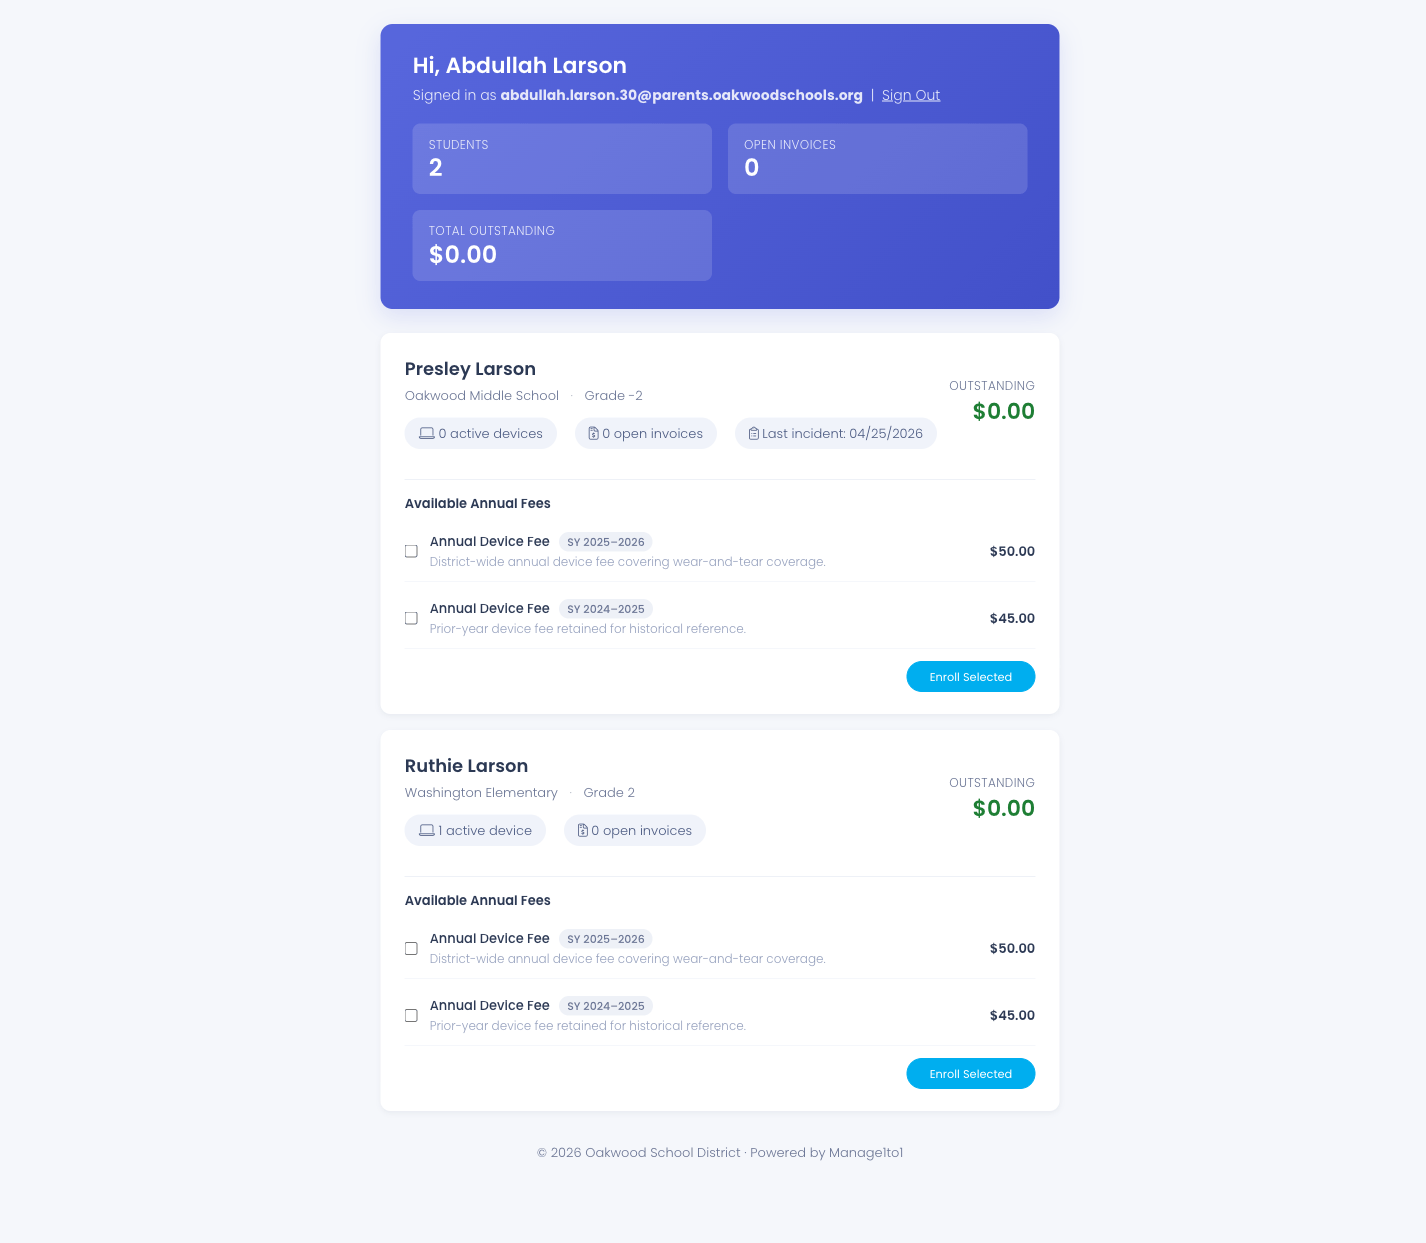
Under each student card, an Available Annual Fees section lists every policy that:
- Is marked Visible
- Targets the student's grade
- Hasn't already been enrolled into for that school year
Guardians check the box next to one or more policies and click Enroll Selected. Behind the scenes, each opt-in materializes a standard enrollment + backing invoice through the same flow an admin would have used in Bulk enroll — meaning the resulting invoice flows through your normal payment gateway path without any special handling.
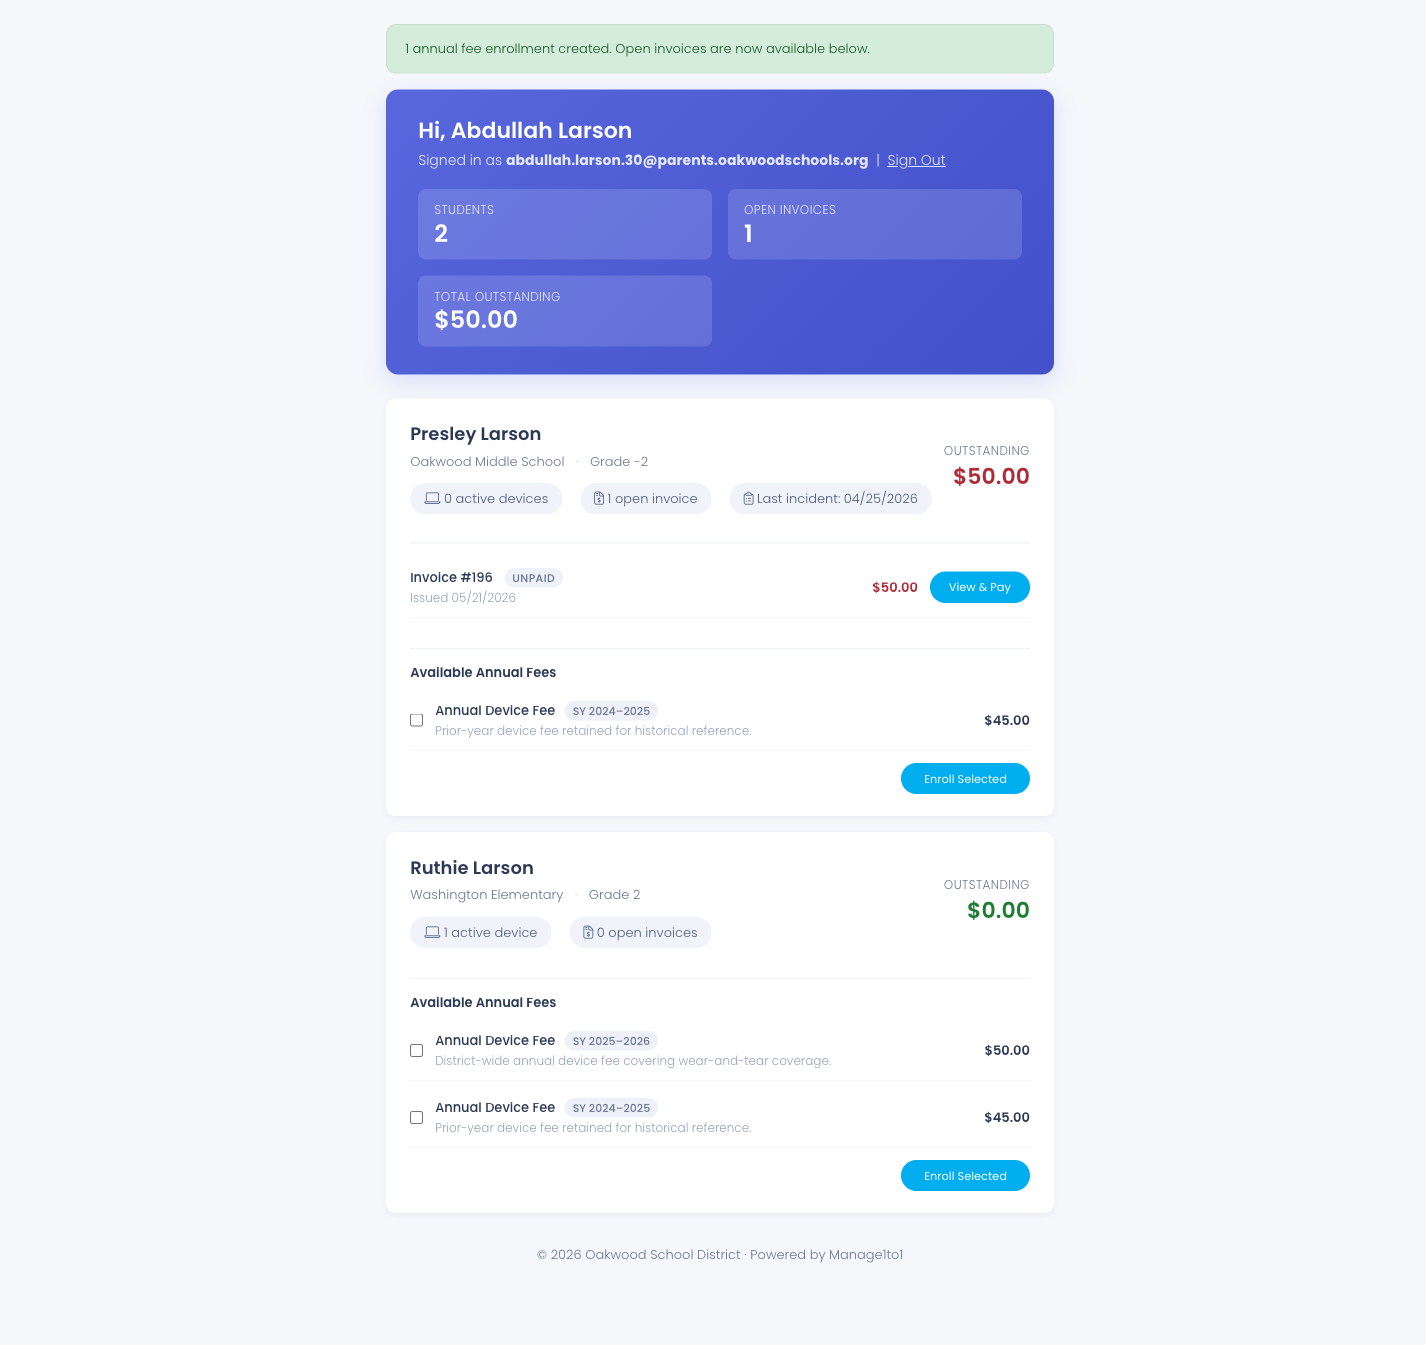
After opt-in, the dashboard reloads with a confirmation banner and the new invoice immediately appears under the student with its View & Pay button.
The server re-validates eligibility on submit — a guardian can't enroll a student who isn't in their family context, can't enroll into a hidden policy by URL-typing the policy ID, and can't double-enroll a student who's already in that policy for that school year. Activity-log entries are recorded with a "via Parent Portal" tag so admins can audit guardian-initiated enrollments separately from admin bulk runs.
Blocking an individual guardian
Sometimes a guardian on file shouldn't have portal access to a particular student — custody arrangements, step-parents whose access wasn't granted, or family-requested limits. Manage1to1 supports per-row guardian blocks so you can block one parent on one student without affecting their access to other students they're also a guardian for.

How to block:
- Open the student's profile under Users
- Scroll to the Guardians section
- In the row of the guardian you want to block, look at the Portal Access column — it shows Allowed (green) or Blocked (red)
- Click the block icon in the Actions column
- Optionally enter a reason for the audit log (e.g., "Per parent request — custody arrangement")
- Confirm
That guardian will no longer be able to see this student in their family dashboard. If they're a guardian on other students, those other students remain visible to them.
To restore access: Click the unlock icon and confirm. The block is removed and the guardian sees the student again on their next sign-in.
Blocking and restoring portal access requires the Manage Parent Portal Access permission, separate from the general Edit User permission. This keeps the lockout authority with the admins who handle escalations rather than every front-office user.
Audit trail: Every block and restore writes to the Activity Log with the acting admin, the affected guardian, and the optional reason — so the history of who blocked whom and why is always recoverable.
Parent Portal Access
How Parents Get Access
Initial access:
- District creates user accounts (students/staff)
- Guardian email addresses are added to user profiles
- Guardian receives automated email with portal access instructions
- Guardian creates password and logs in
Login URL:
Parents access the portal at: https://your-district.manage1to1.com/portal
Authentication options:
- Username/password (managed by parent)
- Single Sign-On (if configured for parent access)
- Email-based password reset
Common Use Cases
Enabling Parent Portal for First Time
Before enabling:
- Ensure user guardian email addresses are populated
- Configure payment processor with Manage1to1 Support
- Set up AUP for current school year
- Test portal with a sample parent account
Steps:
- Navigate to
Settings > Parent & AUP Portals > Generaltab - Enable Parent Portal setting
- Configure payment options (if using online payments)
- Save settings
- Test portal access with guardian account
- Communicate portal availability to families
Parent communication should include:
- Portal URL
- What parents can do in the portal
- How to create an account or reset password
- Support contact for portal issues
Temporarily Disabling Portal
Scenarios:
- End-of-year data cleanup
- Major system migration
- Addressing a critical issue
Steps:
- Navigate to
Settings > Parent & AUP Portals > Generaltab - Disable Parent Portal setting
- Save settings
- Portal displays "not available" message to parents
- Re-enable when ready
Note: Disabling the portal does NOT affect administrator access or the standalone AUP enrollment URL.
Tips for Parent Portal Management
✅ Do:
- Test portal functionality before announcing to families
- Ensure guardian emails are current and accurate
- Configure payment processing before enabling payments
- Provide clear instructions to families about portal access
- Monitor portal usage and payment activity
- Keep AUP policies current for each school year
❌ Don't:
- Enable portal without testing first
- Announce payment availability before processor is configured
- Forget to communicate portal URL to families
- Disable portal without notifying families
- Assume all parents have email addresses on file
Common Questions
Q: How do parents create a portal account? Parents receive an automated email when their child's guardian email is added to the system. The email contains a link to create a password and access the portal. If they don't receive the email, they can use the "Forgot Password" link on the portal login page.
Q: Can parents see multiple children in one portal login? Yes. If multiple students share the same guardian email address, the parent sees all associated children when they log in to the portal.
Q: What if a parent doesn't have an email address? They cannot access the Parent Portal. They'll need to work with the office for invoices, payments, and AUP signatures via paper or in-person methods.
Q: How do I configure payment processing? Contact Manage1to1 Support. They'll help you set up your merchant account, configure the payment gateway integration, and test payment processing before going live.
Q: Can parents pay partial amounts? This depends on portal configuration. Typically, parents can pay the full invoice amount or enter a custom partial payment amount.
Q: What happens if a payment fails? The parent sees an error message and the payment is not recorded. Common reasons: insufficient funds, invalid card, incorrect billing address. The parent can try again or contact their bank.
Q: Do administrators get notified of portal payments?
This depends on email notification settings. You can configure email alerts when payments are received. Check Settings > System Settings > Email Templates for payment notification options.
Q: Can I customize what parents see in the portal? Limited customization is available. Contact Manage1to1 Support to discuss branding options (district logo, colors, etc.) or specific feature visibility.
Q: Is the Parent Portal mobile-friendly? Yes. The portal is responsive and works on mobile devices, tablets, and desktop computers.
Q: How is the portal different from the AUP enrollment URL?
- Parent Portal (
/portal) - Full-featured family access (billing, devices, AUP, etc.) - AUP Enrollment (
/enroll) - Standalone page only for AUP acknowledgement
The enrollment URL works even if the Parent Portal is disabled, allowing AUP signatures without full portal access.
Parent Portal Settings control family access to self-service features. Properly configured, the Parent Portal reduces office workload, improves payment collection, and provides families with convenient 24/7 access to device and billing information.