Ticket Profile
The Ticket Profile is your workspace for managing support ticket conversations. This is where you reply to users, add internal notes, change ticket settings, and track the complete conversation history from initial request through resolution.
You access ticket profiles by clicking on any ticket from the View Tickets list.
To view ticket profiles, you need the View Support Tickets permission assigned to your administrator role.
Understanding the Ticket Profile Layout
The ticket profile displays:
Header: Ticket number and subject (e.g., "Ticket #123 — WiFi not connecting")
User and Date Info: Shows submitter and when the ticket was created
Tab Navigation: Four tabs for different actions:
- Add Reply - Respond to the user (sends email)
- Add Note - Internal staff notes (not emailed to user)
- Custom Fields - Additional ticket metadata
- Options - Change department, status, priority, assignment
Conversation Thread: Below the tabs, displays the complete ticket history
Add Reply Tab
This is where you respond to the user's ticket. Replies are emailed to the user and become part of the conversation thread.
How to Reply to a Ticket
- The Add Reply tab is active by default when you open a ticket
- Type your response in the message text area
- Optionally adjust ticket settings (department, status, priority)
- Click Post Reply
- Your reply is sent to the user via email
- You're returned to the ticket profile so you can continue working
By default, posting a reply keeps you on the ticket. If you'd rather go back to the ticket list, check Return to ticket list after posting before clicking Post Reply. The same option is available when adding notes or saving options.
Reply Settings
While composing a reply, you can change several ticket settings that will be applied when you post:
Department Dropdown
- Change which department handles the ticket
- Select "No Changes" to keep current department
- Useful for routing to correct team
Status Dropdown
- Update ticket status
- Common: "Answered" after replying
- Select "No Changes" to keep current status
Priority Dropdown
- Set ticket urgency (Low, Normal, High, etc.)
- Higher priority tickets may appear first in lists
- Select "No Changes" to keep current priority
Assigned Admin
- Assign ticket to specific technician
- Select "No Changes" to keep current assignment
- Select "Unassigned" to remove assignment
Lock Ticket Checkbox
- Prevents the user from replying via email
- Use when ticket is resolved and you don't want further responses
- Unlock later if needed
What to Include in Replies
Good replies are:
- Clear and specific - User understands exactly what to do next
- Complete - Answers all questions asked
- Professional - Polite, grammatically correct, helpful tone
- Actionable - Provides steps, links, or next actions
Examples:
✅ Good Reply:
Thank you for reporting this issue. I've diagnosed the problem as a network
configuration error on your device.

To resolve this:
1. Open Settings > WiFi
2. Forget the "SchoolNetwork" connection
3. Reconnect and enter password: TechSupport2024
4. Restart your device

Try these steps and let me know if you're able to connect. If the problem
persists, bring the device to the IT office in Building 2, Room 101.

- IT Support Team
❌ Vague Reply:
We'll look into it.
Attaching Files to a Reply

Below the reply settings is the Attachments drop zone. Use it to attach screenshots, vendor RMAs, signed forms, or any other supporting file to your reply.
You can add files three ways:
- Drag and drop one or more files onto the drop zone.
- Click the drop zone to open the file picker (multiple selection supported).
- Paste an image from your clipboard with Ctrl + V (or ⌘ + V on macOS) — handy after taking a screenshot.
Each file you add appears as its own row beneath the drop zone, color-coded by type (images, PDFs, spreadsheets, documents, archives, text). Click the × on a row to remove that one file. The running total along the bottom shows how many files and how much data you've staged so far.
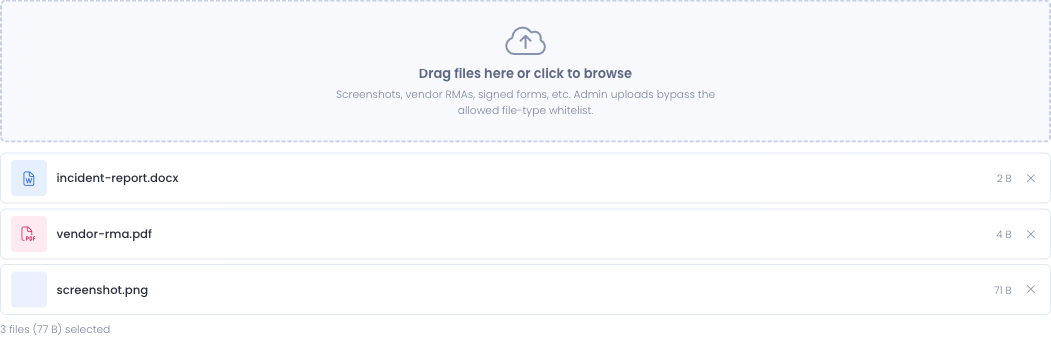
When you click Post Reply, the files upload with the reply and are listed alongside your message in the conversation thread for the user and any watchers to download.
The Enforce Allowed File Types setting on Settings → Help Desk Settings → General Tab restricts end-user attachments to a defined list of extensions. Admin uploads — from the reply form, the note form, and the Open New Ticket form — always bypass that whitelist so support staff can attach whatever the situation needs. (The hard ban on server-executable extensions still applies.)
The same drop zone is available on the Add Note tab; files attached to a private note stay on the note and are never sent to the user.
Reply Tips
- Respond within your district's SLA (Service Level Agreement) timeframe
- Set status to "Answered" after replying (user knows you responded)
- Be thorough - users may not reply for clarification
- Include screenshots or links when helpful
- End with clear next steps or closure statement
Add Note Tab
Internal notes allow staff communication about a ticket without emailing the user.
How to Add a Note
- Click the Add Note tab
- Type your internal message
- Click Post Note
- Note appears in conversation thread marked as "Internal Note"
- User does NOT receive email notification
Editing Notes
Internal notes can be corrected after posting — but only by the person who wrote them. On a note you authored, an Edit button appears next to Delete; click it, adjust the text, and click Save. You cannot edit another technician's note (no Edit button appears on it), and system or workflow-generated notes are never editable.
Every edit is tracked. An edited note shows an "Edited by … on …" line, and hovering it reveals the full edit history (who edited it and when). The note's earlier text is retained behind the scenes, so the record stays intact even after a correction.
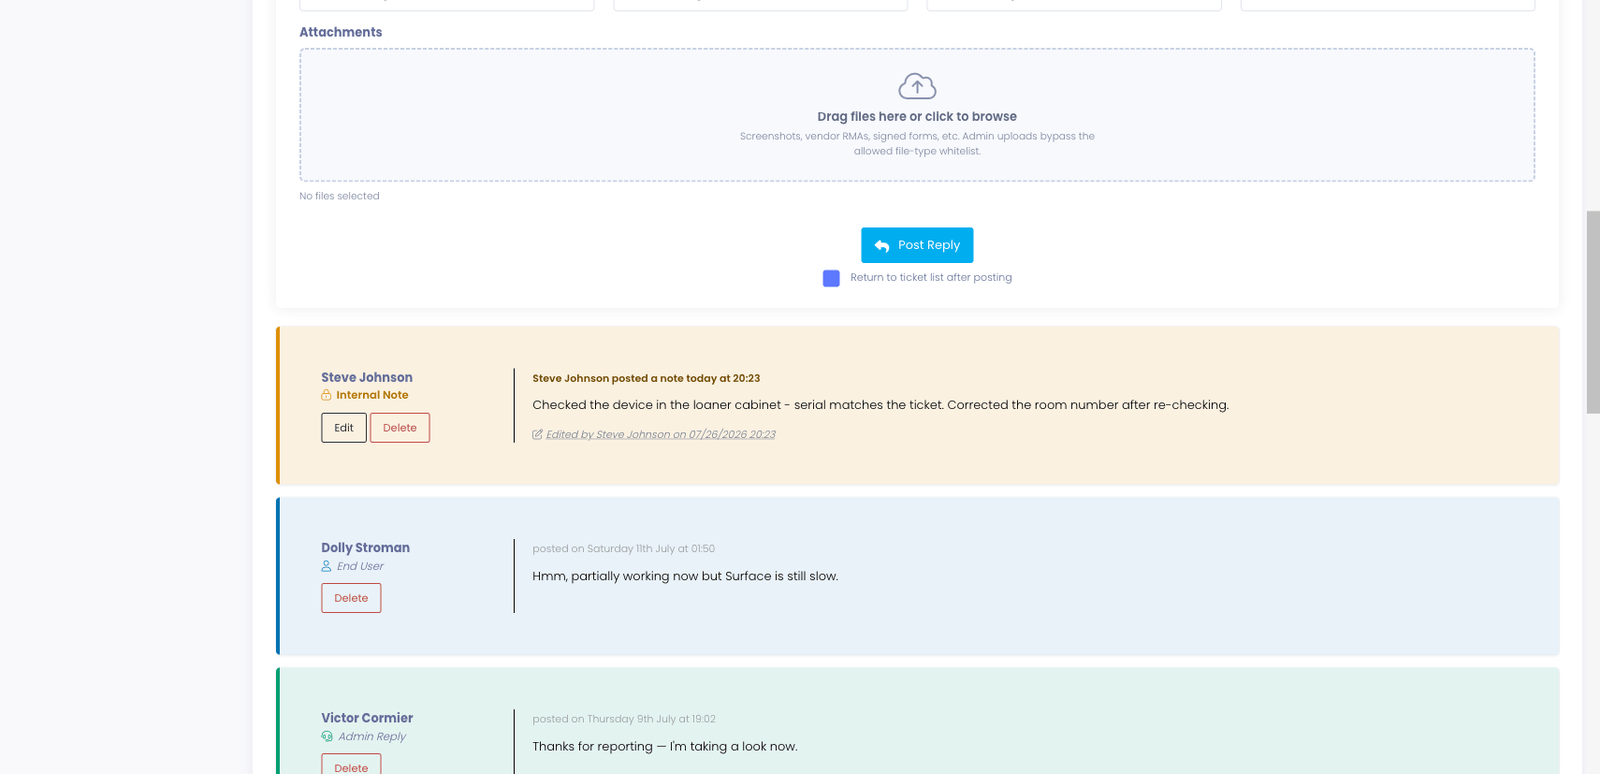
Replies are part of the customer-facing communication record, so they are locked once posted — there is no Edit button on a reply or on the original request. This keeps the conversation history accurate and defensible. If you need to correct something you sent, post a follow-up reply. Internal notes remain editable (by their author) precisely because they're your private working record.
When to Use Notes vs. Replies
Use Notes for:
- Communication between support staff
- Documentation of offline actions
- Troubleshooting steps tried
- Reasons for decisions
- Information not relevant to user
Use Replies for:
- Communicating with the user
- Answering their questions
- Providing solutions or instructions
- Closing ticket with resolution
Examples of good notes:
Internal Note: Contacted network team, they see no issues on server side.
Problem appears isolated to this user's device. Scheduling time for them
to bring device in for diagnosis.
Internal Note: User called office, confirmed they received replacement device
and WiFi is working now. Will close ticket when they confirm via email.
Internal Note: This is the 3rd ticket from this user about WiFi. May need to
check if device needs replacement or if user needs additional training.
Ticket Attachments
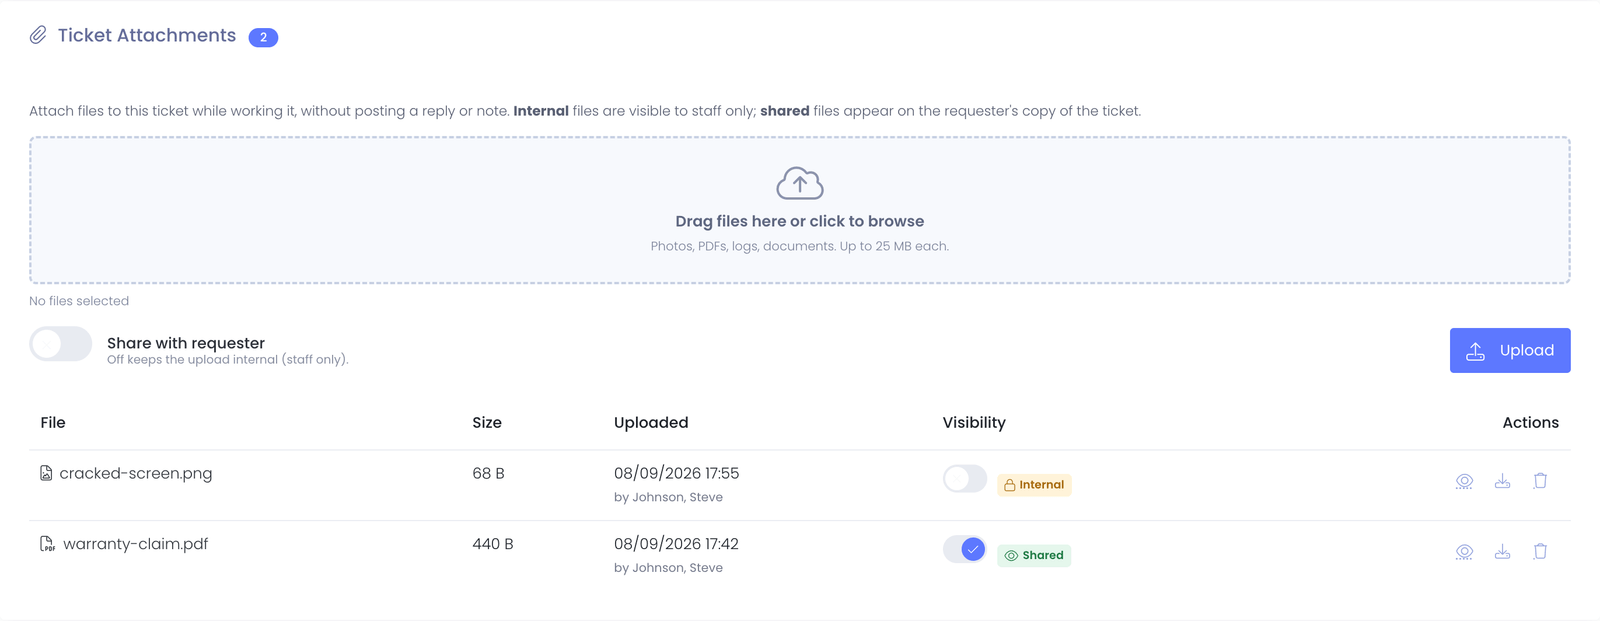
Sometimes you need to add a file to a ticket that isn't part of a reply or a note — a photo of cracked hardware for a warranty claim, a battery-health report, a vendor quote, or a signed equipment form that arrives after the fact. The Ticket Attachments panel, below the ticket tabs, lets you attach files directly to the ticket itself while you work it, so the supporting material lives with the ticket instead of scattered across email or external storage.
Adding a File
- In the Ticket Attachments panel, drag files onto the drop zone, or click it to browse.
- Decide who should see the file using the Share with requester toggle:
- Off (default) keeps the file internal — visible only to staff working the ticket.
- On marks the file shared — the requester will see it on their copy of the ticket.
- Click Upload. Each file appears in the list below with its size, who added it, and when.
New attachments start internal so nothing is exposed to the requester by accident. Turn on Share with requester before uploading, or flip an existing file's toggle at any time, when you specifically want the requester to have it.
Internal vs. Shared
Each file carries its own visibility, shown as a badge in the Visibility column:
- Internal — staff only. Use it for diagnostic output, evidence photos, vendor paperwork, and anything that documents your work but isn't meant for the requester.
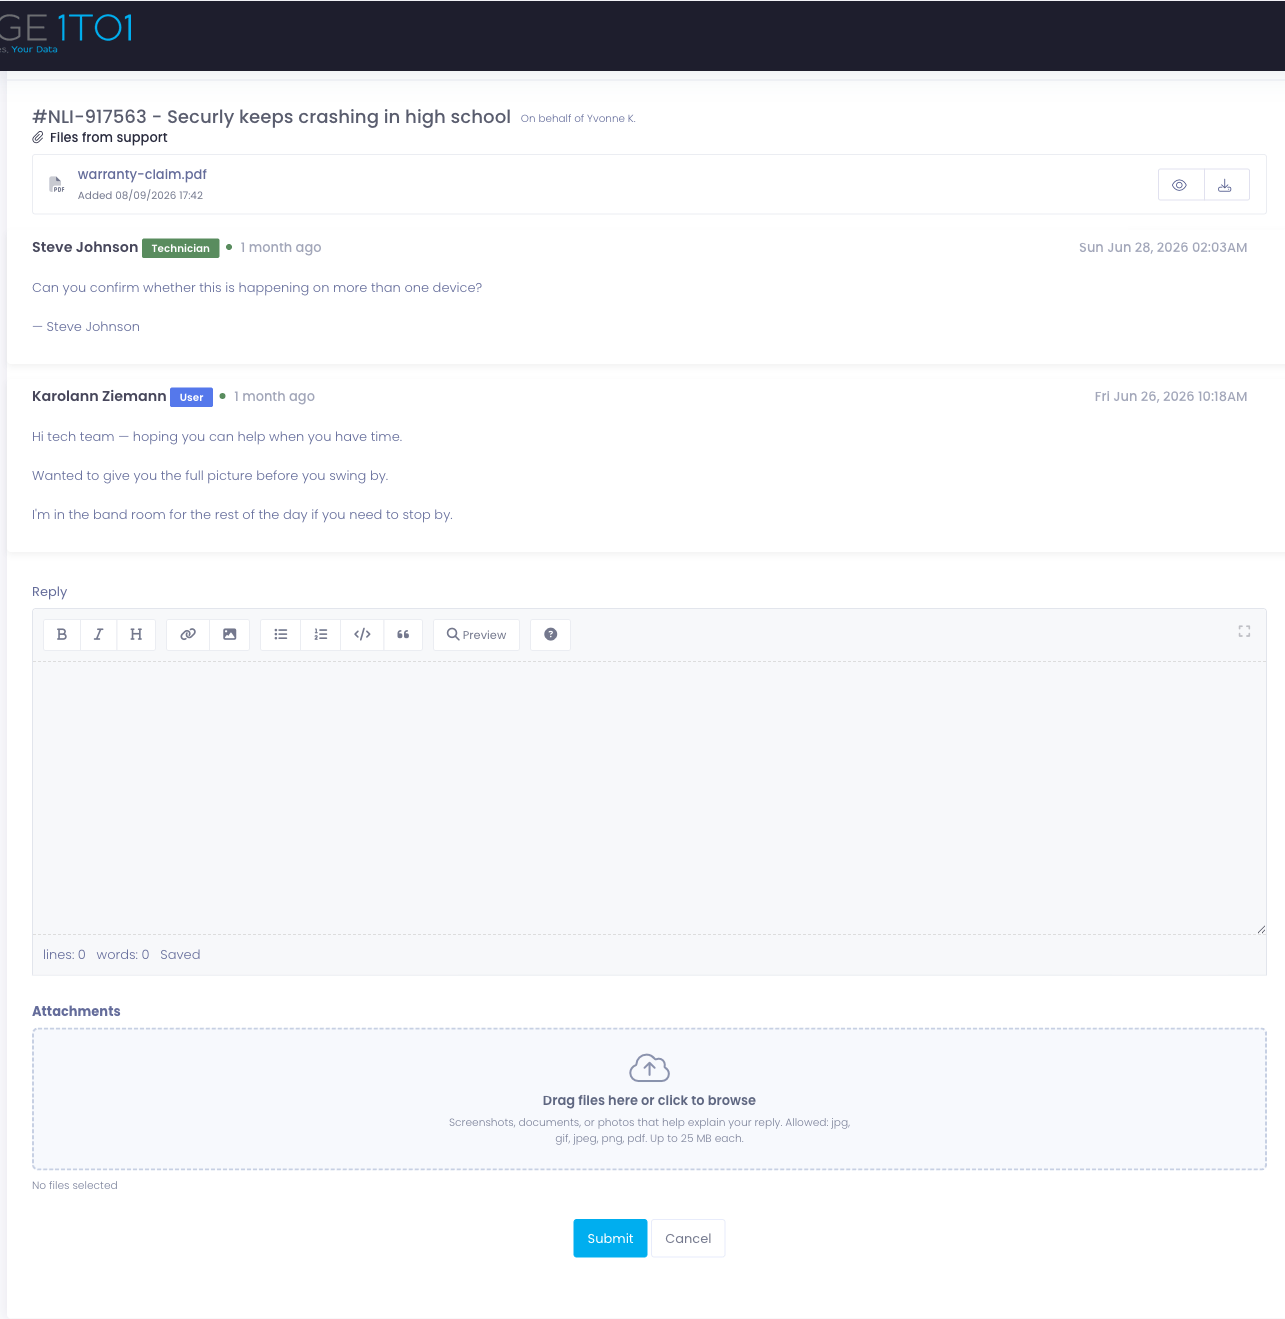
- Shared — appears in the requester's User Portal view of the ticket, under a Files from support heading, where they can preview or download it.
To change a file's visibility, use the toggle in its row. The change takes effect immediately, and every add, visibility change, and removal is recorded in the ticket's history.
Previewing, Downloading, and Removing
Each row has three actions:
- Preview opens images and PDFs right in the browser, so you don't have to download a file just to glance at it. Other file types offer a download instead.
- Download saves the file to your computer.
- Delete removes the file from the ticket. This can't be undone, so you'll be asked to confirm.
What the Requester Sees
Shared files appear on the requester's ticket in the User Portal, grouped under Files from support, with the same preview-or-download options. Internal files never appear there and are never included in email notifications — they stay on the staff side of the ticket, always.
Adding files and changing their visibility uses the View Support Tickets permission; removing a file requires Delete Support Tickets. Ticket attachments use the same size limit as reply attachments, and — like the reply and note forms — staff uploads bypass the allowed file-type whitelist (the ban on server-executable files still applies). When two tickets are merged, the attachments travel with them, keeping their internal or shared setting.
Time Logged
Knowing how much staff time a ticket actually consumed is the foundation of workload planning, staffing cases, and billing for services. The Time Logged panel, below the ticket tabs, lets you record the time you spend working a ticket as you go, so the effort is captured against the ticket instead of reconstructed from memory later.
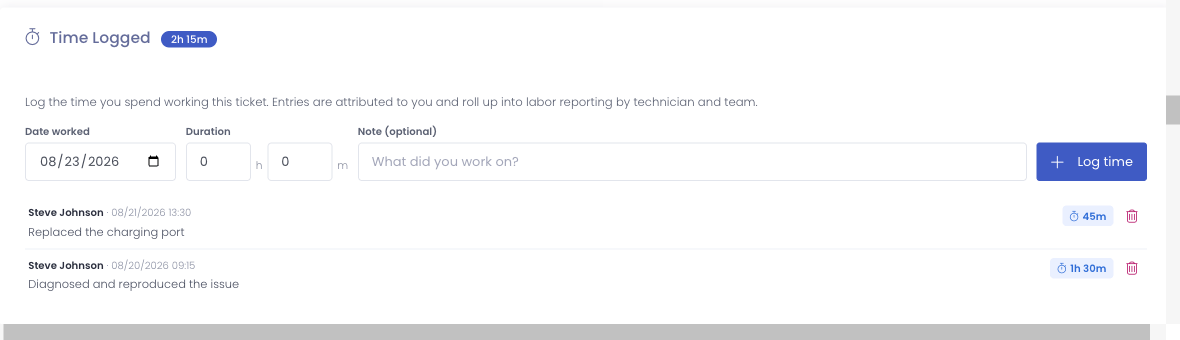
Logging Your Time
- In the Time Logged panel, set the Date worked (it defaults to today).
- Enter how long you spent in the hours and minutes boxes.
- Optionally add a short note describing what you did, such as "Replaced the charging port" or "Phone call with the family."
- Click Log time.
Your entry is added to the list immediately, attributed to you, and the running total in the panel header updates. Each entry shows who logged it, the date worked, the optional note, and the duration.
Recording time in small sessions as you work a ticket is more accurate than estimating a single total at the end. You can log as many separate sessions as you need, and entries from every technician who touches the ticket roll up into the same total.
Reviewing and Removing Entries
Every logged session stays listed on the ticket, newest first, so anyone picking up the ticket can see how much effort has gone into it and where the time went. The header badge shows the combined total across all entries.
You can always remove an entry you logged yourself: click the delete control on its row and confirm. Staff with the Delete Support Tickets permission can remove any entry, from any technician. The running total adjusts right away, and removing an entry can't be undone, so you're asked to confirm first.
Logging time uses the View Support Tickets permission. You can remove your own entries, and staff with the Delete Support Tickets permission can remove anyone's. Because each entry records the technician who logged it and the ticket's team at the time, the totals stay meaningful for workload and labor reporting even after a ticket is reassigned.
Custom Fields Tab
If your district has configured custom ticket fields, they appear here.
Common custom fields:
- Incident number (linking ticket to device incident)
- Resolution time tracking
- Equipment used
- Follow-up date
- Priority override reason
Managing custom fields:
- Click Custom Fields tab
- View current values
- Edit as needed
- Click Save
Custom fields are configured in: Settings > Help Desk Settings
Options Tab
The Options tab allows you to modify ticket settings without posting a reply or note.
Available Options
Change Department
- Reassign to different support team
- Dropdown shows all available departments
- Select and click Update
Change Status
- Update ticket state (Open, Answered, Closed, etc.)
- Select and click Update
Change Priority
- Set urgency level
- Select and click Update
Change Assigned Admin
- Assign to specific technician
- Or set to "Unassigned"
- Select and click Update
Update Subject
- Edit the ticket subject line
- Useful for clarifying vague subjects
- Type new subject and click Update
Update CC Recipients
- Add or remove people copied on emails
- Multi-select dropdown
- Click Update
Link Device
- Associates a specific device with this ticket
- Start typing an asset tag, serial number, or loaner number to search every device you have access to, not just the ones checked out to this user. This is useful when the person who filed the ticket isn't the one holding the device.
- Each result shows the asset tag, model, and serial number, along with whether the device is currently checked out and to whom, so you can confirm you're linking the right one
- Linking a device enables the Create Incident feature on the ticket
Merging a Ticket
If a ticket is a duplicate of another, you can merge it into that ticket from the bottom of the Options tab:
- In the Merge This Ticket field, type the destination ticket number.
- Click Merge and confirm.
This ticket's messages are added as replies on the destination ticket, and this ticket is closed and marked Merged into the destination — a badge at the top of the page links back to it. You're taken to the destination ticket so the whole conversation stays in one place.
To merge several duplicates at once, select them on the View Tickets page and use the Merge bulk action instead.
Merging is controlled by the Merge Tickets permission. Team members without it don't see the Merge This Ticket field or the Merge bulk action. Grant it to a role under Administrators → Manage Roles. Because a merge closes a ticket and moves its history, it's kept separate from the everyday ability to view and reply to tickets.
Linking Related Tickets
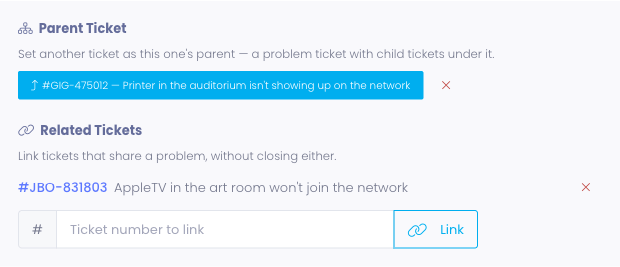
When several tickets share the same underlying problem — say a network outage that generated a dozen separate reports — you can link them so they're easy to find from one another, without closing any of them.
In the Related Tickets section of the Options tab, type another ticket's number and click Link. Both tickets now list each other under Related Tickets, and each shows a small remove control if you need to undo the link later. Unlike merging, linking leaves both tickets open and untouched — it's purely a cross-reference for tracking a shared issue.
Possible Duplicates and Recurrences
When you open a ticket, Manage1to1 looks for other tickets that appear to be the same issue or a repeat of it and lists them here as possible duplicates. It's an easy way to notice that a problem has come up before — a recurring hardware fault, the same request from the same person — without searching for it by hand.
Each suggestion links straight to the ticket, so you can link it as related or merge it in a click. Suggestions are limited to your own support departments, so you'll never see a ticket you don't already have access to. If nothing looks similar, the section simply stays empty.
Setting a Parent Ticket
Parent-child relationships are for a "problem" ticket that has several tickets underneath it — for example a master ticket for a building-wide issue, with the individual reports as its children.
In the Parent Ticket section, type the parent ticket's number and click Set Parent. This ticket then shows a Child of #… badge at the top of the page linking to its parent, and the parent ticket lists all of its children. Use the remove control to clear the parent. A ticket can't be set as the parent of one of its own children (that would create a loop).
When to Use Options Tab
Use this tab when you need to change settings without sending a message:
- Reassigning ticket to another tech (no reply needed)
- Changing status without additional communication
- Updating priority based on new information
- Fixing incorrect subject line
- Linking a device to a ticket for incident creation
If you're replying anyway, use the dropdowns in the Add Reply tab instead.
Creating an Incident from a Ticket
When a ticket describes a device issue that needs formal incident documentation (for repair tracking, billing, etc.), you can create an incident directly from the ticket.
Requirements:
- A user must be associated with the ticket
- A device must be linked to the ticket (use the Options tab to link one)
How to create an incident:
- Link a device to the ticket if one isn't already linked (Options tab → Link Device)
- The Create Incident button appears in the device info area below the ticket tabs
- Click Create Incident — the incident form opens pre-filled with:
- The user from the ticket
- The linked device
- The full ticket conversation (initial message and all replies) as the assessment
- Review the pre-filled details, select an incident type, and add any notes
- Click Add Incident to save
This eliminates the need to open a separate tab or re-enter information from the ticket into a new incident.
Understanding the Conversation Thread
Below the tabs, you'll see the complete ticket history displayed as a conversation.
What's Displayed
Initial Ticket
- User's original message
- Timestamp
- Any attachments they included
Replies (from admins)
- Administrator name
- Reply message
- Timestamp
- Sent via email to user
User Replies (via email)
- User's response messages
- They reply to your email, it updates the ticket
- Conversation flows back and forth
Internal Notes
- Marked clearly as "Internal Note"
- NOT visible to user
- Only admins see these
System Actions
- "Status changed from Open to Answered"
- "Assigned to John Smith"
- "Department changed to Technology"
- Automatic entries documenting changes
Thread Order
Entries appear in chronological order (oldest first, newest last), creating a timeline of the entire support interaction.
Submitter IP Address
When a user submits a ticket or reply through the User Portal, the IP address they connected from appears beneath the message body as Submitted from IP X.X.X.X. This gives administrators a quick at-a-glance signal of where the request originated — useful when triaging reports of "I can't connect from home" or when correlating activity with the user's login history.

The IP indicator only appears on submissions captured through the web User Portal. Replies received by email or notes added by administrators do not carry an IP and do not display this line.
For privacy, the submitter IP is shown only on the administrator-side Ticket Profile. It is never included in outgoing email notifications and is not visible to the end user in their User Portal view of the ticket.
Real-Time Indicators
The ticket profile shows if other administrators are currently viewing or replying:
"Admin is typing" notice:
⚠ John Smith viewed and started replying @ 2:45 PM
This prevents multiple admins from working on the same ticket simultaneously, avoiding duplicate or conflicting responses.
Common Workflows
Scenario 1: Responding to New Ticket
New ticket arrives, you provide solution:
- Open ticket from View Tickets list
- Read user's message carefully
- Research solution if needed
- Click Add Reply tab
- Type helpful response with step-by-step instructions
- Set Status: "Answered"
- Keep Department and Priority as-is (select "No Changes")
- Click Post Reply
- User receives email with your response
Scenario 2: Escalating to Another Department
Ticket routed to wrong department:
- Open ticket
- Click Add Note tab
- Type: "Routing to Facilities - this is a building maintenance issue, not IT."
- Post note
- Click Options tab
- Change Department to "Facilities"
- Click Update
- Facilities team now sees ticket in their queue
Scenario 3: Multi-Day Troubleshooting
Complex issue requiring multiple interactions:
Day 1:
- User submits ticket: "Computer won't turn on"
- You reply: "Please try these steps..." (Status: Answered)
- User replies: "Tried that, still not working"
Day 2:
- Add note: "Requested loaner device from inventory"
- Reply: "I've arranged a loaner device. Pickup at office." (Status: Answered)
- User replies: "Picked up loaner, thanks!"
Day 3:
- Add note: "Original device sent to repair vendor, tracking #12345"
- Reply: "Your device is being repaired. Expect 5-7 days."
Day 8:
- Reply: "Device repaired and ready for pickup." (Status: Answered)
- User replies: "Picked up, working great!"
- Reply: "Glad it's working! Closing this ticket." (Status: Closed, Lock Ticket checked)
Scenario 4: Team Collaboration via Notes
Multiple techs working together:
Tech A:
- Add note: "User reports printer error in Room 205. Checked - printer is offline. Rebooted, still no connection."
Tech B:
- Add note: "I'm in Building 2 today. Will check network connection to that printer this afternoon."
Tech B (later):
- Add note: "Network cable was loose. Reconnected, printer online and responding."
- Reply to user: "Printer issue resolved. Network cable was disconnected. Printer should be working now." (Status: Answered)
Tips for Managing Tickets
✅ Do:
- Reply promptly within your SLA timeframe
- Use notes for internal communication
- Set status to "Answered" after replying
- Close tickets when issues are resolved
- Be thorough and clear in responses
- Use professional, friendly tone
- Check conversation history before replying (context is important)
❌ Don't:
- Leave tickets in "Open" status indefinitely
- Use replies for internal notes (users will see them!)
- Forget to update status after actions
- Reply without reading full conversation thread
- Use jargon or technical terms users won't understand
- Close tickets prematurely (before confirming resolution)
Common Questions
Q: What's the difference between a reply and a note? Reply = Email sent to user. Note = Internal staff communication, user doesn't see it.
Q: Can I edit a reply after posting it? No. Once posted, replies are permanent. If you made a mistake, post a correction reply.
Q: How do I delete a ticket? Only administrators with Delete Support Tickets permission can delete tickets. Use sparingly - tickets are historical records.
Q: Can users reply to ticket emails? Yes! When users reply to ticket notification emails, their responses update the ticket automatically.
Q: What if user doesn't respond to my reply? If ticket is in "Answered" status and user doesn't respond for several days (configurable), it may auto-close. Or manually close after reasonable waiting period.
Q: Can I attach files to replies? Yes. Drag files onto the Attachments drop zone in the reply (or note) form, click to browse, or paste a screenshot with Ctrl/⌘ + V. Multiple files are supported. See Attaching Files to a Reply for details.
Q: Should I create a new ticket or continue the existing one? If it's the same issue, continue the existing ticket. New issue = new ticket.
Next Steps
- View Tickets - Return to ticket list
- Opening Tickets - Create new support requests
The ticket profile is your complete workspace for managing user support from initial request through final resolution!