Adding Incidents
Adding an incident creates a formal record of a device problem, damage report, or repair request. This documentation is essential for tracking repairs, billing users for damage, and maintaining a complete history of device issues.
Incidents are typically created when a device is reported damaged, malfunctioning, or needs repair work.
To add incidents, you need the Create Incidents permission assigned to your administrator role.
How to Add an Incident
There are two common pathways to create an incident:
Method 1: From a Device Profile
The most common way to create an incident is directly from the device that has the problem:
- Find the device in
Devices > View Devices - Open the device profile
- Click the Add Incident button (usually in the device snapshot sidebar)
- The Add Incident form opens with device information pre-filled
- Fill out the incident details
- Click Add Incident to save
Method 2: From a User Profile
If you know which user reported the problem:
- Find the user in
Users > View Users - Open the user profile
- Navigate to their device information or incidents tab
- Click Add Incident
- Select which of their devices the incident applies to
- Fill out the incident details
- Click Add Incident to save
Method 3: From a Support Ticket
If a user submitted a help desk ticket about a device problem, you can create an incident directly from the ticket without re-entering information.
Requirements:
- The ticket must have a device linked to it (set on the ticket profile under the Device field)
- The ticket should have a user associated with it (the person who submitted or is affected)
How it works:
- Open the ticket in Support Center → View Tickets
- On the ticket profile, click Create Incident
- The incident form opens pre-filled with:
- The user from the ticket
- The device linked to the ticket
- The full ticket conversation (initial message and all replies) in the assessment/description field
- Review and adjust the incident details, select the incident type, add any additional notes
- Click Add Incident to save
The incident is created and linked to the device and user automatically. You don't need to open a separate tab or re-enter any of the information from the ticket.
A device must be linked to the ticket before you can create an incident. Devices can be linked in two ways:
- By the end user, when submitting a ticket through the portal, users can select which device their issue is about
- By an administrator, on the ticket profile, use the Options tab to link a device to the ticket
Understanding the Add Incident Page
The Add Incident page uses a two-column layout: the user and device the incident relates to are summarized on the left, and the repair details you fill out are on the right.
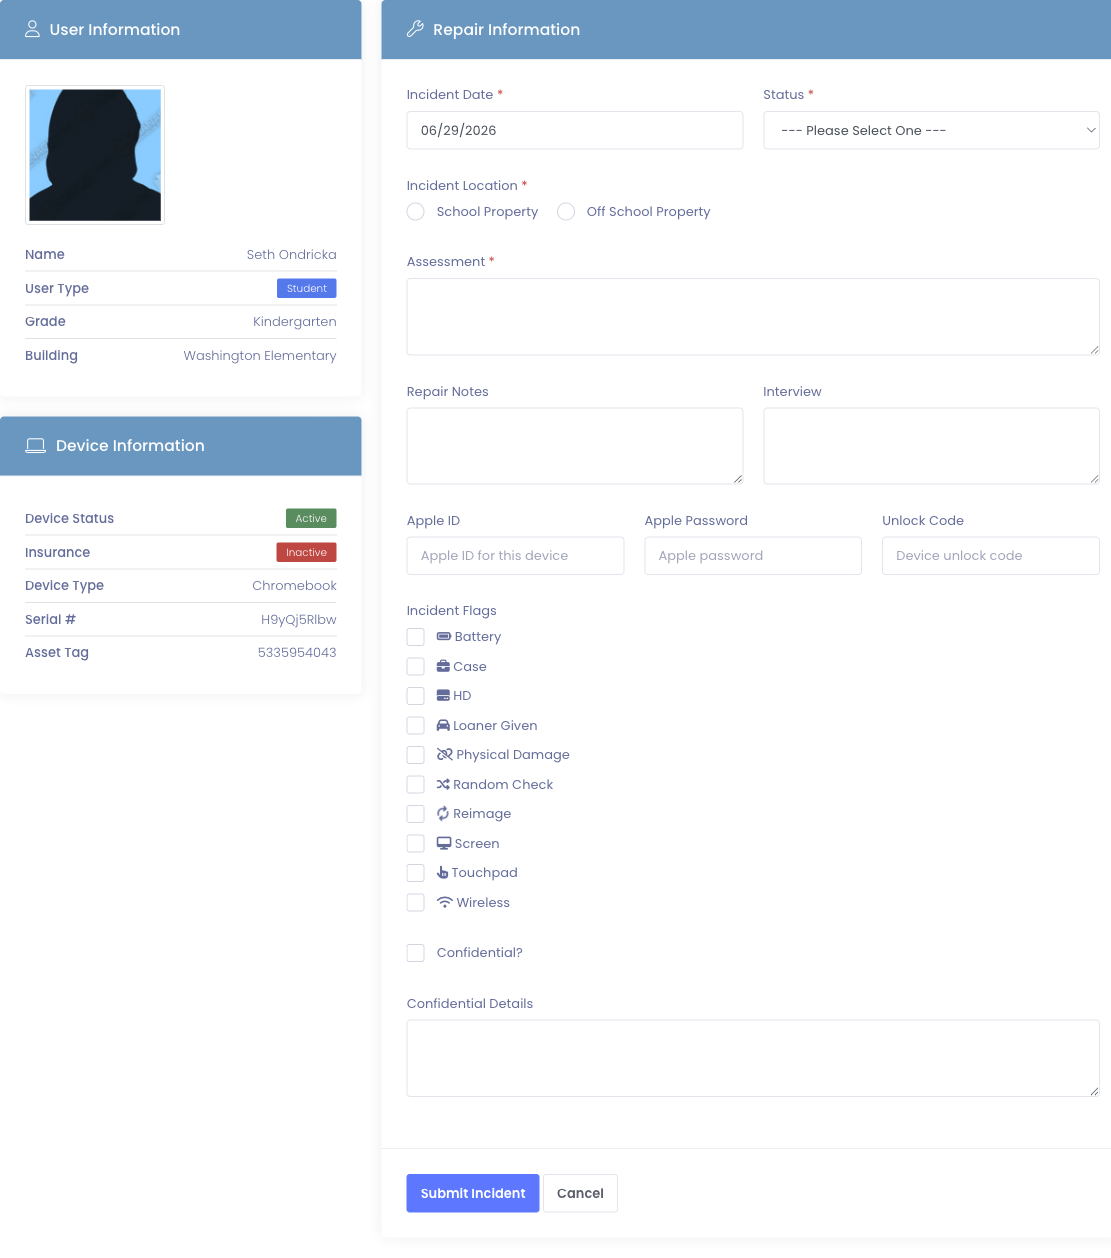
It is organized into three sections:
User Information Section
Displays who had the device when the incident occurred:
- User's full name
- User type (Student or Staff)
- Contact information
- Building assignment
This section is read-only - it's automatically populated based on who currently has the device checked out. If the device isn't checked out to anyone, this section may be empty.
Device Information Section
Shows details about the device that has the problem:
- Device status (Active, Available, etc.)
- Insurance status (if your district tracks insurance)
- Device type/model
- Serial number
- Asset tag
This section is read-only - it's automatically populated from the device record.
Repair Information Section
This is where you document the incident details. All fields in this section are editable.
Required Fields
These fields must be filled out before you can create an incident.
Incident Date *
The date when the problem occurred or was reported.
Default: Today's date (current date)
Common scenarios:
- Student reports damage today → Use today's date
- Device was damaged last week but just reported → Change to the actual damage date
- Found damage during inventory check → Use the date you discovered it
Why this matters: The incident date affects repair turnaround time statistics and helps track when problems actually occurred vs. when they were reported.
Assessment *
Your initial evaluation of the problem. This is the "what's wrong with it" field.
What to include:
- What's broken or not working (cracked screen, won't power on, keyboard issue, etc.)
- Visible damage you observe
- Error messages or symptoms
- Severity assessment
Good examples:
- "Screen cracked in bottom right corner, approximately 3-inch crack. Device still functional."
- "Device will not power on. Tried charging for 30 minutes, no response. Battery may be dead."
- "Keys 'A', 'S', 'D' on keyboard not responding. Possible liquid damage. Sticky residue visible."
- "WiFi not connecting. Attempted network reset, issue persists. Hardware antenna problem suspected."
Avoid vague assessments:
- ❌ "Broken"
- ❌ "Doesn't work"
- ❌ "Student broke it"
Tips:
- Be specific and objective
- Document what you observe, not assumptions
- If this incident came from a support ticket, the assessment field may be pre-filled with the ticket description
- Photos can supplement your assessment. You can attach them right on this form (see Photos below), or add more later from the incident profile
Incident Location *
Where the damage occurred.
Options:
- School Property - Incident happened at school (during school day, on campus, etc.)
- Off School Property - Incident happened at home, in transit, or outside school grounds
Why this matters:
- Affects insurance claims (many policies have different coverage for school vs. home)
- Impacts billing decisions (some districts charge differently for at-home damage)
- Helps identify patterns (more damage in specific locations suggests training needs)
- May determine warranty coverage
When uncertain:
- Ask the user where the damage occurred
- If they don't know, use your best judgment
- Document uncertainty in the Interview field
Status *
The current state of the incident in your repair workflow.
Common statuses include:
- Pending - Just reported, awaiting assessment or repair start
- In Progress - Currently being repaired
- Completed - Repair finished, incident closed
- Investigating - Determining cause or extent of damage
- Awaiting Parts - Waiting for replacement components
- Sent for Repair - Sent to external repair vendor
Your district customizes available statuses in: Settings > System Settings > Incidents Tab
Choosing the right status:
- Creating an incident during initial report → Choose "Pending"
- Already know repair will start immediately → Choose "In Progress"
- Quick assessment shows no repair needed → Choose "Completed"
- Setting status to "Completed" will automatically set the Completed Date to now
Optional Fields
These fields provide additional detail but aren't required to create an incident.
Photos
You can attach photos of the damage right on the Add Incident form, so you don't have to create the incident first and then go back in to add them.
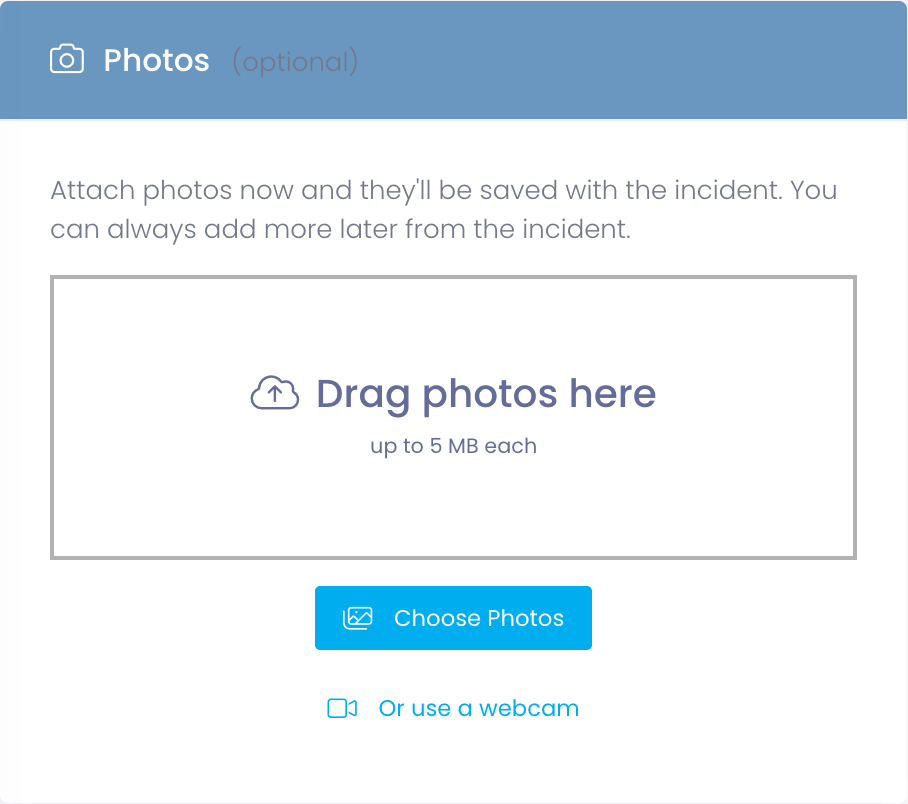
How to add photos while creating an incident:
- On a computer, drag photos onto the drop area or click Choose Photos to pick them.
- On a phone or tablet, just tap the photo area - it opens your camera or photo library so you can snap a new photo or choose an existing one.
- On a computer, you can also click Or use a webcam to snap a photo with an attached camera - line up the shot, choose Capture, then Use this photo (or Retake if you want another).
- Add as many as you need (up to 5 MB each), and remove any you didn't mean to include before saving.
- Click Add Incident. Your photos are saved and attached to the new incident automatically, and you land on the incident with them already in place.
The Photos section appears when you have the Add Photos permission. You can always add more photos later from the incident profile, see Incident Photos.
Repair Notes
Documentation of work performed, parts used, and repair steps taken.
When to fill this out:
- During or after repair work
- If you're creating an incident and immediately repairing it
- To document quick fixes or temporary solutions
What to include:
- Parts replaced (screen assembly, battery, keyboard, etc.)
- Work performed (reimaged device, replaced component, adjusted settings, etc.)
- Repair time estimate
- Cost or billing information
- Any issues encountered during repair
Examples:
- "Replaced screen assembly. Tested touch response, all functional. User can pick up."
- "Cleaned keyboard with compressed air. Keys now responsive. No parts needed."
- "Unable to repair. Logic board damaged. Device marked for recycling."
- "Reimaged device. Loaded current OS image. Tested all functions. Ready to redeploy."
Best practice: Add detailed repair notes even if optional - they're invaluable for warranty claims, billing justification, and future reference.
Interview
The user's account of what happened to the device.
What to document:
- How the damage occurred (user's explanation)
- When it happened (user's timeline)
- What they were doing when it broke
- Whether it was accidental or intentional
- Any relevant context
Examples:
- "Student states device fell from desk during class transition. Landed screen-down on tile floor. Damage immediately visible."
- "User reports device was working fine last night. This morning wouldn't power on. No known incident of dropping or impact."
- "Student admits spilled water on keyboard yesterday. Didn't report immediately. Keys started sticking this morning."
- "Device left in backpack. Another student stepped on backpack. Student heard cracking sound."
Why interviews matter:
- Provides context for billing decisions (accidental vs. negligence)
- Helps identify training needs (recurring patterns in how damage occurs)
- Important for insurance claims
- Creates accountability record
- Can reveal warranty-eligible issues vs. user damage
Tips:
- Be objective - document what they say, not your judgment
- Quote directly when relevant
- Note if user is unsure or story changes
- Document witness statements if available
- Leave blank if user not available for interview
Apple ID, Apple Password, Unlock Code
These fields appear only if:
- Your district manages Apple devices (iPad, Mac, etc.)
- You have the View Users permission
- The setting to track Apple credentials is enabled
Purpose: Document passwords needed to access or reset the device during repair.
Fields:
- Apple ID - The Apple ID associated with this device
- Apple Password - Password for the Apple ID
- Unlock Code - Device passcode/PIN to unlock the device
Default values: Pre-filled from the user's profile if they have these credentials stored
Security note: These fields may be protected by additional permissions. Not all administrators will see password fields even if they can create incidents.
Confidential Checkbox and Details
These fields appear only if you have the View/Edit Incident Confidential permission.
Confidential Checkbox:
- Mark the incident as containing sensitive information
- Restricts access to only administrators with the Confidential permission
- Use for incidents involving:
- Behavioral issues (bullying, inappropriate content, etc.)
- Disciplinary matters
- Personal or sensitive student information
- Legal or law enforcement matters
Confidential Details:
- Text area for sensitive information that should only be visible to authorized staff
- Common uses:
- Behavioral context (device damaged during altercation)
- Disciplinary notes
- Reasons for special handling
- Information relevant to administrators but not general staff
When to use confidential marking:
- ✅ Incident involves sensitive student behavior
- ✅ Legal or law enforcement involvement
- ✅ Special circumstances requiring restricted access
- ❌ Normal accidental damage (doesn't need confidential marking)
- ❌ Standard repair issues (keep accessible to repair staff)
Incident Flags
Incident flags are customizable categories that help you classify and track the type of problem.
Common flags:
- Physical Damage - Cracks, dents, broken parts
- Screen - Display issues, screen cracks
- Battery - Power or battery problems
- Keyboard - Key issues, keyboard damage
- Touchpad - Trackpad not working
- Wireless - WiFi or Bluetooth problems
- Hard Drive - Storage issues
- Case - Protective case damage
- Loaner Given - User received temporary replacement
- Reimage - Device needs OS reinstall
- Random Check - Routine inspection, not a reported problem
How to use flags:
- Check all boxes that apply to the incident
- You can select multiple flags
- Use flags for quick filtering and reporting
- Flags help identify trends (lots of screen damage? Time for case training)
Your district customizes available flags in: Settings > System Settings > Incidents Tab
The flagged indicator:
- Some flags can be marked as "alert" flags (like "Physical Damage")
- These create a visual indicator on the incident
- Helps prioritize or quickly identify specific incident types
Custom Fields
If your district has configured custom incident fields, they appear on the form below the standard repair information.

Common custom fields:
- Repair category or damage cause
- Whether a loaner was issued
- Parts order number
- External repair ticket ID
- Insurance claim number
A custom field marked required shows a red asterisk (*) and must be filled in before the incident can be saved. If your district scopes a field to a specific building, it only appears on incidents at that building; global fields appear on every incident.
Custom incident fields are set up under Settings → System Settings → Custom Fields, see Custom Fields Tab.
After Adding an Incident
Once you click Add Incident, the system:
- Creates the incident record
- Generates a unique incident number
- Redirects you to the Incident Profile page
- Allows you to add photos, update repair notes, or add log entries
From the Incident Profile, you can:
- Upload photos of the damage
- Add entries to the incident log
- Update the status as work progresses
- Generate PDF work orders
- Link invoices for billing
Learn more about the Incident Profile →
Common Scenarios
Scenario 1: Student Reports Cracked Screen
A student walks into the office with a cracked screen:
- Pull up the student's profile
- Find the device with the cracked screen
- Click Add Incident from the device profile
- Fill out the form:
- Incident Date: Today
- Assessment: "Screen cracked across top left quadrant. Touch still responsive. Approximately 4-inch crack."
- Interview: "Student states dropped device in hallway between classes. Fell from hand, landed face-down on tile. Damage immediately visible."
- Location: School Property
- Flags: Check "Screen" and "Physical Damage"
- Status: Pending
- Click Add Incident
- Upload photos of the crack on the incident profile
- Update status to "In Progress" when repair begins
Scenario 2: Device Won't Power On
Teacher brings a non-functional device:
- Open the device profile (scan asset tag or search)
- Click Add Incident
- Fill out:
- Incident Date: Today
- Assessment: "Device will not power on. No response to power button. Attempted charging for 1 hour, no charging indicator. Battery or power issue suspected."
- Interview: "Teacher reports device was working fine yesterday. Student charged overnight. This morning would not turn on. No drops or impacts reported."
- Location: Off School Property (charging at home)
- Flags: Check "Battery"
- Status: Investigating
- Save the incident
- Test with known-good charger
- Update repair notes with findings
Scenario 3: Routine Maintenance Check
During inventory, you find a device with sticky keys:
- Open the device profile
- Add incident
- Fill out:
- Incident Date: Today
- Assessment: "Keyboard keys sticky and unresponsive. Keys 'E', 'R', 'T' have reduced response. Visible residue between keys suggesting liquid exposure."
- Interview: Leave blank (user not present)
- Location: Unknown (discovered during inventory)
- Flags: Check "Keyboard"
- Status: Pending
- Attempt cleaning
- Update repair notes: "Cleaned keyboard with compressed air and isopropyl alcohol. Keys now functional. No parts replaced."
- Change status to Completed
Tips for Creating Effective Incidents
✅ Do:
- Be specific and detailed in assessments
- Document the user's story in the interview field
- Select all applicable flags
- Take photos immediately after creating the incident
- Set realistic statuses based on your workflow
- Include repair notes as work is done (don't wait until completion)
- Double-check the incident date matches when damage actually occurred
❌ Don't:
- Use vague language ("broken", "doesn't work")
- Skip the interview - user's account is important
- Forget to set incident location correctly (impacts billing/insurance)
- Leave incidents in "Pending" forever - update status as you work
- Create incidents for every minor issue - use judgment
- Delete incidents once created - update to "Completed" instead
Common Questions
Q: Should I create an incident for every device problem? Depends on your district's policy. Most schools create incidents for:
- Physical damage (cracks, dents, breaks)
- Hardware malfunctions needing repair
- Issues requiring parts or service
- Problems that may result in billing
Minor issues (quick settings changes, quick software fixes) may not need formal incidents.
Q: What if I don't know who had the device when damage occurred? Create the incident anyway. The user information may be blank or show "Unknown." You can update it later if you determine who had it.
Q: Can I change the incident details after creating it? Yes, if you have the Edit Incidents permission. Open the incident profile and click Edit.
Q: What happens if I set status to "Completed" when creating the incident? The system automatically sets the Completed Date to the current timestamp. Use this if you're documenting a problem that was already fixed.
Q: Do I have to fill out repair notes when creating the incident? No, repair notes are optional at creation. Most people add repair notes later as work is performed.
Q: Can I create an incident for a device that's not checked out? Yes. The user information will be blank, but you can still document the problem.
Next Steps
After creating an incident, you'll typically want to:
- View the Incident Profile - See complete incident details
- Add Photos - Document damage visually
- Update the Incident Log - Track repair progress
Creating detailed incident records ensures proper documentation, supports billing decisions, and maintains a complete history of device issues!