View Incidents
The View Incidents page is your central hub for tracking all device damage reports, repairs, and incident records across your entire 1:1 program. This is where you monitor repair progress, review incident history, and manage device problems from initial report through completion.
You can access this page from the main navigation under View Incidents.
To view this page, you need the View Incidents permission assigned to your administrator role.
Understanding Incidents
An incident is a record of any problem with a device - from minor technical issues to major physical damage. Incidents track the complete lifecycle of a problem:
- Initial report - What happened, when, and to which device
- Assessment - Initial evaluation of the damage or issue
- Interview - User's account of what occurred
- Repair process - Work performed, parts used, costs incurred
- Resolution - Final status and completion date
Think of incidents as work orders for your device repair workflow. Each incident documents a problem from start to finish, creating a permanent history of device issues for warranty claims, insurance, billing, and accountability.
Understanding the Incident List
When you open the View Incidents page, you'll see a table displaying all incidents you have permission to view. Like devices and carts, you only see incidents from buildings your administrator account can access.
What You'll See in the Table
The incident table displays these columns by default:
| Column | What It Shows |
|---|---|
| Incident # | Unique incident ID number |
| Incident Date | When the problem was reported |
| Completed Date | When the repair was finished (or blank if still open) |
| Asset Tag | The device's inventory tracking number |
| Serial | Device manufacturer serial number |
| User | Who had the device when the incident occurred |
| Status | Current incident status (Pending, In Progress, Complete, etc.) |
| Building | Which school the incident belongs to |
| Action | Buttons to view, edit, or delete the incident |
Incident Groups
The page separates incidents into groups so open work stays distinct from finished and parked cases:
- Current Incidents — active, open work.
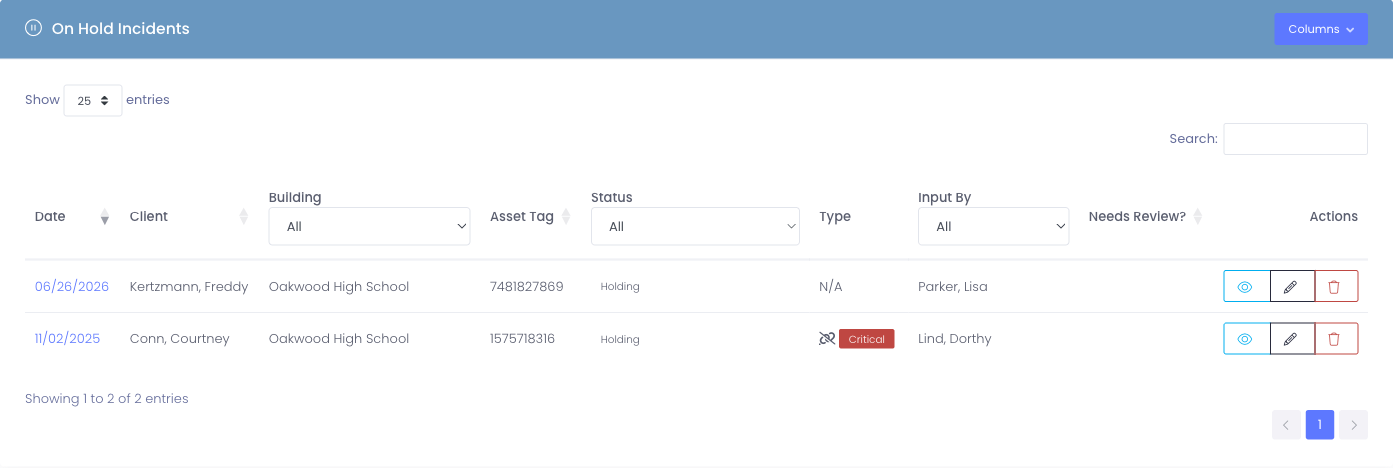
- On Hold Incidents — incidents parked in a hold status (for example, a device you're holding onto for a while). They're kept out of the Current list and out of the Average Hours to Closure statistic, so a long hold doesn't distort your turnaround time. This group only appears when your district has a hold-type status.
- Completed Incidents — closed cases.
Which group an incident lands in is driven by its status's behavior, configured under Settings → System Settings → Incidents.
Incident Statistics
If you have the View Stats permission, you'll see statistics at the top of the page showing repair efficiency:
Average Hours to Closure (This Year)
- Shows how long incidents take to complete on average during the current school year
- Helps track whether your repair turnaround time is improving or declining
- Lower numbers indicate faster incident resolution
Average Hours to Closure (All Time)
- Historical average across all completed incidents
- Provides baseline for comparing current year performance
- Useful for year-over-year trend analysis
These metrics help you:
- Identify bottlenecks in your repair process
- Set realistic expectations for repair timelines
- Demonstrate program efficiency to stakeholders
- Justify staffing or resource requests
Searching and Filtering
Quick Search
Use the search bar at the top of the table to find incidents by:
- Incident number
- Device asset tag or serial number
- User name
- Building name
- Status
As you type, the table automatically filters to show matching results.
Filter by Building
If you manage multiple schools, you can filter incidents to show only one building:
- Look for the Building dropdown filter above the table
- Select a specific building from the list
- The table updates to show only incidents from that building
- Select "All Buildings" to clear the filter
Filter by Status
Filter incidents based on their current status:
- Use the Status dropdown filter
- Choose a specific status (Pending, In Progress, Completed, etc.)
- View only incidents matching that status
- Select "All Statuses" to show everything
Common filtering scenarios:
- Show only Pending incidents to see new reports awaiting assessment
- Filter to In Progress to track ongoing repairs
- View Completed incidents for closed cases
- Combine building + status filters for targeted results (e.g., "Building 3 + In Progress")
Filter by Tag
The Filter by tag picker above the table narrows the list to incidents flagged with one or more of your district's incident tags (Physical Damage, Screen, Touchpad, Battery, Reimage, etc. — whatever your district has configured under Settings → System Settings → Incident Flags).
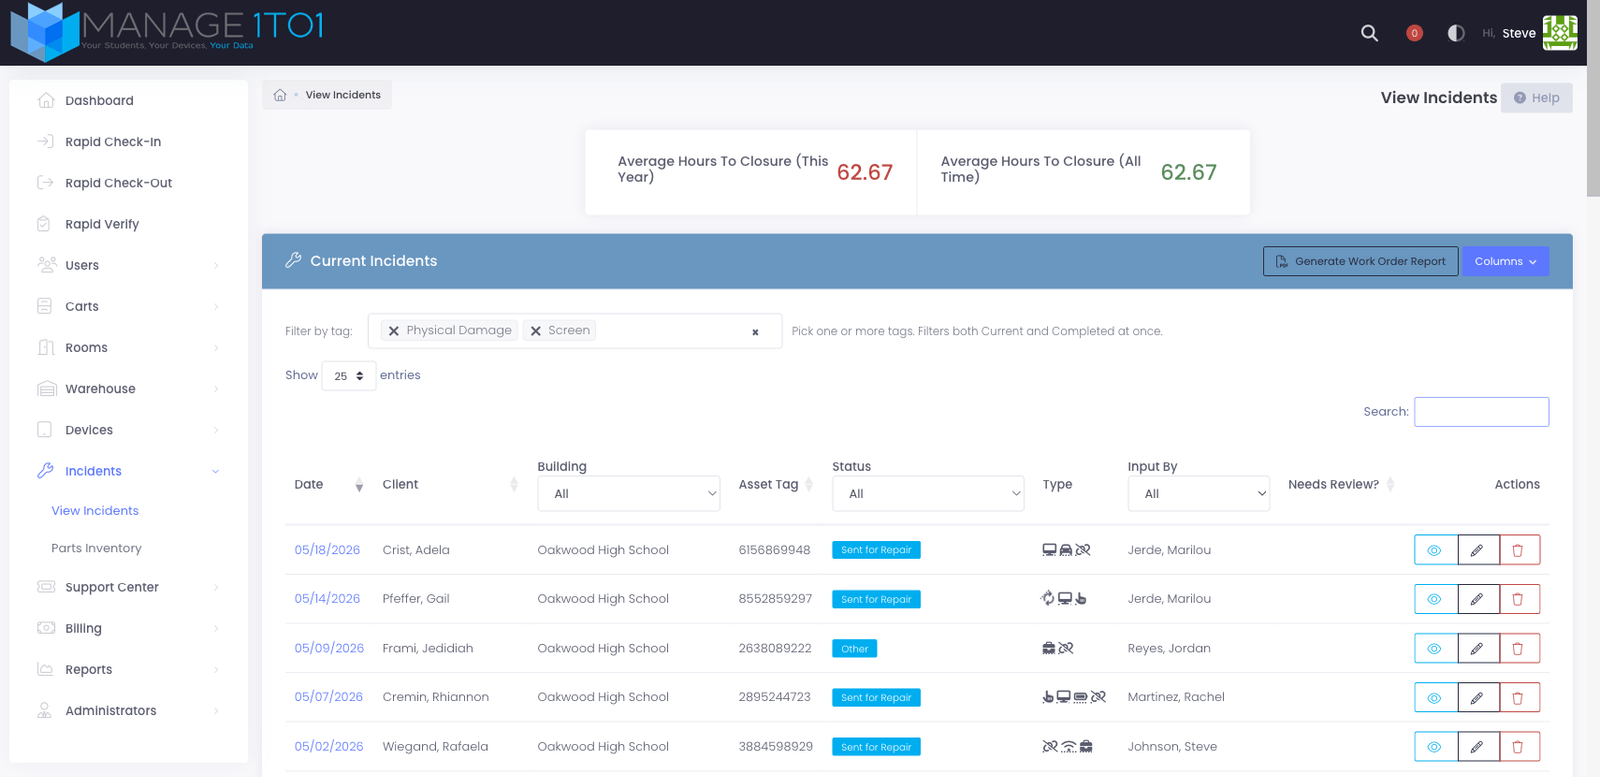
To use it:
- Click the Filter by tag picker above the incident table.
- Start typing to search, or scroll the dropdown to browse every available tag.
- Click each tag you want to include — selected tags appear as removable chips in the picker.
- The table updates immediately to show only incidents that carry at least one of the selected tags.
- Click the small × on a chip to remove that tag from the filter, or click the × at the right end of the picker to clear all tags at once.
Good to know:
- Picking multiple tags is an any-of match. Selecting Screen + Physical Damage shows every incident tagged with either one (or both).
- The tag filter applies to both the Current Incidents and Completed Incidents tables at the same time — useful when you're tracking, for example, every screen-replacement incident across the whole year.
- The tag filter combines with the Building and Status filters. Stacking all three lets you ask very pointed questions like "every In Progress screen-damage incident at Lincoln Elementary."
- Tags themselves are managed from Settings → System Settings → Incident Flags — add a tag there and it shows up in this picker automatically.
Sorting
Click any column header to sort by that column:
- Sort by Incident Date to see newest or oldest first
- Sort by Completed Date to track recently finished repairs
- Sort by User to group incidents by student/staff
- Sort by Status to see all pending, in-progress, or completed incidents together
Taking Action on Incidents
Each incident row has an Action column with buttons for managing that incident.
View Incident
Click the View or incident number to open the incident profile. This shows:
- Complete incident details
- Repair timeline and notes
- Photos of damage
- Incident log (activity history)
- Related invoices or billing
Learn more about incident profiles →
Edit Incident
Click the Edit button to modify incident details like:
- Status
- Assessment notes
- Interview details
- Repair notes
- Flags and categorization
To edit incidents, you need the Edit Incidents permission.
Delete Incident
Click the Delete button to remove an incident from the system.
You cannot delete an incident if:
- It has associated invoices or billing records
- It has photos attached to it
This protection prevents accidental data loss. If you need to delete an incident with these records, remove the related items first (invoices, photos), then delete the incident.
Important: Only delete incidents that were created by mistake. If an incident is legitimate but no longer relevant, update its status to "Completed" instead of deleting it.
To delete incidents, you need the Delete Incidents permission.
Generating Work Order Reports
The View Incidents page allows you to generate PDF work order reports for specific date ranges.
How to Generate a Work Order Report
- Click the Generate Work Order Report button (usually above or near the incident table)
- A modal window opens asking for a date range
- Enter the Start Date (incidents on or after this date)
- Enter the End Date (incidents on or before this date)
- Click Generate
- A PDF downloads containing all incidents within that date range
Work order reports include:
- Incident summary information
- Device details
- User information
- Repair notes and status
- Formatted for printing and record-keeping
Common uses:
- End-of-month repair summaries
- School year review reports
- Sharing with repair vendors
- Documentation for insurance claims
- Administrative record-keeping
Understanding Incident Statuses
Incident statuses track where a repair or issue stands in your workflow. Your district can customize these statuses in Settings > System Settings > Incidents Tab.
Common incident statuses:
- Pending - Incident reported but not yet assessed
- In Progress - Actively being worked on
- Completed - Repair finished, incident closed
- Investigating - Determining the cause or extent of damage
- Waiting for Parts - Repair paused until components arrive
- Sent for Repair - Device sent to external repair service
- Awaiting Pickup - Repaired and ready for user to collect
Statuses help you:
- Track repair pipeline stages
- Identify where incidents are getting stuck
- Prioritize work based on status
- Report on repair progress to stakeholders
Common Workflows
Scenario 1: Daily Incident Review
Every morning, check for new incidents that need attention:
- Open the View Incidents page
- Filter by Status: Pending to see new reports
- Review each incident's details
- Assign incidents to repair staff
- Update statuses to "In Progress" as work begins
- Move completed incidents to "Completed" status
Scenario 2: Tracking Repair Progress
Monitor how many devices are currently in repair:
- Filter by Status: In Progress
- Sort by Incident Date to see how long each has been open
- Identify incidents approaching your target turnaround time
- Prioritize older incidents to avoid delays
- Update statuses as repairs are completed
Scenario 3: End-of-Month Reporting
Generate a monthly report for administration:
- Use the Generate Work Order Report feature
- Set date range to the previous month (e.g., October 1 - October 31)
- Download the PDF
- Review statistics: Average Hours to Closure
- Create summary showing:
- Total incidents this month
- Completion rate
- Average turnaround time
- Common damage types
Scenario 4: Finding User's Incident History
A student has multiple damaged devices - review their history:
- Use the search bar to search for the student's name
- View all incidents associated with that user
- Sort by Incident Date to see chronological history
- Review patterns (multiple screen breaks, recurring issues)
- Use this information for accountability discussions or identifying need for training
Scenario 5: Building-Specific Review
Check incidents for a specific school:
- Filter by Building (select the school)
- Review incident volume for that location
- Compare to other buildings to identify trends
- Check if one building has significantly higher incident rates
- Investigate causes (device age, student grade level, staff training, etc.)
Tips for Using the Incident List
✅ Do:
- Review pending incidents daily to avoid backlog
- Keep statuses updated so the list reflects reality
- Use filters to focus on specific categories (pending, in-progress, etc.)
- Generate monthly reports for record-keeping
- Update completed dates promptly when repairs finish
- Use search to quickly find specific incidents
❌ Don't:
- Let incidents sit in "Pending" status indefinitely - assign and update them
- Delete legitimate incidents - update status to "Completed" instead
- Ignore high incident counts from specific users or buildings - investigate patterns
- Forget to close out completed incidents (impacts turnaround statistics)
- Leave old incidents in "In Progress" that are actually stuck or abandoned
Understanding Permissions and Access
Your incident access is controlled by two factors:
- Building Permissions - You only see incidents from buildings you can access
- Role Permissions - Your role determines what actions you can perform
Common permission combinations:
- View Incidents only - See incident list and view details, but can't modify
- View + Create Incidents - Can report new incidents but not edit existing ones
- View + Edit Incidents - Can update incident details and statuses
- Full incident access - View, Create, Edit, and Delete Incidents permissions
- With Stats permission - Also see average closure time statistics
- With Confidential permission - Can view/edit sensitive confidential data in incidents
- With Password permission - Can view/edit password fields in incident records
If you need additional incident permissions, contact your system administrator.
Next Steps
Now that you know how to find and view incidents, you might want to learn about:
- Adding Incidents - Create new incident reports
- Incident Profile - Complete incident detail view
- Incident Log - Track incident activity and updates
- Incident Photos - Document damage with photos
The View Incidents page is your command center for managing device repairs and tracking problems throughout your 1:1 program!