Managing Rooms
The room detail page is your command center for managing everything about a specific room - its information, the devices checked out to it, and the carts assigned to it. From here you can view room details, manage equipment assignments, and track what's in each physical space.
You can access this page by clicking the View button on any room in the View Rooms list.
To view room details, you need the View Rooms permission. Additional permissions are required to edit room information or manage device/cart assignments.
Room Information Summary
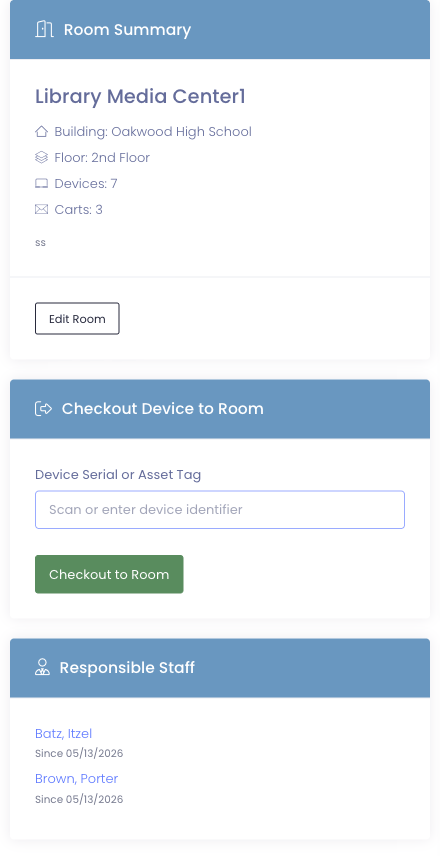
At the top of the room detail page, you'll see a summary card showing key room information:
| Field | Description |
|---|---|
| Building | Which school building this room is in |
| Floor | The floor designation (if set) |
| Devices | Number of devices currently checked out to this room |
| Carts | Number of carts currently assigned to this room |
This gives you a quick snapshot of the room's location and current equipment status.
Editing Room Information
To update room details, click the Edit Room button in the summary section. You can modify:
- Room Name - Change the room's display name
- Building - Move the room to a different building (use carefully!)
- Floor - Update or add floor information
- Comments - Add or update notes about the room
- Responsible Staff - Add or remove the teachers / staff members responsible for this room. See Responsible Staff below for what this controls.
To edit rooms, you need the Edit Rooms permission.
Responsible Staff
A room can have one or more responsible staff members — typically the teacher (or teachers) who manages that classroom. Responsibility is tracked over time: every time you add or remove someone on the room's edit page, Manage1to1 closes the previous period with an end date and opens a new one, so the full history is preserved.
Where you see it on the room page
To open the room's detail page: navigate to Rooms > View Rooms in the main menu, find your room in the table, and click the View Devices button in the Actions column.
If anyone is currently responsible for this room, a Responsible Staff card appears in the left column of the room detail page (just below the Checkout Device to Room form). Each name links to the staff member's profile, with "Since date" underneath showing when their current period of responsibility started.
The card is hidden when no one is currently responsible, so empty rooms don't carry a stub portlet.
Adding or removing responsible staff
- Navigate to
Rooms > View Roomsin the main menu. - Find your room in the table and click the Edit button in the Actions column. (Alternatively, if you're already on the room's detail page, click the Edit Room button in the Room Summary card.)
- On the Edit Room page, scroll to the Responsible Staff field.
- Click the dropdown and pick a staff member from the list, or type to search. Repeat to add more. Click the × next to any chip to remove someone.
- Click Save Room.
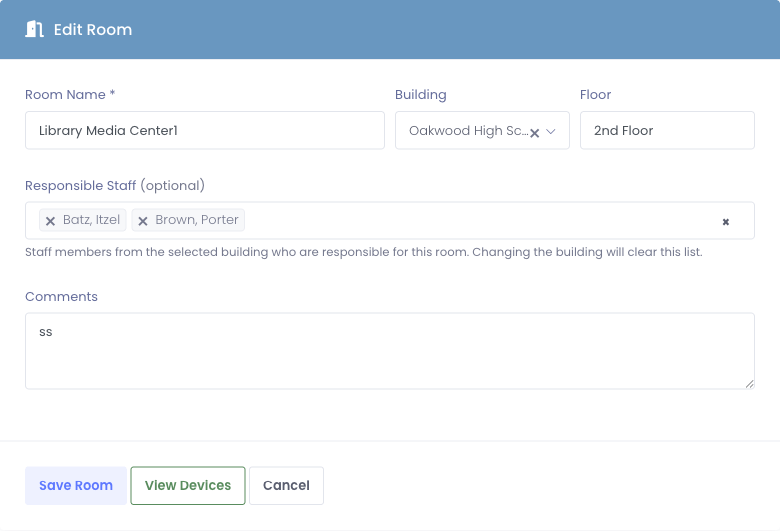
The dropdown lists staff from the building you've selected at the top of the form. Changing the Building clears the Responsible Staff list, since staff are scoped to a single building.
When you save, the system end-dates anyone you removed (today becomes their end date) and creates new open-ended periods for anyone you added. Your administrator account is recorded as the Assigned By for new entries.
Staff Responsibility History
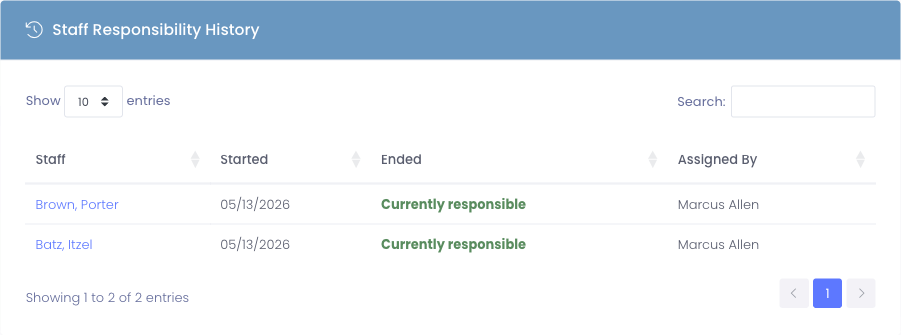
The full historical record — every period of responsibility this room has ever had — appears in the Staff Responsibility History portlet at the bottom of the room detail page. It's a paginated table (10 per page) sorted newest-first.
| Column | What it shows |
|---|---|
| Staff | The staff member's name, linking to their profile |
| Started | The day they became responsible for this room |
| Ended | The day responsibility ended, or Currently responsible if it's still active |
| Assigned By | The administrator who recorded the assignment |
This is the table to use when you need to answer "who was the teacher of this room in March 2024" — find the row where the Started date is on or before that date and Ended is blank or after.
The same data shows up on the user's profile too — open any responsible teacher's profile, click the Checkout History tab, and you'll find a Room Responsibility History table showing every room they've managed over time. The room view answers "who had this room?"; the user view answers "what rooms did this teacher have?".
Devices Checked Out to This Room
The Devices section shows all devices currently checked out to this room. This displays devices that have been temporarily assigned to the room through the checkout process (not permanent "home room" assignments).
What You'll See
The device table displays:
| Column | Description |
|---|---|
| Serial | Device serial number |
| Asset Tag | Device asset tag |
| Model | Device model name |
| Checkout Date | When the device was checked out to this room |
| Actions | Options to view device or check it in |
Checking In Devices
To return a device from the room (end its checkout):
- Find the device in the list
- Click the Check In button
- Confirm the check-in
- The device returns to available status
This ends the checkout and removes the device from the room's active assignments.
To check in devices, you need the Checkout Device permission.
Carts in This Room
The Carts section shows all carts currently assigned to this room. When a cart is checked out to a room, it appears here along with all the devices it contains.
What You'll See
The cart table displays:
| Column | Description |
|---|---|
| Name | Cart name |
| Asset Tag | Cart asset tag (if assigned) |
| Devices | Number of devices in the cart |
| Checkout Date | When the cart was checked out to this room |
| Actions | Options to view cart or check it in |
Viewing Cart Details
Click the cart name or View button to open the cart's device management page. From there you can see all devices in the cart and manage the cart assignment.
Checking In Carts
To return a cart from the room:
- Find the cart in the list
- Click the Check In button
- You'll be taken to a checkout snapshot page
- Verify the return date and click Check-In Cart
- The cart returns to available status
To check in carts, you need the Checkout Device permission.
Checking Out Equipment to a Room
You can check out devices and carts directly to a room, indicating they're being used in that location.
Checking Out a Cart to This Room
To assign a cart to this room:
- Navigate to
Carts > View Carts - Find an available cart (not currently checked out)
- Click View to open the cart device page
- Click Check Out Cart
- In the modal, you'll see both users and rooms listed
- Find this room in the list (rooms show with a "Room" badge)
- Click the checkout button next to the room name
- The cart is now checked out to this room
When you return to the room detail page, the cart will appear in the Carts section.
Checking Out Devices to Rooms
Individual device checkout to rooms works similarly:
- Open the device's profile page
- Click Check Out Device
- Select the room from the checkout options
- Complete the checkout
The device will then appear in this room's Devices section.
Room Status at a Glance
The room detail page makes it easy to see everything assigned to a room:
Summary section shows:
- Total device count (checked out to room)
- Total cart count (assigned to room)
- Building and floor location
Devices section shows:
- Each device with serial number and asset tag
- When each device was checked out
- Quick actions to view or check in
Carts section shows:
- Each cart with name and device count
- When each cart was assigned
- Quick actions to view or check in
This comprehensive view helps you manage room equipment without navigating to multiple pages.
Common Workflows
Scenario 1: Setting Up a New Classroom
A teacher is moving into a new room and needs devices:
- Create the room if it doesn't exist yet
- Navigate to the View Carts page
- Find an available cart with the right devices
- Check out the cart to the new room
- Physically deliver the cart to the room
- View the room page to verify the assignment
Scenario 2: End of Year Room Inventory
Checking all rooms during year-end inventory:
- Open the View Rooms page
- For each room with devices or carts:
- Click View to open the room detail page
- Note the expected device/cart counts
- Physically verify equipment in the room
- Check in any equipment that needs to return to storage
- Update any discrepancies
Scenario 3: Room Reassignment
A cart needs to move from one room to another:
- Open the current room's detail page
- Find the cart in the Carts section
- Click Check In to return the cart
- Navigate to the cart's device page
- Click Check Out Cart
- Select the new room from the list
- The cart now appears in the new room's detail page
Scenario 4: Finding Missing Equipment
You can't locate a device and need to check if it's in a room:
- Open the device's profile page to check its status
- If checked out to a room, note the room name
- Navigate to that room's detail page
- Verify the device is listed
- Physically check that room for the device
Tips for Managing Room Equipment
✅ Do:
- Regularly verify room equipment matches system records
- Check in equipment when it leaves a room
- Use room assignments for permanent or semi-permanent equipment placements
- Keep room comments updated with relevant information
- Train staff on proper checkout/check-in procedures
❌ Don't:
- Leave equipment checked out to rooms after it's been removed
- Forget to check in carts at year-end
- Move equipment between rooms without updating the system
- Assume room assignments are always accurate (verify periodically)
Understanding Room vs User Checkouts
Rooms and users represent different types of equipment assignments:
User Checkout:
- Device/cart assigned to a specific person
- That person is responsible for the equipment
- Common for 1:1 device programs or teacher assignments
Room Checkout:
- Device/cart assigned to a physical location
- The room (and whoever uses it) has the equipment
- Common for computer labs, shared classrooms, or permanent installations
Learn more about room assignments →
Permissions Summary
Different actions require different permissions:
| Action | Required Permission |
|---|---|
| View room details | View Rooms |
| Edit room information | Edit Rooms |
| Check out devices/carts to room | Checkout Device |
| Check in devices/carts from room | Checkout Device |
| Delete rooms | Delete Rooms |
Next Steps
Now that you understand room management, explore related topics:
- Room Assignments - Understand home rooms vs checkout assignments
- Viewing Rooms - Navigate the room list
- Checking Out Carts - Detailed cart checkout procedures
Effective room management helps you know exactly where your equipment belongs and where it currently is!