Parts Locations
Parts Locations represent physical storage areas where you keep inventory. Whether you have a single tech office or multiple warehouses and school-based storage rooms, locations let you track exactly where each part is stored.
You can access location management from Incidents > Parts Inventory, then click the Manage Locations button.
To add, edit, or delete locations, you need the Manage Parts permission assigned to your administrator role.
Understanding Locations
Locations serve two purposes in Parts Inventory:
- Track where parts are physically stored - Know exactly how many screens are in the tech office vs. the warehouse
- Control access by site - Determine which storage locations are available when working on incidents at different schools
Think of locations as your stockrooms. When a technician adds a part to an incident, they select both the part and the location it comes from. This creates accountability and ensures accurate inventory tracking.
The Locations List
When you click Manage Locations, you'll see a table of all storage locations.
What You'll See
| Column | What It Shows |
|---|---|
| Name | Location name (clickable to view details) |
| Description | Optional description of the location |
| Sites | Which schools can access this location |
| Status | Active or Inactive |
| Action | Buttons to edit or delete |
Adding a New Location
To create a storage location:
- Go to
Incidents > Parts Inventory - Click Manage Locations
- Click Add Location
- Fill out the location details
- Click Save
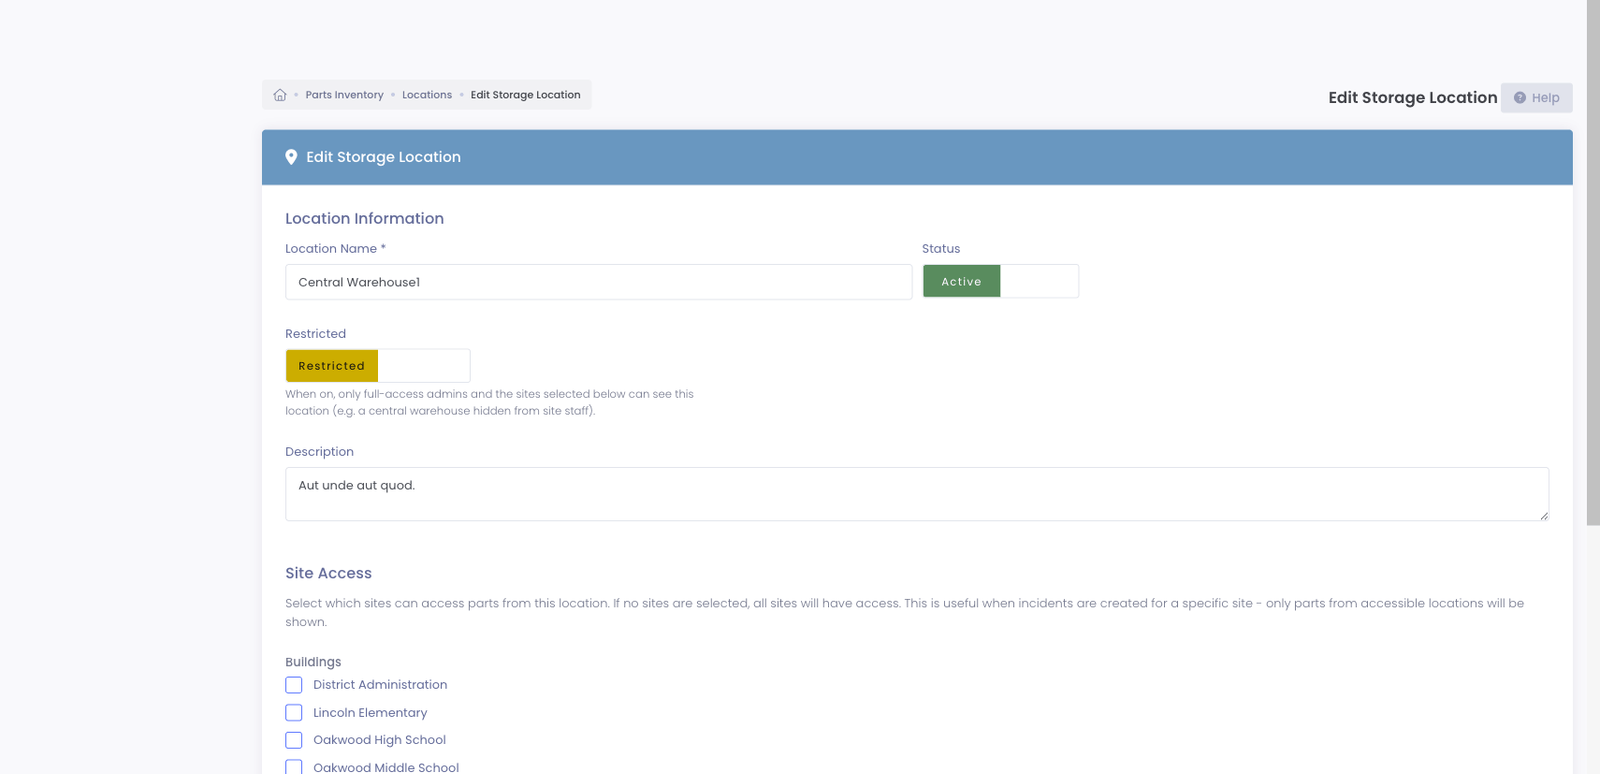
Location Fields Explained
Name *
The name for this storage location.
Good examples:
- "Main Tech Office"
- "Central Warehouse"
- "East High School Storage"
- "District Office Parts Room"
- "Mobile Repair Cart"
Tips:
- Use names that clearly identify the physical location
- Consider including building names for clarity
- Make names descriptive enough that anyone can find the location
Description
Optional details about the location.
What to include:
- Physical address or room number
- Access instructions
- Hours of operation
- Contact person
- Special notes
Example: "Room 142 in the main office building. Access via key card. Open 7am-5pm weekdays. Contact Mike for after-hours access."
Site Accessibility
Controls which schools can see and pull parts from a location.
How it works:
When a technician adds a part to an incident, the system shows only the locations their own buildings can access:
- A technician assigned to specific schools sees only the locations available to those schools.
- A full-access administrator (one who can see every building) sees every location.
This is enforced on the server, so a site technician can't reach a location their buildings aren't allowed to use.
Configuration options:
-
Open, all sites - Leave site accessibility empty and leave Restricted off
- Location is available to everyone
- Good for a general storeroom you don't need to lock down
-
Specific sites - Select one or more schools
- Location appears only for staff at those schools (plus full-access admins)
- Good for school-based storage rooms
-
Restricted - Turn on the Restricted switch
- The location is hidden from site staff entirely, appearing only for full-access administrators — or for any specific schools you also select
- This is how you keep a central parts warehouse off the parts picker for building-level technicians
To let building techs see only their own school's parts and keep the Main Tech Warehouse to yourself, turn on Restricted for the warehouse location and assign each school's storeroom to its building. Building staff then see just their site; full-access admins still see everything.
Example setup:
| Location | Restricted | Accessible Sites | Result |
|---|---|---|---|
| Central Warehouse | On | (none) | Only full-access admins see it |
| Tech Office | Off | (none) | Everyone sees it |
| East High Storage | Off | East High School | Only East High staff (and full-access admins) |
| West Middle Storage | Off | West Middle School | Only West Middle staff (and full-access admins) |
| Elementary Cluster | Oak Elementary, Pine Elementary, Maple Elementary | Shared between nearby schools |
What happens in practice:
An incident at East High School would show:
- Central Warehouse (accessible to all)
- Tech Office (accessible to all)
- East High Storage (specifically accessible)
It would NOT show West Middle Storage unless the technician clicks "Show All Locations."
Active Status
Whether the location is currently active.
Active locations:
- Appear in location selection dropdowns
- Can receive inventory adjustments
- Can be source for parts on incidents
Inactive locations:
- Hidden from selection dropdowns
- Cannot receive new inventory
- Retain historical data and existing inventory records
When to deactivate:
- Location is no longer used for storage
- Building closed or relocated
- Temporary closure (can reactivate later)
Transfer any remaining inventory to another location before deactivating. Inventory at inactive locations remains in the system but can't be used.
Editing a Location
To modify an existing location:
- Go to
Incidents > Parts Inventory - Click Manage Locations
- Click on the location name
- Click Edit
- Update the desired fields
- Click Save
What you can change:
- Name and description
- Site accessibility
- Active status
Deleting a Location
To remove a location:
- Go to
Incidents > Parts Inventory - Click Manage Locations
- Click the Delete button for the location
- Confirm deletion
You cannot delete a location if:
- It has inventory (any parts with quantity > 0)
- It has adjustment or transfer history
- Parts have been used from this location on incidents
This protection prevents data loss. Mark the location as Inactive instead if you can't delete it.
Transferring Parts Between Locations
You can move parts from one location to another:
- Go to
Incidents > Parts Inventory - Click on a part name to view details
- Click Transfer
- Select From Location (source)
- Select To Location (destination)
- Enter Quantity to transfer
- Add optional notes
- Click Transfer
The system records:
- Which administrator made the transfer
- Source and destination locations
- Quantity transferred
- Date and time
Learn more about Inventory Adjustments →
Common Workflows
Scenario 1: Setting Up a Multi-School District
Your district has a central warehouse plus storage at each school:
Step 1: Create the central location
- Click Add Location
- Name: "District Warehouse"
- Description: "Main parts storage, Building A Room 101"
- Site Accessibility: Leave empty (all sites)
- Save
Step 2: Create school-specific locations
- Click Add Location
- Name: "Lincoln High Storage"
- Description: "Tech closet in Room 204"
- Site Accessibility: Select "Lincoln High School"
- Save
- Repeat for each school
Result: Technicians at Lincoln High see both District Warehouse and Lincoln High Storage. Technicians at other schools see only District Warehouse and their own school's storage.
Scenario 2: Closing a School Location
A school is closing and you need to consolidate inventory:
-
Transfer inventory out:
- Go to each part with inventory at the closing location
- Transfer all quantities to another location
- Document reason: "Location closing - consolidating to District Warehouse"
-
Deactivate the location:
- Go to
Incidents > Parts Inventory> Manage Locations - Click on the location
- Edit and uncheck Active
- Save
- Go to
-
Verify: The location no longer appears in dropdowns but historical records remain intact.
Scenario 3: Adding a Mobile Repair Station
You have a cart that travels between schools:
- Click Add Location
- Name: "Mobile Repair Cart"
- Description: "Traveling repair station. Check schedule for current location."
- Site Accessibility: All Sites (leave empty)
- Save
Stock the cart by transferring parts from your main location. The cart's inventory travels with it conceptually - technicians at any school can use parts from it.
Tips for Managing Locations
✅ Do:
- Use clear, descriptive names everyone understands
- Include room numbers or physical addresses in descriptions
- Set appropriate site accessibility based on actual access
- Transfer inventory before deactivating locations
- Keep the number of locations manageable
- Review location setup when schools open/close
❌ Don't:
- Create too many locations (harder to manage)
- Use vague names like "Storage" or "Room 1"
- Forget to update site accessibility when schools change
- Delete locations with history (deactivate instead)
- Leave inventory at inactive locations
Common Questions
Q: Can a location be accessible to multiple schools? Yes. Select multiple schools in the site accessibility field. This is useful for shared storage between nearby schools.
Q: What if I need a part from a location not accessible to my incident's school? Use the "Show All Locations" option when adding parts to an incident. This overrides the site filter and shows all locations.
Q: Can I have multiple locations at the same school? Yes. You might have "Tech Office" and "Classroom Storage" both accessible to the same school. Each tracks inventory separately.
Q: What happens to inventory if I deactivate a location? The inventory remains in the system but can't be used. Parts at inactive locations still count toward total quantity but aren't available for selection.
Q: Can I rename a location? Yes. The new name appears everywhere, including historical records. The record linkage remains intact.
Next Steps
- Managing Parts - Create your parts catalog
- Inventory Adjustments - Add stock and transfer parts
- Using Parts on Incidents - Track parts in repairs
- Parts Inventory Reports - View inventory by location
Properly configured locations make inventory tracking accurate and help technicians find parts quickly!