Custom Fields Tab
The Custom Fields tab allows districts to store additional information on users, devices, and incidents that doesn’t naturally fit into standard system fields.
Most districts use custom fields to track information that is important locally but varies from district to district, such as funding sources, internal notes, program participation, or repair details.
Once created, these fields become part of your everyday workflows and can appear directly on user, device, and incident pages.
How Custom Fields Are Used
Custom fields are attached to devices, users, or incidents, depending on how the field is configured. They can be displayed directly on profile pages, included in exports, and referenced by staff during day-to-day operations.
Because custom fields often support reporting or compliance needs, districts typically define them carefully and avoid frequent changes once they are in active use.
Types of Custom Fields
When creating a custom field, you choose how data will be entered. The available field types are intentionally flexible to support a wide range of use cases.
Common field types include:
-
Text Box Used for short, open-ended values such as asset tags, internal references, or brief notes.
-
Text Area Similar to a text box, but supports longer, multi-line entries. Often used for comments or explanations.
-
Dropdown Allows selection from a predefined list of values. This is one of the most common field types, especially when consistent reporting is required.
-
Multi-Select Like a Dropdown, but allows more than one value to be chosen from the same predefined list. Selected values appear as removable tags, and the field displays them as a comma-separated list wherever the value is shown. Use it when a single item can belong to several categories at once, such as accessories included with a device or the areas of a device affected by a repair.

-
Checkbox A simple yes or no option, useful for indicators such as program participation or eligibility.
-
Date Captures a calendar date through a date picker. Useful for fields such as warranty expiration, lease end date, or any value compared against a deadline.
-
Number Stores a numeric value. Useful for fields such as repair counts, accessory counts, or scores compared against thresholds.
-
Password Stores values that the administrator can see, however it is fully encrypted in the database. This is most often used for sensitive reference information.
Supported Custom Field Locations
Device Custom Fields
Device custom fields store information that applies to the device itself, not the person using it.
Examples include:
- Funding source
- Warranty notes
- Special handling requirements
- Deployment program identifiers
If not hidden, these fields appear directly on the Device Profile page and are always available when editing a device.
By default a device field applies to every device. You can also limit a field to specific asset categories so it only appears on the device types it's relevant to (see Limiting a device field to asset categories).
User Custom Fields
User custom fields apply to students or staff and are displayed on the User Profile.
Common examples include:
- Program participation indicators
- Internal notes for staff
- District-specific identifiers
- Compliance or documentation flags
As with device fields, hidden fields will not appear on the profile view but are always available when editing the user.
Incident Custom Fields
Incident custom fields let you capture the information your district needs on every incident, beyond the standard assessment, repair notes, and status. Use them to structure the details your repair and media staff enter, so key information is consistent and reportable instead of buried in free-text notes.
Common examples include:
- Repair category or damage cause
- Whether a loaner was issued
- Vendor or RMA reference
- Parts ordered
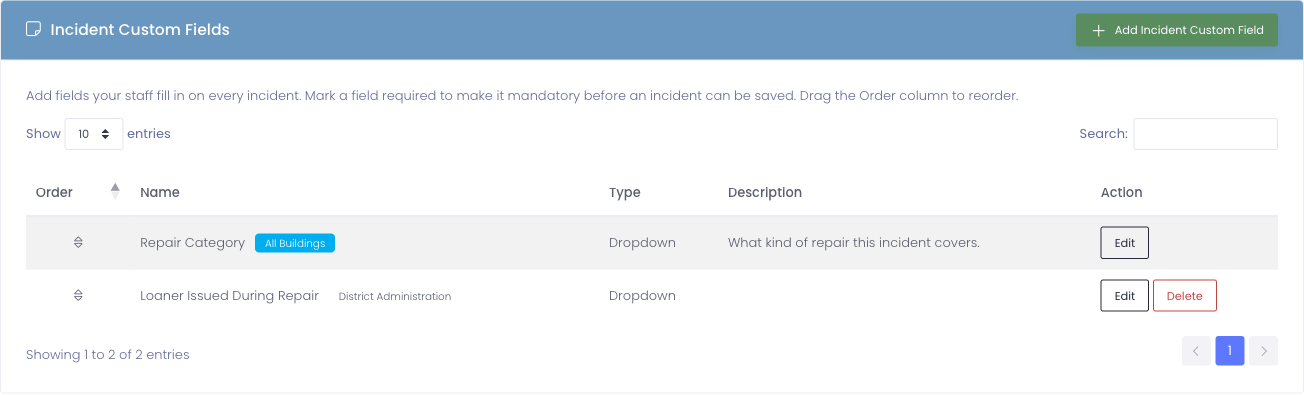
Incident custom fields appear on the Add Incident and Edit Incident forms, and their saved values are shown in an Additional Details section on the incident record. Two options are unique to incident fields:
- Required, the field must be filled in before an incident can be saved (see below).
- Applies To, show the field on every incident district-wide, or only for incidents at a specific building (see Applying a field to one building).
Adding or Editing a Custom Field
Adding and editing a custom field use the same workflow. The only difference is whether you select Add Device Custom Field, Add User Custom Field, or Add Incident Custom Field, or click Edit on an existing field.
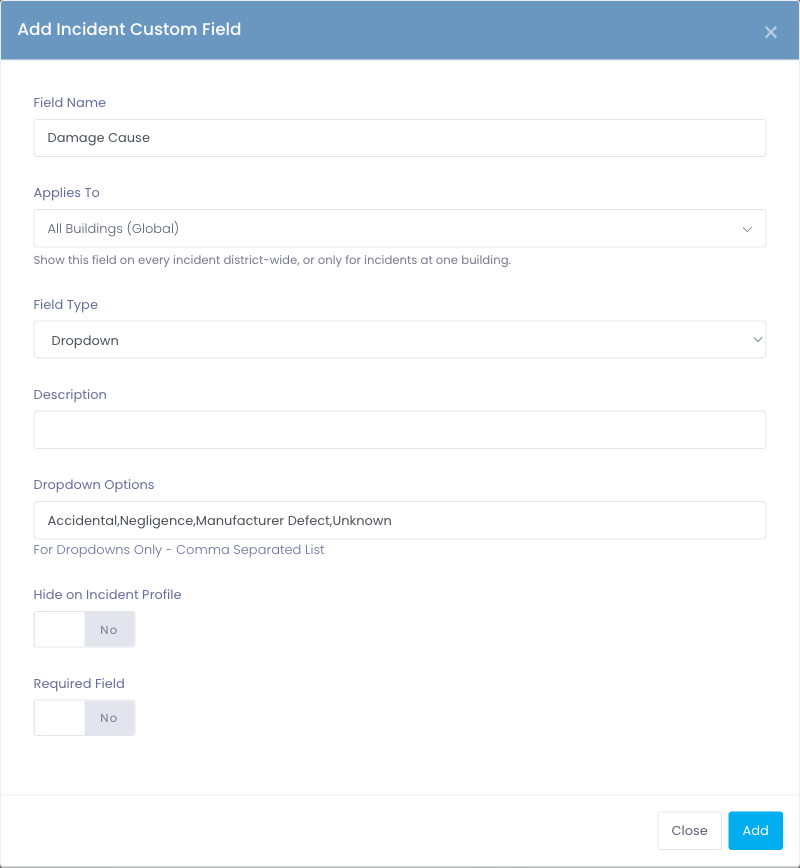
When configuring a custom field, you’ll define:
-
Field Name The label displayed throughout the system.
-
Field Type Determines how data is entered and stored.
-
Description Optional helper text shown beneath the field to guide staff entering data.
-
Dropdown / Multi-Select Options Used for Dropdown and Multi-Select fields. Values are entered as a comma-separated list.
-
Hide on Profile Controls whether the field appears directly on the profile page. Even when hidden, the field remains available on edit screens and in exports.
-
Required (support and incident fields only) When enabled, the field must have a value before the ticket or incident can be saved.
-
Applies To (incident fields only) Choose whether the field shows on every incident district-wide, or only on incidents at one building.
-
OneRoster Metadata Key (user custom fields only) Optional. Binds this field to a
metadata.<key>value from your SIS export. During each OneRoster sync, the matching metadata value for that user is written into this field automatically, no manual data entry needed. The key must start with a letter and may contain letters, digits, and underscores (e.g.graduation_year,bus_route,program_track). Leave blank if the field is admin-managed only.Rather than typing the key by hand, choose Preview keys from your provider to pick from the keys your SIS is actually sending, each shown with a short sample value. If your SIS starts sending new keys, use Refresh from provider to pull the latest list.
Hiding a field does not remove it from the system. It simply reduces visual clutter on profile pages while keeping the data accessible to authorized users.
Requiring an Incident Field
Turn on Required to make sure staff always capture the information you need. A required incident field must have a value before the incident can be saved, the form highlights the field and blocks the save until it is filled in. This is the simplest way to enforce consistent, reportable data on every incident.
Pairing Required with a Dropdown field guarantees every incident is classified using the same set of values, which makes reports far more useful. Use required text fields sparingly so staff aren't blocked when a value genuinely doesn't apply.
Applying a Field to One Building or All Buildings
Incident custom fields can be global (shown on every incident across the district) or scoped to a single building (shown only on incidents filed at that building). You choose this with the Applies To picker when adding or editing the field.
- All Buildings (Global), the field appears on every incident, no matter which building it belongs to. Use this for information you track district-wide, such as a repair category.
- A specific building, the field appears only on incidents at that building. Use this for details that only make sense at one site, such as a program or vendor unique to that school.
In the Incident Custom Fields list, each field shows a badge indicating its scope, All Buildings for global fields, or the building's name for a building-specific field. When staff open an incident, they see the global fields first, followed by any fields specific to that incident's building.
Limiting a Device Field to Asset Categories
By default, a device custom field shows on every device. You can limit a field to one or more asset categories so it only appears on the device types it applies to, for example a Stylus Included field on tablets and interactive displays, or a Backlit Keyboard field on laptops.
When adding or editing a device custom field, turn on Limit to specific asset categories. This reveals an Asset Categories picker where you choose which categories the field applies to. Leave the toggle off to keep the field on every device.
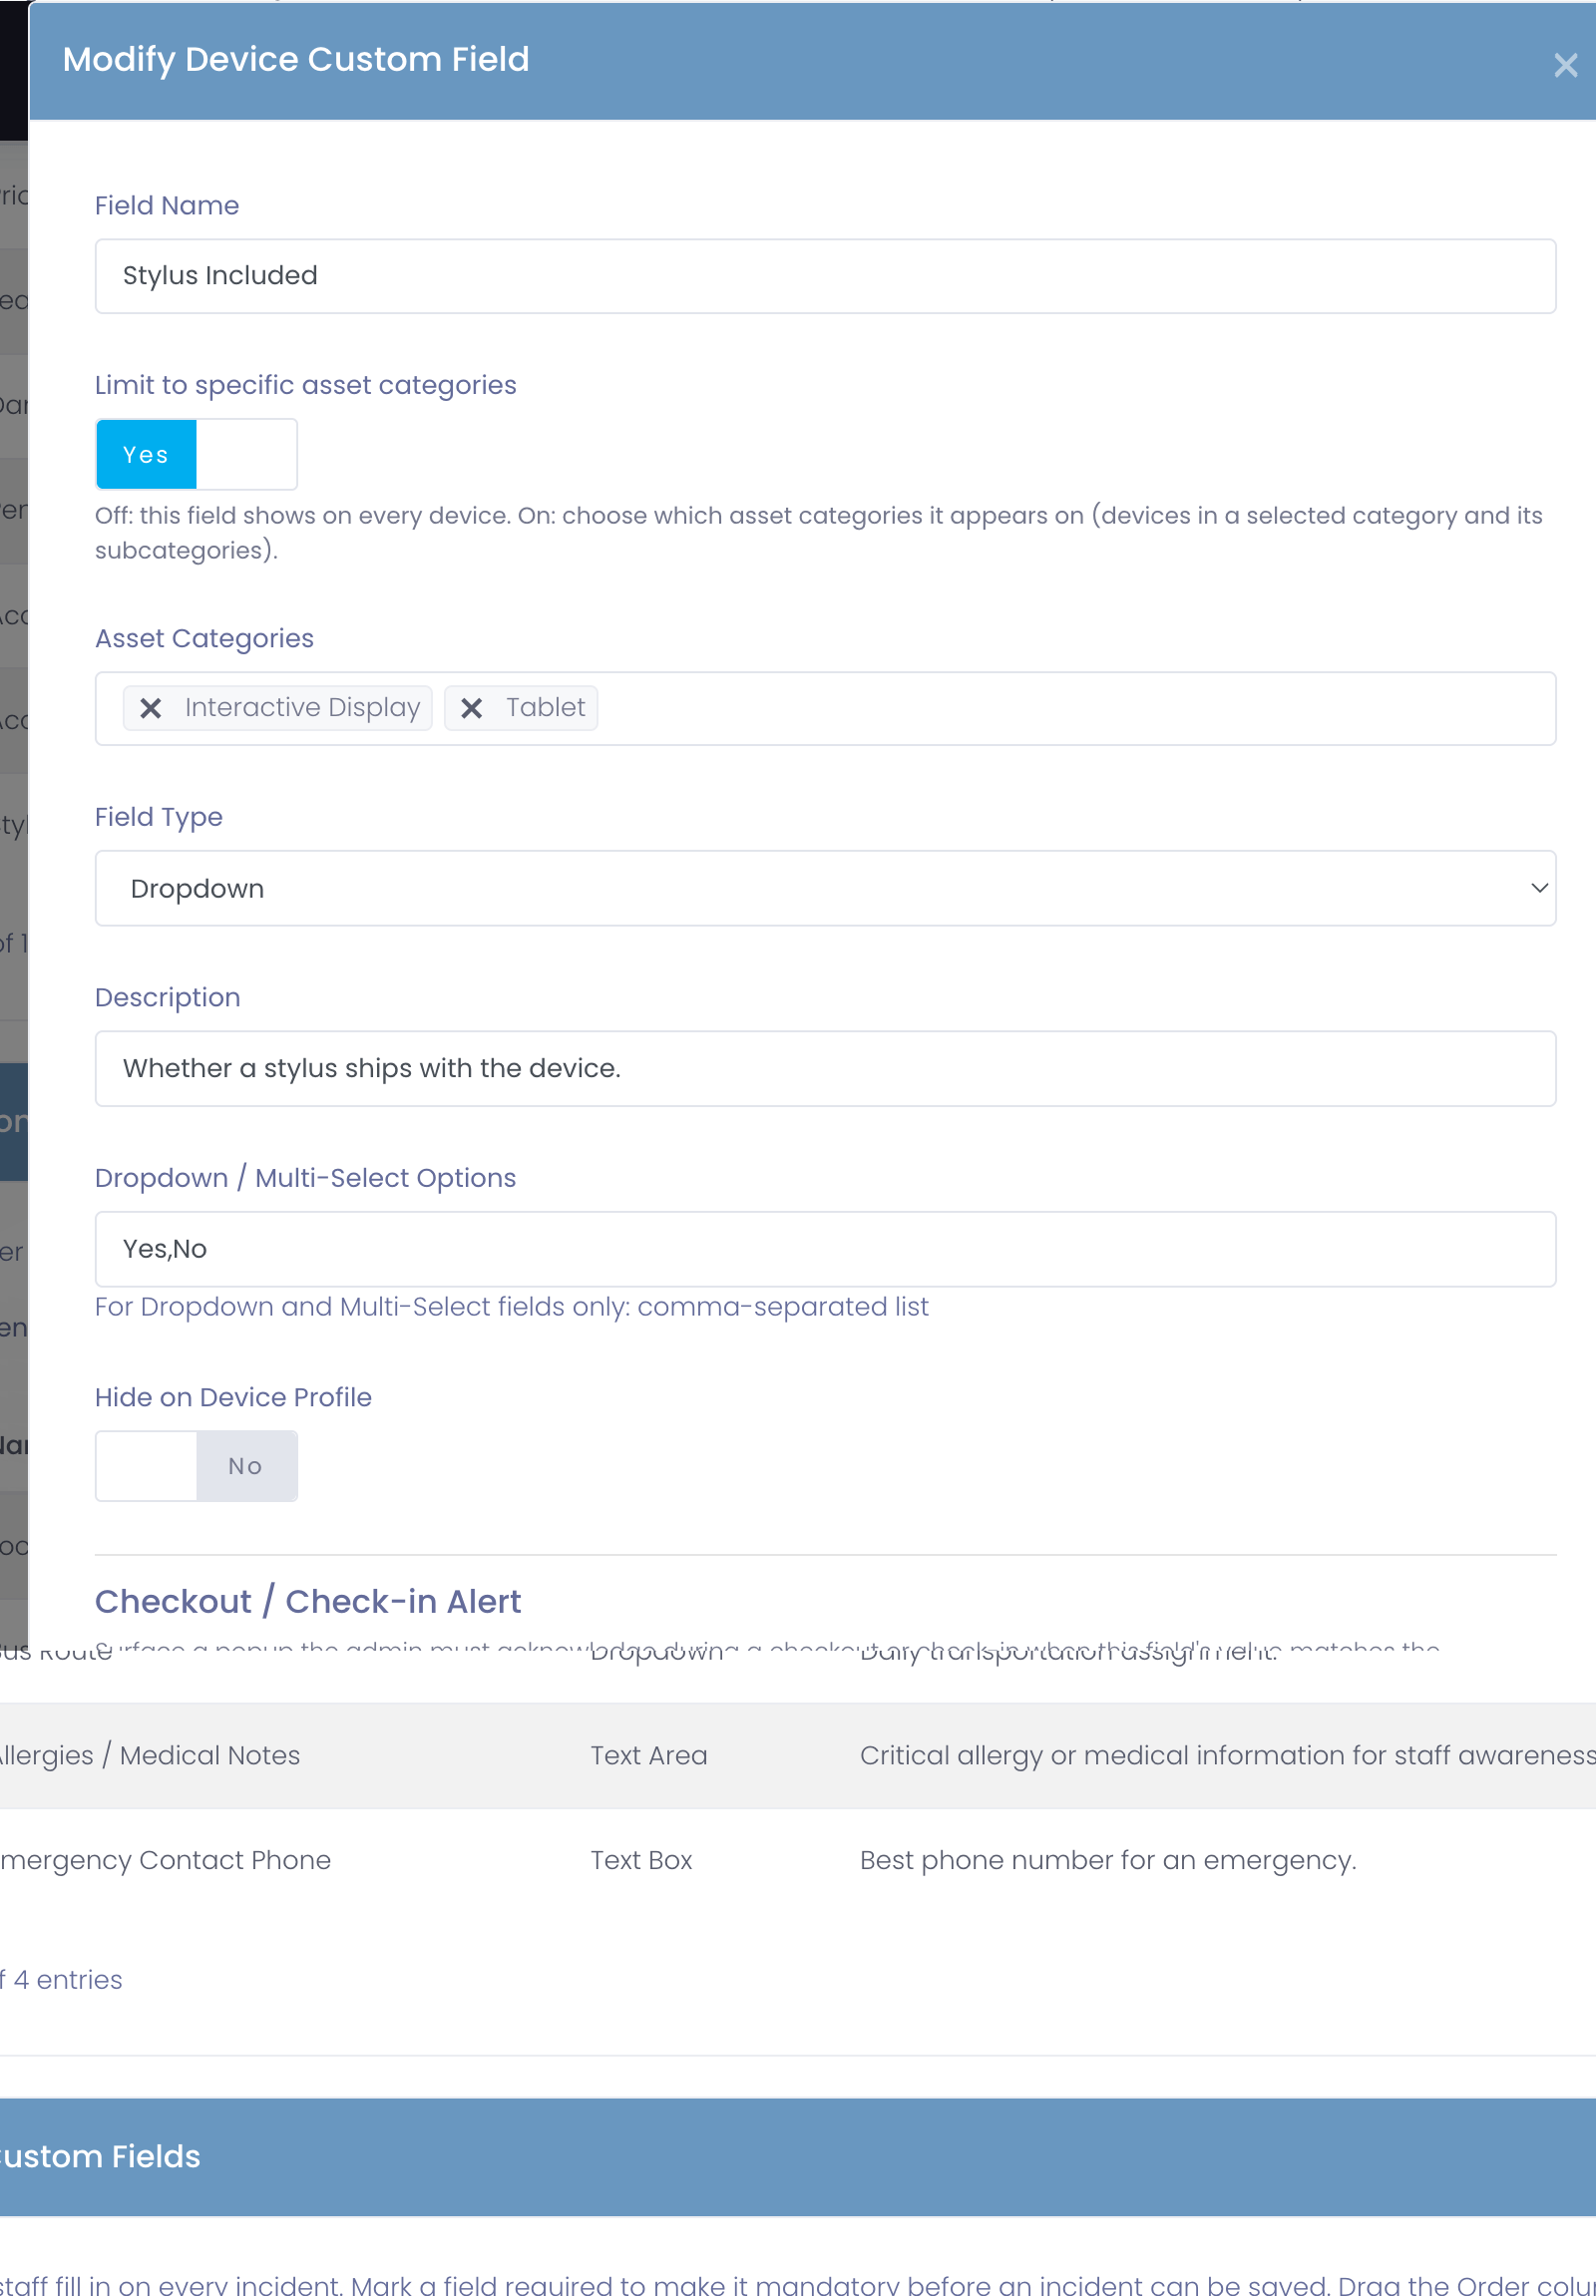
Scoping rolls down the category tree: if you limit a field to a parent category, it also appears on devices in that category's subcategories.
In the Device Custom Fields list, each field shows a badge indicating its scope, All Categories for a field that applies everywhere, or the category names for a scoped field. On the Add Device and Edit Device forms, the custom fields update automatically as you choose the device's model, showing only the fields that apply to that model's asset category.
Checkout / Check-in Alerts (Device Custom Fields)
Device custom fields can be configured to display a popup warning when a device is being checked out or checked in. This is useful for ensuring staff verify important conditions before completing a transaction, for example, warning that a device is past its lease end date, has unresolved repair notes, or is missing required accessories.
Alerts are configured on the Add / Edit Device Custom Field form. When neither alert toggle is enabled, the alert section is hidden, turning either toggle on reveals the rest of the configuration.
Alert Settings
-
Alert on Checkout When enabled, the alert fires when an admin attempts to check the device out to a user, room, or cart.
-
Alert on Check-in When enabled, the alert fires when an admin attempts to check the device back in.
-
Alert Condition Determines when the alert is considered triggered for a given device.
Condition What it checks Field is empty The custom field has no value stored on the device Field is not empty The custom field has any value stored on the device Date has passed (Date fields only) The stored date is before the configured threshold, or before today's date if no threshold is set Number exceeds threshold (Number fields only) The stored numeric value is greater than the configured threshold The Date and Number conditions are only selectable when the matching field type is chosen. If you change the field type, an incompatible condition will be cleared automatically.
-
Threshold Required for the Date and Number conditions; ignored for the empty / not-empty conditions.
- For Date has passed, pick a date with the calendar picker. Leave blank to compare against today's date.
- For Number exceeds threshold, enter the numeric value the field must exceed before the alert fires.
-
Alert Message The text shown to the admin when the alert fires. Leave blank to use a generic default; provide your own message to give specific guidance ("Verify charger is included", "Confirm screen is undamaged", etc.).
How Alerts Surface
When an admin starts a checkout or check-in for a device that has one or more triggered alerts, a popup appears listing each fired alert with the field name and the configured message. The admin must click Continue to proceed or Cancel to abort. Alerts are informational, they do not block the action, but they ensure the admin acknowledges the condition before the transaction commits.
Alerts surface in every flow that issues or returns a device:
- Rapid Check-Out
- Rapid Check-In
- Device Profile → Check-Out to User (and the Cart / Room variants)
- Device Profile → Check-In
Each triggered alert adds a confirmation step to checkout. Reserve alerts for conditions that genuinely need staff attention; using them for every field will slow throughput and train staff to dismiss popups without reading.
Ordering Custom Fields
Custom fields can be reordered by dragging and dropping using the Order column. This controls how fields appear on profile pages and edit screens.
Most districts place their most frequently referenced fields near the top to reduce scrolling and improve usability for staff.
Best Practices
Districts that get the most value from custom fields tend to follow a few consistent patterns:
- Use dropdowns whenever possible for data that will be reported on.
- Keep field names clear and self-explanatory.
- Avoid editing or renaming fields once they are actively in use.
- Use descriptions to guide data entry, especially when multiple staff members are involved.
- Periodically review fields to ensure they are still relevant and being used consistently.