General Tab
The General tab contains the core configuration settings that define how Manage1to1 behaves for your district. These settings establish district identity, control default communication behavior, and enable or disable several platform-wide features that affect day-to-day workflows.
Most districts configure this section during initial setup and revisit it occasionally as processes evolve.
To access the General tab, you need the Manage Settings permission assigned to your role.
District Identity
The district identity fields define how your district is represented throughout the platform and in outbound communication.
District Name
The District Name is displayed across Manage1to1, including emails, reports, and user-facing areas of the application. This should reflect the official district name used internally and externally.
Best practice: Use your official district name exactly as it appears on letterhead and official communications.
Example: "Springfield Public Schools" or "Lincoln County School District #45"
Address Fields
Address-related fields store the district's primary mailing address. While not used heavily in workflows, these values will be used in invoices and email templates depending on your configuration.
Fields:
- Street Address
- City
- State
- ZIP Code
When to update: When district office relocates, addresses change, or incorrect information needs correction.
District Logo
Upload your district's logo to replace the Manage1to1 logo throughout the platform. Once set, your logo appears on:
- The admin login screen (and the forgot-password, password-reset, and multi-factor screens)
- The admin header in the top-left corner of every page
- The user portal — both its login screen and header
- Invoice and AUP PDFs (in the document header)
- Email templates that include the logo
Until you upload a logo, every one of these places shows the standard Manage1to1 logo, so there's no change to how things look until you're ready.
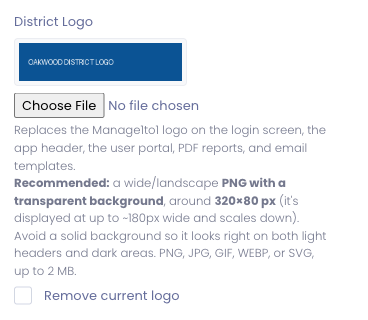
To upload a logo:
- Go to
Settings → System Settings → Generaltab. - Find the District Logo field (under the district address).
- Click Choose File and select your logo image.
- Click Save Settings at the bottom of the tab.
Your new logo takes effect immediately. The field shows a small preview of the logo that's currently in use.

For the best results across all those surfaces:
- Use a wide / landscape logo (a horizontal lockup), not a tall or square one.
- A PNG with a transparent background looks best — it sits cleanly on both light pages and the darker app header.
- Aim for around 320 × 80 pixels. It's displayed at up to ~180px wide and scaled down as needed.
- PNG, JPG, GIF, WEBP, or SVG are accepted, up to 2 MB.
Using your logo in email templates: when editing an email template, the merge-field list includes a District Logo URL field ({$logo_url}). Insert it into an <img> tag's source to show your logo in that email — it automatically uses your uploaded logo, or the Manage1to1 logo if none is set.
Replacing the logo: uploading a new logo automatically replaces the previous one — there's only ever one district logo at a time, regardless of file type. To go back to the Manage1to1 logo, check Remove current logo and save.
Email Behavior and Defaults
Email settings control how messages sent from Manage1to1 appear to recipients and who receives copies of those messages.
Email Reply-To Address
The Email Reply-To Address determines where replies are routed when users respond to system-generated emails. Many districts use a shared support or help desk inbox here.
Best practice: Use a monitored inbox that appropriate staff check regularly.
Examples:
techsupport@district.edu- Help desk inboxdevicehelp@district.edu- Device management teamoneto1@district.edu- 1:1 program coordinators
Avoid: Personal staff email addresses (what if that person leaves?)
Sender Name
The Sender Name is the display name shown in outbound emails. Districts typically use a recognizable name such as the district name or technology department.
Best practice: Use a name parents will recognize and trust.
Examples:
- "Springfield Public Schools" - Official district name
- "Springfield Technology Department" - Specific department
- "Springfield 1:1 Program" - Program-specific
Avoid: Generic names like "Manage1to1" (parents may not know what that is)
CC and BCC Fields
Optional CC and BCC fields allow the district to receive copies of applicable outbound email. This is often used for auditing, record-keeping, or internal awareness without relying on end-user forwarding.
CC (Carbon Copy):
- Recipients can see this address received a copy
- Use when transparency is desired
BCC (Blind Carbon Copy):
- Recipients cannot see this address received a copy
- Use for internal tracking without exposing admin addresses to families
Common uses:
- Billing office receives BCC of all invoice emails
- Help desk receives CC of incident notifications
- District administrator receives BCC of all parent communications
Caution: Sending CC/BCC on all emails can create inbox overload. Use selectively.
Email Domain Fields
Staff and student email domain fields define the expected domain formats used throughout the system. These are commonly referenced during imports, validation, and automation to ensure consistency.
Staff Email Domain:
- Example:
@district.eduor@staff.district.org - Used when auto-generating staff email addresses
Student Email Domain:
- Example:
@students.district.edu - Used when auto-generating student email addresses
Purpose: Ensures consistency when creating user accounts from SIS imports or bulk uploads.
Email Server Configuration
The Email Server field shows how Manage1to1 currently delivers outbound email. Selecting Update Email Server opens the delivery configuration.
Default: Most districts use Manage1to1's built-in email delivery service, with no configuration needed.
Your own email server: Some districts prefer outbound mail to flow through their own Google Workspace, Microsoft 365, or other SMTP server, for compliance, archiving, or brand consistency. Both Google and Microsoft support secure OAuth2 sending with no stored password.
Full setup steps, including OAuth2 for Google and Microsoft and how to confirm your SPF and DKIM records, are covered in the dedicated Email Server section.
Platform Feature Toggles
Several district-wide behaviors are controlled through enable/disable switches on this page. These toggles allow districts to align Manage1to1 with their operational practices without exposing unused features to staff.
Username Generation Settings
Username generation is configured as a pattern string with two independent settings — one for students and one for staff — because most districts run different shapes for each role (for example, firstinitial + lastname for students, firstname.lastname for staff). Patterns are composed from curly-brace tokens with any free text in between, so dots, dashes, underscores, and grade numbers all work.
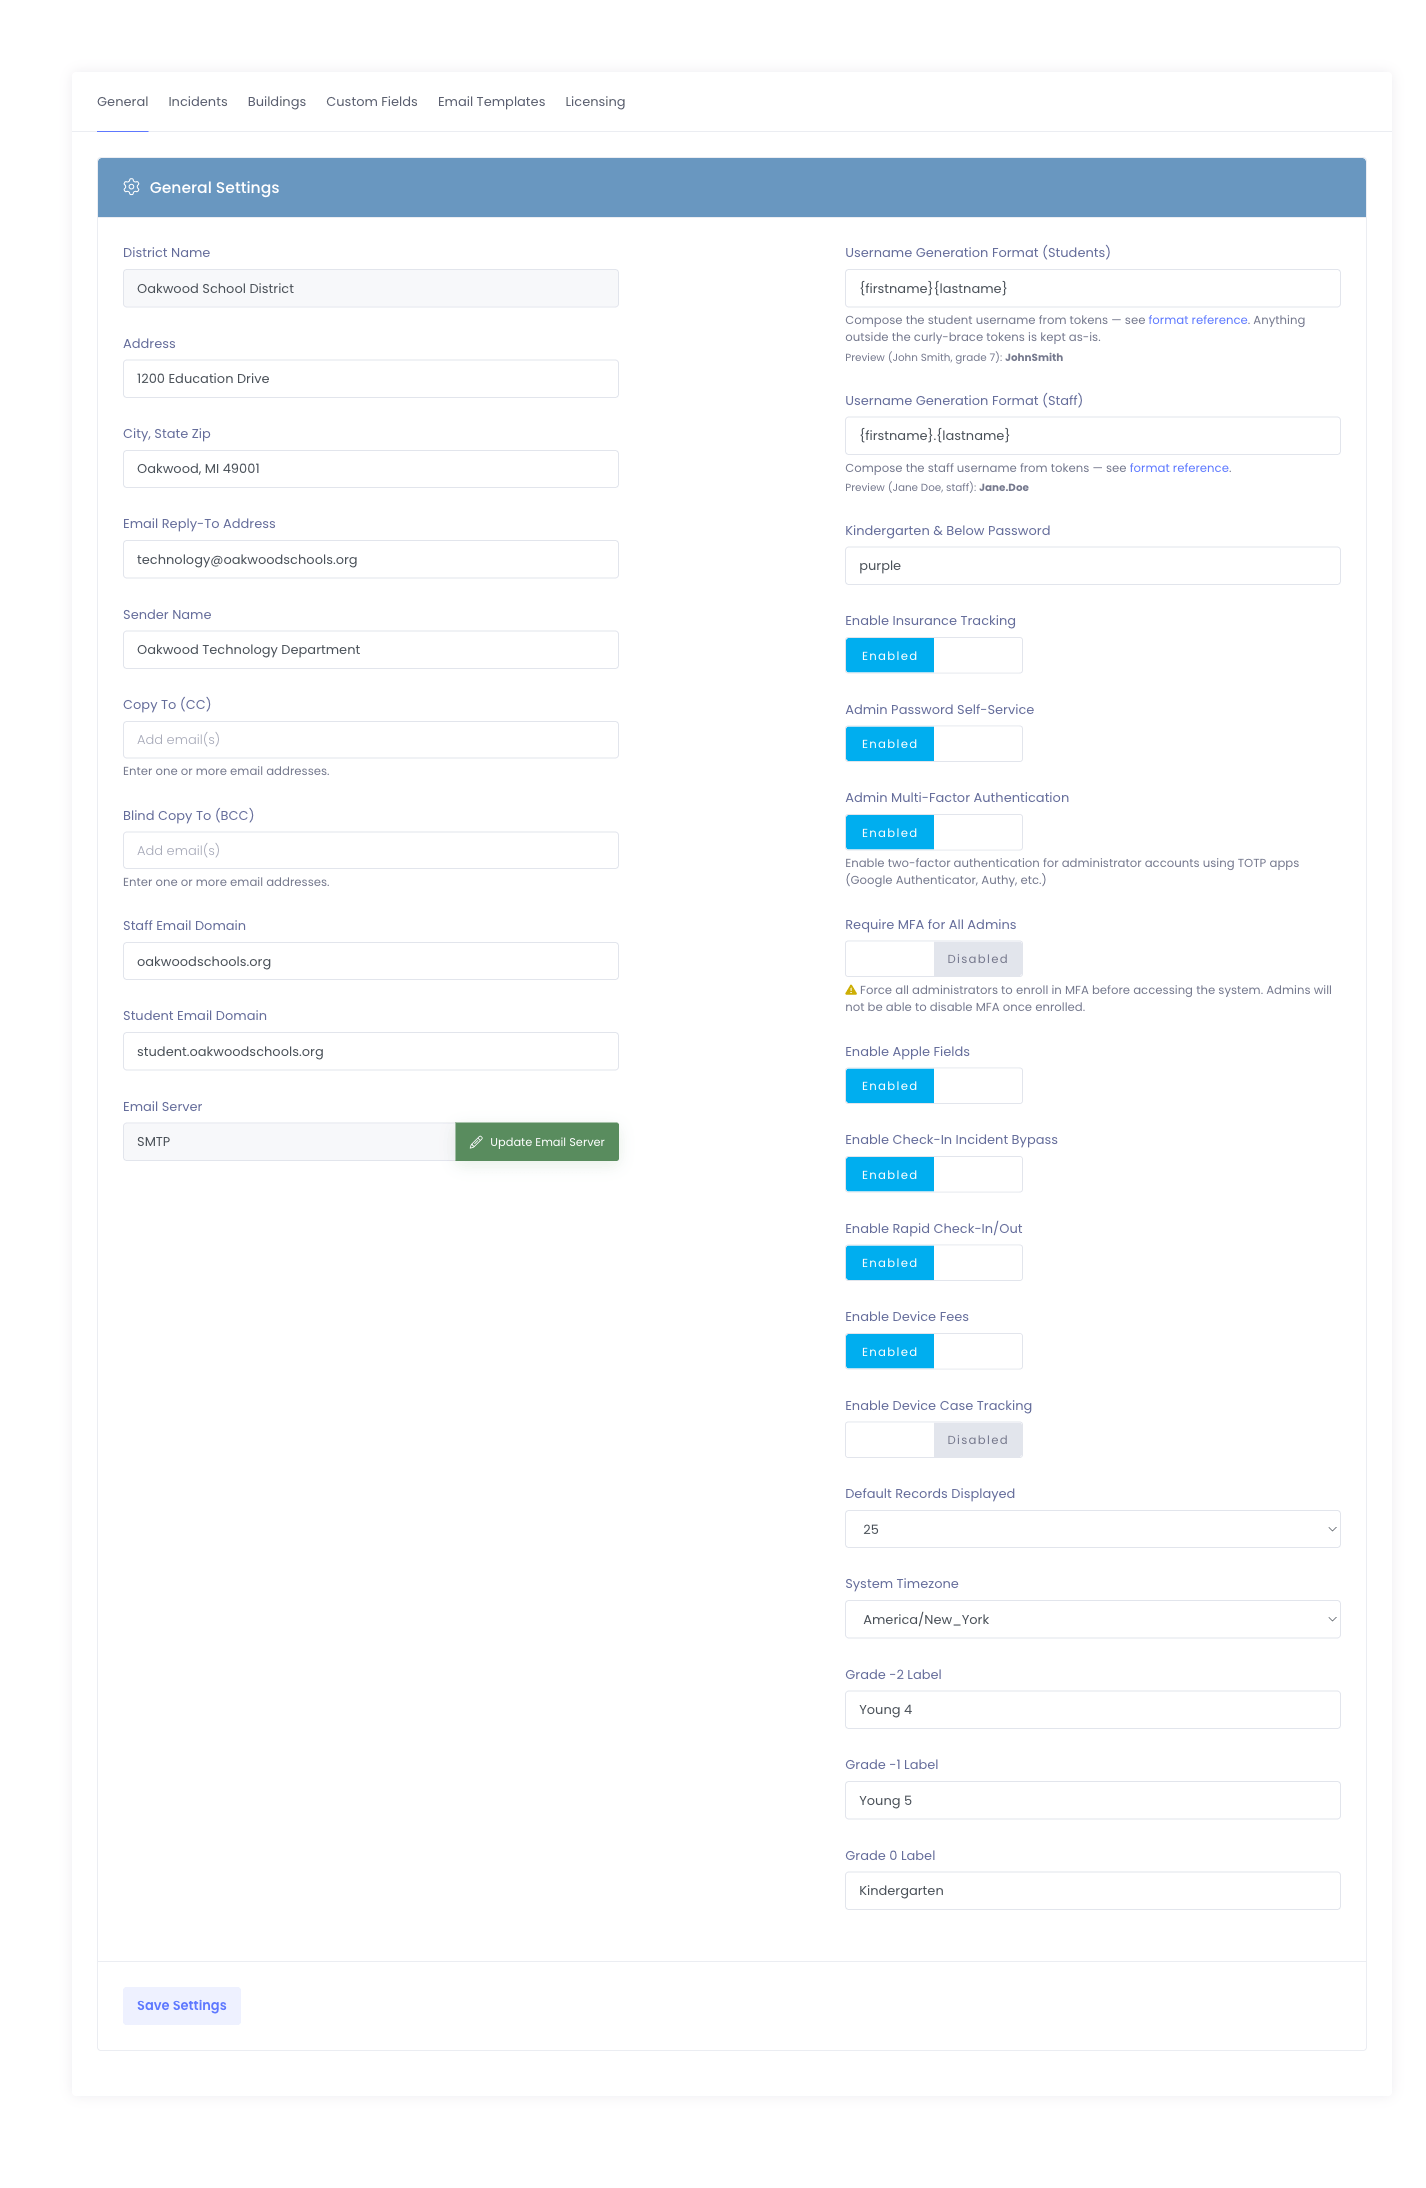
Each field shows a live preview under it using "John Smith, grade 7" (student) and "Jane Doe, staff" (staff) as sample inputs, so you can see exactly what the pattern will produce before saving.
Where to find it: Settings → System Settings → General tab. Look for the two Username Generation Format fields in the right-hand column.
Available tokens
Click format reference under either input to open the full token table:
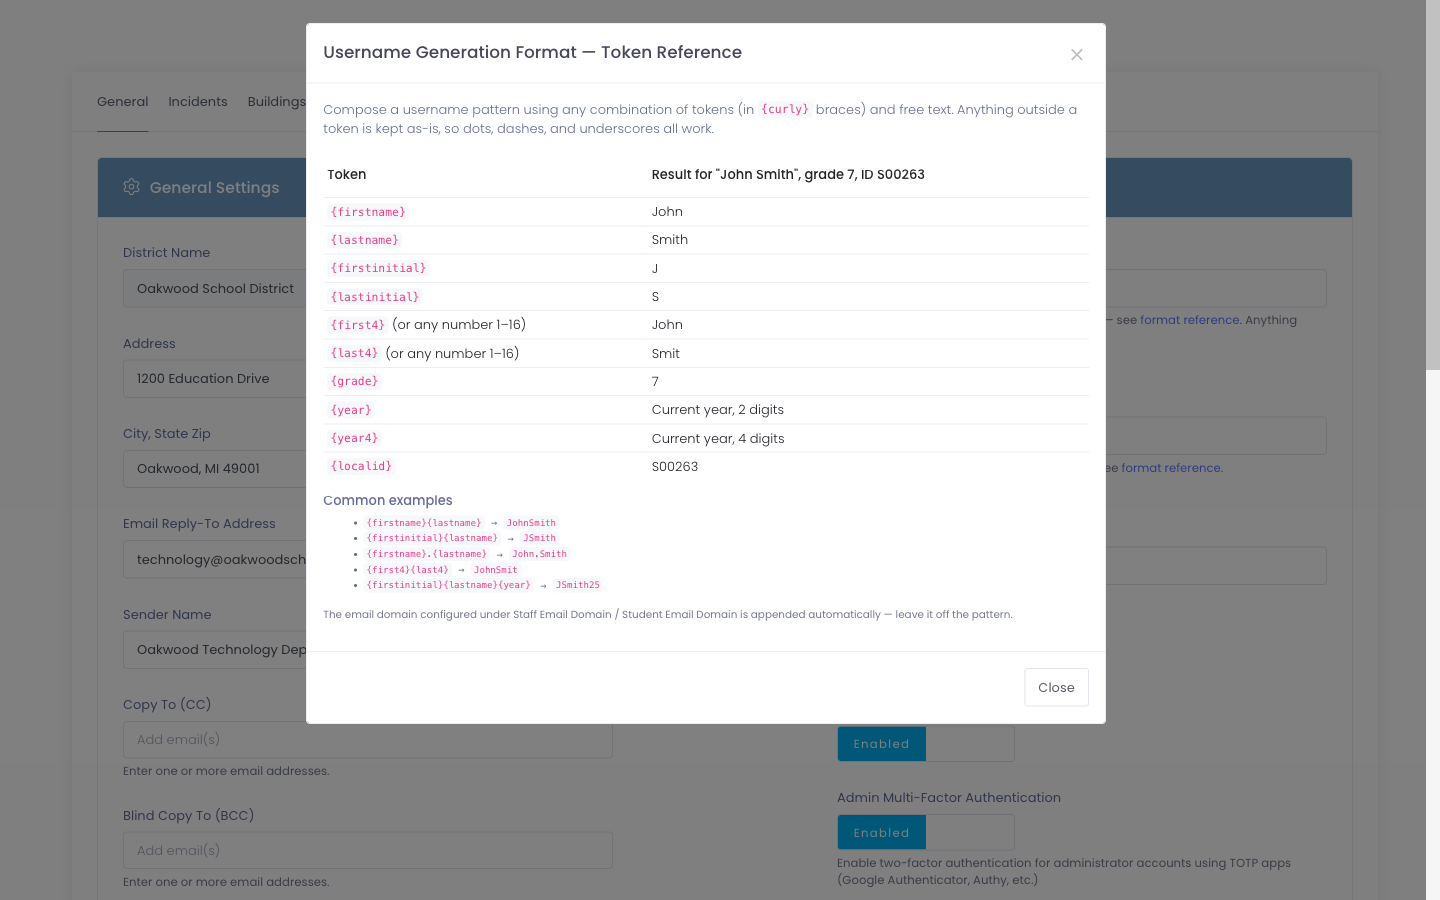
| Token | What it produces |
|---|---|
{firstname} | Full first name, Title-cased (e.g. John) |
{lastname} | Full last name, Title-cased (e.g. Smith) |
{firstinitial} | First letter of first name (J) |
{lastinitial} | First letter of last name (S) |
{first1} … {first16} | First N characters of the first name |
{last1} … {last16} | First N characters of the last name |
{grade} | Grade level when known (blank for staff) |
{year} | Current calendar year, 2 digits (e.g. 26) |
{year4} | Current calendar year, 4 digits (e.g. 2026) |
{localid} | Local / state ID when known |
Anything outside a curly-brace token flows through as-is, so {firstname}.{lastname} produces John.Smith (the dot is preserved) and {firstinitial}{lastname}{year} produces JSmith26.
Common examples
| Pattern | Result for John Smith |
|---|---|
{firstname}{lastname} | JohnSmith |
{firstinitial}{lastname} | JSmith |
{firstname}.{lastname} | John.Smith |
{first4}{last4} | JohnSmit |
{firstinitial}{lastname}{year} | JSmith26 |
Notes:
- Names are stripped to letters only — apostrophes, spaces, and hyphens are removed (so
O'BrienbecomesObrien). - The email domain configured under Staff Email Domain / Student Email Domain is appended automatically when an email is generated — leave it off the pattern.
- If the generated username already exists, the system appends a unique number (e.g.
JSmith→JSmith01→JSmith02). - If the pattern field is blank, the system falls back to
{firstname}{lastname}.
Why it matters: Consistent, predictable usernames simplify troubleshooting, SIS integration, and user communication. Per-role formats let staff follow professional conventions while students follow whatever shape your district has standardized on.
Password Generation Rules
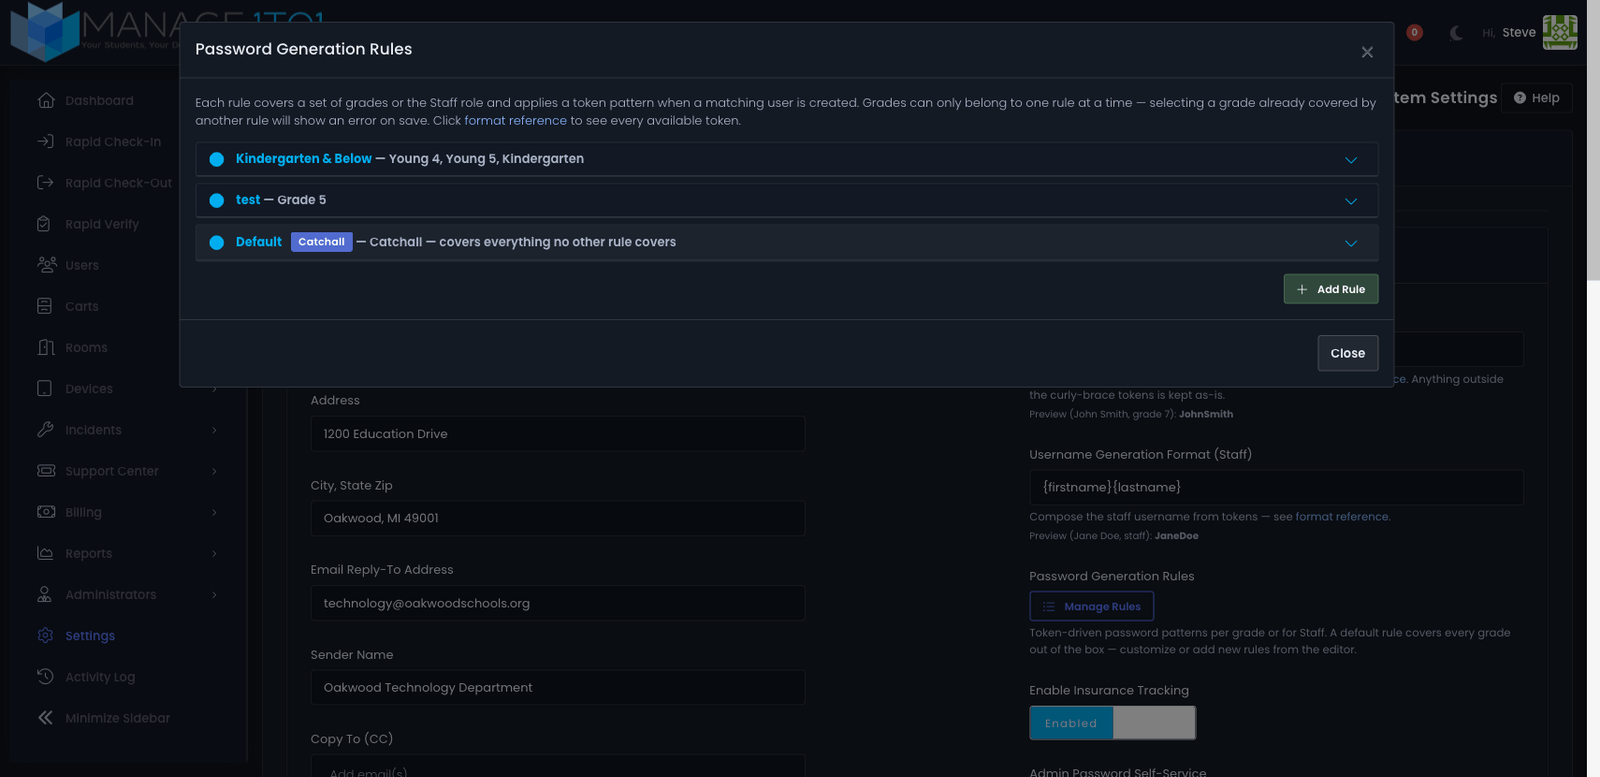
The Password Generation Rules editor lets you configure exactly how Manage1to1 builds initial passwords for newly created students and staff. Each rule combines a token pattern (same vocabulary as the username generator) with a set of grades or the Staff role.
Click Manage Rules to open the editor:
How rules resolve
When Manage1to1 creates a new user, it looks at the user's grade (or whether they're staff) and picks the single rule that covers them. Each grade — and the Staff role — can only belong to one rule at a time, so there's never any ambiguity about which pattern applies.
A built-in Default rule sits at the bottom of the list as a catchall. It covers any grade or role that no other rule has claimed. The Default rule:
- Cannot be deleted
- Cannot be renamed
- Is always enabled
- Has its coverage filled in automatically based on what the other rules don't cover
When you expand the Default rule, chips for grades that another rule covers appear struck-through with a tooltip showing which rule has claimed them:
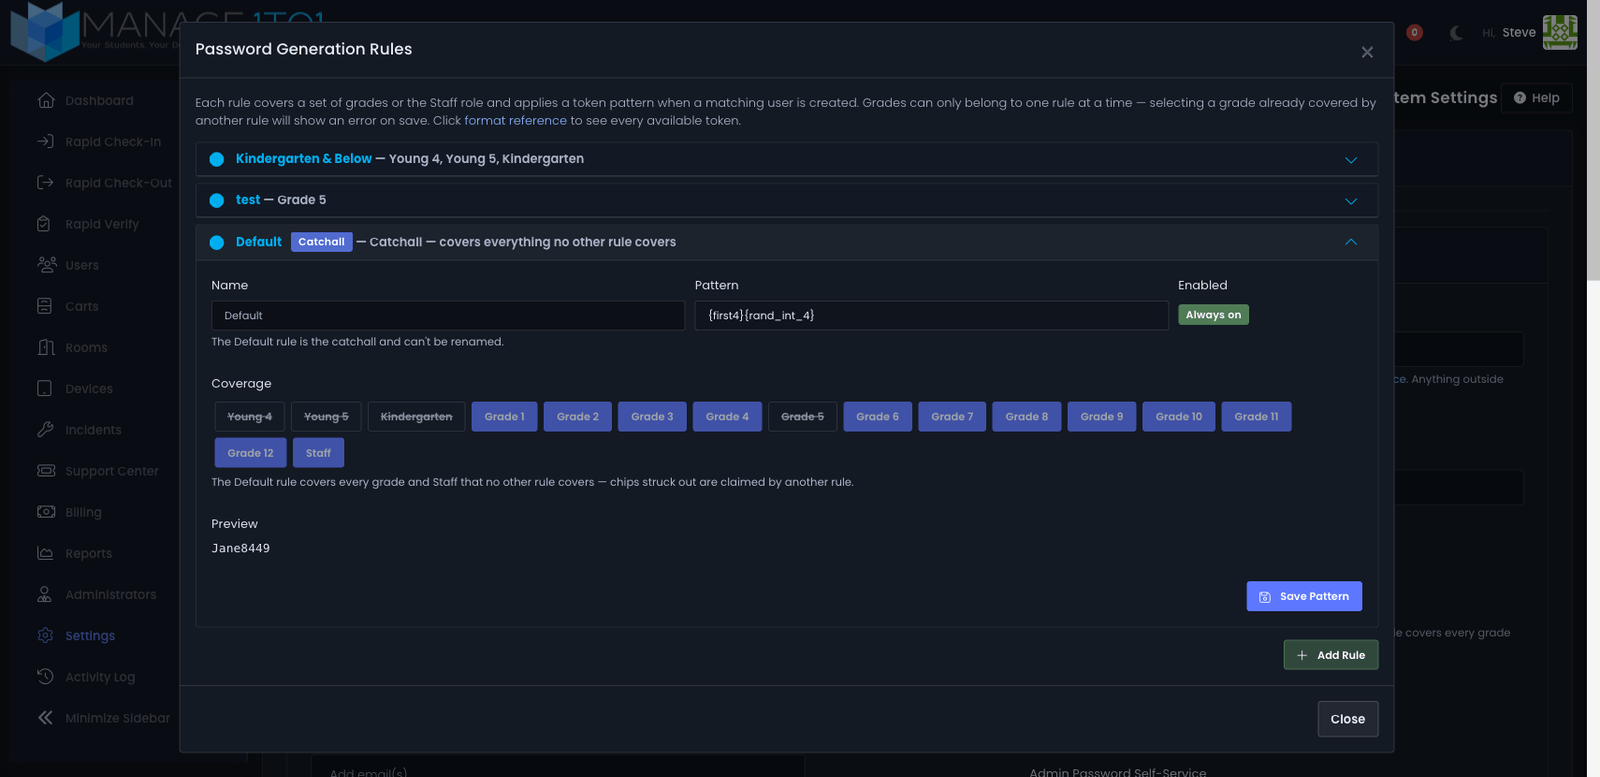
You only need to change the Default rule's pattern — its coverage is managed for you.
Anatomy of a rule
Each rule has four pieces:
| Piece | Purpose |
|---|---|
| Name | A label so you can recognize it later — for example, "Upper Elementary" or "Middle School". |
| Pattern | The token string Manage1to1 expands into a password (e.g. {firstinitial}{last4}{rand_int_4}{rand_symbol}). |
| Coverage | The grade chips and/or the Staff chip that this rule applies to. |
| Enabled | Switch a rule off without deleting it — disabled rules are skipped during resolution and their grades fall back to the Default. |
Creating a rule
- Click Add Rule at the bottom of the editor. A new card appears above the Default rule, already expanded.
- Type a Name that makes sense for the grades you'll cover (e.g. "Lower Elementary").
- Enter a Pattern. The Preview line under the chips shows what a sample password from that pattern would look like, so you can iterate without saving.
- Click chips in the Coverage row to claim grades or the Staff role. Chips that another rule already covers appear greyed out with a tooltip explaining which rule owns them — you don't need to free them first; they just can't be re-claimed.
- Click Save Rule.
Once saved, the grades you claimed are automatically removed from the Default rule's coverage.
Available tokens
The Pattern field accepts the same tokens as the Username Generation Format plus a set of random tokens unique to passwords. Click format reference in the editor for the full list. The most useful patterns:
| Token | Expands to |
|---|---|
{firstname} / {lastname} | Full first or last name, letters only |
{firstinitial} / {lastinitial} | Just the first letter |
{first4} / {last4} | First 4 letters of the name (also first2, last3, etc., up to 16) |
{rand_int_4} | 4 random digits (works with any length 1–8) |
{rand_letter_3} | 3 random uppercase letters |
{rand_lower_3} | 3 random lowercase letters |
{rand_alnum_5} | 5 random alphanumeric characters |
{rand_symbol} | One symbol from ! @ # $ % & * ? |
{grade} | The user's grade |
{localid} | The student's Local ID |
{year} / {year4} | 2- or 4-digit current year |
Example patterns:
{firstinitial}{last4}{rand_int_4}— quick, readable:JSmit8264{first4}{rand_symbol}{rand_int_3}— adds a symbol for stronger entropy:John!472{firstinitial}{lastname}{grade}{rand_int_2}— incorporates the grade:JSmithers717
Security note: Shared or trivially predictable passwords (e.g. abc123 for an entire grade) reduce security. Use at least one random token in every pattern so each user gets a distinct password, even if the literal parts of the pattern collide.
Enable Insurance Tracking
Enables or disables the Insurance tab on user profiles for tracking device insurance coverage.
Enable when: District offers device insurance program and needs to track enrollment.
Disable when: District doesn't use device insurance.
See: Insurance Tab Documentation for details.
Enable Apple Fields
These are legacy fields utilized by districts wishing to store older information regarding Apple Devices such as Unlock Code, Device Username, and Device Passcode.
Enable when: District manages older Apple devices requiring these specific fields.
Disable when: Not using Apple-specific legacy fields (recommended for most districts).
Enable Device Fees
Controls whether device fee functionality is available throughout the system.
Enable when: District charges annual device fees or checkout fees.
Disable when: District does not charge device-related fees.
Enable Case Tracking
Enables tracking of protective cases as separate items from devices.
Enable when: District tracks cases independently (inventory, damage, replacement).
Disable when: Cases are not separately tracked.
Enable Check-In Incident Bypass
Enabling this option will allow devices to be checked in without an incident being created. If this is disabled, in order to check in a device, an incident will be required.
Enable when: Devices can be returned in good condition without creating an incident.
Disable when: District policy requires incident documentation for all check-ins (strict accountability).
Enable Rapid Check-In/Out
Enabling this option will turn on the "Librarian Style" check in and out functionality of Manage1to1.
What it does: Streamlined checkout interface for high-volume, quick transactions (similar to library book checkout).
Enable when: Staff check out many devices quickly (cart checkouts, library-style distribution).
Disable when: Standard checkout workflow is sufficient.
Admin Password Self-Service
Controls whether administrators can reset their own passwords via email without contacting a super administrator.
What it does: When enabled, a "Forgot Password?" link appears on the admin login page. Administrators can request a password reset link via email, which expires after 24 hours.
Enable when:
- You want administrators to be able to reset their own passwords independently
- Your district email system is reliable and secure
- You trust administrators to manage their own account security
Disable when:
- District policy requires centralized password reset management
- You want all password changes to go through super administrators
- Enhanced security protocols are needed for administrative access
Security features:
- Reset tokens expire after 24 hours
- Rate limiting prevents abuse (3 requests per hour per email address)
- Tokens are single-use only
- All password reset attempts are logged in activity log
- Email enumeration protection (won't reveal if email exists)
Common use case: Most districts enable this feature to reduce help desk burden and allow administrators to regain access quickly during off-hours.
See also: Administrators documentation for more on admin account security.
Admin Multi-Factor Authentication
Enables two-factor authentication (2FA/MFA) for administrator accounts using Time-based One-Time Password (TOTP) apps such as Google Authenticator, Authy, or Microsoft Authenticator.
What it does: When enabled, administrators can optionally (or mandatorily, if enforced) protect their accounts with an additional layer of security beyond username and password. After entering their password, administrators must provide a 6-digit code from their authenticator app to complete login.
Enable when:
- District security policy requires multi-factor authentication
- Administrators access Manage1to1 from various locations or devices
- Compliance requirements mandate MFA for administrative systems
- District wants to reduce risk of compromised admin credentials
Disable when:
- District has alternative security measures in place
- MFA creates operational challenges (though this is rare)
How it works:
- Administrator enables MFA in their profile (My Profile > Security tab)
- System generates a QR code to scan with authenticator app
- Administrator verifies setup by entering a code from their app
- System provides 10 backup codes for emergency access
- On future logins, administrator enters password + 6-digit code
Security features:
- TOTP codes rotate every 30 seconds
- Backup codes are single-use and hashed for security
- 90-second verification window accounts for clock drift
- Administrators can regenerate backup codes if lost
- All MFA events are logged in activity log
- Rate limiting prevents brute-force attempts
Important: When MFA is enabled but not enforced, it's optional per administrator. Each admin decides whether to enroll based on their security preferences.
See also: MFA Setup Guide for step-by-step enrollment instructions.
Require MFA for All Admins
This option only appears when Admin Multi-Factor Authentication is enabled.
Forces all administrators to enroll in MFA before accessing the system. Administrators will be unable to disable MFA once enrolled.
What it does:
- Unenrolled administrators are prompted to set up MFA immediately after login
- Administrators cannot skip or postpone MFA enrollment
- "Disable MFA" option is hidden from administrator profiles
- All admin accounts must maintain active MFA enrollment
Enable when:
- District security policy mandates MFA for all administrative access
- Compliance requirements require MFA across all admin accounts
- District wants maximum security for sensitive student/staff data
- External audits or insurance requirements demand universal MFA
Disable when:
- District wants to allow optional MFA per administrator
- Some administrator roles don't require MFA protection
- Gradual rollout approach is preferred (optional first, enforced later)
⚠️ Important considerations before enforcing:
- Communication: Notify all administrators before enabling enforcement
- Training: Ensure administrators know how to use authenticator apps
- Support: Have a plan for administrators who lose phone/access
- Emergency access: Backup codes must be stored securely by each admin
- No exceptions: Once enforced, all admins must comply (including super admins)
Rollout recommendation:
- Enable MFA as optional first
- Encourage administrators to enroll voluntarily
- Provide training and support during transition period
- Monitor enrollment rate via admin list
- Enable enforcement once majority are enrolled
Emergency access: If an administrator loses their authenticator device and backup codes:
- Contact super administrator for manual MFA reset
- Super administrator can disable MFA for the affected account
- Administrator must re-enroll immediately upon regaining access
Common use case: Districts typically enable optional MFA first, then enforce universally after 30-60 days once staff are comfortable with the process.
See also:
- MFA Setup Guide for enrollment walkthrough
- MFA Best Practices for recommendations
System Defaults
Default Record Display Settings
Default record display settings control how many records appear in tables across the application. This is purely a usability preference.
Common values: 25, 50, 100 records per page
Considerations:
- Higher values reduce clicking "next page"
- Lower values improve page load speed
- Users can typically override on individual pages
System Timezone
The system timezone defines how timestamps are displayed throughout Manage1to1, including reports, activity logs, and time-based workflows. This should match the district's timezone.
Important: Choose your district's primary timezone (e.g., America/Chicago, America/New_York).
Impact:
- Report timestamps
- Activity log entries
- Scheduled automation
- Email send times
Change carefully: Changing timezone affects how historical timestamps are displayed.
Grade Labels
Grade label fields allow districts to customize how lower grade levels are labeled throughout the system. This is especially useful for early childhood programs where traditional grade naming may not apply.
Examples:
- Standard: K, 1, 2, 3...
- Custom: PreK, Kindergarten, First Grade, Second Grade...
- Alternative: PK, KG, G1, G2...
Why customize: Match your district's official grade terminology for consistency across systems.
Common Questions
Q: Can I change district name mid-year? Yes. The district name can be updated at any time. It will appear in future emails, reports, and invoices. Historical records retain the name that was active when they were created.
Q: What if I change the Reply-To email address? New emails will use the updated address. Already-sent emails still show the old reply-to address. Ensure the new address is monitored before changing.
Q: Should I enable all feature toggles? No. Only enable features your district actually uses. Unused features can clutter the interface and confuse staff.
Q: Can I test email settings before going live? For sender name and reply-to, send a test invoice or notification email to yourself to verify appearance. For SMTP configuration, work with Manage1to1 Support to test.
Q: What happens if I set the wrong timezone? Timestamps throughout the system will display incorrectly. Activity logs, reports, and scheduled tasks may show confusing times. Set correctly during initial setup.
Q: Can building-level admins access the General tab? Only if they have the Manage Settings permission. This is typically restricted to district-level administrators to prevent unintended changes.
Q: Do email CC/BCC settings apply to all emails? Yes, if configured in the General tab. For template-specific CC/BCC, configure in individual email templates (Email Templates tab).
Q: How often should I review the General tab settings? Annually at minimum, or when:
- District office contact information changes
- Staff responsible for email monitoring changes
- District policies evolve (requiring feature toggle adjustments)
- SIS integration details change
The General tab establishes foundational platform behavior. Properly configured, these settings ensure consistent district identity, effective communication, and features aligned with your operational needs.