Incidents Tab
The Incidents tab controls how device incidents behave across your district. This includes how users are notified, how incidents are categorized, and how status progression is handled throughout the repair, investigation, or review process.
Most districts configure this section early during implementation, then refine it over time as workflows mature and reporting needs become clearer.
Incident Management
The Incident Management section controls district wide behavior related to how incidents communicate status changes.
Waiting for Pickup Notifications
When enabled, Manage1to1 automatically sends a “Your device is ready for pickup” email when an incident status changes to Waiting for Pickup.
This is commonly used by districts that want students or staff notified immediately once a device has completed repair or review. The message is sent to the primary contact associated with the incident.
The email content itself is managed from the Email Templates area and can be customized to match district messaging.
Districts that prefer manual communication, front office pickup slips, or alternate notification workflows typically leave this disabled.
Changes to this setting apply to all incidents going forward.
Incident Flags
Incident flags provide a structured way to categorize issues associated with an incident. They allow staff to quickly understand what type of issue is being addressed without reading through full incident notes.
Flags are also heavily used throughout reporting, dashboards, and data exports, making them an important part of consistent district wide data tracking.
Common examples include physical damage, battery issues, loaner provided, screen damage, or routine checks.
Each flag includes:
- A display name shown throughout the system
- An icon for quick visual recognition
- An option to alert administrators when applied
- A visibility setting that controls whether the flag can be selected
- An optional profile counter + Repeat Offender behavior (see Profile Counters and the Repeat Offender Badge below)
- An optional damage severity — Cosmetic, Minor, Major, or Critical — shown as a color-coded badge on the incident and available as a column in incident reports
- An optional default cost that pre-fills the fine amount when an incident carrying the flag is turned into an invoice (you can still adjust the amount before saving)
- An optional building scope: limit the flag to specific buildings, or leave it available at every building (see Limiting a flag to specific buildings below)
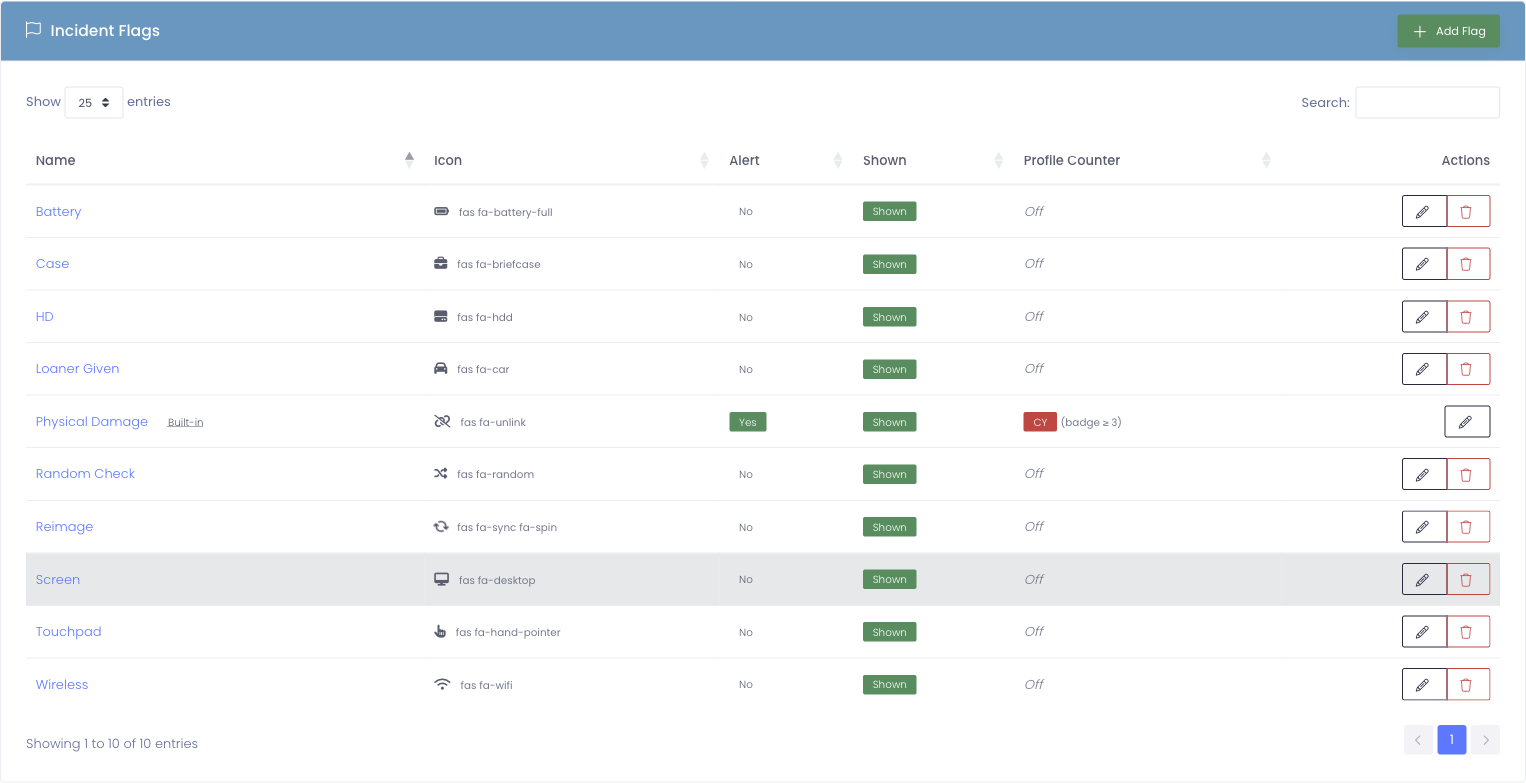
Creating and Managing Flags
New flags can be added at any time using the Add Flag button. When creating a flag, you define how it appears, whether it is selectable, and whether it triggers an alert. Editing an existing flag opens the same form with current values pre-filled.
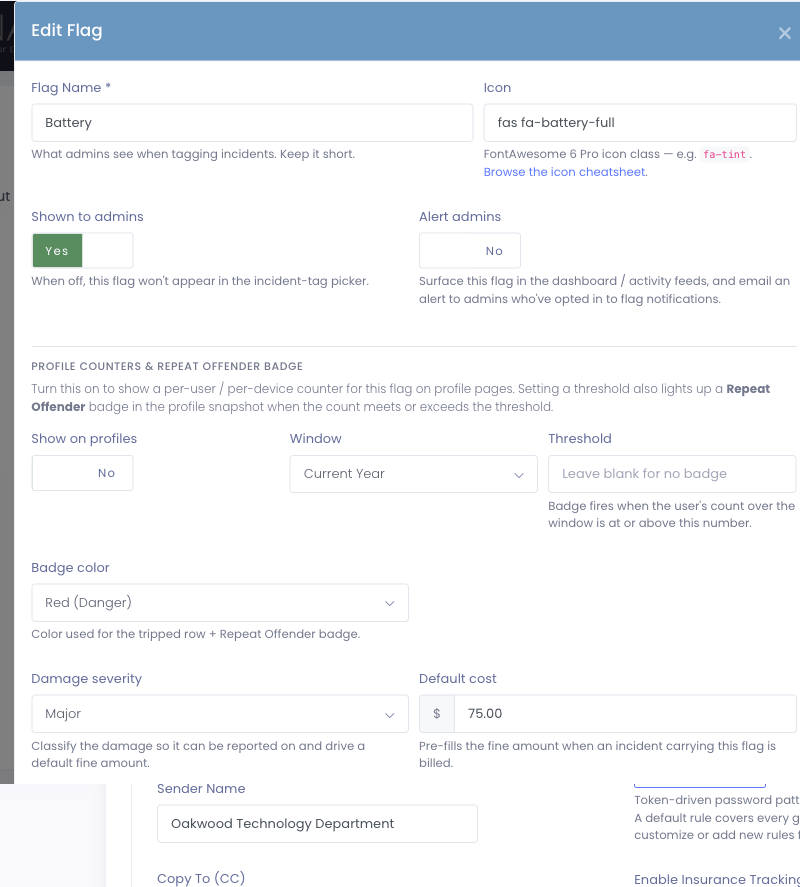
Editing a flag updates how that flag appears on all existing incidents. If you need to change behavior without impacting historical data, it is often better to create a new flag and hide the old one.
Limiting a Flag to Specific Buildings
By default, an incident flag is offered on incidents at every building. You can limit a flag to one or more specific buildings so it only appears when staff file an incident for a device at those buildings.
When adding or editing a flag, turn on Limit to specific buildings. This reveals a Buildings picker where you choose which buildings the flag applies to. Leave the toggle off to keep the flag available everywhere.
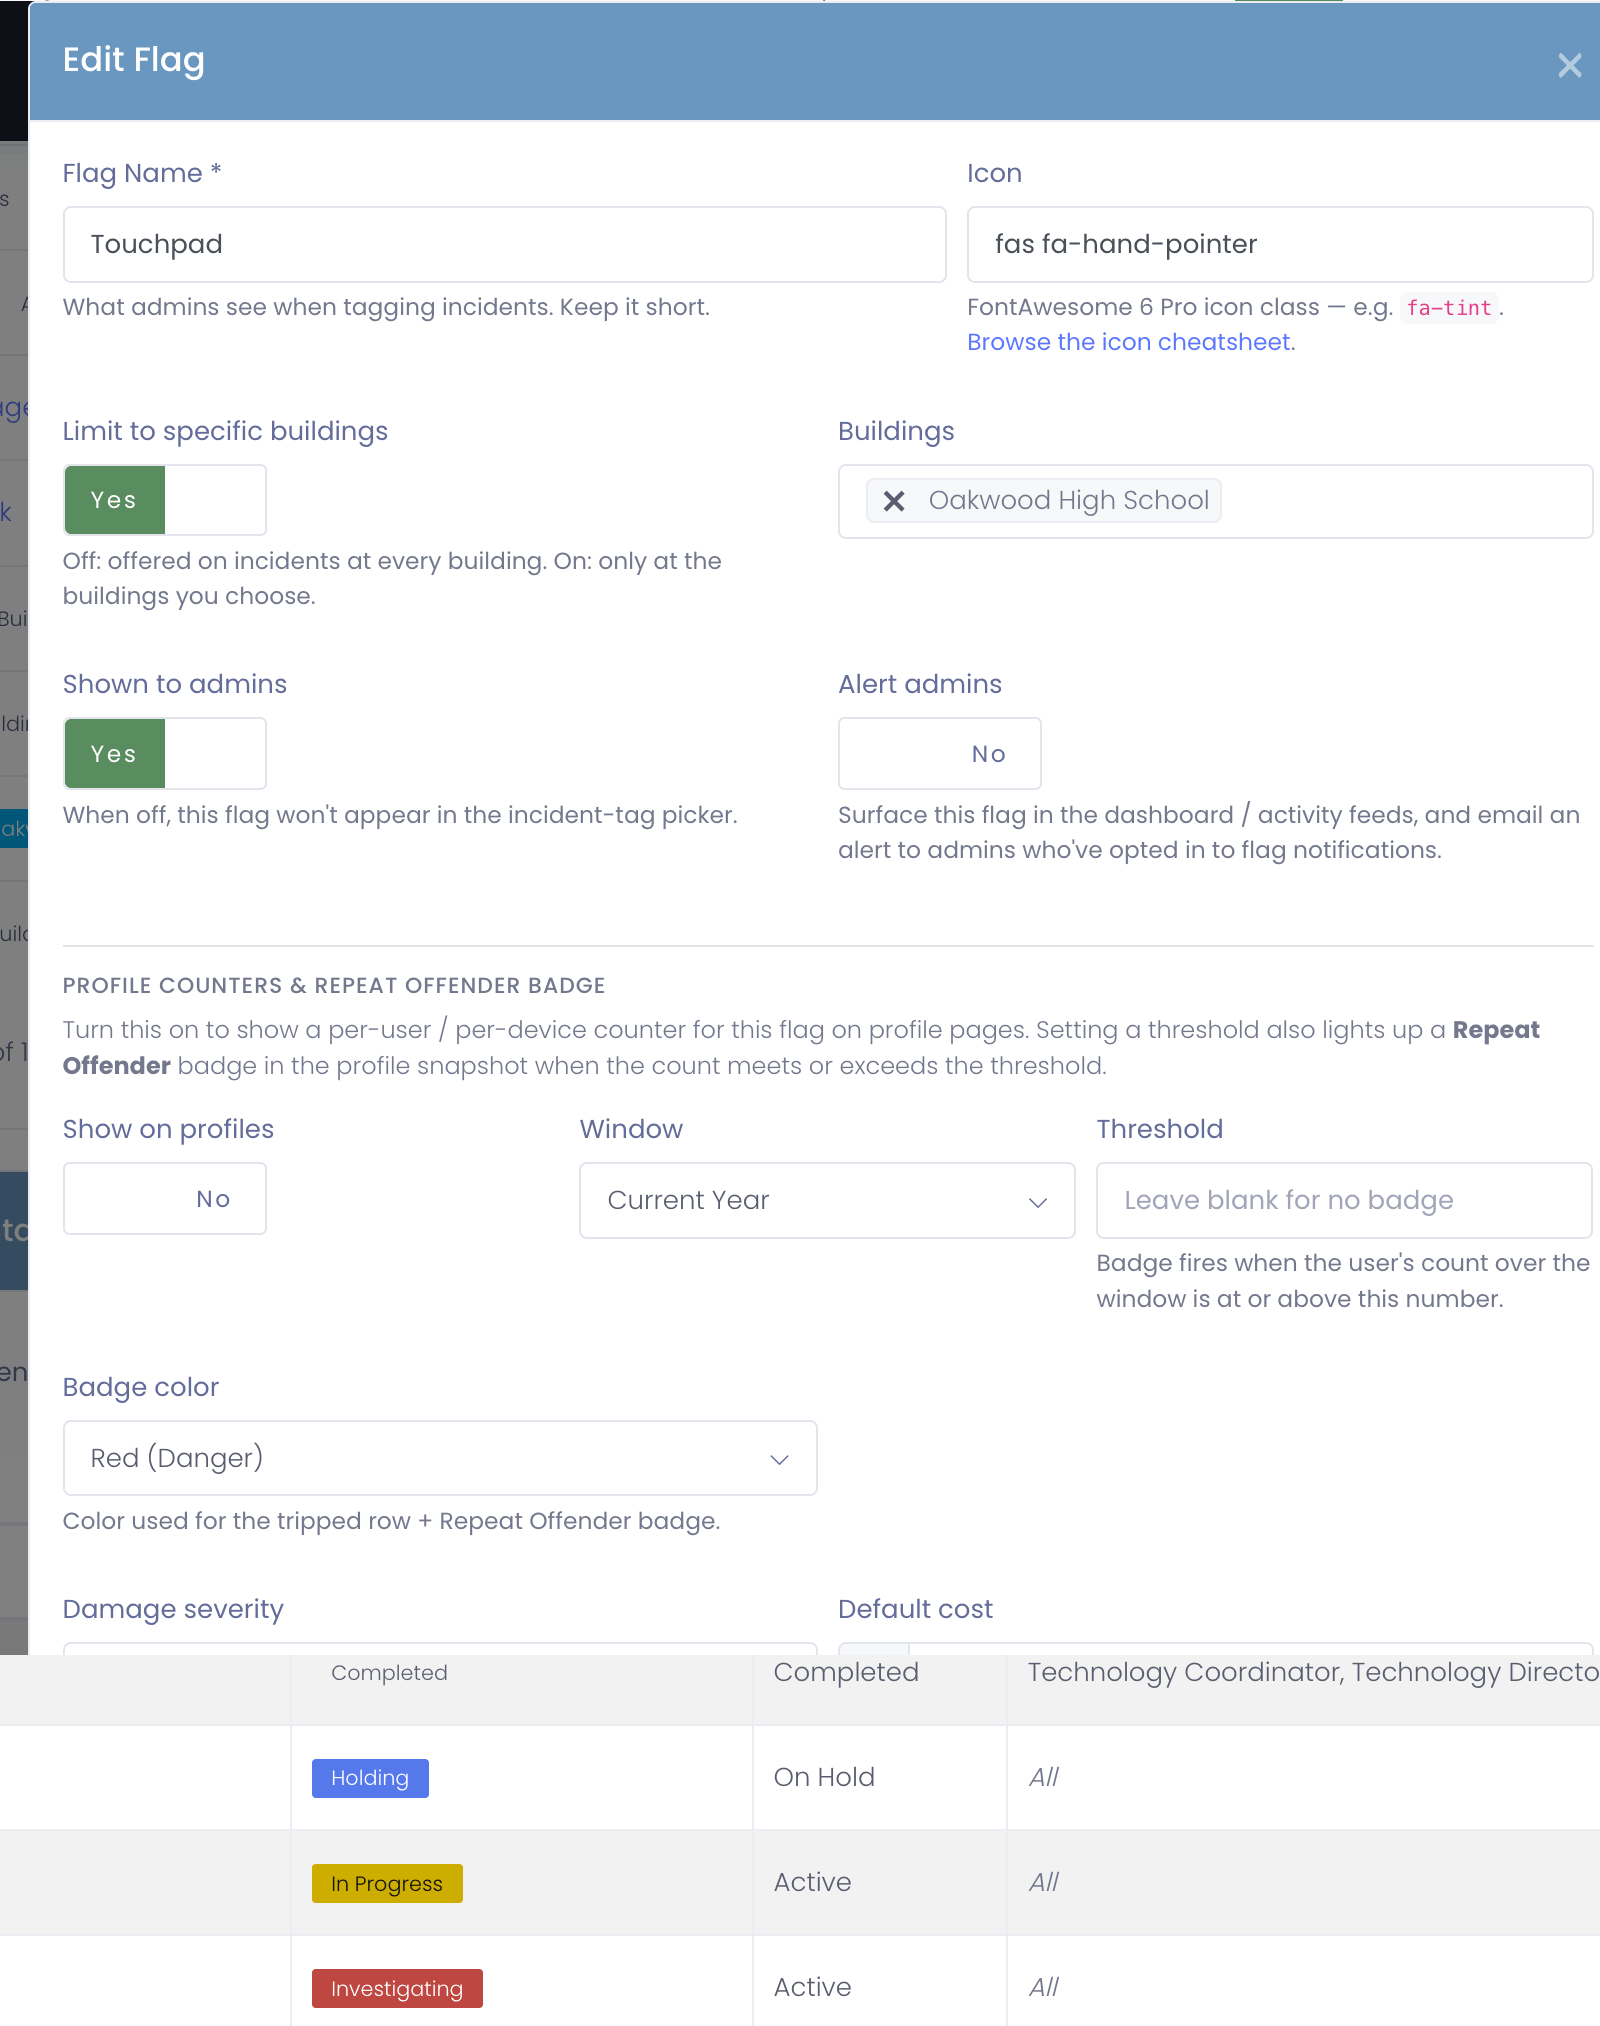
In the Incident Flags list, each flag shows a badge indicating its scope: All Buildings for a flag offered everywhere, or the building names for a scoped flag. When staff add an incident, they see the global flags plus any flags scoped to that device's building; flags scoped to other buildings are hidden. A flag already applied to an incident stays visible on that incident even if it is later limited to different buildings.
Deleting Flags
Most flags can be deleted with the trash button on their row. Deleting a flag removes its tag from all incidents that referenced it; the incidents themselves remain.
The built-in Physical Damage flag is protected — it cannot be renamed or deleted, since it underpins the default Repeat Offender configuration. You can still adjust its icon, visibility, threshold, and the rest of its settings.
Profile Counters and the Repeat Offender Badge
Each flag can be configured to render a per-user / per-device counter on profile pages. When you turn Show on profiles on, Manage1to1 counts incidents tagged with that flag for the user (or device) over the selected Window — Current Year, Last 90 Days, Last 180 Days, or Lifetime — and shows the count on the profile snapshot. If you set a Threshold, that user is flagged as a Repeat Offender whenever their count meets or exceeds it, with a colored badge in the profile header and the row turned red.
Out of the box, the Physical Damage flag ships with a threshold of 3 in the current school year. Districts that want a different bar can edit the flag to raise or lower the threshold, change the window, or switch the badge color.
Only turn on Show on profiles for the flags principals actually need to see at a glance. Each flag you enable adds a counter row to every user / device profile. The profile snapshot keeps the top few rows visible and pushes any overflow into the User Information panel below.
Icons
Incident flags use a font based icon system for fast loading and consistent display across devices. Manage1to1 utilizes Font Awesome icons.
When selecting an icon, use the official Font Awesome icon class name:
Taking advantage of modern HTML5 technology, we utilize a font-based icon system to ensure fast rendering and consistency across platforms. For this we utilize FontAwesome Pro.
To view the full list of either FontAwesome, please refer to the links below:
Please note, when when referring to FontAwesome, you must use the proper FontAwesone icon name shown on their website under the “Icon Class”.
Incident Status
Incident statuses define the lifecycle of an incident from creation through completion. They control how incidents appear in dashboards, queues, and reports.
Each status includes a status attribute that tells the system how to treat it functionally, such as whether the incident is active, in progress, or completed.
Common examples include:
- In Progress
- Investigating
- Sent for Repair
- Waiting for Student Pickup
- Completed
Managing Statuses
Districts can add new statuses, rename existing ones, or adjust colors to match local workflows. Many districts align statuses with repair handoffs, internal review steps, or vendor processes.
Status changes are logged in the incident history and may trigger automation depending on configuration.
Updating a status will affect all incidents currently using that status. As with flags, consider adding a new status and retiring the old one if historical clarity is important.
Status Behavior
Each status has a Behavior that controls how incidents using it are grouped on the View Incidents page and whether they count toward the Average Hours to Closure statistic:
- Active — open work. Shows in the Current Incidents group. This is the default for new statuses.
- On Hold — parked. Shows in its own On Hold Incidents group and is left out of Average Hours to Closure, so a long hold doesn't distort your turnaround time. Use this for statuses like "Holding" or "Awaiting Parts."
- Completed — closes the incident, stamps the completed date, and counts toward Average Hours to Closure.
You can put more than one status in any behavior — for example several completed statuses, or both "Holding" and "Awaiting Parts" set to On Hold. The built-in Completed status is always treated as completed and cannot be reclassified.
Pick a status's behavior from the Behavior dropdown when adding or editing it; the current behavior is shown in the Behavior column of the status table.
Restricting a Status to Specific Roles
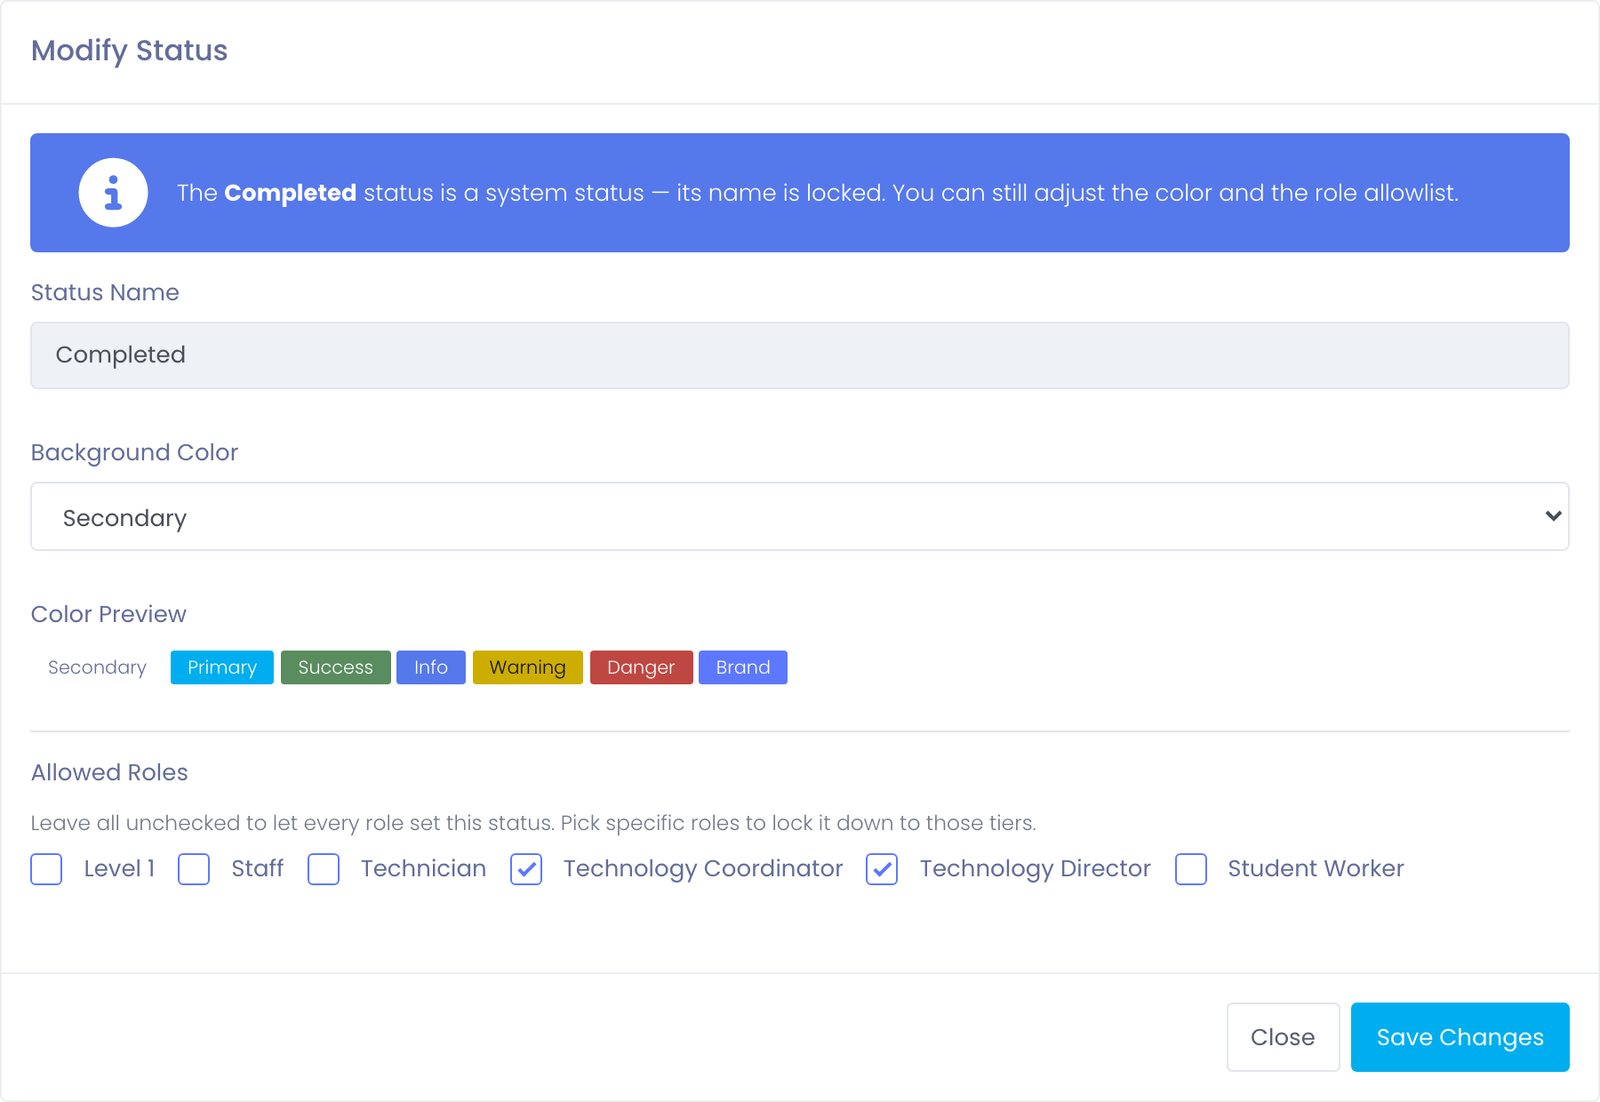
Each status has an Allowed Roles setting that controls which administrator tiers can apply it to an incident. This is the right tool when certain statuses should only be set by senior staff — for example, only Technology Coordinators and Directors should mark an incident Completed, or only Technicians and above should send a device Out for Repair.
How it works:
- Leave all unchecked → the status is available to every role (the backward-compatible default — no district has to opt in)
- Check specific roles → only admins assigned to those roles see the status in their dropdown when creating or editing an incident
- Administrators flagged as system-level always see every status, regardless of restriction
The Incident Status table shows the current allowlist for each status in the Allowed Roles column. A status with no restriction reads "All"; a restricted status reads the comma-separated list of allowed roles.
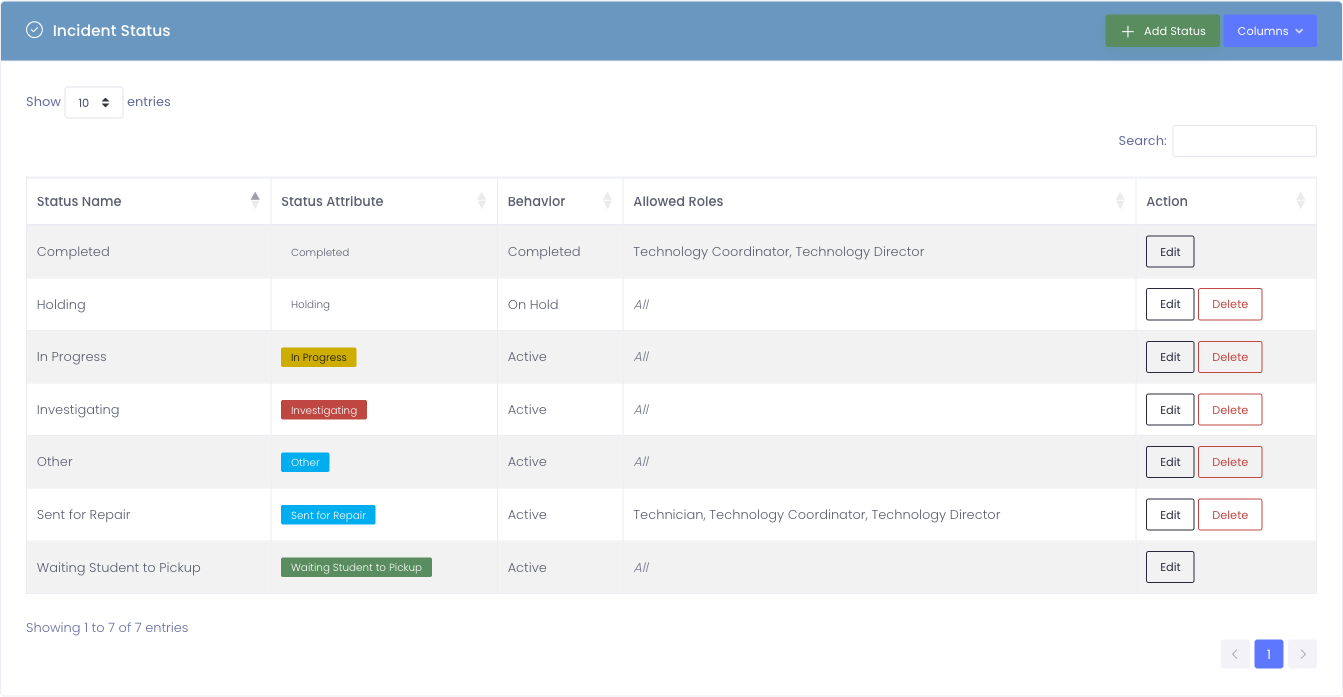
On the incident form, lower-tier admins simply don't see restricted statuses in their dropdown. If they're editing an incident that's currently in a status they can't normally set, the status appears in the dropdown labeled (your role can't change this) — they can save the form without changing it, but they can't pick another forbidden value.
Most districts don't need restrictions on day one — leave everything open. Reach for this when:
- A status represents a billing or vendor handoff that needs senior approval
- You want a clear separation between "front-line triage" and "case closure" actions
- An audit or compliance process requires documented approval levels
Deleting Statuses
A status cannot be deleted if it has already been used in an incident. This ensures past incident data remains intact and reportable.
Unused statuses may be safely removed.
Best Practices
Most districts find success by:
- Keeping flags concise and standardized across buildings
- Using statuses to reflect meaningful workflow transitions
- Avoiding frequent renaming of items already in use
- Reviewing incident reporting periodically to adjust flags and statuses as needs evolve