Manage Departments
Help Desk Departments define how tickets are organized, routed, and optionally created via email.
This guide covers creating departments, configuring auto-assignment rules, setting up email importing, and managing custom fields.
To create or modify Help Desk Departments, you need the Manage Settings permission assigned to your role.
Overview
Help Desk Departments define how tickets are organized, routed, and optionally created via email. Departments may be used for internal workflows only or configured to accept inbound email and automatically generate tickets.
The same interface is used to both create and manage departments. When editing an existing department, additional configuration options become available.
Create or edit a department
- Navigate to Settings, then Help Desk Settings.
- Open the Help Desk Departments tab.
- Select Add Department to create a new department, or Edit next to an existing department.
When editing an existing department, all previously configured options remain available and can be modified.
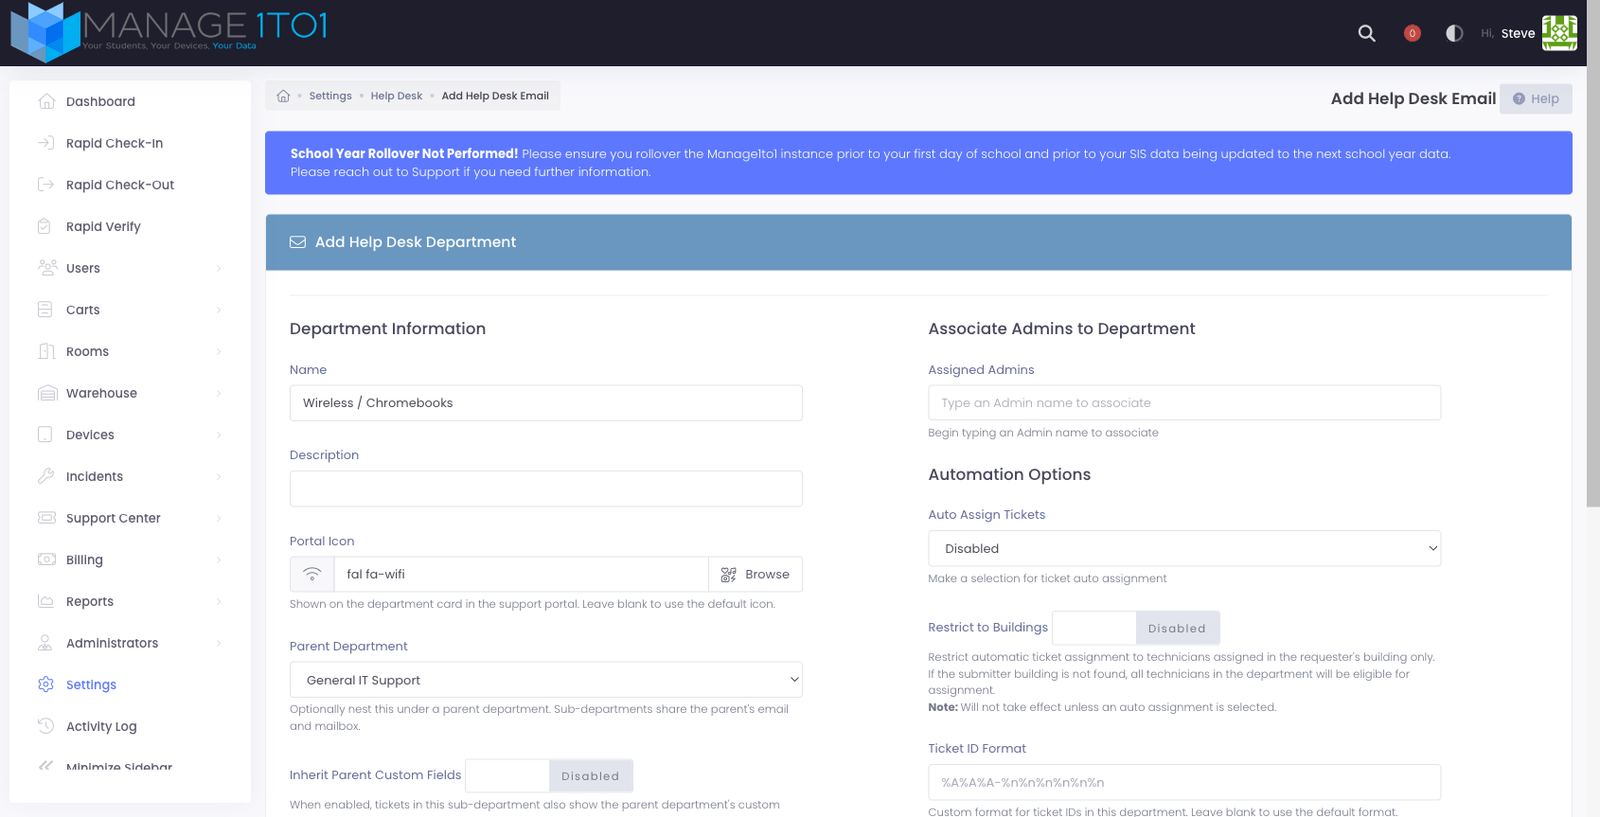
Department information
- Enter a Name for the department.
- Optionally enter a Description to clarify the department’s purpose for staff and shown in the public facing portal (if enabled).
- Optionally choose a Portal Icon.
- Specify a Sender Email.
The sender email is used for outbound ticket notifications and replies associated with this department.
Portal icon
The Portal Icon is the small icon shown on the department’s card when users choose a department in the support portal.
- Select Browse next to the Portal Icon field to open the icon chooser.
- Search for an icon, pick a style, and select the one you want.
- The preview updates to show your choice. Leave the field blank to use the default icon.
Choosing a recognizable icon per department (for example, a Wi‑Fi symbol for a network team or a wrench for repairs) makes the portal easier to scan at a glance.
Each department must use a unique sender email address. Reusing the same address across departments can cause reply routing issues and ambiguous ticket ownership.
Whitelisting behavior
- Enable Whitelisted Emails Only if you want to restrict ticket creation and replies to approved domains.
- Enter one or more Whitelisted Domains, separated by commas.
Only messages sent from email addresses matching these domains will be imported or allowed to reply.
Whitelisting is commonly used during phased rollouts or to restrict ticket intake to district controlled domains.
Who can see a department
The Visible To setting controls which users see a department on the support portal:
- Everyone (Students & Staff) — all portal users can select the department.
- Students only — only students see it.
- Staff only — only staff see it.
- Admin only — the department is hidden from the portal entirely. Only administrators can create tickets in it or transfer existing tickets to it; existing tickets remain accessible.
This applies to sub-departments too, and each sub-department has its own Visible To setting independent of its parent — so, for example, a staff-only sub-department can live under a department everyone can see.
Admin only is useful for internal-only workflows that shouldn't be visible to end users.
Common use cases
Internal escalation queue Create an "Escalated Issues" or "Tier 2 Support" department where complex tickets can be transferred by staff. Users submit to a general department, and technicians escalate when needed.
Staff-only requests Create a department for internal IT requests (e.g., "Staff Hardware Requests" or "Network Access") that only administrators can access. Staff submit requests through other channels, and technicians create tickets on their behalf.
Sensitive or HR-related issues Departments handling confidential matters (disciplinary device issues, security incidents) can be hidden from the public portal while remaining fully functional for authorized staff.
Admin Only departments are indicated with an "Admin Only" badge in the department list, making it easy to identify which departments are hidden from the public portal.
Ask for a Device
When a user submits a ticket, they're normally asked to pick the device the ticket is about. Some departments don't work that way — a maintenance request for a leaky faucet, for example, isn't tied to a specific device.
Turn Ask for a Device off to remove that step for a department. Users submitting a ticket to it skip straight from choosing the department to describing their issue.

- Enabled (default) — the user is asked to attach a device to the ticket.
- Disabled — the device step is skipped entirely for this department.
Existing departments keep asking for a device until you turn this off, so nothing changes unless you choose to.
Sub-departments
Sub-departments let you organize a broad department into more specific areas without creating separate mailboxes or duplicating configuration. For example, an IT Support department might have Wireless, Chromebooks, and Software sub-departments beneath it.
Sub-departments are one level deep — a department can have sub-departments, but a sub-department cannot have its own sub-departments.
Create a sub-department
- Select Add Department, or edit an existing department.
- In the Parent Department field, choose the department this one belongs under.
- Fill in the remaining details and select Save Settings.
When a parent department is selected, the mail-related fields disappear — a sub-department shares its parent’s email and mailbox, so there is nothing to configure there.
A department that already has sub-departments of its own cannot be turned into a sub-department. Remove or reassign its sub-departments first.
How sub-departments behave
- Shared mailbox — sub-departments send from and receive mail through the parent’s email address. You don’t need a separate address for each area. Tickets that arrive by email land on the parent department, where staff (or an automated workflow) can move them into the right sub-department.
- Inherited staff — administrators assigned to the parent department automatically have access to all of its sub-departments. You can also assign administrators to a specific sub-department only.
- Custom fields — each sub-department can have its own custom fields. A sub-department can optionally also show the parent department’s fields (see Inherit parent custom fields).
- Reporting — every sub-department appears as its own line in reports and dashboards, so you always see the detailed breakdown rather than a single combined total.
The user experience in the portal
When a user submits a ticket and chooses a department that has sub-departments, they are shown a follow-up step to pick the specific area. A General option is always offered for requests that don’t fit a specific sub-department, so users are never forced into the wrong choice.
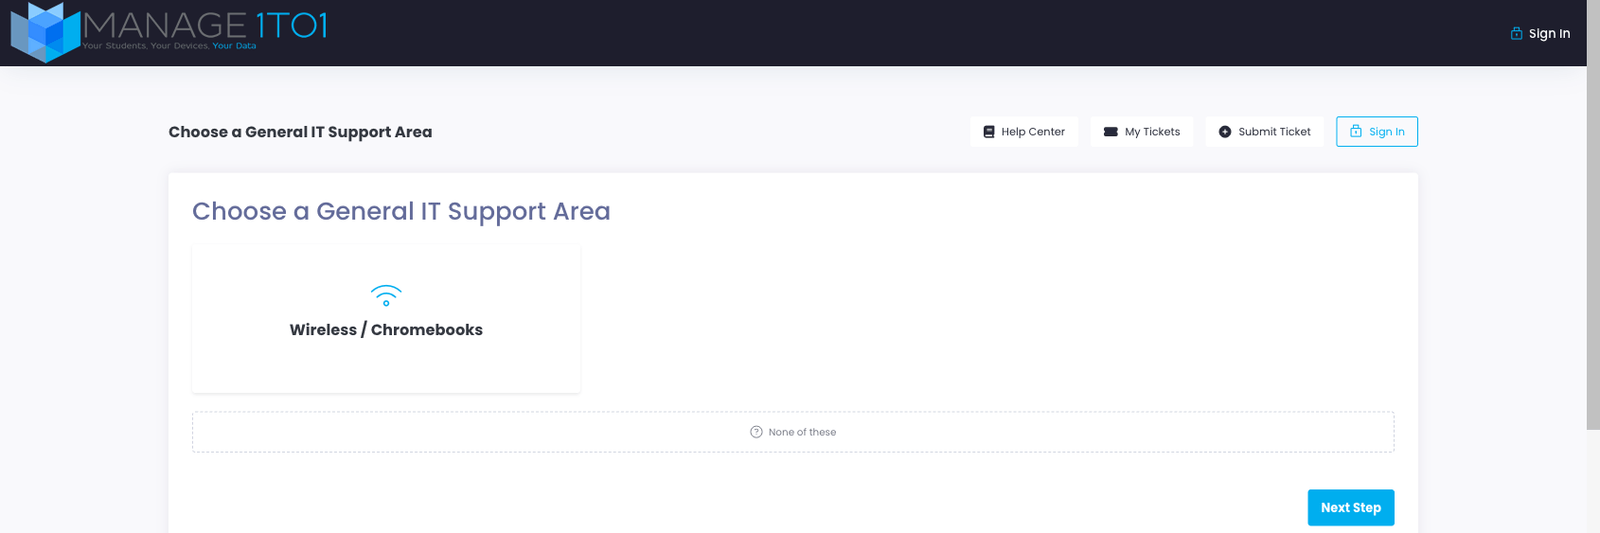
Departments without sub-departments are unaffected — users go straight from choosing the department to the next step as before.
Associate administrators to a department
- In Assigned Admins, begin typing an administrator name.
- Select one or more administrators to associate with the department.
Associated administrators become eligible for ticket assignment and visibility within this department.
Administrator association does not override role permissions. Administrators must still have the appropriate help desk permissions assigned via their role.
Automation options
Auto assign tickets
- Enable Auto Assign Tickets to allow automatic technician assignment.
- When enabled, tickets will be assigned based on department configuration and availability.
Restrict to buildings
When auto assignment is enabled, you may also enable Restrict to Buildings.
When enabled:
- Tickets are assigned only to technicians associated with the requester's building.
- If the requester's building cannot be determined, all department technicians remain eligible.
Restrict to Buildings has no effect unless Auto Assign Tickets is enabled.
Ticket ID format
Each ticket is assigned a unique identifier when created. By default, ticket IDs follow a standard format combining letters and numbers (e.g., ABC-123456). You can customize this format per department to match your organization's preferences or create meaningful patterns.
To customize the ticket ID format:
- Enter a pattern in the Ticket ID Format field
- Use format codes to define the structure
- Leave blank to use the default format
Available format codes:
| Code | Description | Example |
|---|---|---|
%A | Random uppercase letter | A, B, C... Z |
%a | Random lowercase letter | a, b, c... z |
%n | Random number | 0-9 |
%y | 4-digit year | 2026 |
%Y | 2-digit year | 26 |
%m | 2-digit month | 01-12 |
%d | 2-digit day | 01-31 |
%H | 2-digit hour (24-hour) | 00-23 |
%i | 2-digit minute | 00-59 |
%s | 2-digit second | 00-59 |
%D | Department ID (3 digits) | 001, 002... |
Example patterns:
| Pattern | Result |
|---|---|
%A%A%A-%n%n%n%n%n%n | ABC-123456 (default) |
IT-%y%m%d-%n%n%n%n | IT-20260115-4832 |
%D-%Y%m-%n%n%n%n | 001-2601-7293 |
HELP-%n%n%n%n%n | HELP-84721 |
Date-based patterns (using year, month, day) make it easy to identify when a ticket was created at a glance. Department prefixes help distinguish tickets from different support queues.
Mail server configuration
Departments may optionally be configured to accept tickets via email.
If mail server information is not configured, the department functions as an internal-only ticket destination and will not accept inbound email replies.
Generic email providers
- Select the Generic provider.
- Enter the mail server hostname.
- Enter the POP or IMAP port.
- Enter the email address and password for the mailbox.
Use a dedicated mailbox for each department. Imported messages are deleted from the mailbox after successful ticket creation.
Google (OAuth2)
If using Gmail or Google Workspace, configure Google OAuth importing instead of entering a mailbox password.
See Email Importing - Google for the full step-by-step OAuth configuration.
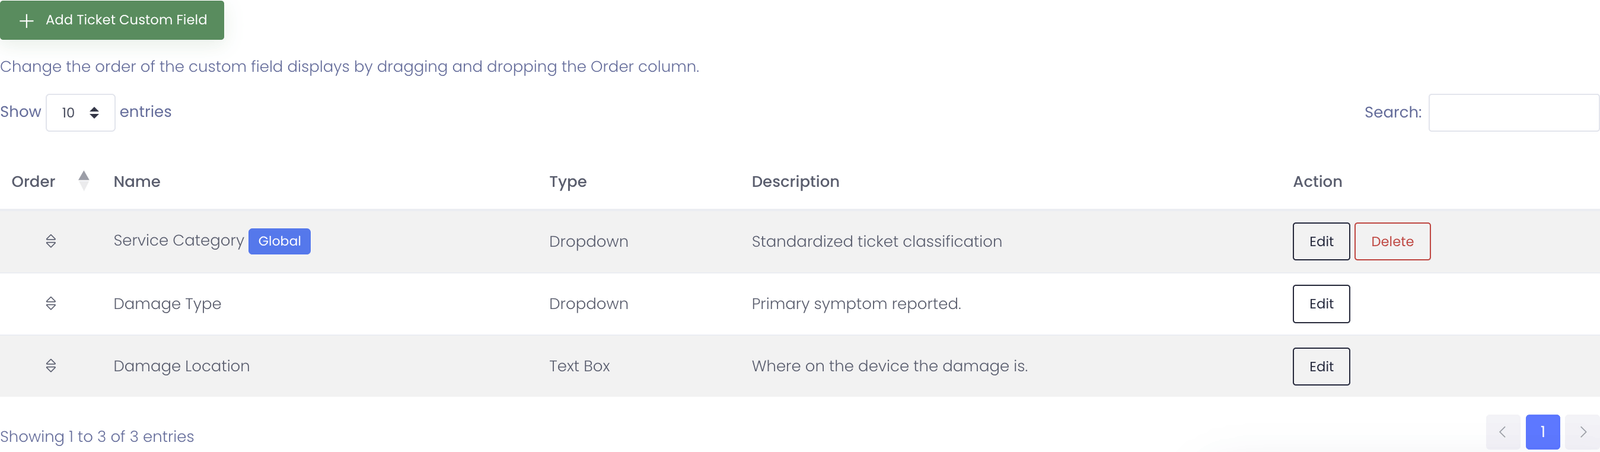
Custom Fields
When editing an existing department, the Custom Fields tab becomes available.
Custom fields allow you to collect additional information from users when tickets are submitted to this department.
Inherit parent custom fields
When editing a sub-department, an Inherit Parent Custom Fields option is available. When enabled, tickets submitted to the sub-department show the parent department’s custom fields in addition to the sub-department’s own fields. Leave it off to keep the sub-department’s fields completely separate.
When configuring a custom field, you’ll define:
-
Apply To Choose This department only to add the field to just this department, or All help desk departments (Global) to apply it to every department at once. Global fields are ideal for a shared classification you want on every ticket — such as a Service Category or Request Type — so you configure it once instead of repeating it in each department.
-
Field Name The label displayed throughout the system.
-
Field Type Determines how data is entered and stored.
-
Description Optional helper text shown beneath the field to guide staff entering data.
-
Dropdown Options Used only for dropdown fields. Values are entered as a comma-separated list.
-
Hide on Profile Controls whether the field appears directly on the profile page. Even when hidden, the field remains available on edit screens and in exports.
-
Required Field Tickets cannot be submitted without this field being filled out when this option is enabled.
Field order
Custom fields can be reordered by dragging rows in the Order column.
The order determines how fields appear on the ticket submission form.
Global fields (all departments)
Set a field's Apply To option to All help desk departments (Global) to have it apply to every department at once — you configure it in one place. This is ideal for a standardized classification such as Service Category or Request Type that you want technicians (and users submitting from the portal) to choose on every ticket.
Global fields:
- Appear at the top of the ticket form on every department, before that department's own fields.
- Show first in each department's Custom Fields tab with a Global badge, so it's clear the field is shared.
- Can be reported on in Reports → Ticket Volume → By Custom Field (labeled "Global"), letting you chart tickets by that classification across all departments.
Department-scoped custom fields are specific to that department and do not appear in others. To share one field across every department, set its Apply To option to All help desk departments (Global). Global fields appear first, with a Global badge, in every department’s Custom Fields tab — and editing or removing one there affects every department.
Saving and validation
- Select Save Settings to apply changes.
- If mail importing is configured, the system will validate connectivity during save.
If validation fails:
- Confirm mail server settings or OAuth configuration
- Confirm the correct mailbox account was authorized
- Confirm redirect URIs match exactly for Google OAuth
Once saved successfully, changes take effect immediately for new tickets and incoming messages.
Common Questions
Q: Can I use the same sender email for multiple departments? No. Each department must use a unique sender email address. Reusing the same address causes reply routing issues and ambiguous ticket ownership. If you need shared branding, use aliases pointing to different mailboxes.
Q: What happens if I don't configure email importing? The department works perfectly for portal-only ticket submission. Users can still submit tickets through the web interface, and assigned administrators can manage them normally. Email importing is optional.
Q: How does auto-assignment decide which technician gets the ticket? Tickets are assigned using round-robin distribution among eligible administrators. If Restrict to Buildings is enabled, only administrators associated with the requester's building are eligible.
Q: Can I change a department's name after creation? Yes. Edit the department and update the name. Existing tickets remain associated with the department and will reflect the new name.
Q: What field types are available for custom fields? Common types include text input, dropdown (single select), checkbox, and textarea. Dropdown fields require you to specify options as a comma-separated list.
Q: Will custom fields appear on existing tickets? Custom fields apply to tickets submitted after the field is created. Existing tickets do not retroactively show new custom fields unless edited.
Q: What happens to custom fields if I delete a department? Custom field data remains associated with existing tickets but cannot be used on new tickets. Best practice: disable department instead of deleting to preserve configuration and historical data.
Q: Can I test email importing without affecting production tickets? Yes. Send a test email to the department address and verify a ticket is created successfully. You can immediately close/delete the test ticket. Check that replies route correctly and sender email appears as expected.
Q: Do whitelisted domains apply to portal submissions? No. Whitelisting only affects email-based ticket creation and replies. Portal submissions are controlled by the Require Login setting in the General Tab.
Q: What happens if an email is sent from a non-whitelisted domain? The message is rejected and no ticket is created. The sender does not receive a bounce notification. Use whitelisting carefully to avoid missing legitimate support requests.
Q: What is the difference between Admin Only and Whitelisting? Admin Only hides the department from the public portal entirely—users cannot see or select it when submitting tickets. Whitelisting restricts which email addresses can create tickets via email but does not hide the department from the portal. Use Admin Only for internal workflows; use Whitelisting to control email-based ticket creation.
Q: Can users still reply to tickets in an Admin Only department? Yes. If a ticket is transferred to an Admin Only department, the user can still reply via email or view the ticket if they have the ticket ID and key. The department is only hidden from new ticket submission on the portal.
Q: Can I change the ticket ID format after creating tickets? Yes. Changes to the ticket ID format only affect newly created tickets. Existing tickets retain their original IDs. This allows you to update your format without affecting historical data.
Q: What happens if a generated ticket ID already exists? The system automatically regenerates a new ID if a collision occurs. This is extremely rare with properly designed patterns but is handled gracefully to ensure every ticket has a unique identifier.
Q: Can different departments have different ticket ID formats? Yes. Each department can have its own custom format, or use the default. This is useful for distinguishing tickets from different support queues at a glance (e.g., IT tickets vs. facilities tickets).
Q: Do sub-departments need their own email address? No. Sub-departments share the parent department’s email and mailbox. Email that arrives at the parent address creates a ticket on the parent department, and staff or an automated workflow can move it into the correct sub-department.
Q: If I assign an administrator to a parent department, do they get its sub-departments too? Yes. Assigning an administrator to a parent department automatically gives them access to all of its sub-departments. You can also assign an administrator to a single sub-department when you want to narrow their access.
Q: Can I delete a department that has sub-departments? Yes. When you delete a parent department, its sub-departments are promoted to top-level departments rather than being removed, so no configuration is lost.
Q: Will my existing departments change when this feature is available? No. Every existing department stays exactly as it is. Sub-departments are entirely optional — nothing changes until you choose to nest a department under a parent.